08-封装一个组件
# 一,封装一个组件
# 1,什么是组合
我们通过封装一个弹窗组件,体会一下组合的思想实现组件化。
高中学习排列组合,有5个蓝球,有2个红球,有3个黄球。一次拿2个球,问:有多少种组合。
在React中组合是优于继承。看一个UI组件库,官网:https://ant.design/index-cn/
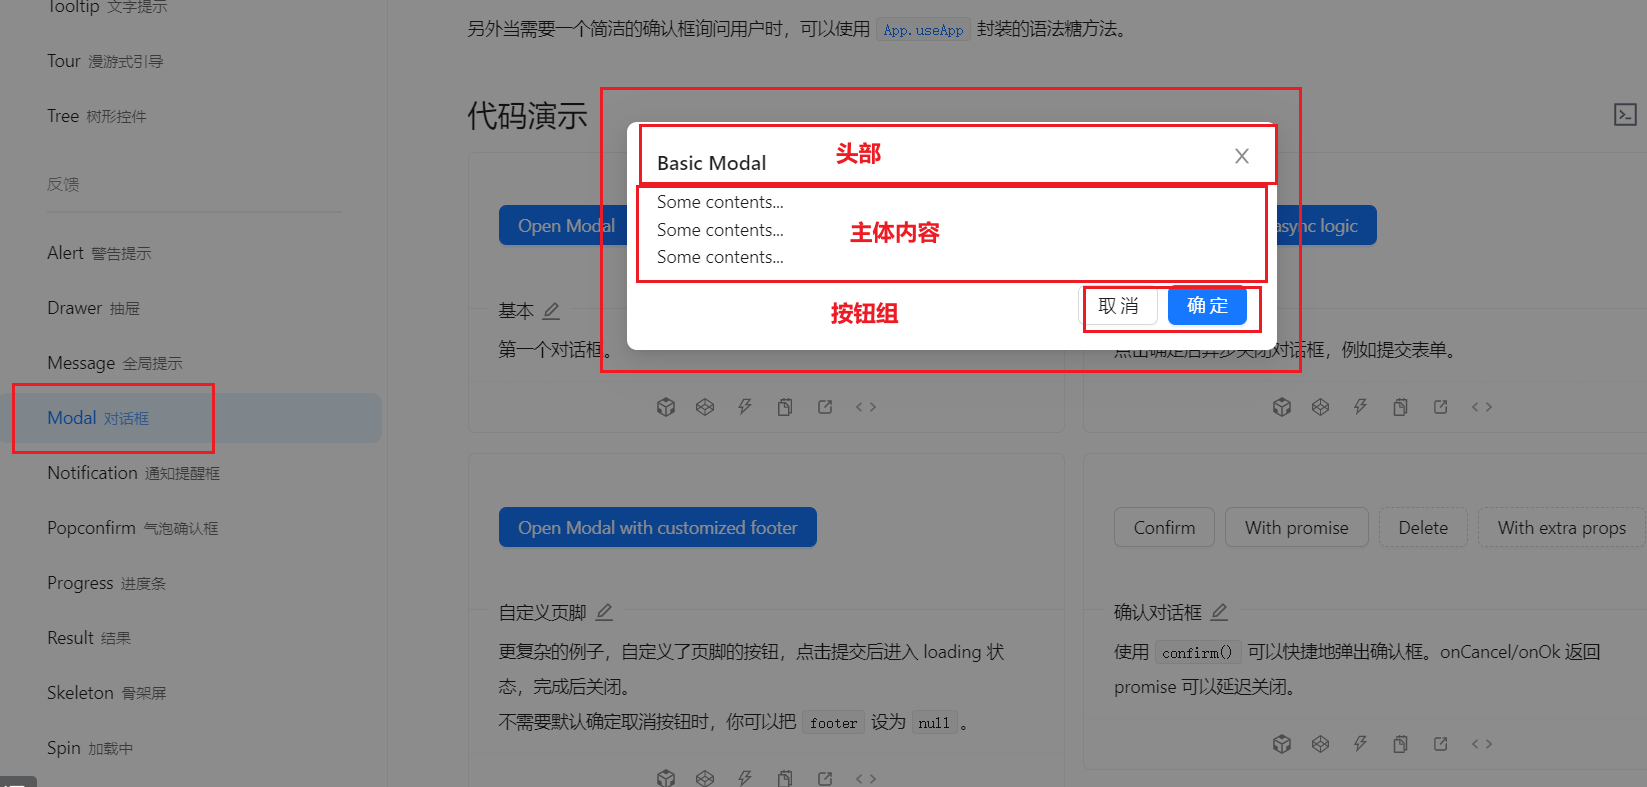
看头部,头部可能有,也可能没有,头部可以带有关闭按钮,也可以没有关闭按钮,头部可以分左中右结构,也可以分左右结构... 总之个头部,可以当成一个独立的组件。假如有5种不同的头部。
看主体内容,主体内容中可以放普通的文本,也可以放表单,也可以放表格... 我们也可以把主体内容当成一个独立的组件。假如有4种不同的情况。
看按钮组,可能有取消按钮,也可能没有取消按钮,可能有确定按钮,也可能没有确定按钮,把按钮组也看成一个独立的组件。假如有4种不同的情况。
问:现在我去组合弹窗,能组合出多少种情况的弹窗?
答:5 * 4 * 4 = 80种。
# 2,使用组合的思想封装弹窗组件
定义一个Modal组件,由三部分组成,header,main,footer三个部分组成。还有一个遮罩层。代码如下:
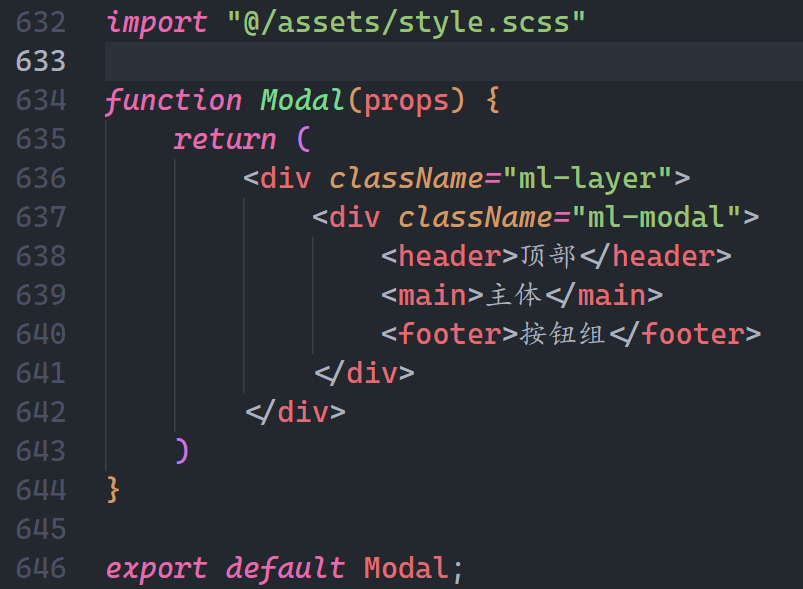
对应的样式,大家直接copy,参考如下:
.ml-layer {
    position: fixed;
    top: 0;
    right: 0;
    bottom: 0;
    left: 0;
    background-color: rgba(0, 0, 0, 0.6);

    .ml-modal {
        width: 520px;
        background: white;
        border-radius: 3px;
        position: absolute;
        top: 120px;
        left: 50%;
        margin-left: -260px;
        box-sizing: border-box;

        header {
            line-height: 50px;
            padding: 0 20px;
            border-bottom: 1px solid #eee;
            font-size: 12px;

            &>div {
                width: 100%;
                height: 100%;
                overflow: hidden;

                &>div:first-child {
                    float: left;
                }

                &>div:last-child {
                    float: right;
                    cursor: pointer;
                }
            }
        }

        footer {
            line-height: 50px;
            padding: 0 20px;
            border-top: 1px solid #eee;
            font-size: 12px;
            height: 50px;
            overflow: hidden;

            &>.ml-button {
                float: right;
            }
        }

        main {
            box-sizing: border-box;
            padding: 20px;
            font-size: 14px;
        }
    }
}

.ml-button {
    display: inline-block;
    cursor: pointer;
    margin: 0 15px;

    span {
        display: inline-block;
        height: 30px;
        box-sizing: border-box;
        line-height: 28px;
        font-size: 12px;
        border-radius: 2px;
        padding: 0 15px;
        border: 1px solid transparent;
    }

    span.default {
        border-color: #ccc;
    }

    span.primary {
        color: white;
        background: blue;
        border-color: blue;
    }

    span.danger {
        color: white;
        background: red;
        border-color: red;
    }

    span.info {
        color: white;
        background: green;
        border-color: green;
    }
}
2
3
4
5
6
7
8
9
10
11
12
13
14
15
16
17
18
19
20
21
22
23
24
25
26
27
28
29
30
31
32
33
34
35
36
37
38
39
40
41
42
43
44
45
46
47
48
49
50
51
52
53
54
55
56
57
58
59
60
61
62
63
64
65
66
67
68
69
70
71
72
73
74
75
76
77
78
79
80
81
82
83
84
85
86
87
88
89
90
91
92
93
94
95
96
97
98
99
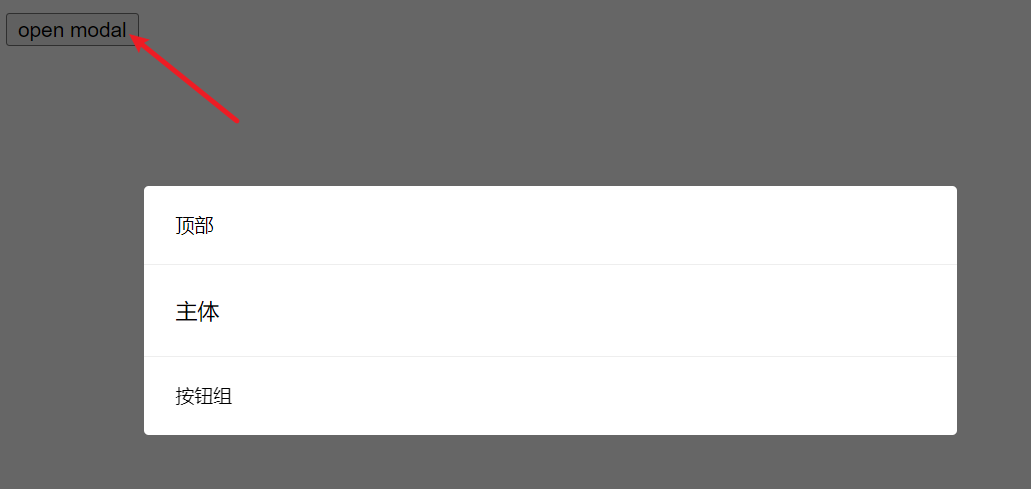
效果如下:
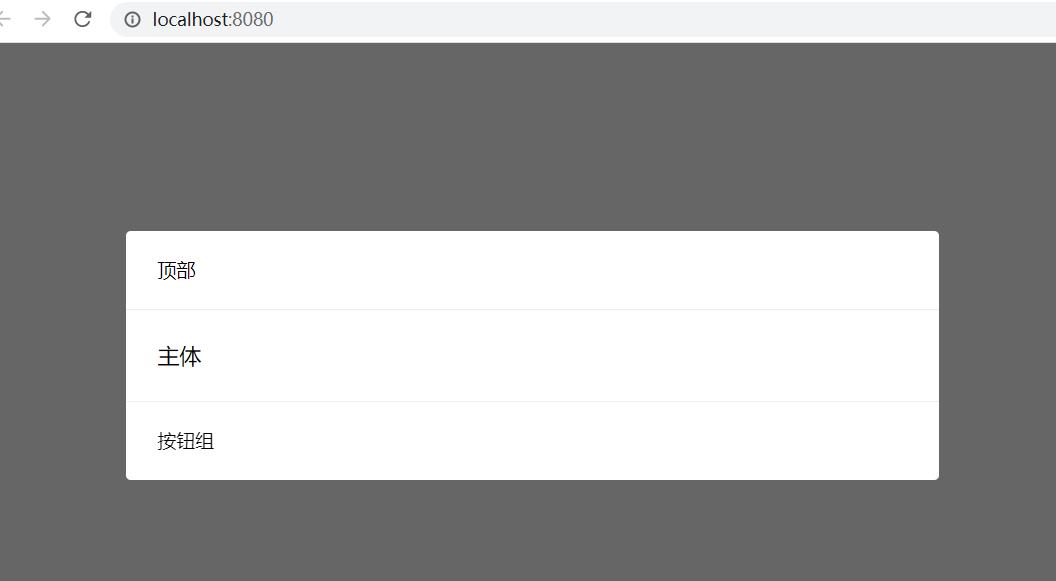
弹窗需要通过一个按钮控制显示隐藏,如下:
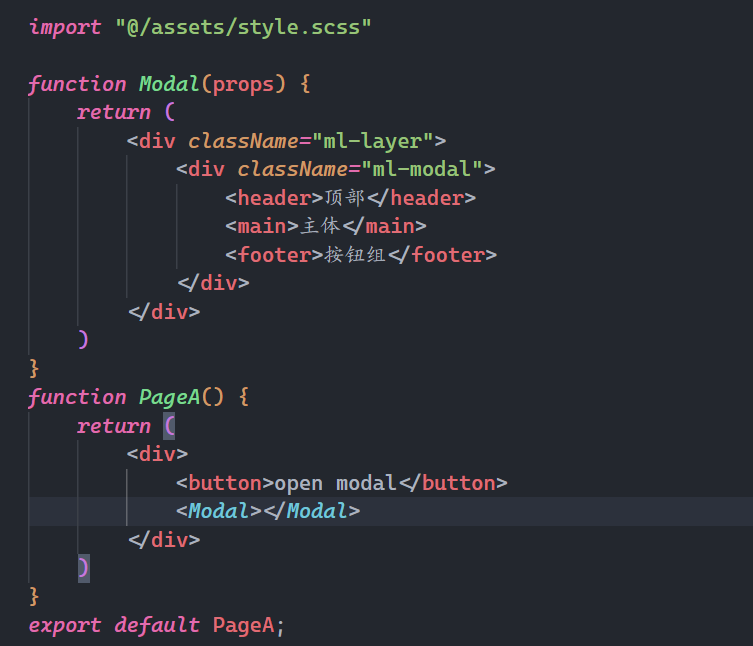
效果如下:
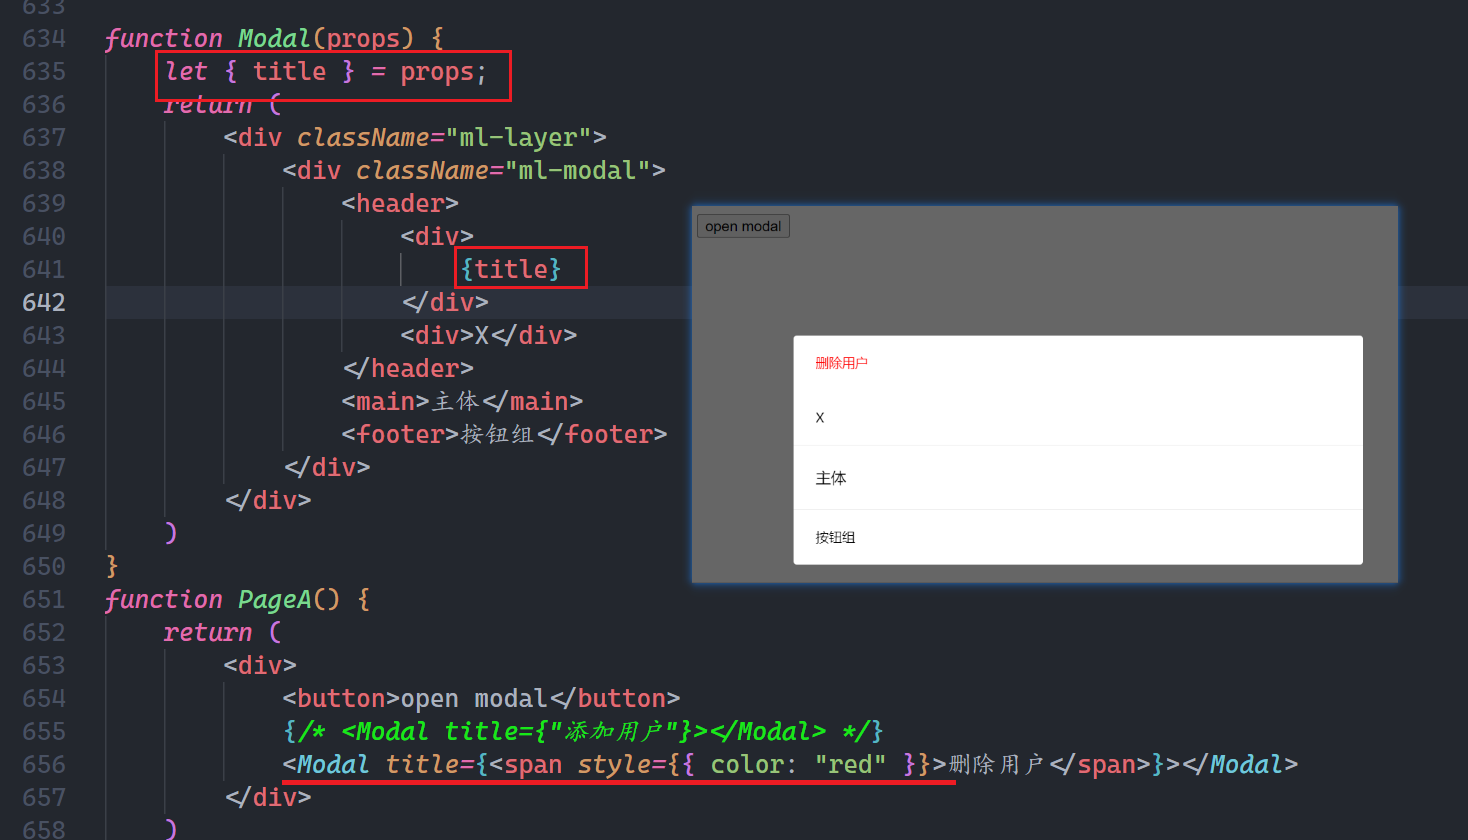
传递title,如下:
控制X的显示与隐藏,如下:
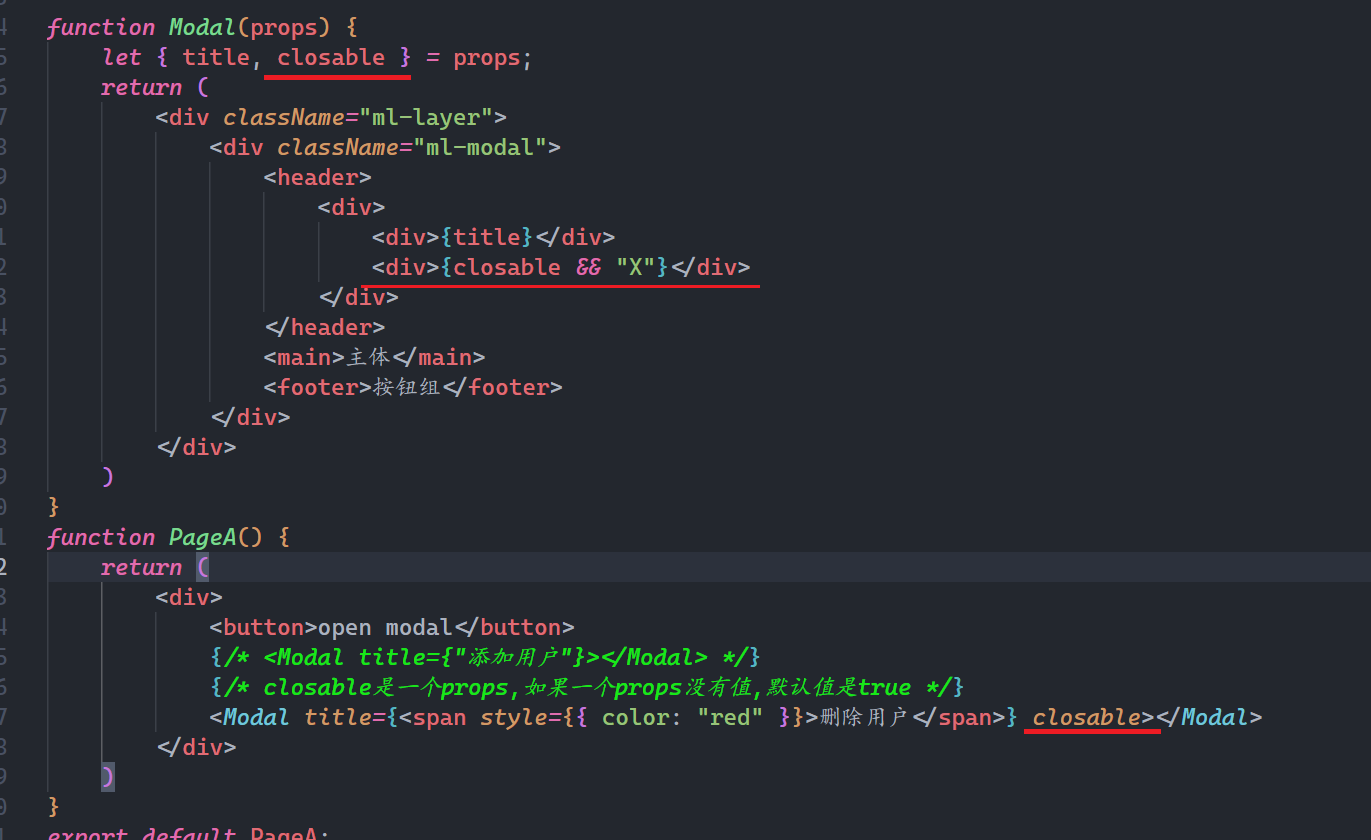
效果如下:
在封装组件时,我们需要给组件传递非常多的数据,此时,需要对数据进行校验,需要使用一个第三方包,叫prop-types,如下:
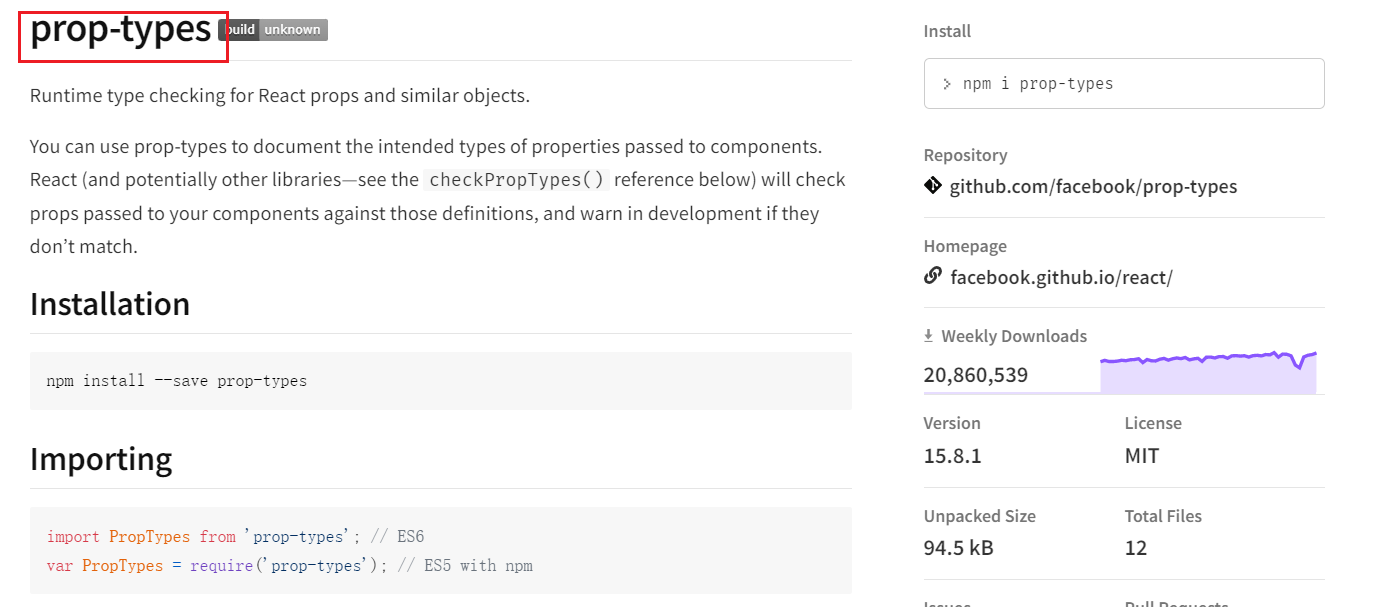
使用文档,直接看npm就OK了,地址:https://www.npmjs.com/package/prop-types
安装之,如下:

安装好后,就可以使用这个包对react中的props进行校验,如下:
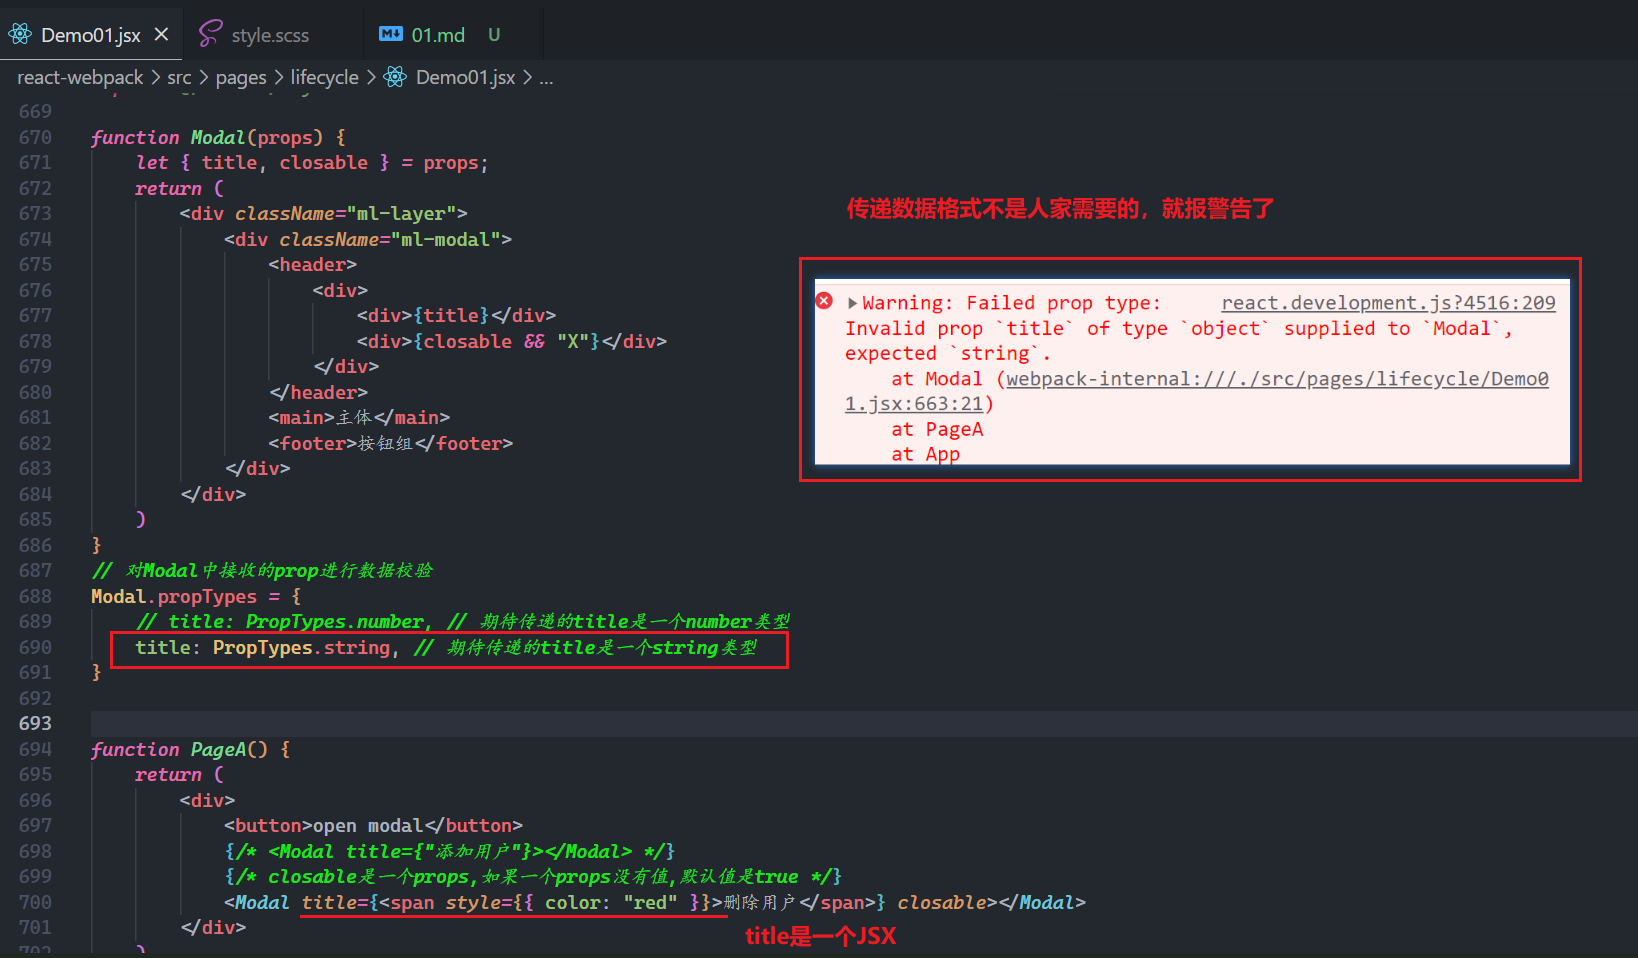
再看一下都有哪些数据格式,如下:
Modal.propTypes = {
    title: PropTypes.number, // 期待传递的title是一个number类型
    title: PropTypes.string, // 期待传递的title是一个string类型
    title: PropsTypes.bool, // 期待传递的title是一个bool类型
    title: PropsTypes.elementType, // React元素类型 = jsx, stirng, null, und
    title: PropsTypes.string.isRequired, // 期待传递的title是一个string类型,并且是必传项
    title: PropTypes.number.isRequired, // 期待传递的title是一个number类型,并且是必传项
    title: PropTypes.func, // 期待传递的title是一个函数类型
    title: PropTypes.array, // 期待传递的title是一个数组类型
    title: PropTypes.oneOf(['primary', 'danger', 'info']), // 期待传递的title是数组中其中一个
    // 期待传递的title是number或bool
    title: PropTypes.oneOfType([PropTypes.number, PropsTypes.bool]),
    title: PropTypes.node, // 期待传递的title是jsx, string, number, und, null, bool
}

// 非必传项,需要提供默认值
Modal.defaultProps = {
    title: "默认小标题",
    closable: true
}
2
3
4
5
6
7
8
9
10
11
12
13
14
15
16
17
18
19
20
代码如下:
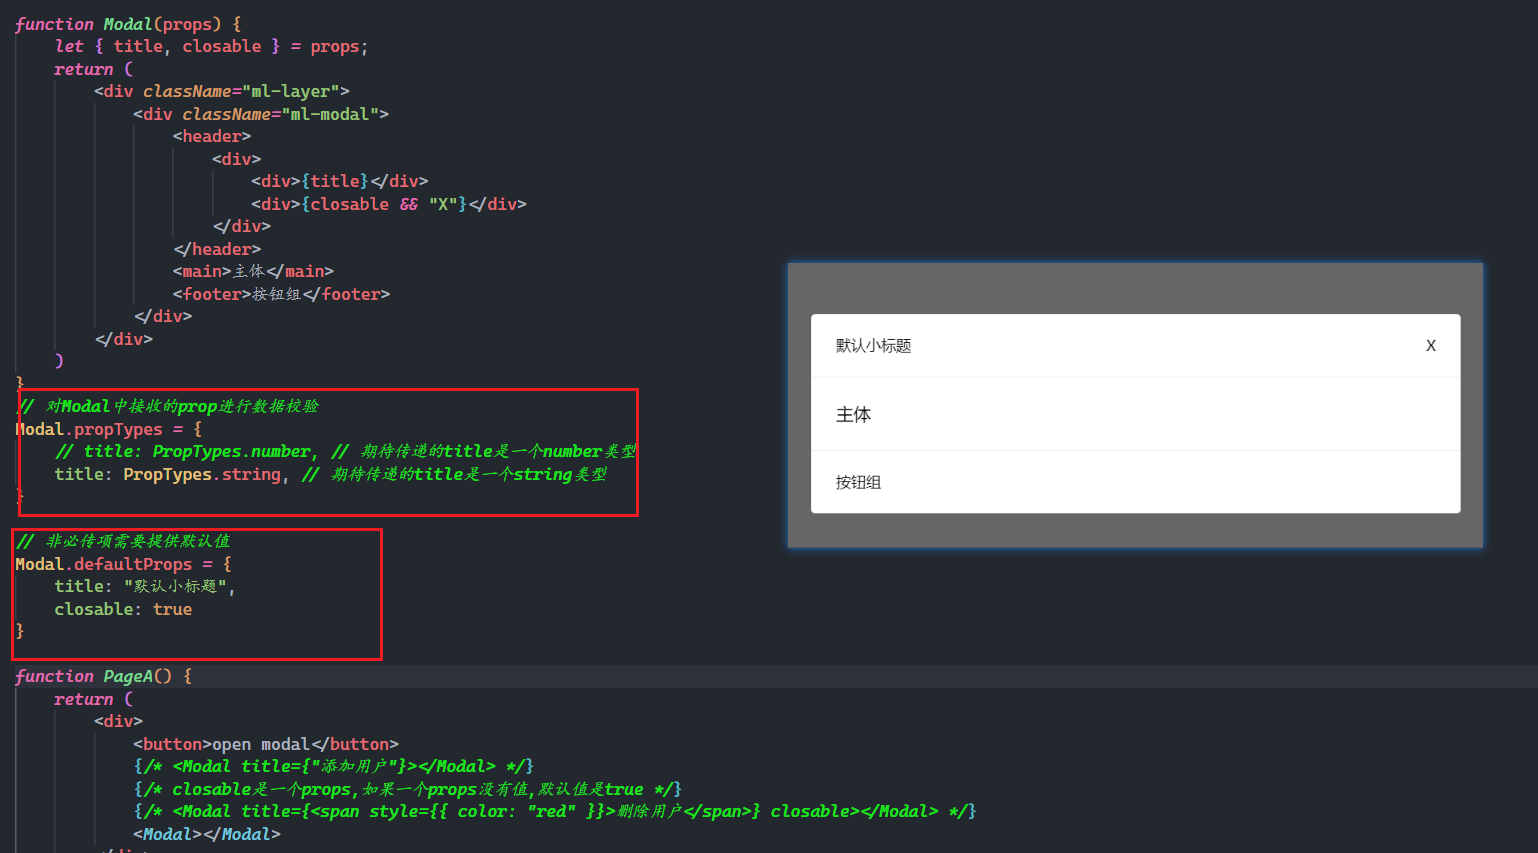
具体都有哪些数据类型,直接看文档。
对于弹窗的主体,在使用弹窗组件时,可以传递数据,组件通过props.children来接收,如下:
import PropTypes from "prop-types"
import "@/assets/style.scss"

function Modal(props) {
    let { title, closable, children } = props;
    return (
        <div className="ml-layer">
            <div className="ml-modal">
                <header>
                    <div>
                        <div>{title}</div>
                        <div>{closable && "X"}</div>
                    </div>
                </header>
                <main>
                    {
                        children
                    }
                </main>
                <footer>按钮组</footer>
            </div>
        </div>
    )
}
Modal.propTypes = {
    title: PropTypes.elementType, // jsx, string, null,und, func
    closable: PropTypes.bool,
    children: PropTypes.node
}

Modal.defaultProps = {
    title: "默认小标题",
    closable: true,
    children: <div>主体内容默认值</div>
}

function PageA() {
    return (
        <div>
            <button>open modal</button>
            <Modal title={"添加用户"} closable>
                <div>
                    <input type="text" />
                    <div>你确定要添加此用户吗?</div>
                </div>
            </Modal>
        </div>
    )
}
export default PageA;
2
3
4
5
6
7
8
9
10
11
12
13
14
15
16
17
18
19
20
21
22
23
24
25
26
27
28
29
30
31
32
33
34
35
36
37
38
39
40
41
42
43
44
45
46
47
48
49
50
效果如下:
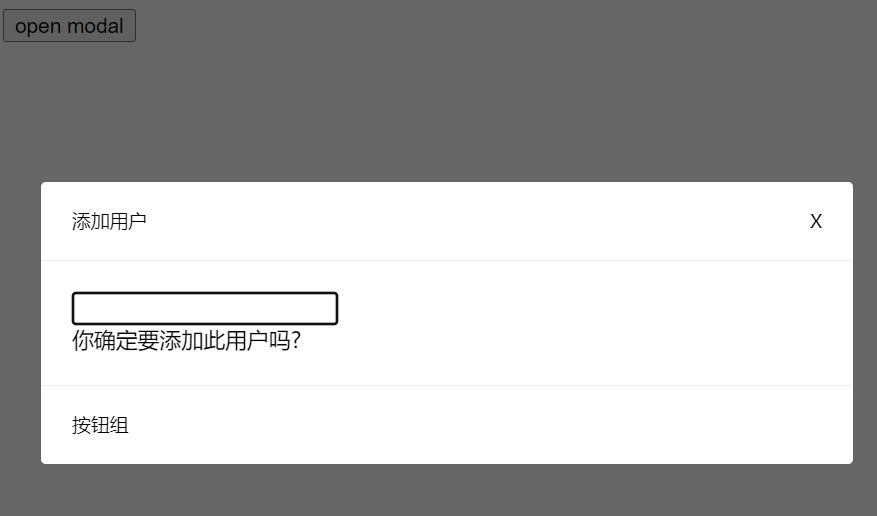
然后,考虑一下按钮组,可以有不同的按钮,把按钮也封装成一个组件,如下:
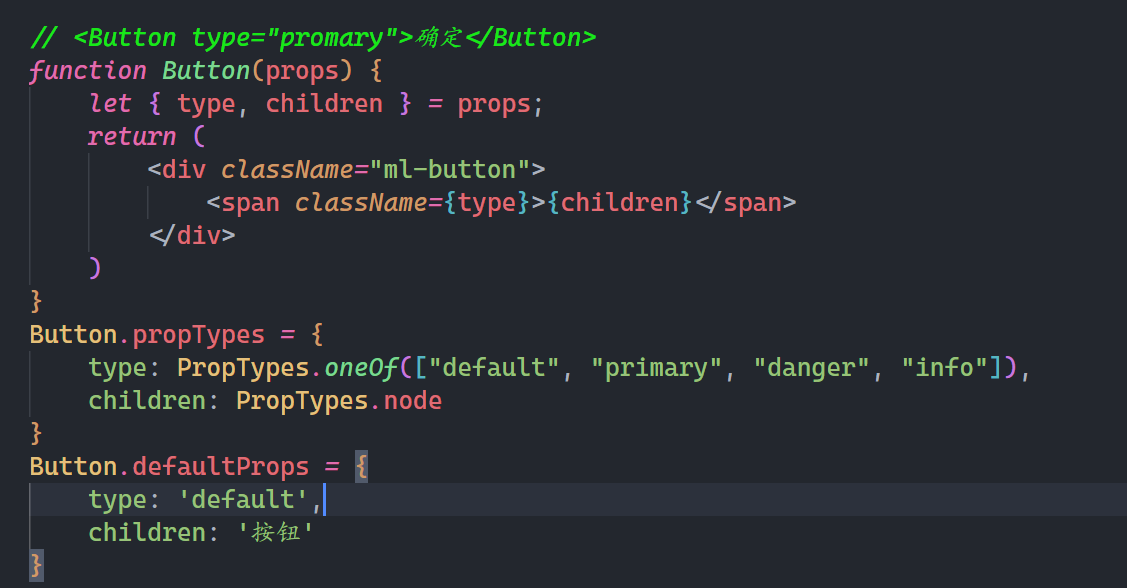
在Modal组件中使用封装的按钮,如下:
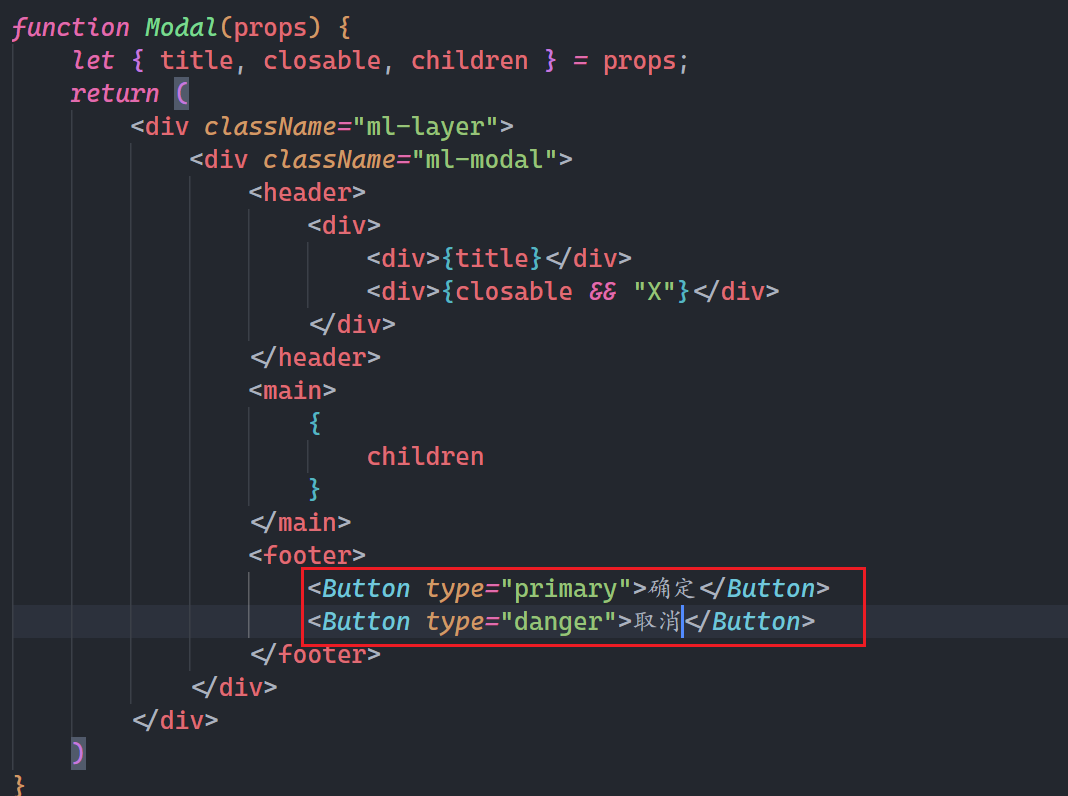
效果如下:
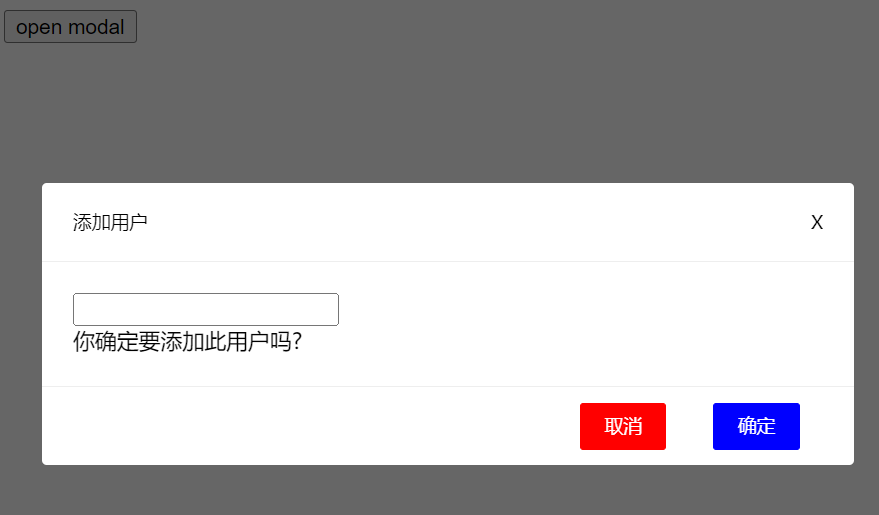
现在我们把弹出分成不同类别的弹窗,如confirm弹窗,danger弹窗,info弹窗。需要给弹窗组件指定type属性,如下:
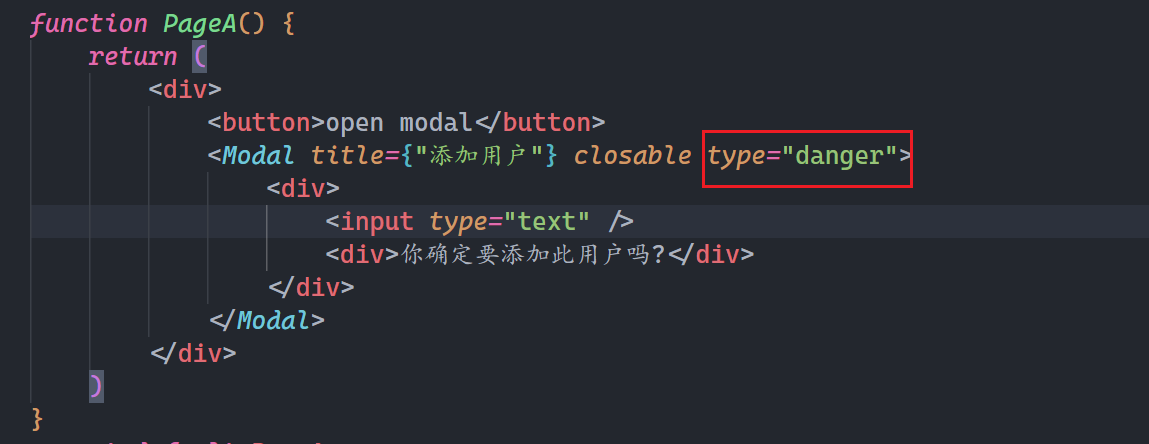
校验type,并指定默认值,如下:
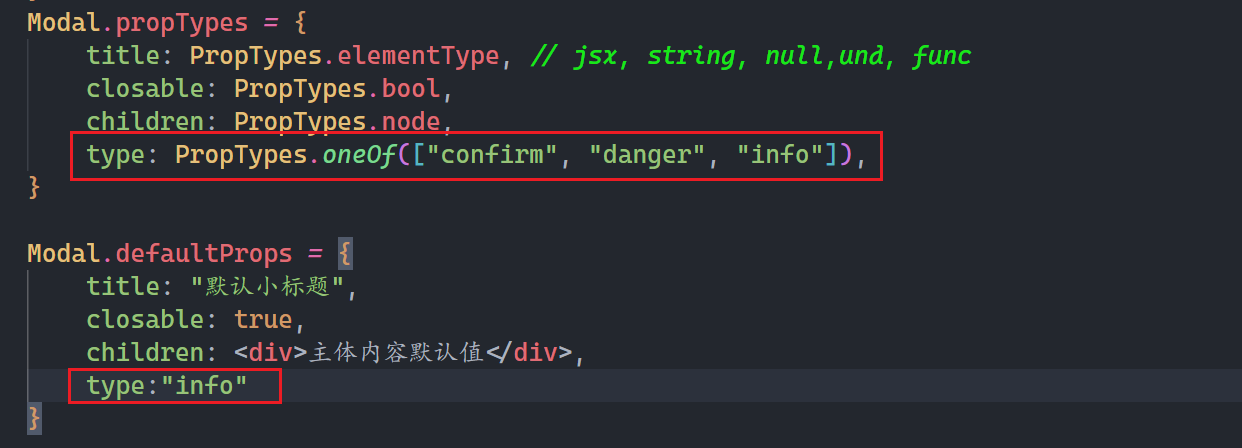
在Modal中接收type,根据不同的type,渲染出不同的按钮组,如下:
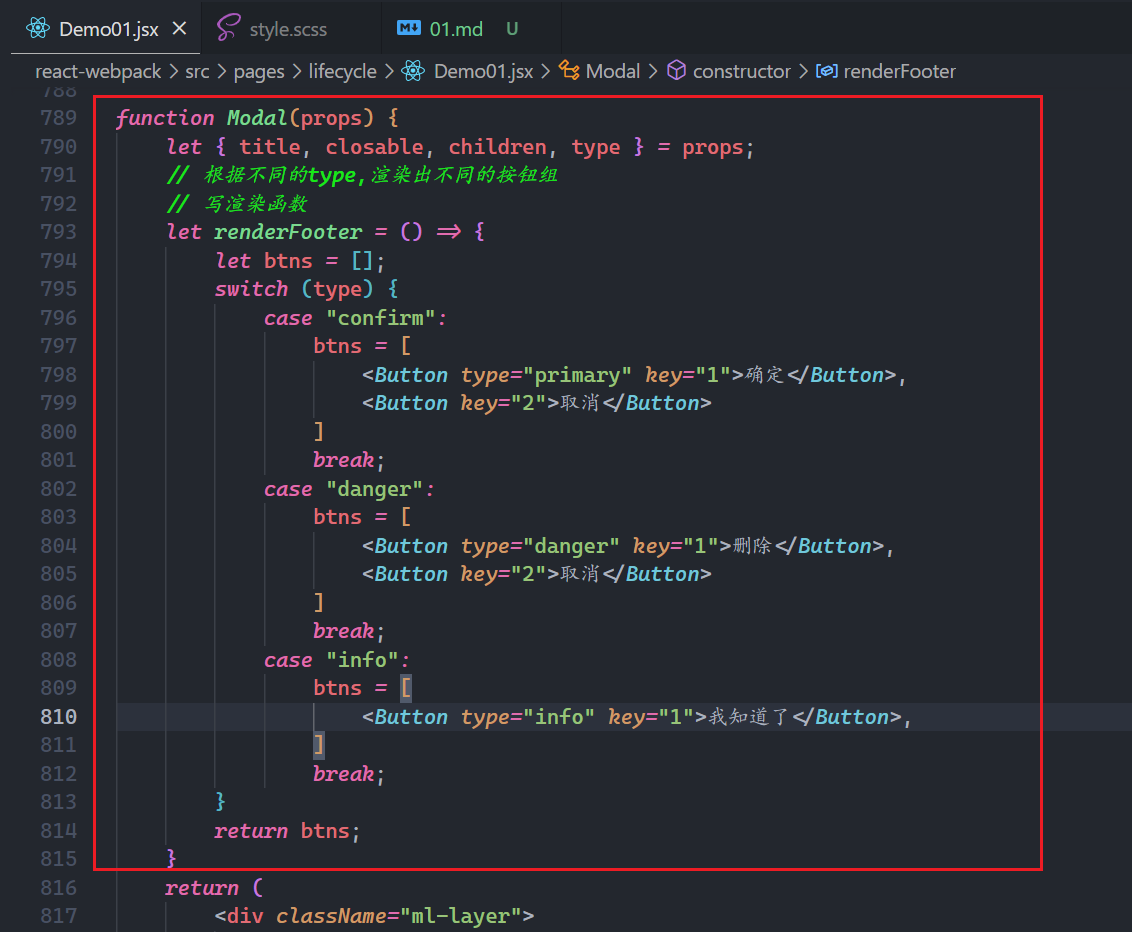
使用渲染函数,如下:
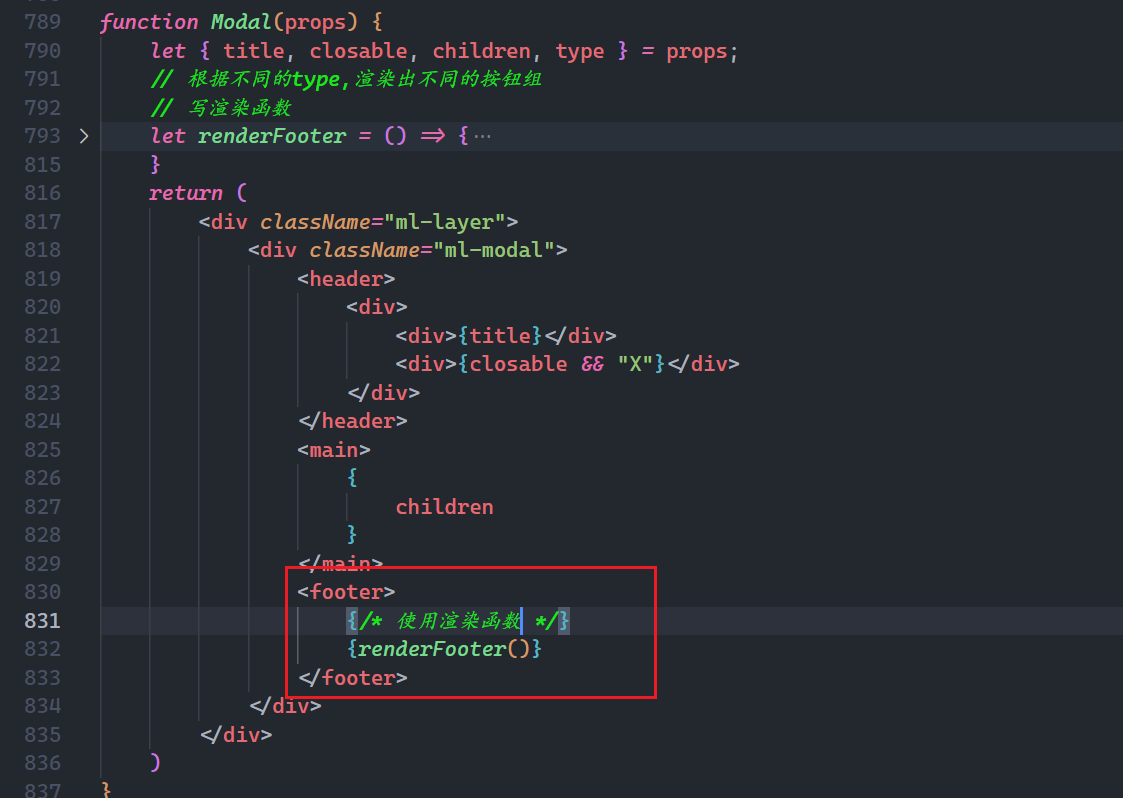
测试之如下:


代码如下:
import PropTypes from "prop-types"
import "@/assets/style.scss"

// <Button type="promary">确定</Button>
function Button(props) {
    let { type, children } = props;
    return (
        <div className="ml-button">
            <span className={type}>{children}</span>
        </div>
    )
}
Button.propTypes = {
    type: PropTypes.oneOf(["default", "primary", "danger", "info"]),
    children: PropTypes.node
}
Button.defaultProps = {
    type: 'default',
    children: '按钮'
}

function Modal(props) {
    let { title, closable, children, type } = props;
    // 根据不同的type,渲染出不同的按钮组
    // 写渲染函数
    let renderFooter = () => {
        let btns = [];
        switch (type) {
            case "confirm":
                btns = [
                    <Button type="primary" key="1">确定</Button>,
                    <Button key="2">取消</Button>
                ]
                break;
            case "danger":
                btns = [
                    <Button type="danger" key="1">删除</Button>,
                    <Button key="2">取消</Button>
                ]
                break;
            case "info":
                btns = [
                    <Button type="info" key="1">我知道了</Button>,
                ]
                break;
        }
        return btns;
    }
    return (
        <div className="ml-layer">
            <div className="ml-modal">
                <header>
                    <div>
                        <div>{title}</div>
                        <div>{closable && "X"}</div>
                    </div>
                </header>
                <main>
                    {
                        children
                    }
                </main>
                <footer>
                    {/* 使用渲染函数 */}
                    {renderFooter()}
                </footer>
            </div>
        </div>
    )
}
Modal.propTypes = {
    title: PropTypes.elementType, // jsx, string, null,und, func
    closable: PropTypes.bool,
    children: PropTypes.node,
    type: PropTypes.oneOf(["confirm", "danger", "info"]),
}

Modal.defaultProps = {
    title: "默认小标题",
    closable: true,
    children: <div>主体内容默认值</div>,
    type: "info"
}

function PageA() {
    // 定义一个状态控制弹窗是否显示
    return (
        <div>
            <button>open modal</button>
            <Modal title={"添加用户"} closable type="confirm">
                <div>
                    <input type="text" />
                    <div>你确定要添加此用户吗?</div>
                </div>
            </Modal>
        </div>
    )
}
export default PageA;
2
3
4
5
6
7
8
9
10
11
12
13
14
15
16
17
18
19
20
21
22
23
24
25
26
27
28
29
30
31
32
33
34
35
36
37
38
39
40
41
42
43
44
45
46
47
48
49
50
51
52
53
54
55
56
57
58
59
60
61
62
63
64
65
66
67
68
69
70
71
72
73
74
75
76
77
78
79
80
81
82
83
84
85
86
87
88
89
90
91
92
93
94
95
96
97
98
99
定义一个状态来控制弹窗的显示与否,如下:
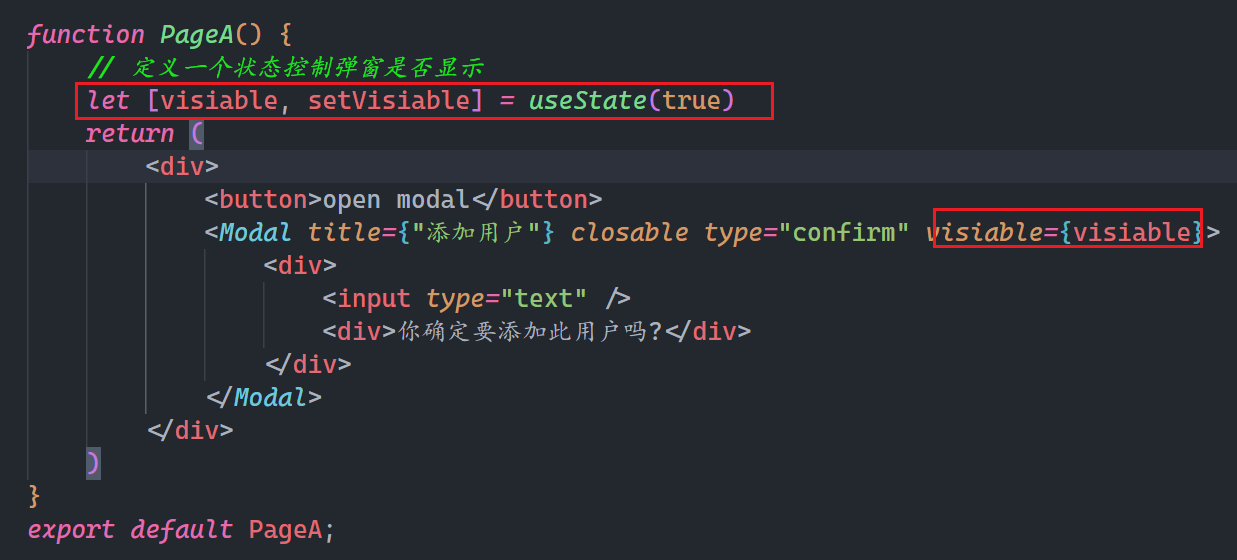
Modal就需要校验和设置默认值,如下:
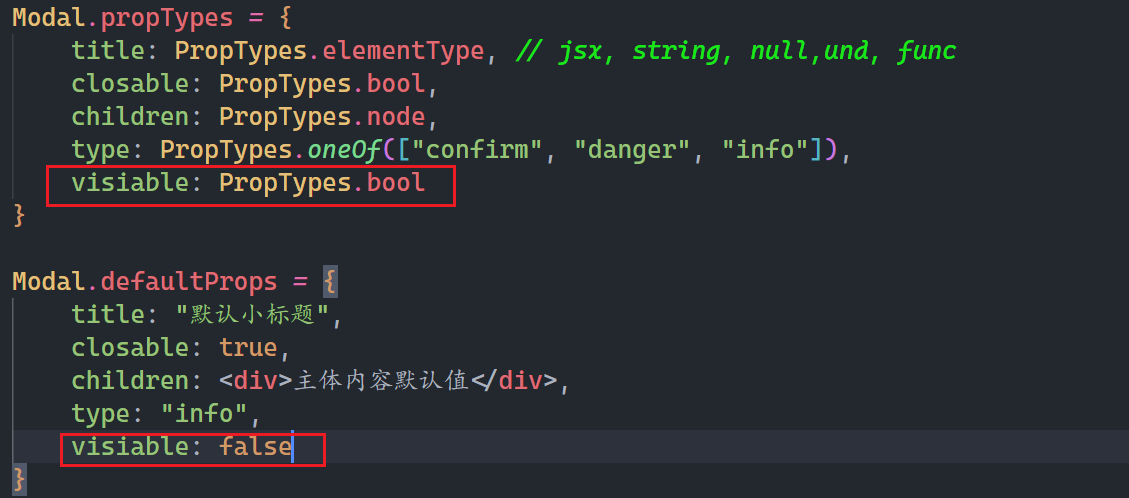
使用visiable,控制一个元素的显示与隐藏,就是所谓的条件渲染,分两类:
- 控制是否创建与销毁
- 控制样式
这里,我们控制样式,实现显式与隐藏,如下:
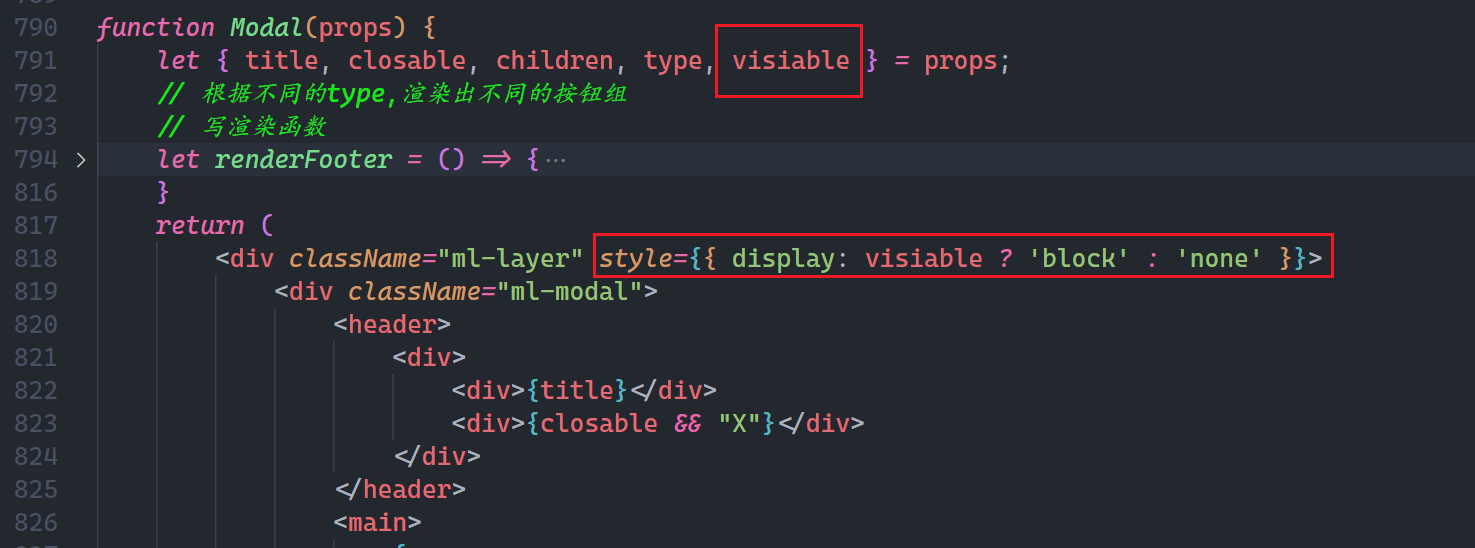
默认是隐藏掉的,点击按钮时,需要显示,如下:
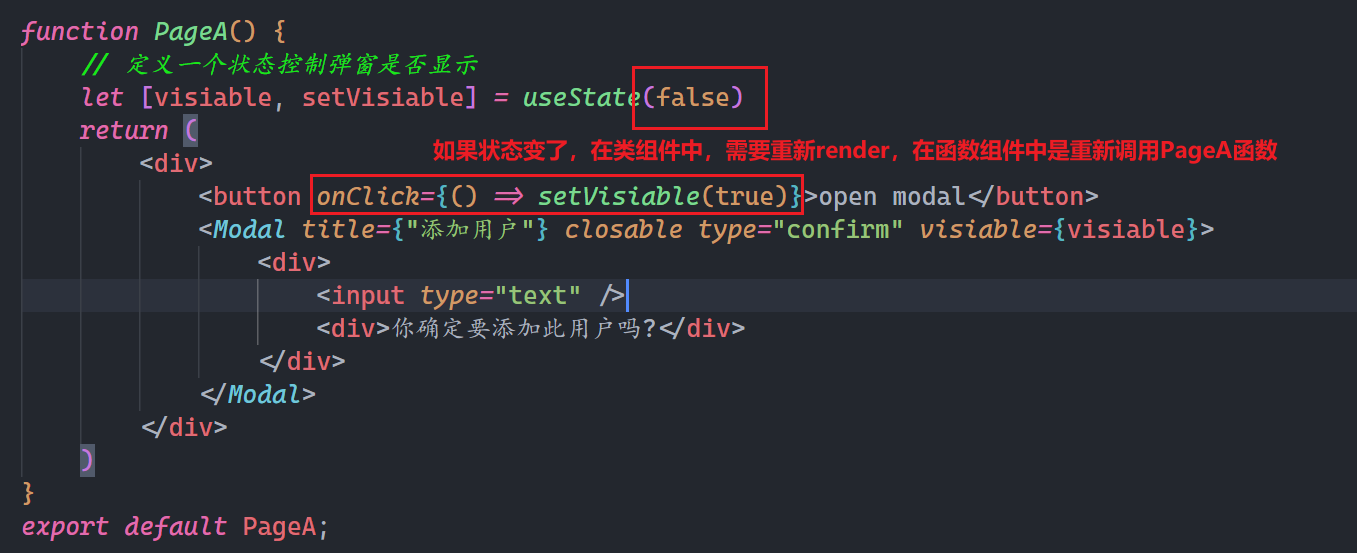
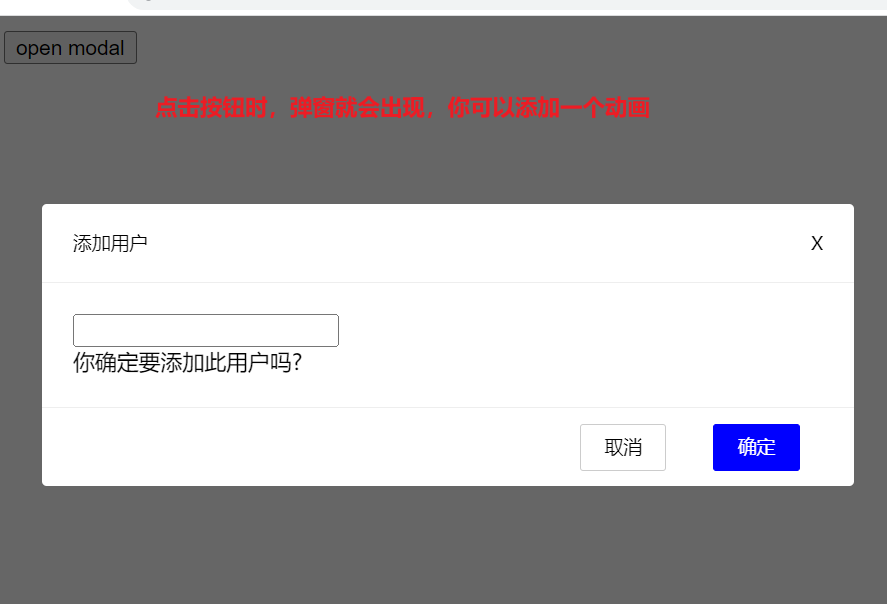
测试如下:
当点击取消时,需要把弹窗隐藏了,说白了,也是改变状态,给Modal传递一个事件函数,如下:
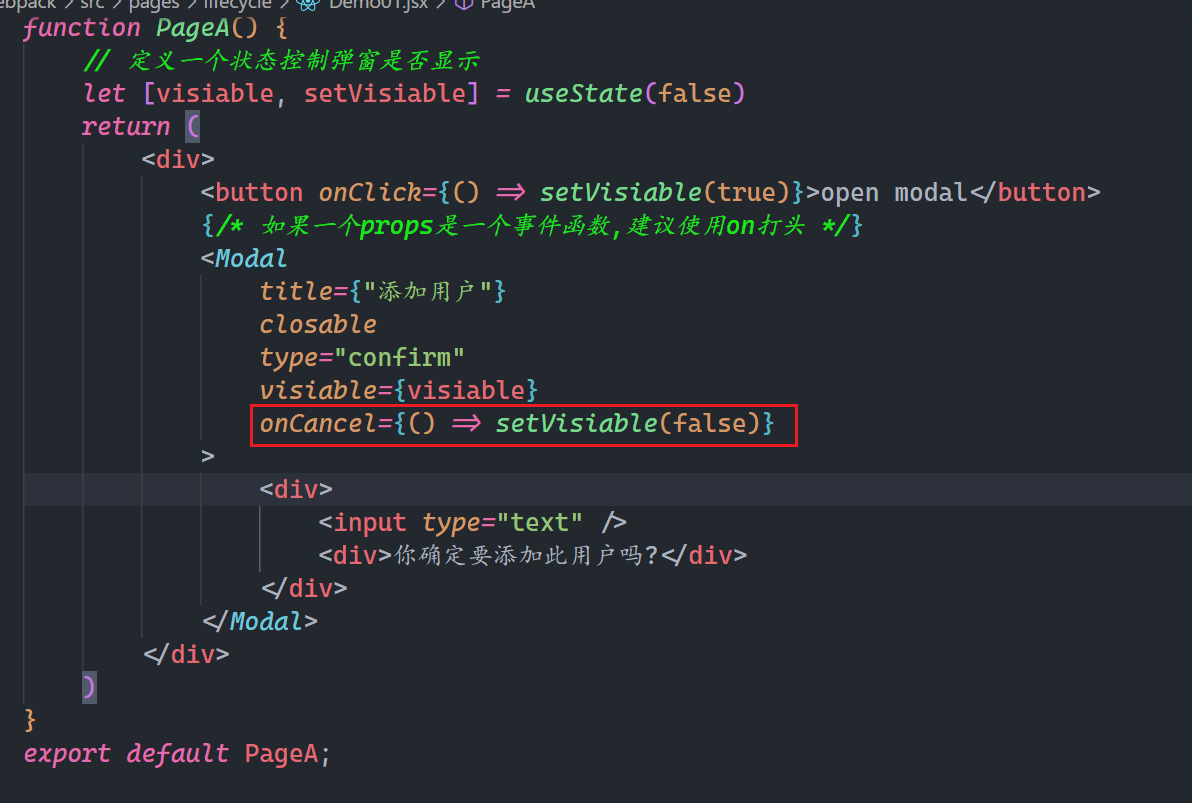
Modal需要校验,设置默认值,如下:
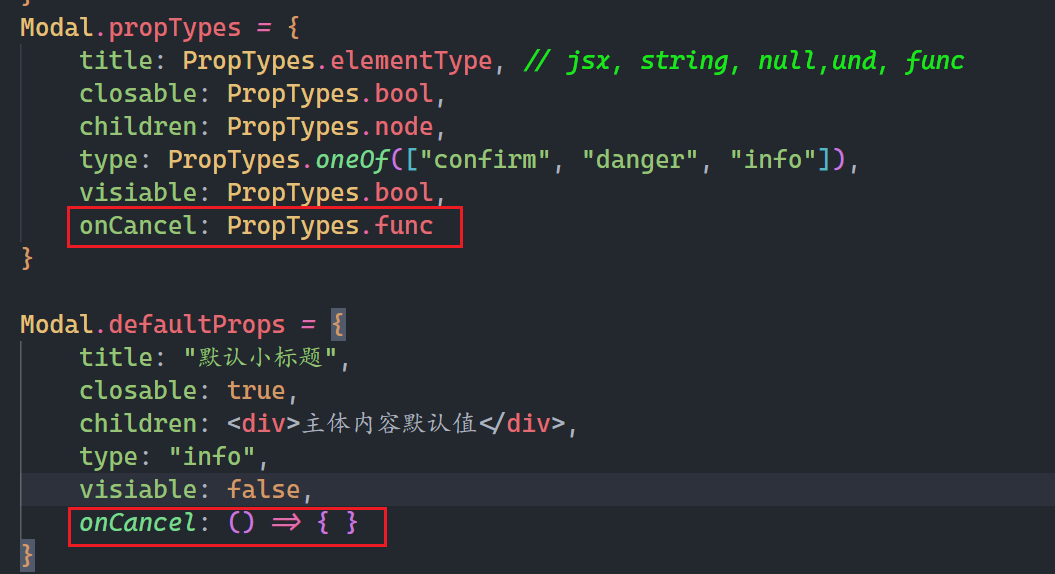
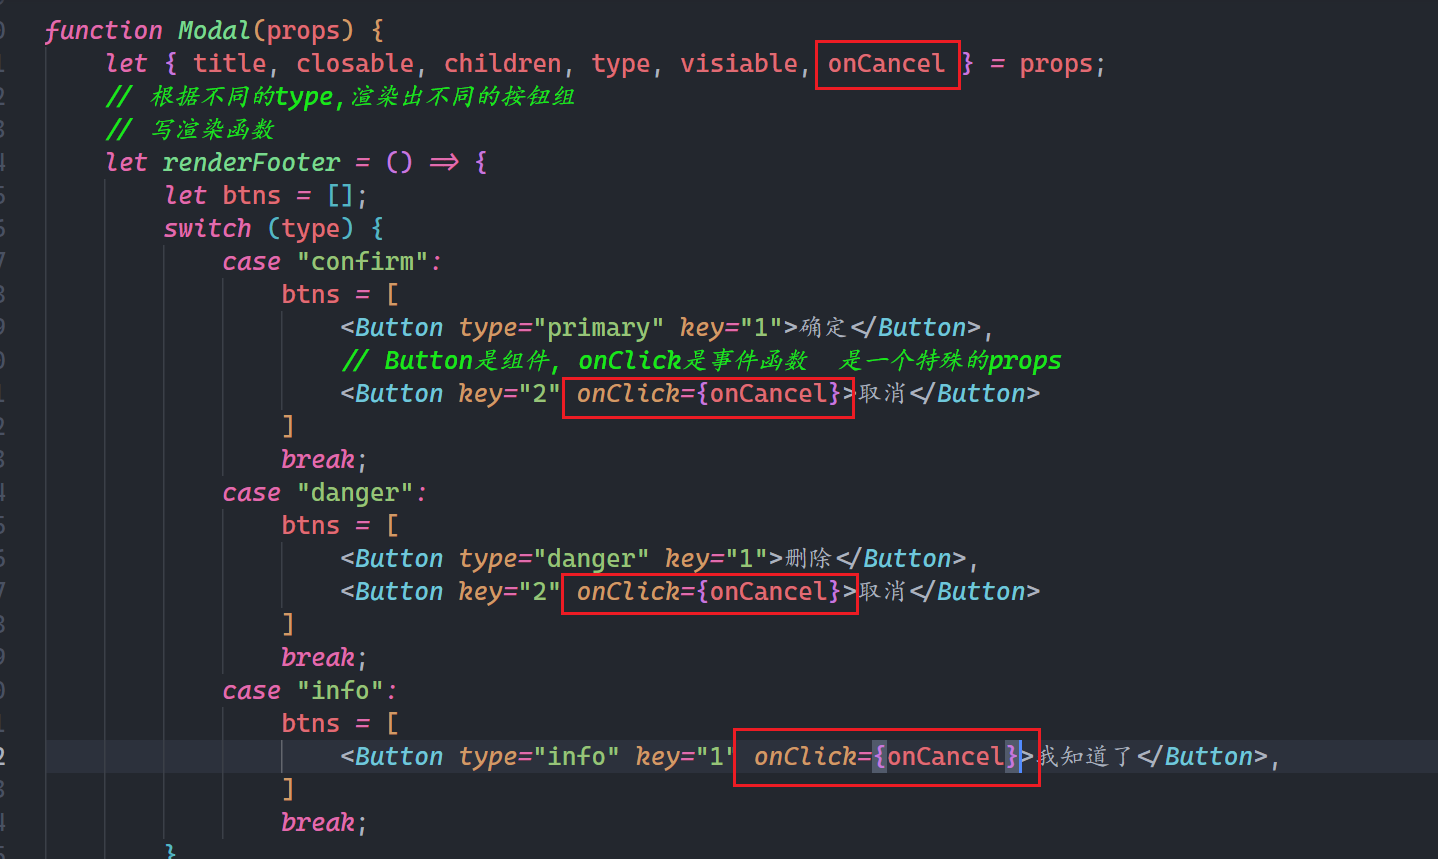
使用onCancel,onCancel是一个函数,调用这个函数,就可以把弹窗隐藏掉,如下:
在Button组件中校验和设置默认值,如下:
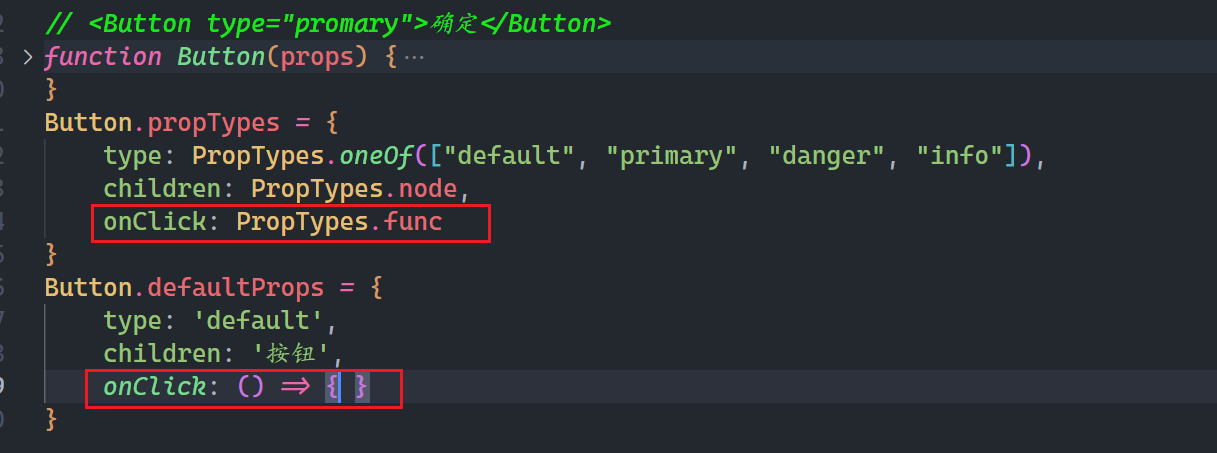
在Button组件中,接收,使用之,如下:

测试OK。
给小X也,也需要传递onCancel,如下:
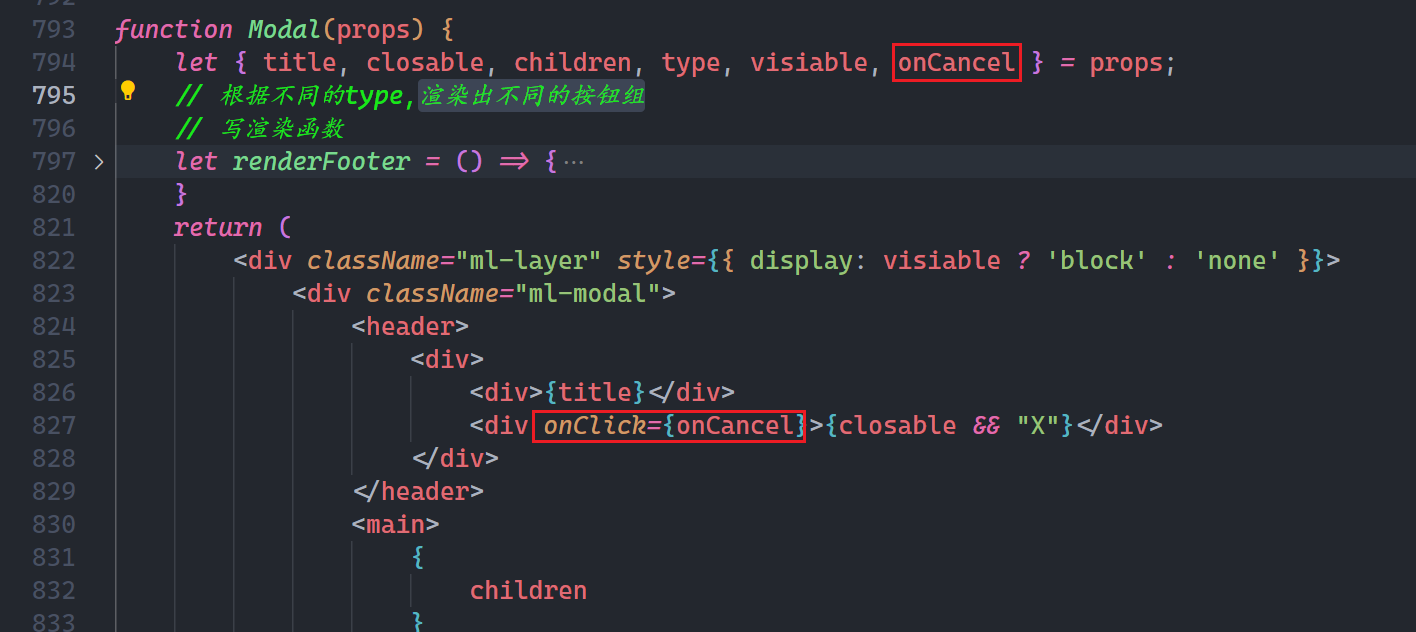
点击遮罩层,也需要取消,需要考虑事件冒泡,如下:
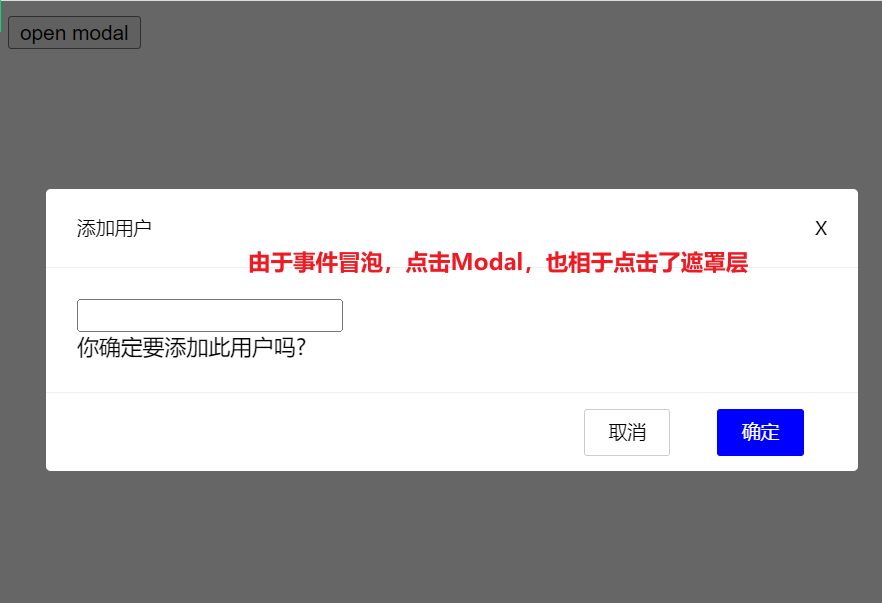
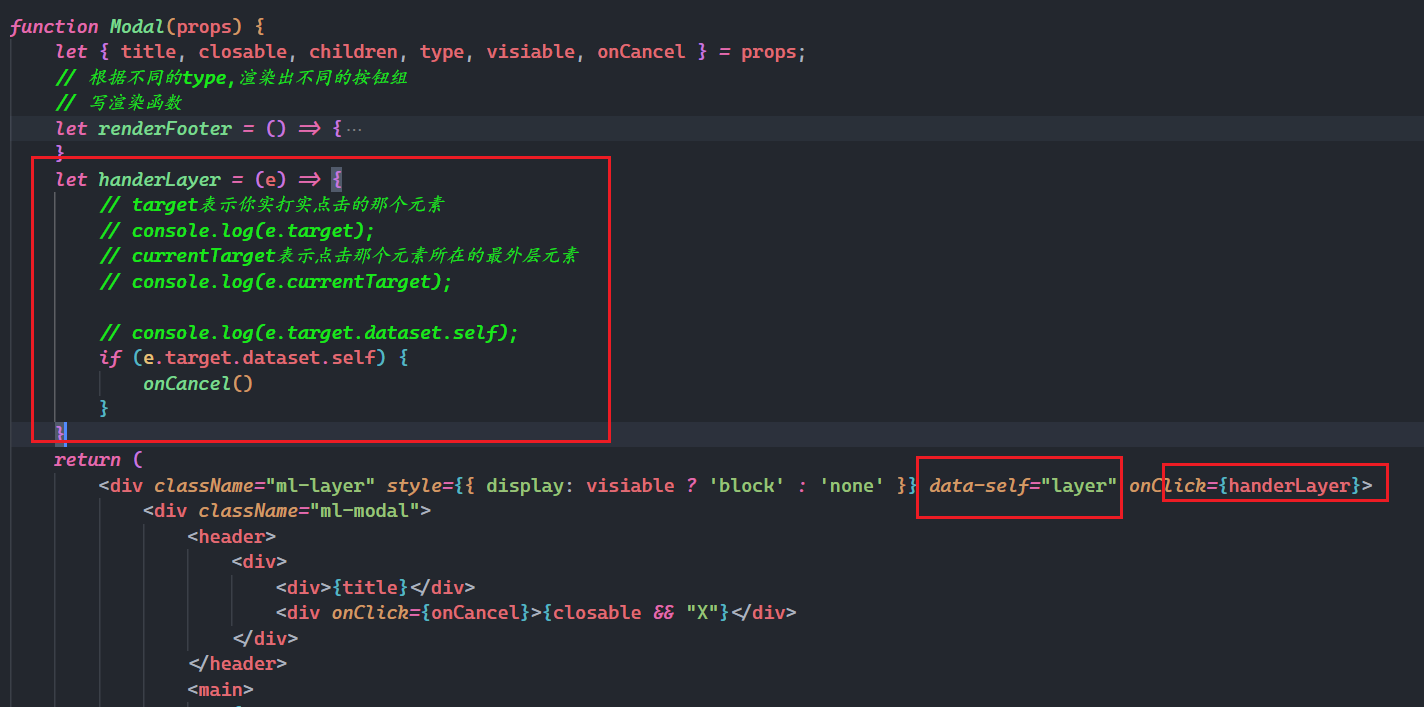
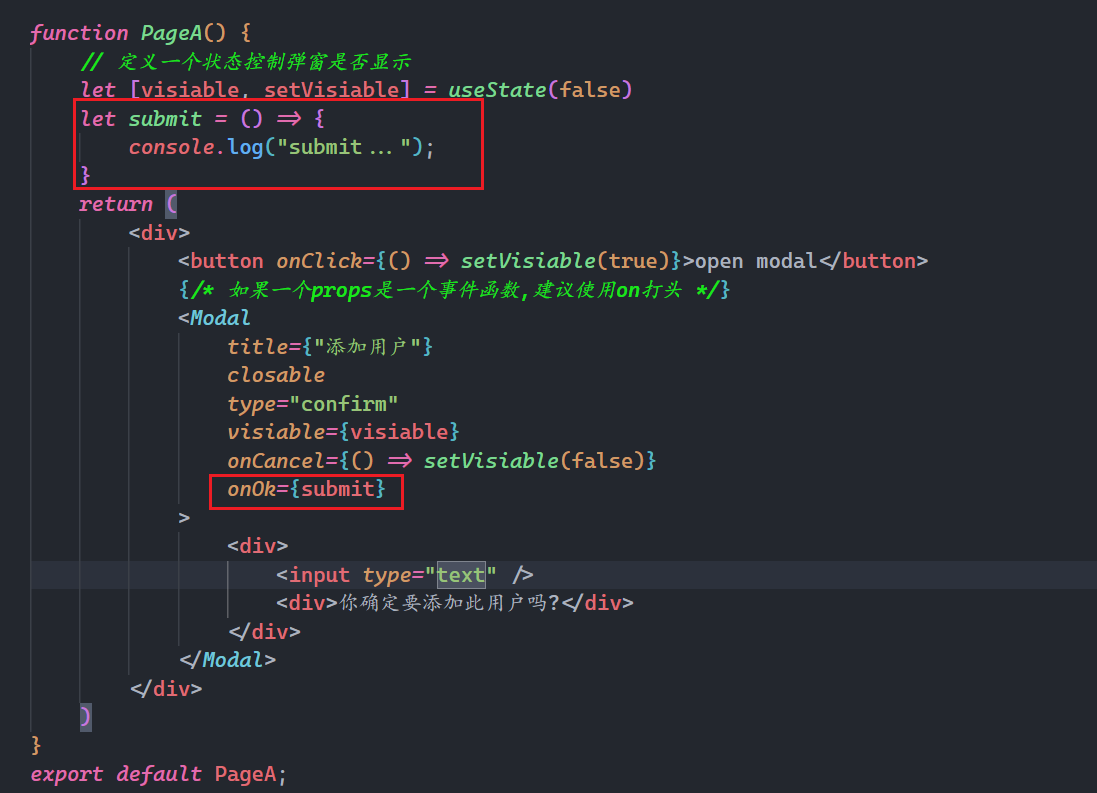
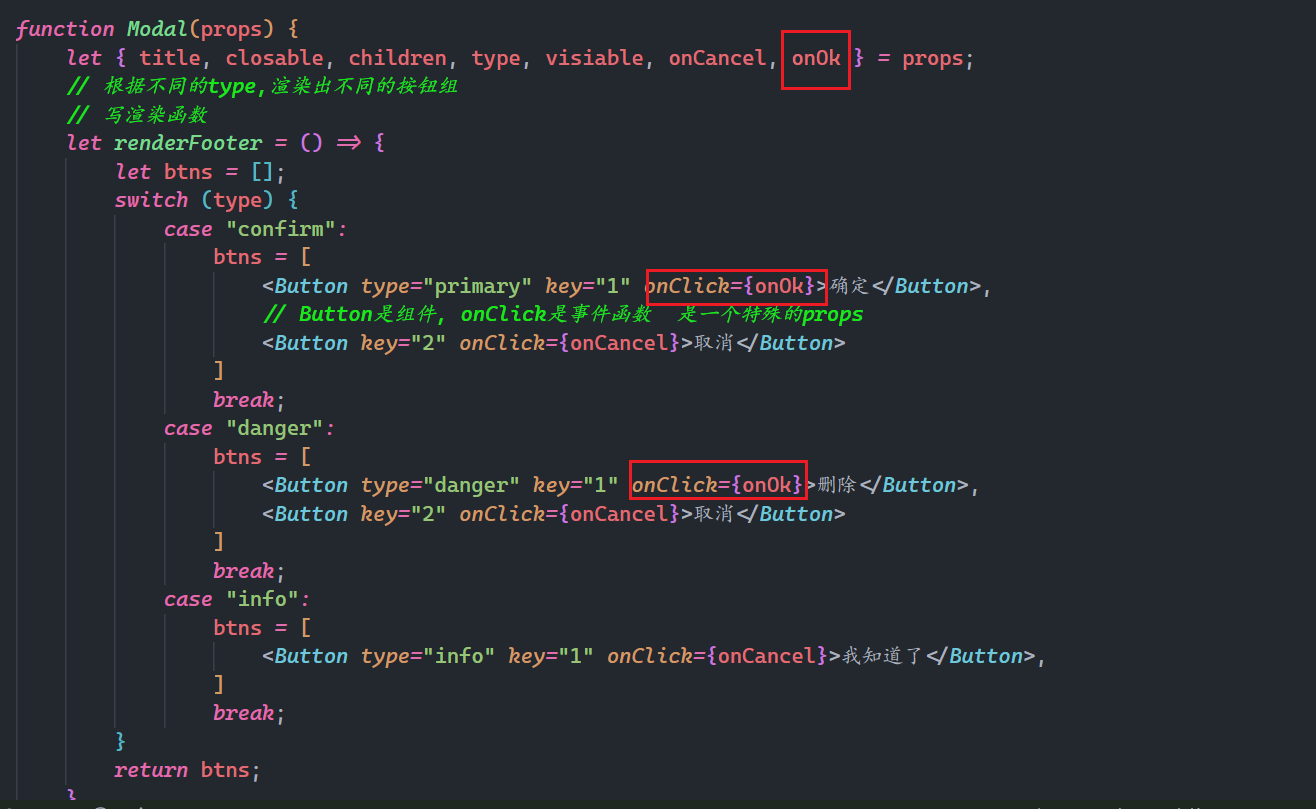
处理点击确定,传递onOK事件函数,如下:
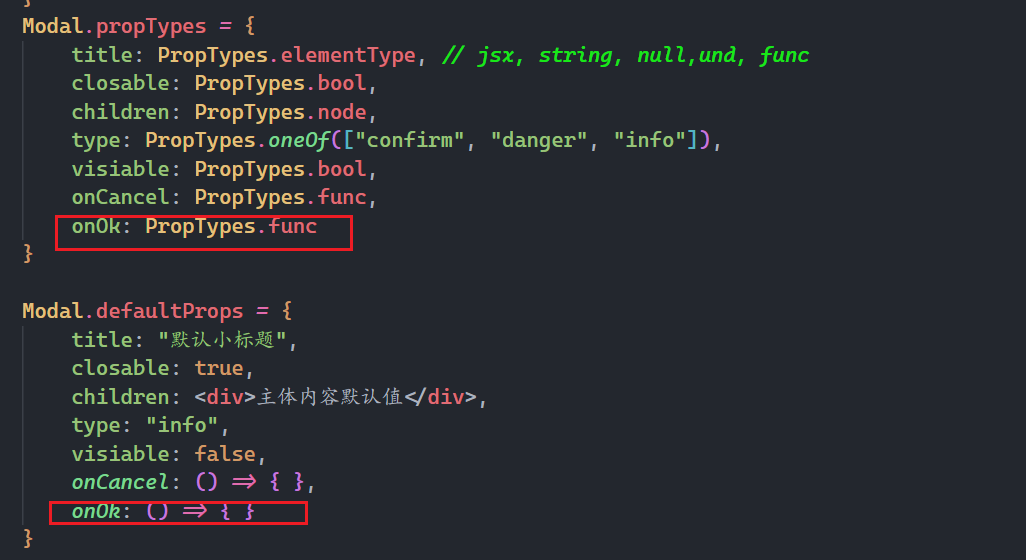
Modal组件,校验,设置默认值,如下:
接收使用之,如下:
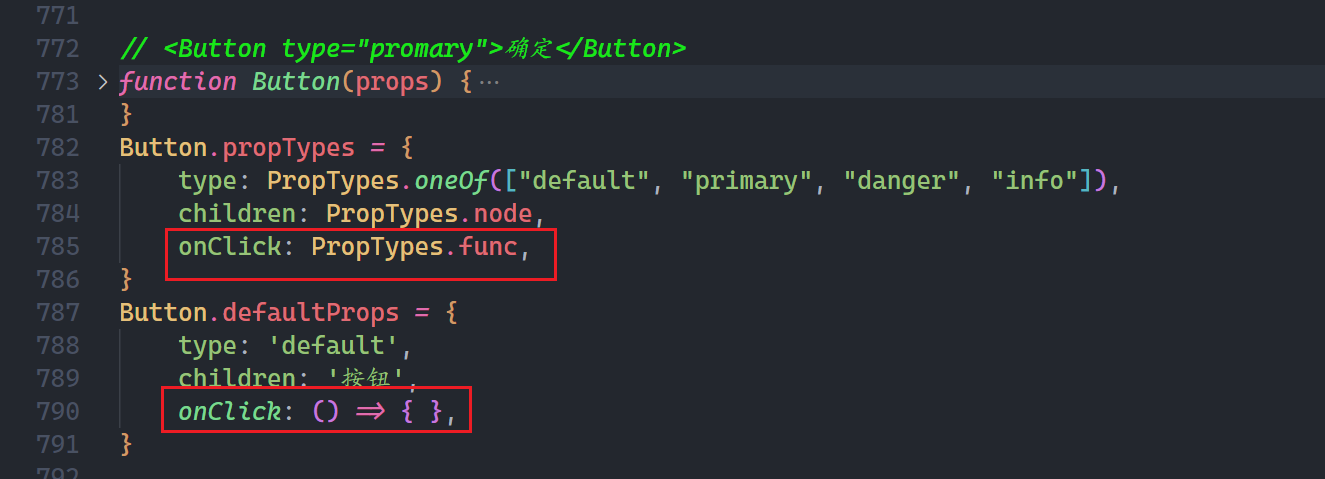
Button组件,校验,设置默认值,之前已经写过了:
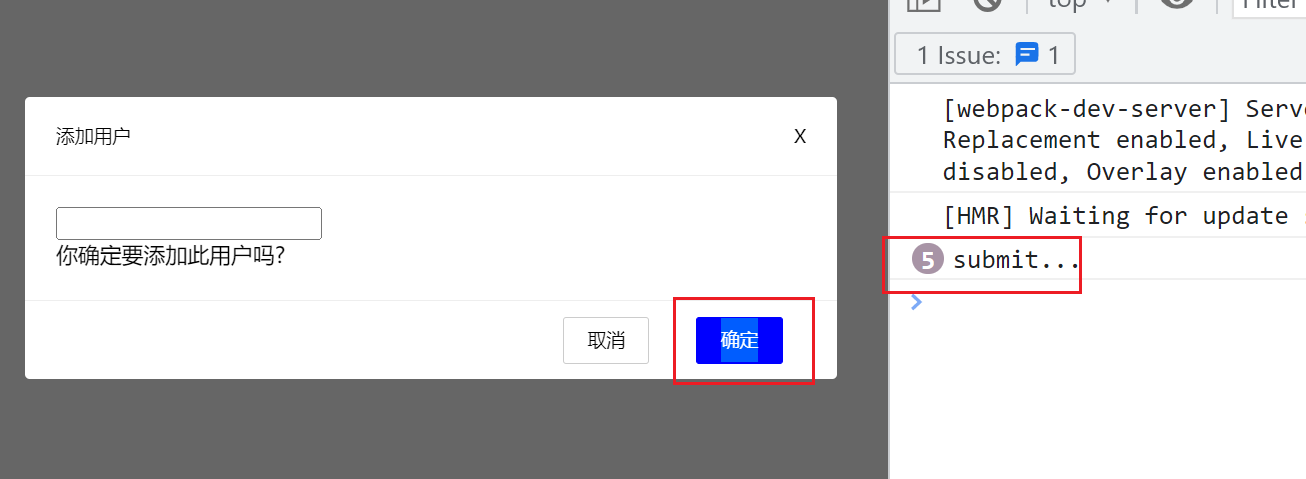
测试之,如下:
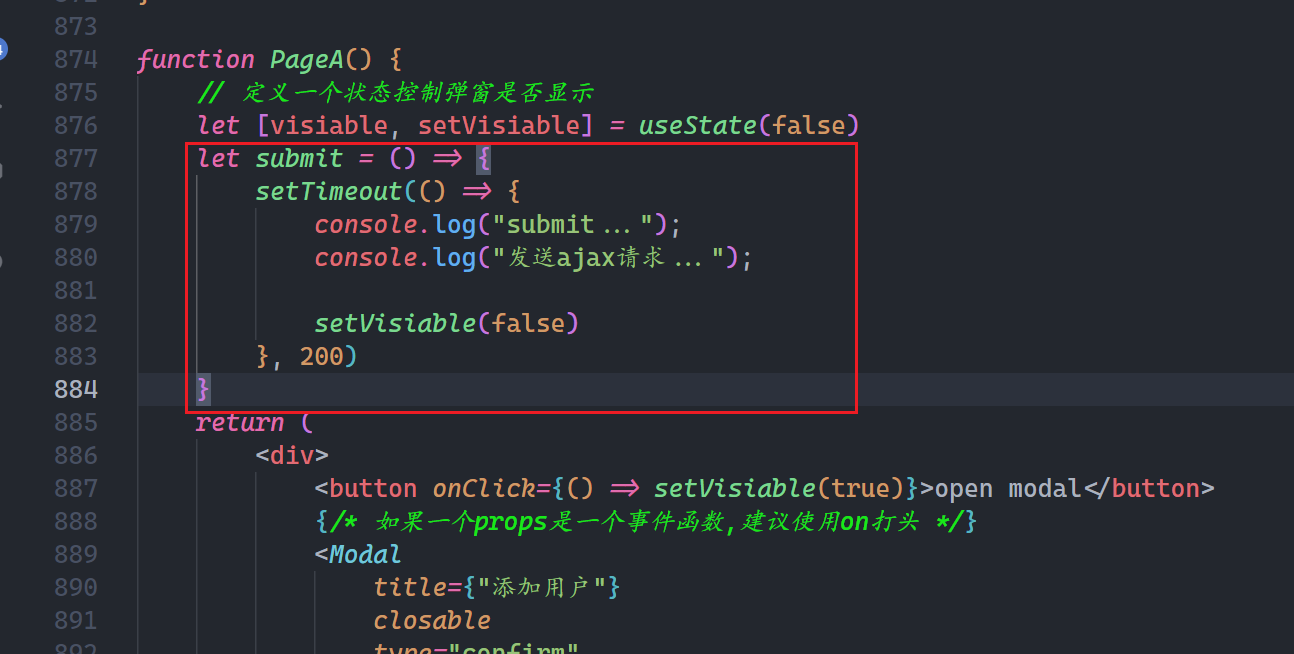
此时,在sumbit中就可以写我们的业务逻辑了,如下:
参考代码如下:
import PropTypes from "prop-types"
import "@/assets/style.scss"
import { useState } from "react"

// <Button type="promary">确定</Button>
function Button(props) {
    let { type, children, onClick } = props;
    return (
        <div className="ml-button">
            {/* onClick 叫React的合成事件 */}
            <span className={type} onClick={onClick}>{children}</span>
        </div>
    )
}
Button.propTypes = {
    type: PropTypes.oneOf(["default", "primary", "danger", "info"]),
    children: PropTypes.node,
    onClick: PropTypes.func,
}
Button.defaultProps = {
    type: 'default',
    children: '按钮',
    onClick: () => { },
}

function Modal(props) {
    let { title, closable, children, type, visiable, onCancel, onOk } = props;
    // 根据不同的type,渲染出不同的按钮组
    // 写渲染函数
    let renderFooter = () => {
        let btns = [];
        switch (type) {
            case "confirm":
                btns = [
                    <Button type="primary" key="1" onClick={onOk}>确定</Button>,
                    // Button是组件, onClick是事件函数  是一个特殊的props
                    <Button key="2" onClick={onCancel}>取消</Button>
                ]
                break;
            case "danger":
                btns = [
                    <Button type="danger" key="1" onClick={onOk}>删除</Button>,
                    <Button key="2" onClick={onCancel}>取消</Button>
                ]
                break;
            case "info":
                btns = [
                    <Button type="info" key="1" onClick={onCancel}>我知道了</Button>,
                ]
                break;
        }
        return btns;
    }
    let handerLayer = (e) => {
        // target表示你实打实点击的那个元素
        // console.log(e.target);
        // currentTarget表示点击那个元素所在的最外层元素
        // console.log(e.currentTarget);

        // console.log(e.target.dataset.self);
        if (e.target.dataset.self) {
            onCancel()
        }
    }
    return (
        <div className="ml-layer" style={{ display: visiable ? 'block' : 'none' }} data-self="layer" onClick={handerLayer}>
            <div className="ml-modal">
                <header>
                    <div>
                        <div>{title}</div>
                        <div onClick={onCancel}>{closable && "X"}</div>
                    </div>
                </header>
                <main>
                    {
                        children
                    }
                </main>
                <footer>
                    {/* 使用渲染函数 */}
                    {renderFooter()}
                </footer>
            </div>
        </div>
    )
}
Modal.propTypes = {
    title: PropTypes.elementType, // jsx, string, null,und, func
    closable: PropTypes.bool,
    children: PropTypes.node,
    type: PropTypes.oneOf(["confirm", "danger", "info"]),
    visiable: PropTypes.bool,
    onCancel: PropTypes.func,
    onOk: PropTypes.func
}

Modal.defaultProps = {
    title: "默认小标题",
    closable: true,
    children: <div>主体内容默认值</div>,
    type: "info",
    visiable: false,
    onCancel: () => { },
    onOk: () => { }
}

function PageA() {
    // 定义一个状态控制弹窗是否显示
    let [visiable, setVisiable] = useState(false)
    let submit = () => {
        setTimeout(() => {
            console.log("submit...");
            console.log("发送ajax请求...");

            setVisiable(false)
        }, 200)
    }
    return (
        <div>
            <button onClick={() => setVisiable(true)}>open modal</button>
            {/* 如果一个props是一个事件函数,建议使用on打头 */}
            <Modal
                title={"添加用户"}
                closable
                type="confirm"
                visiable={visiable}
                onCancel={() => setVisiable(false)}
                onOk={submit}
            >
                <div>
                    <input type="text" />
                    <div>你确定要添加此用户吗?</div>
                </div>
            </Modal>
        </div>
    )
}
export default PageA;
2
3
4
5
6
7
8
9
10
11
12
13
14
15
16
17
18
19
20
21
22
23
24
25
26
27
28
29
30
31
32
33
34
35
36
37
38
39
40
41
42
43
44
45
46
47
48
49
50
51
52
53
54
55
56
57
58
59
60
61
62
63
64
65
66
67
68
69
70
71
72
73
74
75
76
77
78
79
80
81
82
83
84
85
86
87
88
89
90
91
92
93
94
95
96
97
98
99
100
101
102
103
104
105
106
107
108
109
110
111
112
113
114
115
116
117
118
119
120
121
122
123
124
125
126
127
128
129
130
131
132
133
134
135
136
137
138
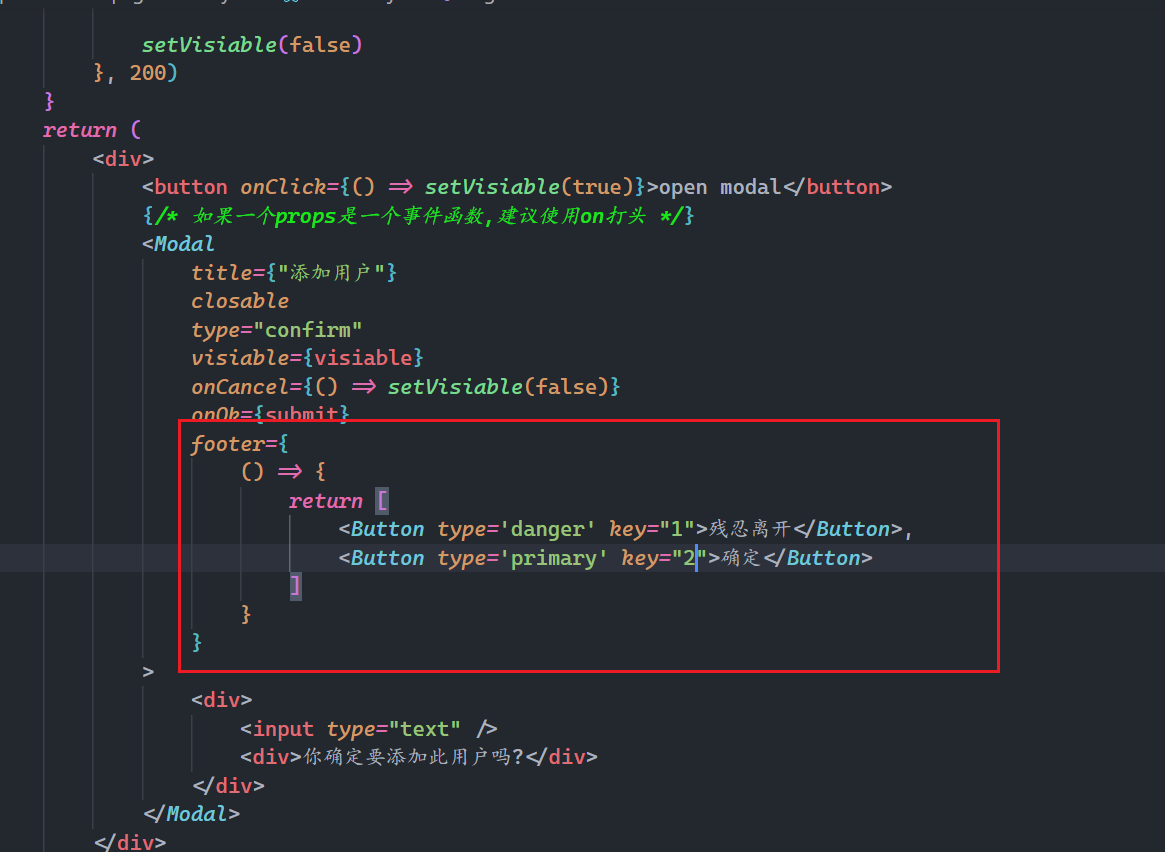
对按钮组的结构进行定制化,现在的弹窗按钮组就只有三种,可以定制一下,给Modal组件传递footer,如下:
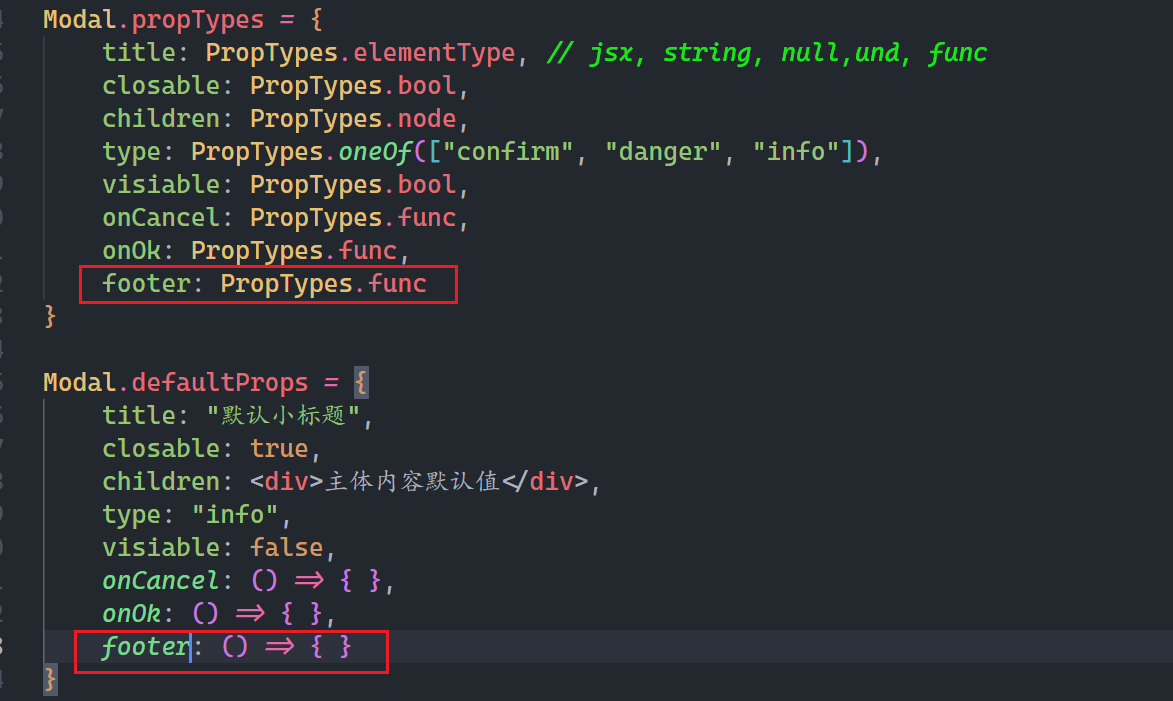
Modal组件校验,设置默认值,如下:
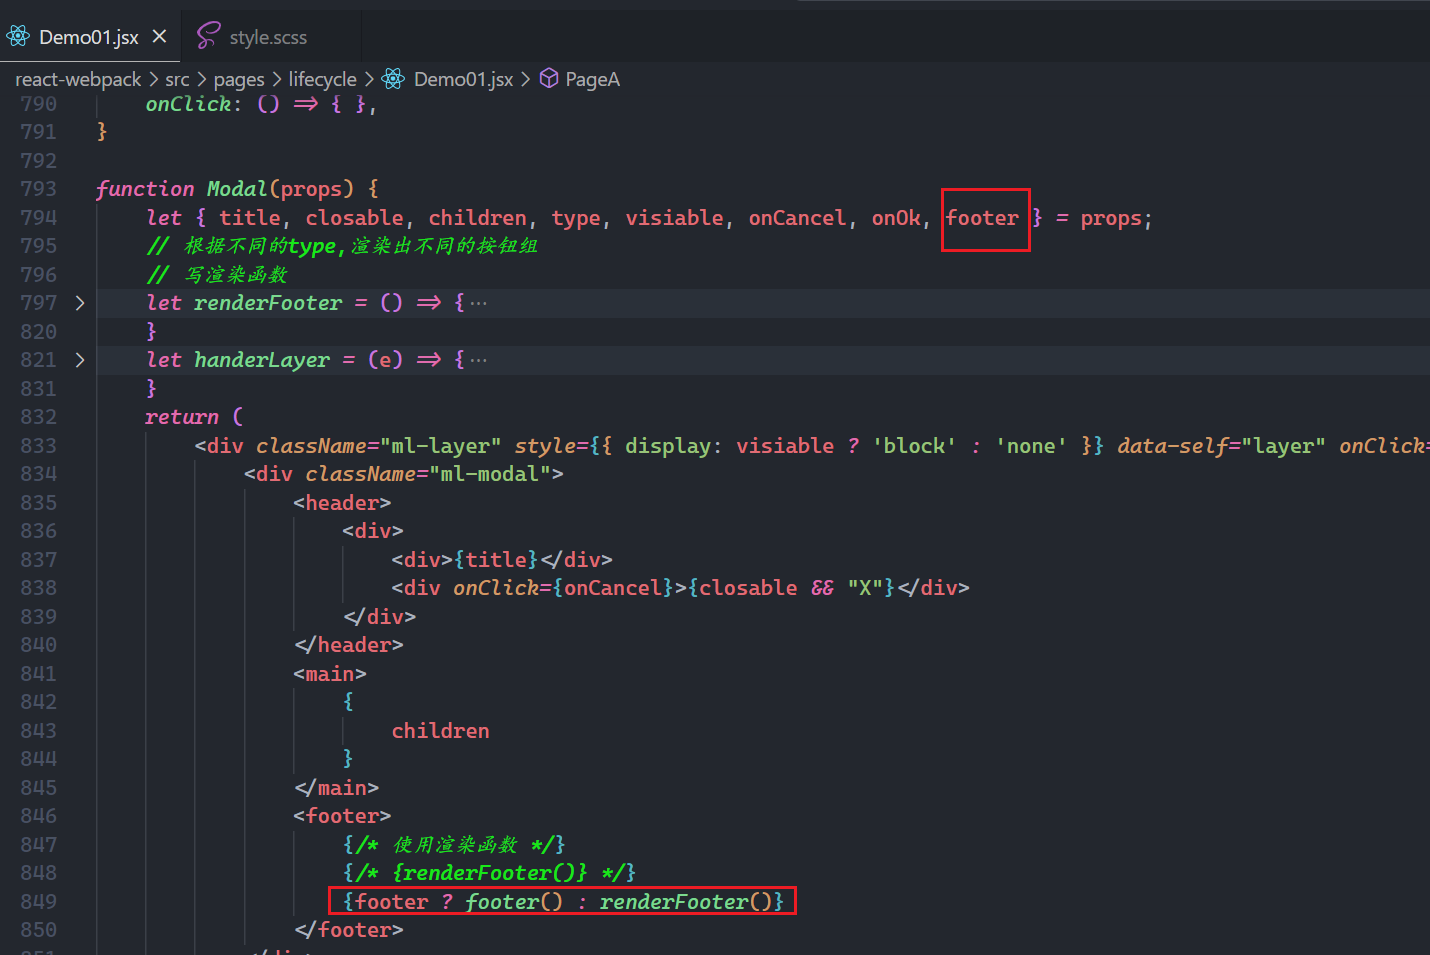
接收footer,使用之,如下:
效果如下:
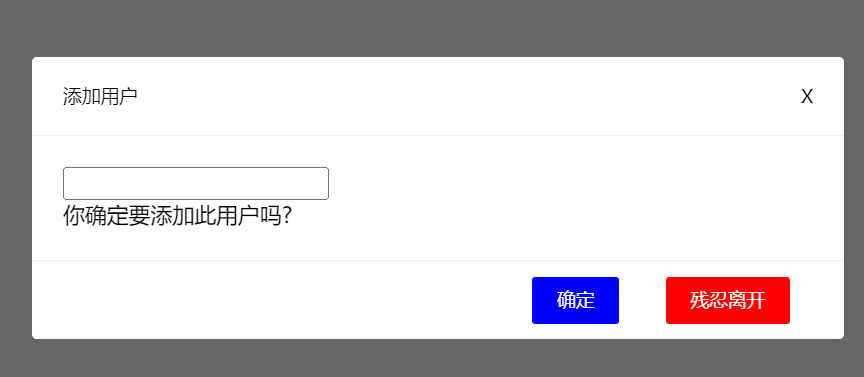
上面我们写的footer,它的值是一个函数,返回jsx视图,这个一个特殊的props,叫 "render props"。就是可以参与组件的视图渲染的props。render props在封装组件时,用的非常多。
代码如下:
import PropTypes from "prop-types"
import "@/assets/style.scss"
import { useState } from "react"

// <Button type="promary">确定</Button>
function Button(props) {
    let { type, children, onClick } = props;
    return (
        <div className="ml-button">
            {/* onClick 叫React的合成事件 */}
            <span className={type} onClick={onClick}>{children}</span>
        </div>
    )
}
Button.propTypes = {
    type: PropTypes.oneOf(["default", "primary", "danger", "info"]),
    children: PropTypes.node,
    onClick: PropTypes.func,
}
Button.defaultProps = {
    type: 'default',
    children: '按钮',
    onClick: () => { },
}

function Modal(props) {
    let { title, closable, children, type, visiable, onCancel, onOk, footer } = props;
    // 根据不同的type,渲染出不同的按钮组
    // 写渲染函数
    let renderFooter = () => {
        let btns = [];
        switch (type) {
            case "confirm":
                btns = [
                    <Button type="primary" key="1" onClick={onOk}>确定</Button>,
                    // Button是组件, onClick是事件函数  是一个特殊的props
                    <Button key="2" onClick={onCancel}>取消</Button>
                ]
                break;
            case "danger":
                btns = [
                    <Button type="danger" key="1" onClick={onOk}>删除</Button>,
                    <Button key="2" onClick={onCancel}>取消</Button>
                ]
                break;
            case "info":
                btns = [
                    <Button type="info" key="1" onClick={onCancel}>我知道了</Button>,
                ]
                break;
        }
        return btns;
    }
    let handerLayer = (e) => {
        // target表示你实打实点击的那个元素
        // console.log(e.target);
        // currentTarget表示点击那个元素所在的最外层元素
        // console.log(e.currentTarget);

        // console.log(e.target.dataset.self);
        if (e.target.dataset.self) {
            onCancel()
        }
    }
    return (
        <div className="ml-layer" style={{ display: visiable ? 'block' : 'none' }} data-self="layer" onClick={handerLayer}>
            <div className="ml-modal">
                <header>
                    <div>
                        <div>{title}</div>
                        <div onClick={onCancel}>{closable && "X"}</div>
                    </div>
                </header>
                <main>
                    {
                        children
                    }
                </main>
                <footer>
                    {/* 使用渲染函数 */}
                    {/* {renderFooter()} */}
                    {footer ? footer() : renderFooter()}
                </footer>
            </div>
        </div>
    )
}
Modal.propTypes = {
    title: PropTypes.elementType, // jsx, string, null,und, func
    closable: PropTypes.bool,
    children: PropTypes.node,
    type: PropTypes.oneOf(["confirm", "danger", "info"]),
    visiable: PropTypes.bool,
    onCancel: PropTypes.func,
    onOk: PropTypes.func,
    footer: PropTypes.func
}

Modal.defaultProps = {
    title: "默认小标题",
    closable: true,
    children: <div>主体内容默认值</div>,
    type: "info",
    visiable: false,
    onCancel: () => { },
    onOk: () => { },
    footer: () => { }
}

function PageA() {
    // 定义一个状态控制弹窗是否显示
    let [visiable, setVisiable] = useState(false)
    let submit = () => {
        setTimeout(() => {
            console.log("submit...");
            console.log("发送ajax请求...");

            setVisiable(false)
        }, 200)
    }
    return (
        <div>
            <button onClick={() => setVisiable(true)}>open modal</button>
            {/* 如果一个props是一个事件函数,建议使用on打头 */}
            <Modal
                title={"添加用户"}
                closable
                type="confirm"
                visiable={visiable}
                onCancel={() => setVisiable(false)}
                onOk={submit}
                footer={
                    () => {
                        return [
                            <Button type='danger' key="1">残忍离开</Button>,
                            <Button type='primary' key="2">确定</Button>
                        ]
                    }
                }
            >
                <div>
                    <input type="text" />
                    <div>你确定要添加此用户吗?</div>
                </div>
            </Modal>
        </div>
    )
}
export default PageA;
2
3
4
5
6
7
8
9
10
11
12
13
14
15
16
17
18
19
20
21
22
23
24
25
26
27
28
29
30
31
32
33
34
35
36
37
38
39
40
41
42
43
44
45
46
47
48
49
50
51
52
53
54
55
56
57
58
59
60
61
62
63
64
65
66
67
68
69
70
71
72
73
74
75
76
77
78
79
80
81
82
83
84
85
86
87
88
89
90
91
92
93
94
95
96
97
98
99
100
101
102
103
104
105
106
107
108
109
110
111
112
113
114
115
116
117
118
119
120
121
122
123
124
125
126
127
128
129
130
131
132
133
134
135
136
137
138
139
140
141
142
143
144
145
146
147
148
149
然后开始拆分,直接代码如下:
import PropTypes from "prop-types"
import "@/assets/style.scss"
import { useState } from "react"

// <Button type="promary">确定</Button>
function Button(props) {
    let { type, children, onClick } = props;
    return (
        <div className="ml-button">
            {/* onClick 叫React的合成事件 */}
            <span className={type} onClick={onClick}>{children}</span>
        </div>
    )
}
Button.propTypes = {
    type: PropTypes.oneOf(["default", "primary", "danger", "info"]),
    children: PropTypes.node,
    onClick: PropTypes.func,
}
Button.defaultProps = {
    type: 'default',
    children: '按钮',
    onClick: () => { },
}

function ModalHeader(props) {
    let { title, closable, onCancel } = props;
    return (
        <div>
            <div>{title}</div>
            <div onClick={onCancel}>{closable && "X"}</div>
        </div>
    )
}
function ModalFooter(props) {
    let { type, onCancel, onOk, footer } = props;
    let renderFooter = () => {
        let btns = [];
        switch (type) {
            case "confirm":
                btns = [
                    <Button type="primary" key="1" onClick={onOk}>确定</Button>,
                    // Button是组件, onClick是事件函数  是一个特殊的props
                    <Button key="2" onClick={onCancel}>取消</Button>
                ]
                break;
            case "danger":
                btns = [
                    <Button type="danger" key="1" onClick={onOk}>删除</Button>,
                    <Button key="2" onClick={onCancel}>取消</Button>
                ]
                break;
            case "info":
                btns = [
                    <Button type="info" key="1" onClick={onCancel}>我知道了</Button>,
                ]
                break;
        }
        return btns;
    }
    return (
        footer ? footer() : renderFooter()
    )
}

function Modal(props) {
    let { children, visiable, onCancel, width } = props;
    let handerLayer = (e) => {
        if (e.target.dataset.self) {
            onCancel()
        }
    }
    return (
        <div className="ml-layer" style={{ display: visiable ? 'block' : 'none' }} data-self="layer" onClick={handerLayer}>
            <div className="ml-modal" style={{ width: `${width}px`, marginLeft: `-${width / 2}px` }}>
                <header>
                    {/* 叫props穿透 */}
                    <ModalHeader {...props}></ModalHeader>
                </header>
                <main>
                    {
                        children
                    }
                </main>
                <footer>
                    <ModalFooter {...props}></ModalFooter>
                </footer>
            </div>
        </div>
    )
}

Modal.propTypes = {
    title: PropTypes.elementType, // jsx, string, null,und, func
    closable: PropTypes.bool,
    children: PropTypes.node,
    type: PropTypes.oneOf(["confirm", "danger", "info"]),
    visiable: PropTypes.bool,
    onCancel: PropTypes.func,
    onOk: PropTypes.func,
    footer: PropTypes.func,
    width: PropTypes.oneOfType([
        PropTypes.number,
        PropTypes.string
    ])
}

Modal.defaultProps = {
    title: "默认小标题",
    closable: true,
    children: <div>主体内容默认值</div>,
    type: "info",
    visiable: false,
    onCancel: () => { },
    onOk: () => { },
    footer: () => { },
    with: 520
}

function PageA() {
    // 定义一个状态控制弹窗是否显示
    let [visiable, setVisiable] = useState(false)
    let submit = () => {
        setTimeout(() => {
            console.log("submit...");
            console.log("发送ajax请求...");

            setVisiable(false)
        }, 200)
    }
    return (
        <div>
            <button onClick={() => setVisiable(true)}>open modal</button>
            {/* 如果一个props是一个事件函数,建议使用on打头 */}
            <Modal
                title={"添加用户"}
                closable
                type="confirm"
                visiable={visiable}
                onCancel={() => setVisiable(false)}
                onOk={submit}
                footer={
                    () => {
                        return [
                            <Button type='danger' key="1" onClick={() => setVisiable(false)}>残忍离开</Button>,
                            <Button type='primary' key="2">确定</Button>
                        ]
                    }
                }
                width={800}
            >
                <div>
                    <input type="text" />
                    <div>你确定要添加此用户吗?</div>
                </div>
            </Modal>
        </div>
    )
}
export default PageA;
2
3
4
5
6
7
8
9
10
11
12
13
14
15
16
17
18
19
20
21
22
23
24
25
26
27
28
29
30
31
32
33
34
35
36
37
38
39
40
41
42
43
44
45
46
47
48
49
50
51
52
53
54
55
56
57
58
59
60
61
62
63
64
65
66
67
68
69
70
71
72
73
74
75
76
77
78
79
80
81
82
83
84
85
86
87
88
89
90
91
92
93
94
95
96
97
98
99
100
101
102
103
104
105
106
107
108
109
110
111
112
113
114
115
116
117
118
119
120
121
122
123
124
125
126
127
128
129
130
131
132
133
134
135
136
137
138
139
140
141
142
143
144
145
146
147
148
149
150
151
152
153
154
155
156
157
158
159
160
什么是组合?
组合是React组件化的设计模式。也就是研究如何封装一个组件,步骤如下:
- 第一步:根据UI设计图拆解组件。
- 第二步:把这个独立的组件单独进行封装。
- 第三步:利用props把组件串联起来。
