13-uniapp实战
# 一,环境搭建
# 1,软件安装与环境搭建
之前开发小程序,使用的是原生的小程序技术。在真实开发中,使用最多的还是Vue或React。在使用vue开发小程序,最好的解决方案就是uniapp。使用uniapp大部分情况都开发小程序。
官网:https://uniapp.dcloud.net.cn/
下载HBuilder X,如下:
下载完后,直接解压,不需要安装,如下:
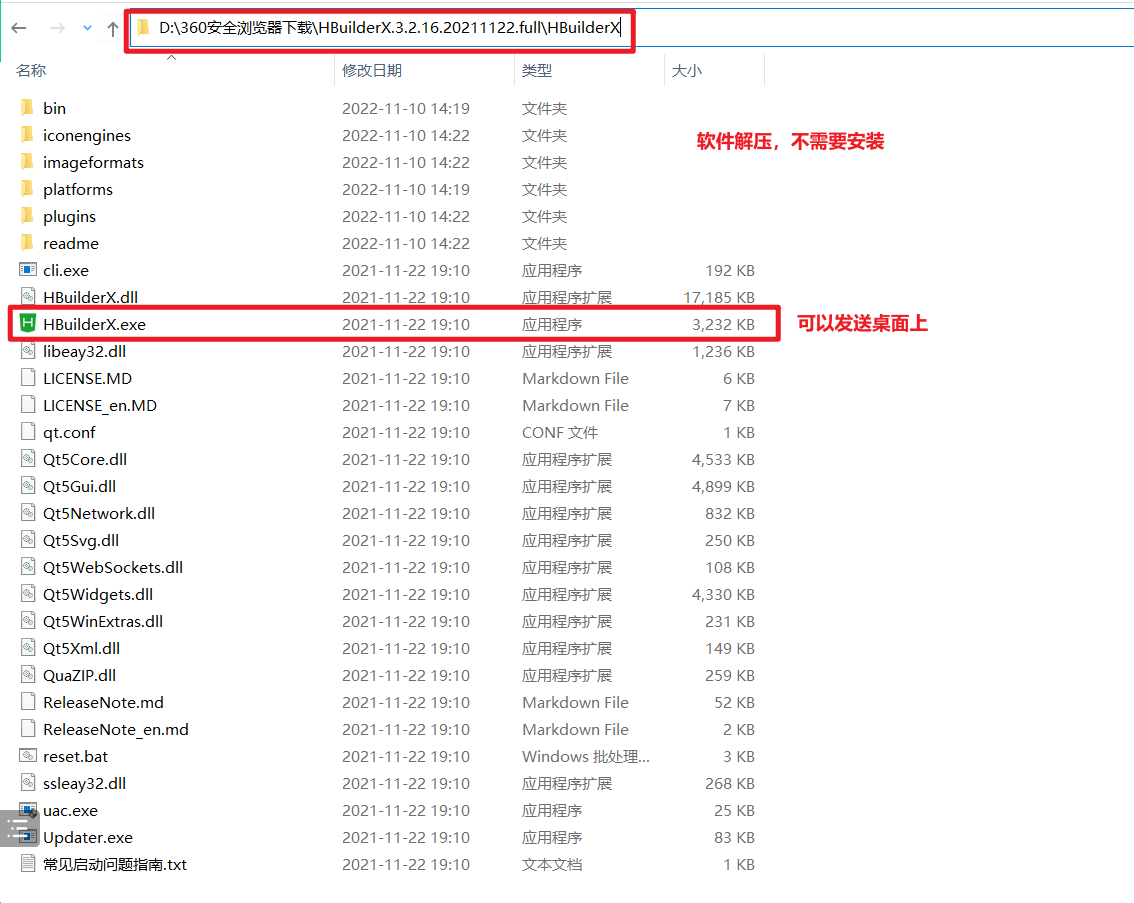
发送到桌面上,如下:
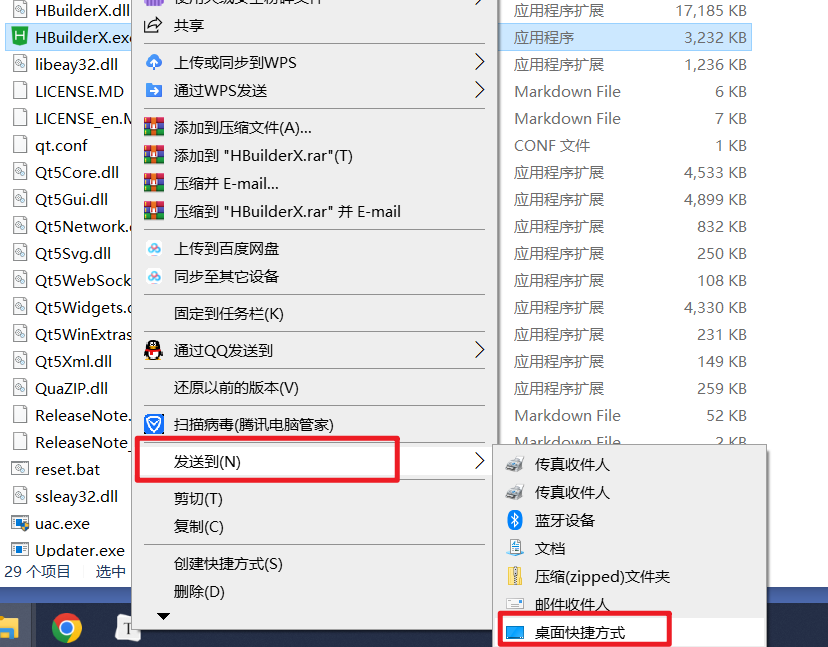
在桌面上,就有快捷方式,如下:
双击打开软件,如下:
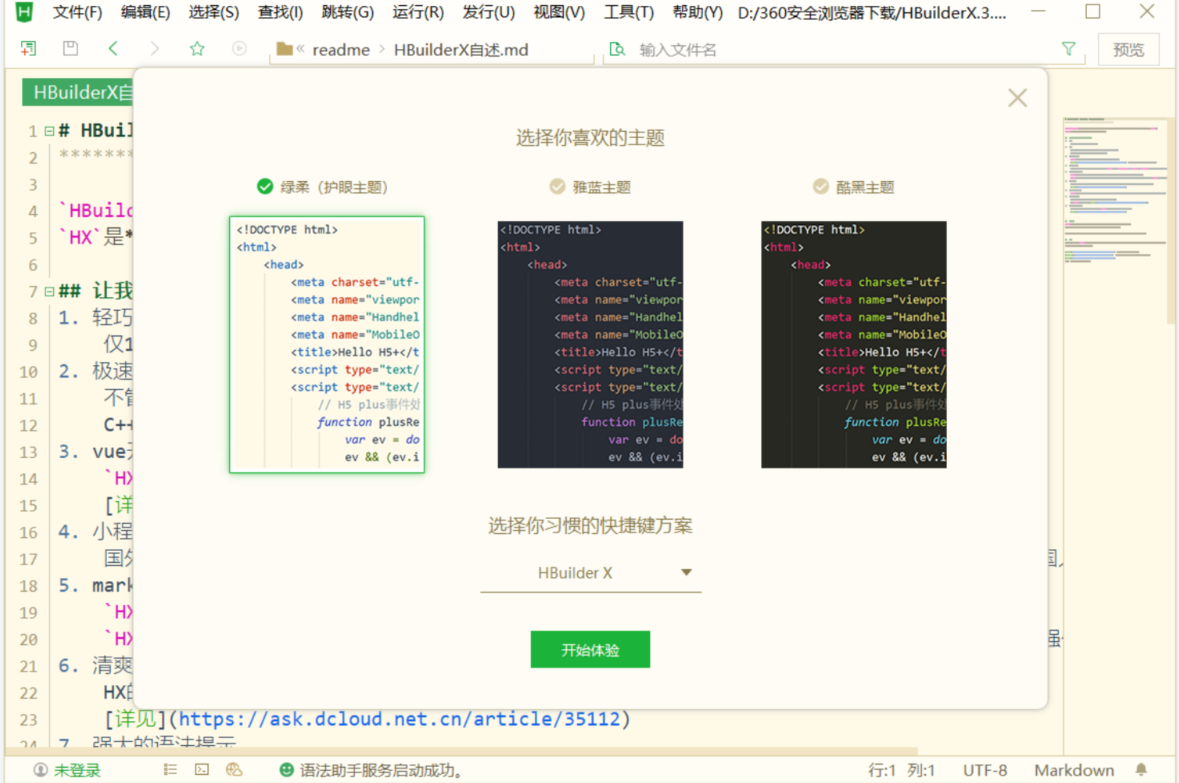
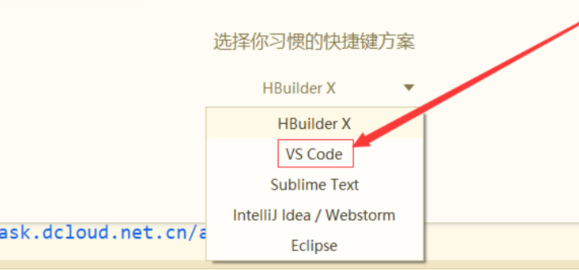
选择快捷键方案,选择VS Code快捷键:
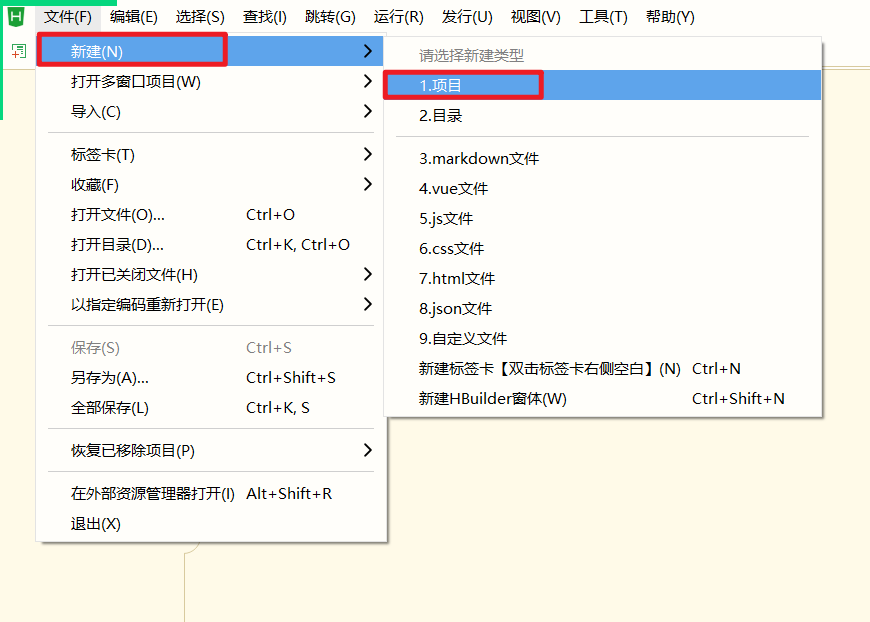
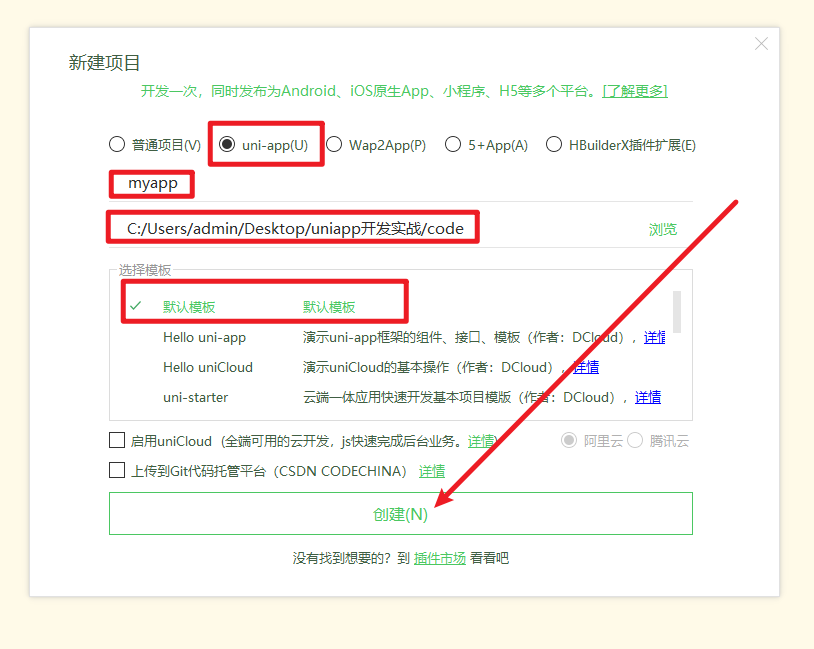
创建一个,项目,如下:
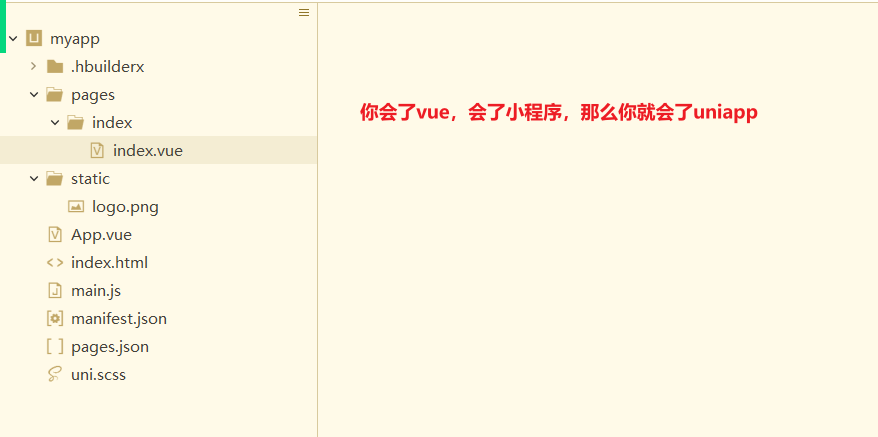
创建出来的项目,如下:
把项目运行起来,如下:
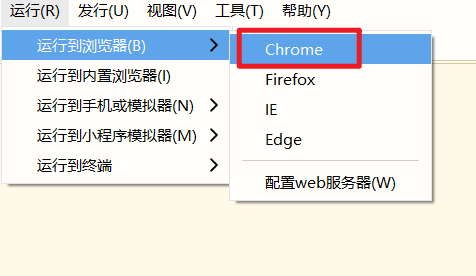
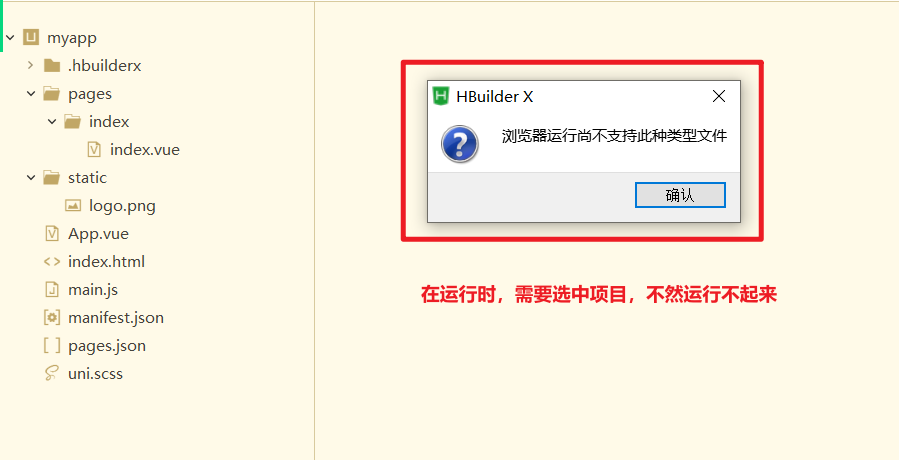
选中项目,再次运行,如下:
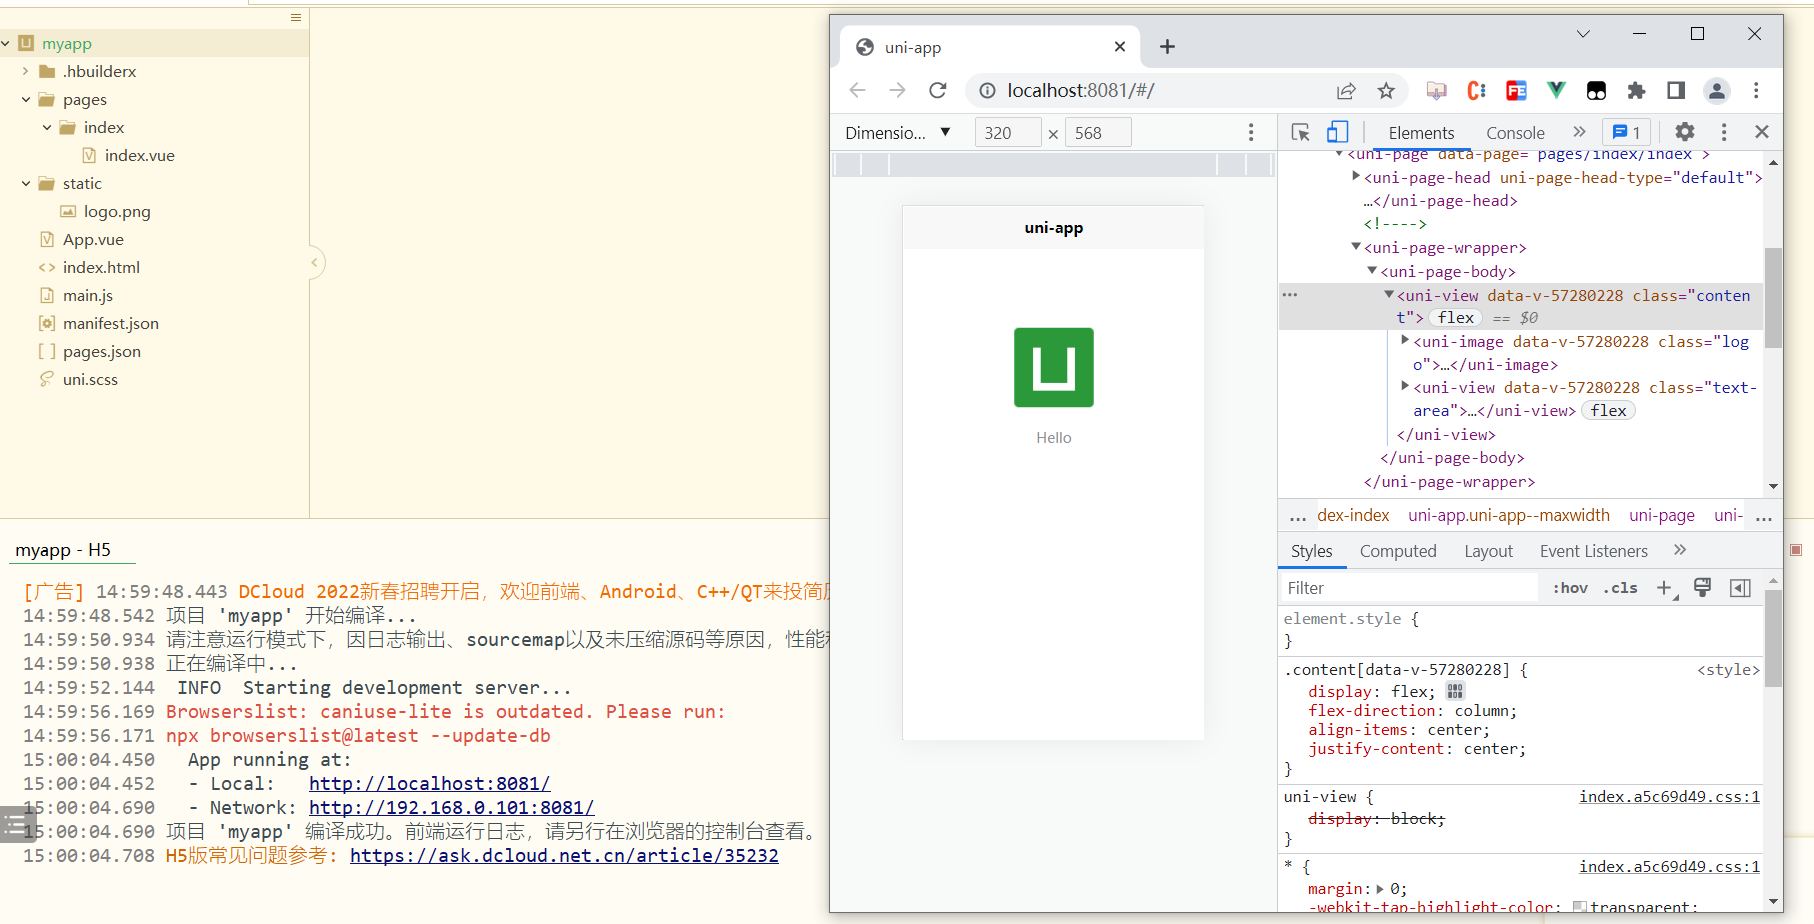
还需要告诉HbuilderX,谷歌浏览器地址,如下:

想让项目在小程序中运行,你需要先告诉HbuilderX,小程序开发者工具,在什么地方,如下:

现在需要打开微信开发者工具,如下:
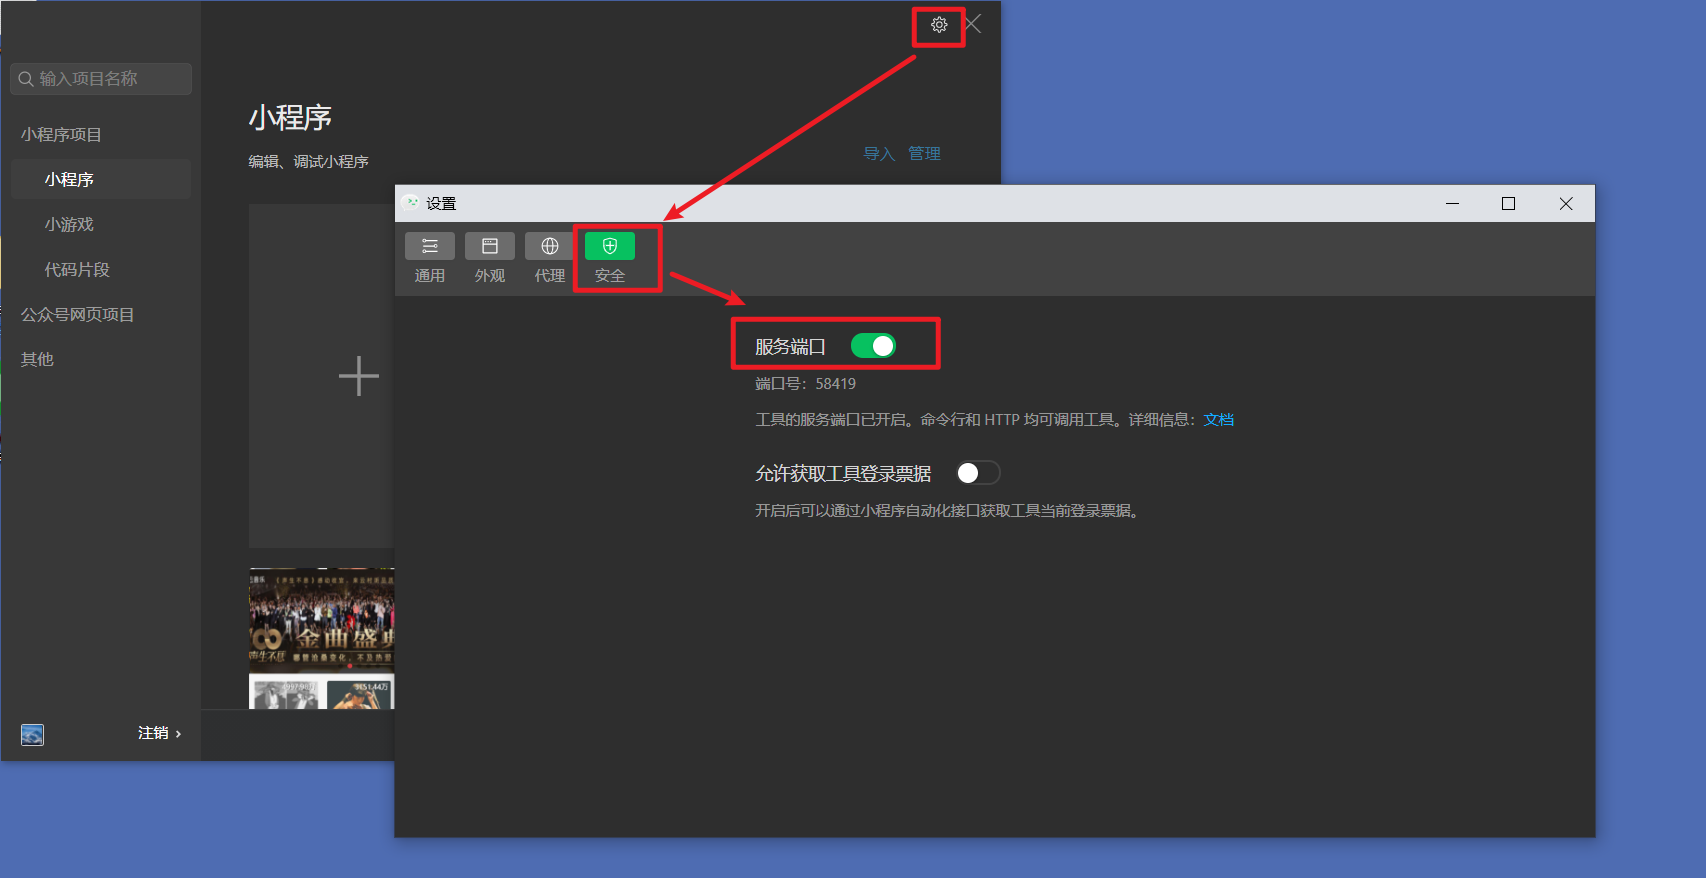
此时,就可以把项目,运行到小程序中,如下:
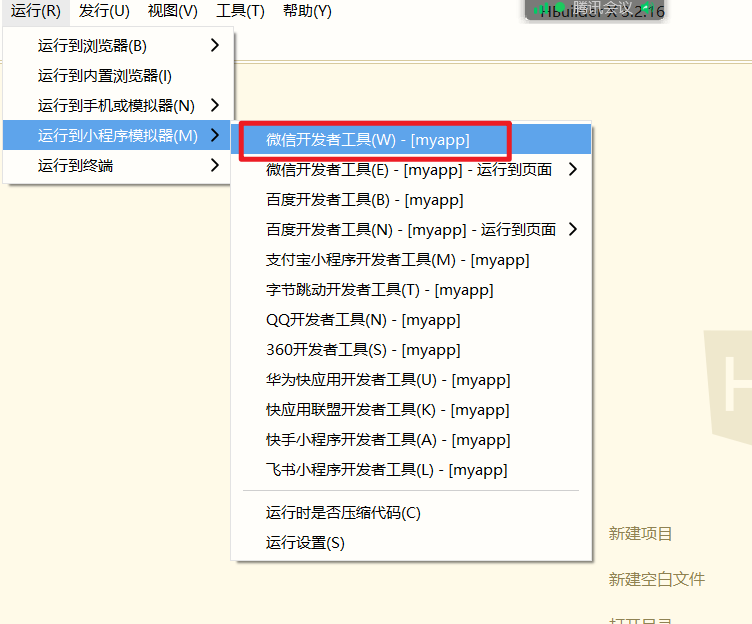
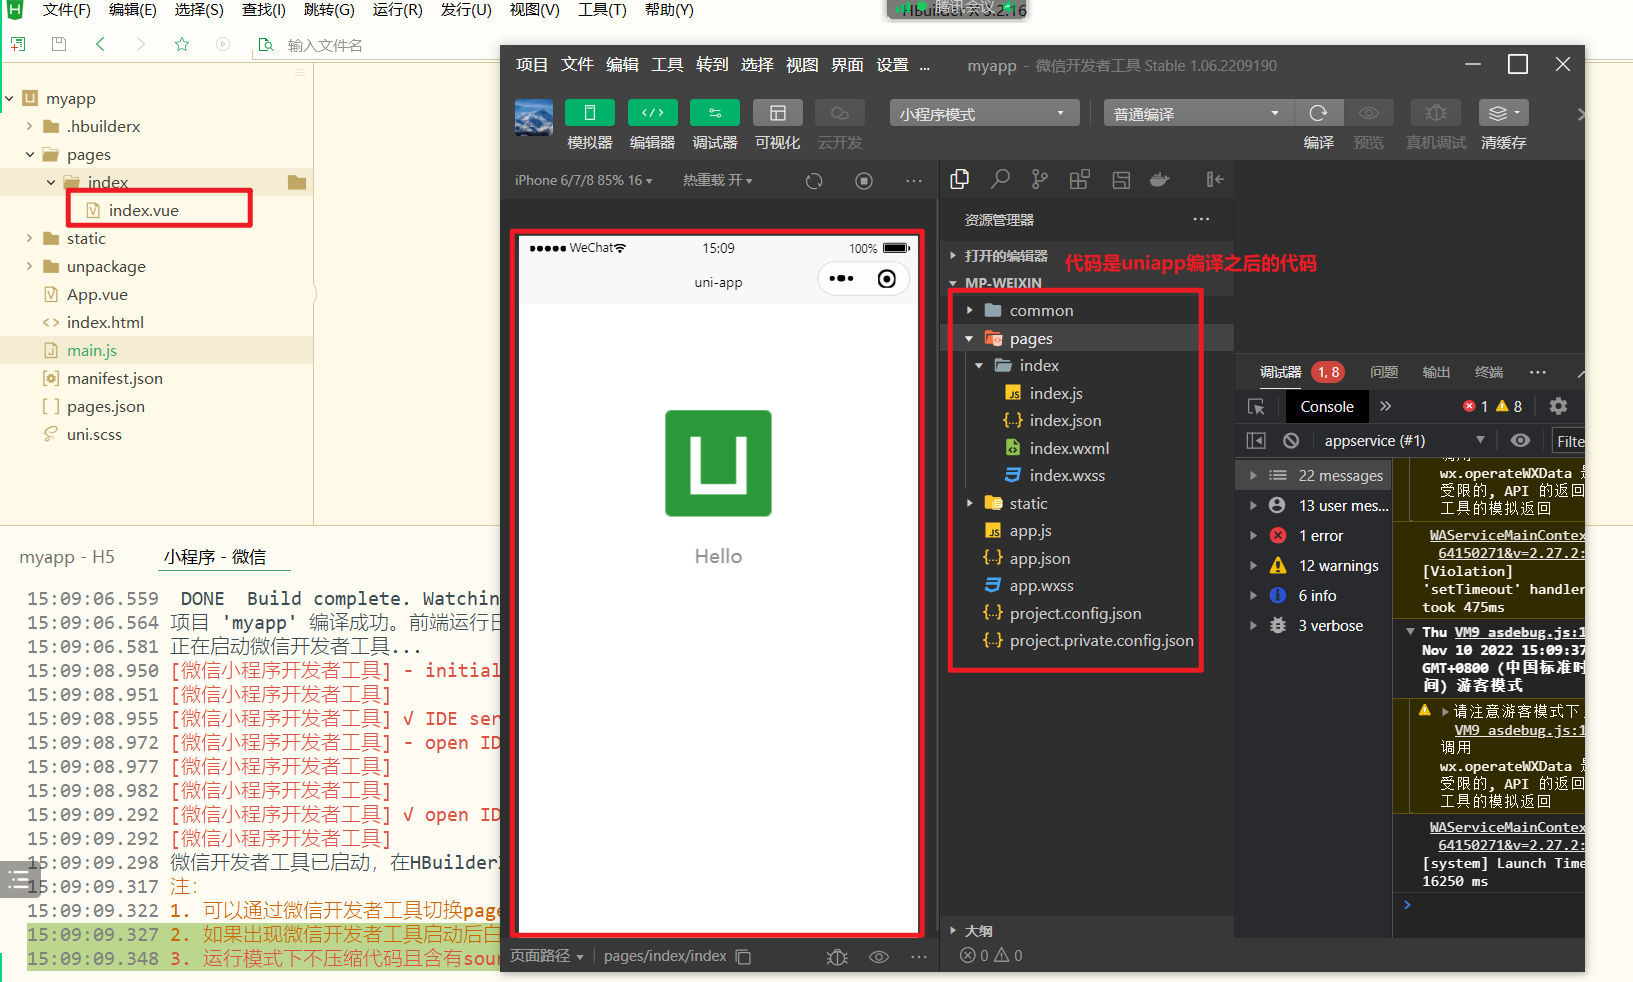
如果你想在支付宝小程序中运行,你就去下载支付宝小程序....
# 2,插件安装
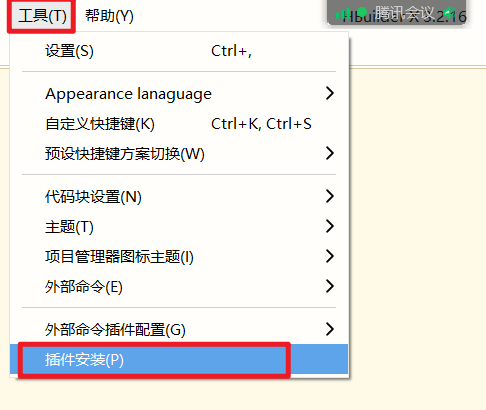
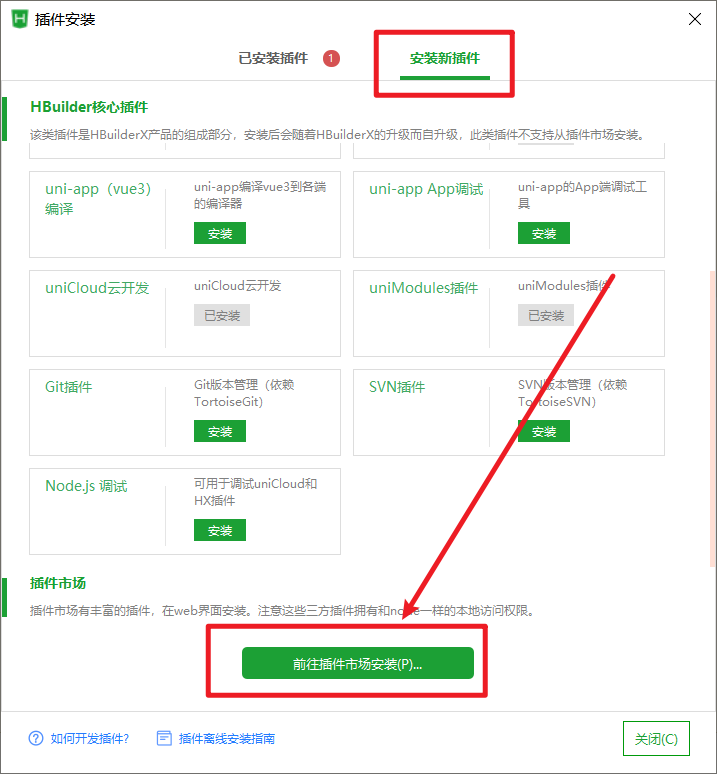
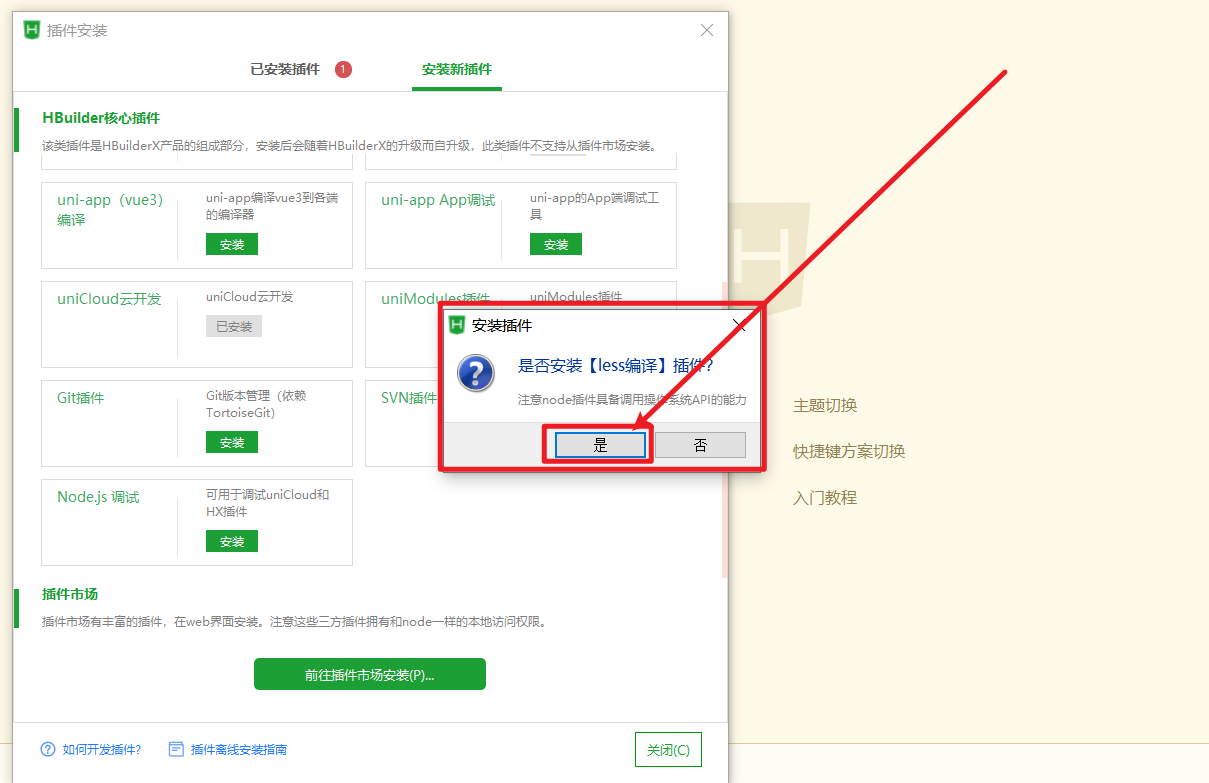
点击插件安装,如下:
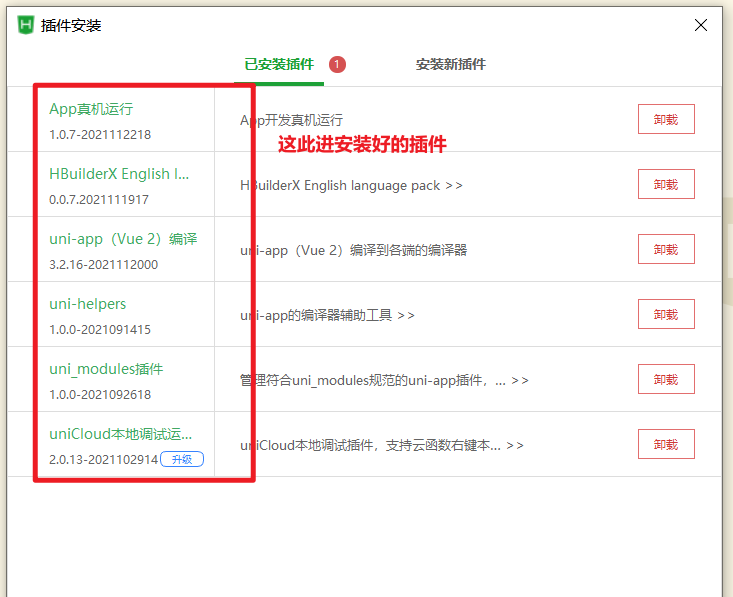

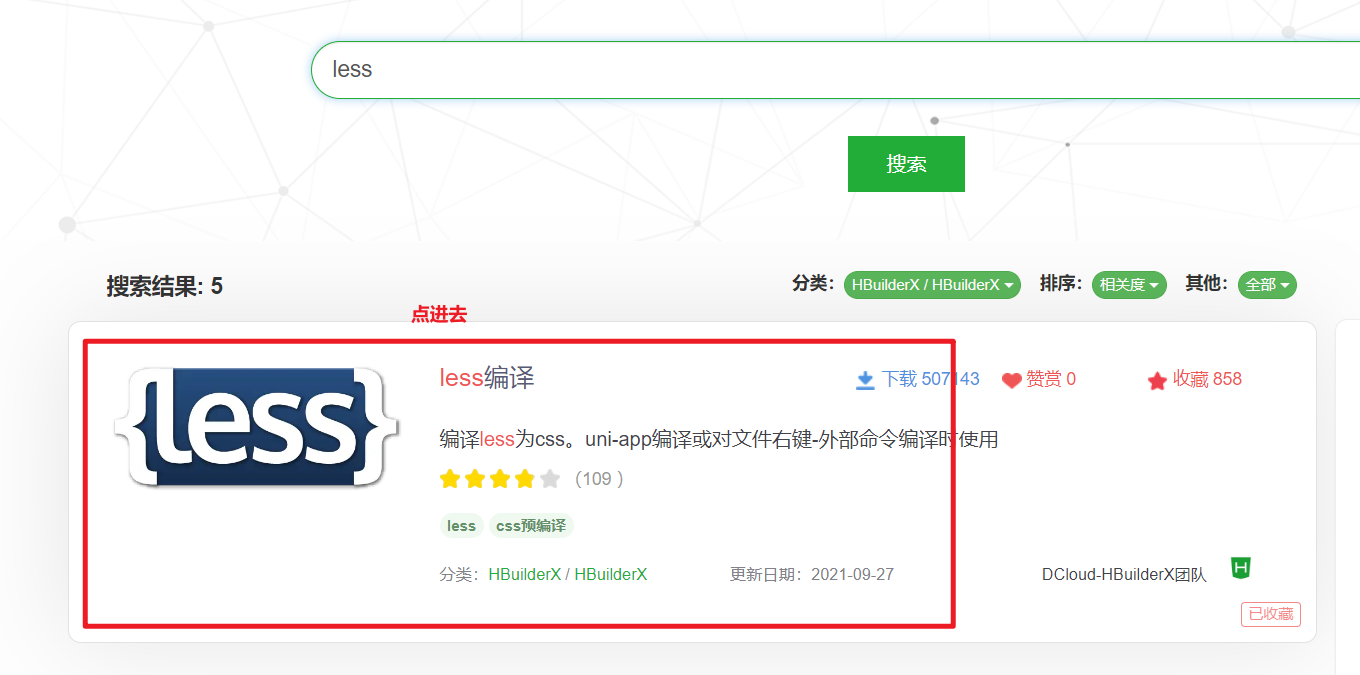
我已经注册过了,并登录了,然后在搜索框中,就可以搜索我们需要的插件,如下:

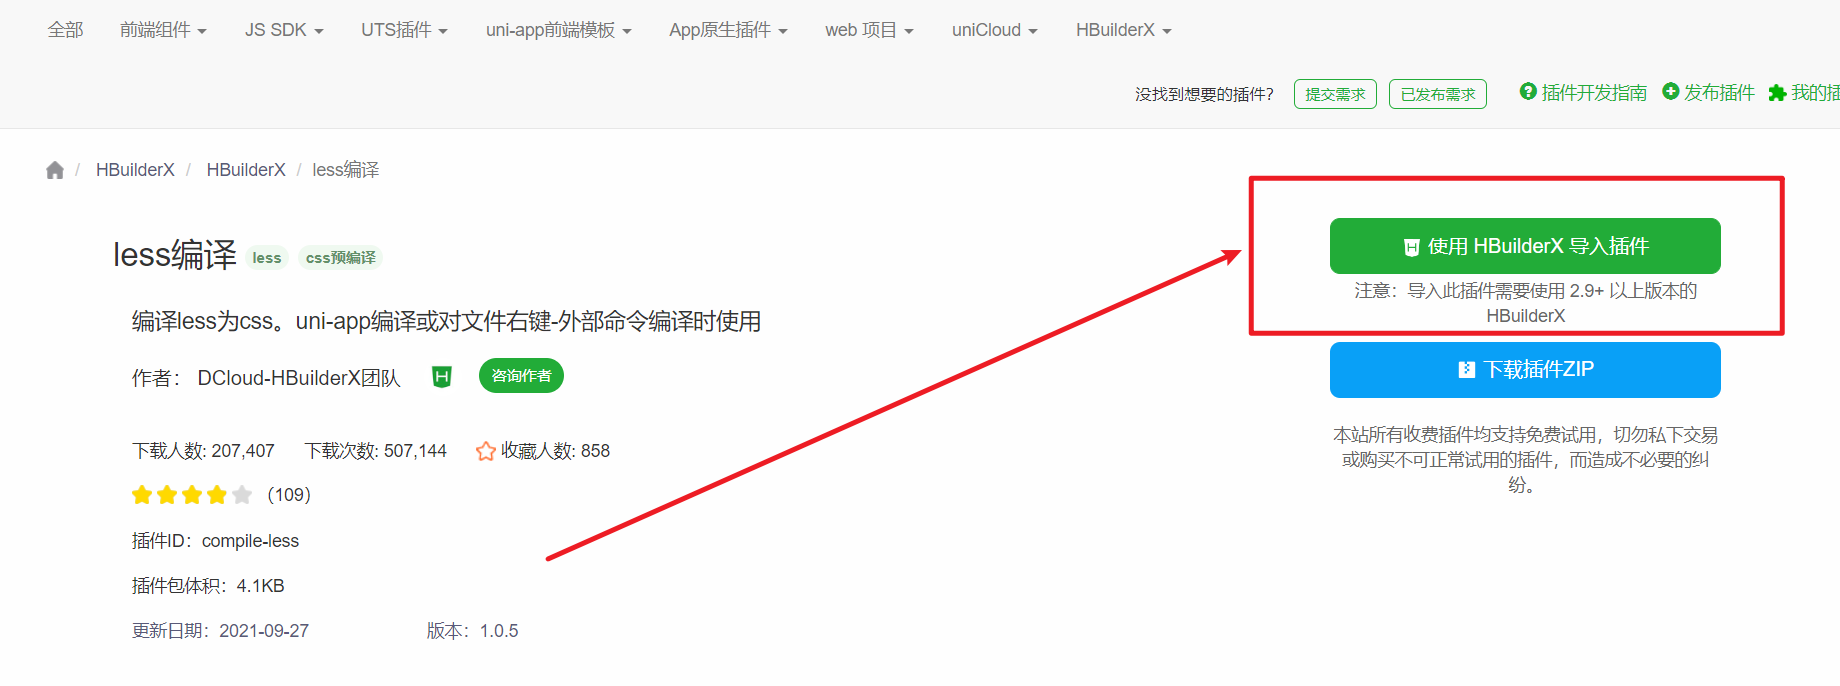
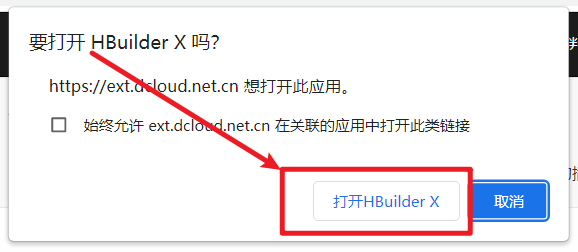
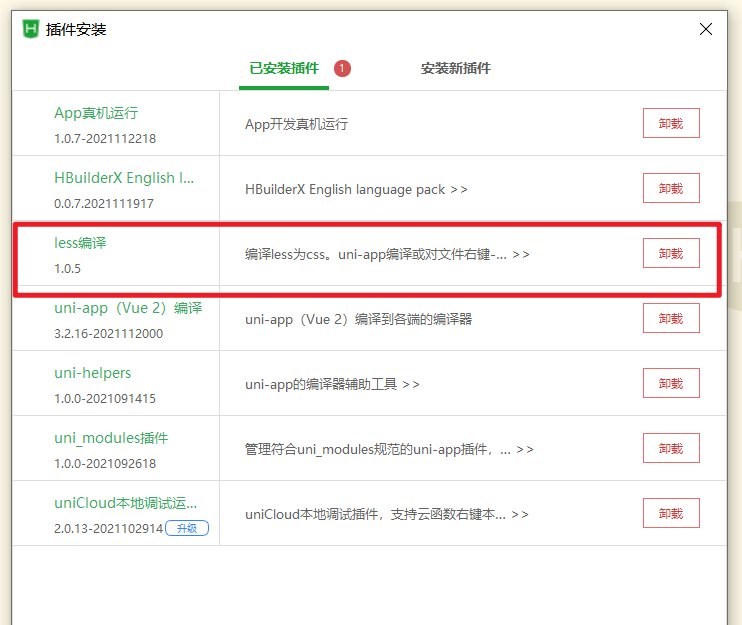
安装完毕后,在已安装插件中,就有插件了,如下:
# 二,开始项目
# 1,创建项目
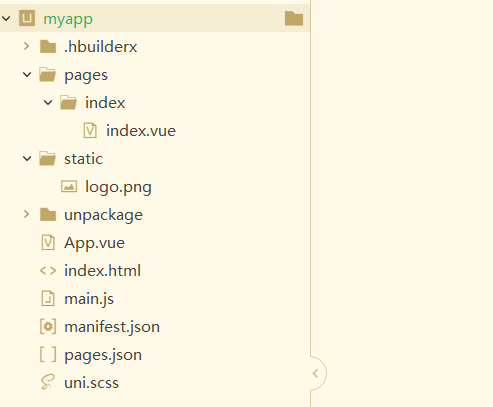
上面我们已创建过项目了,如下:
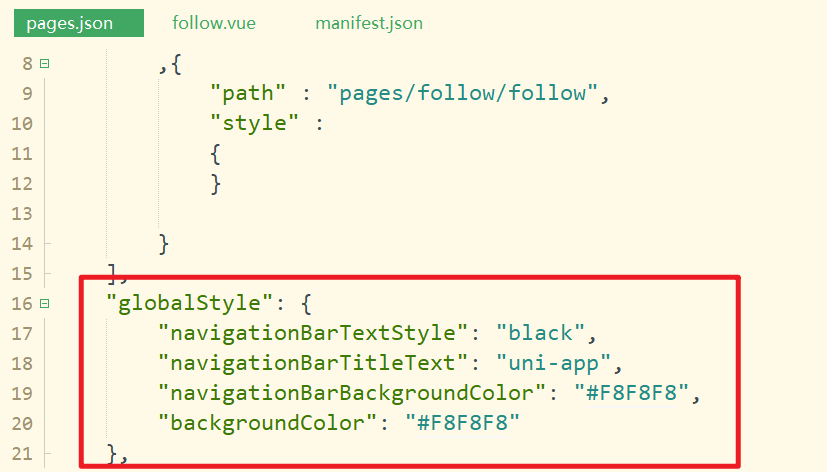
在pages.json中做一些配置,如下:
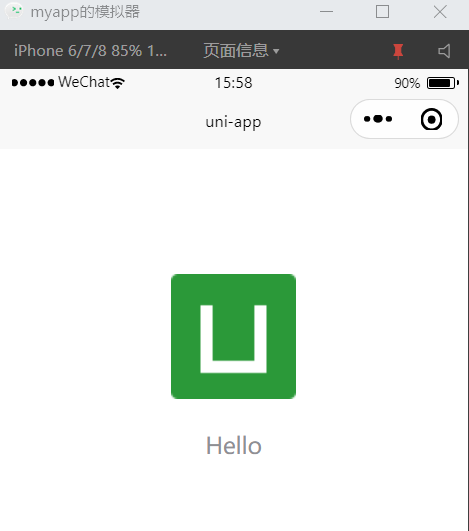
效果如下:
globalStyle配置(参考就行):
"globalStyle": {
    "navigationBarTextStyle": "white",
    "navigationBarTitleText": "uni-app",
    "navigationBarBackgroundColor": "#F8F8F8",
    "backgroundColor": "#F8F8F8"
},
2
3
4
5
6
创建一个页面,如下:
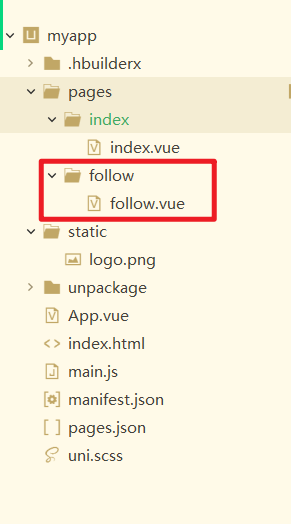
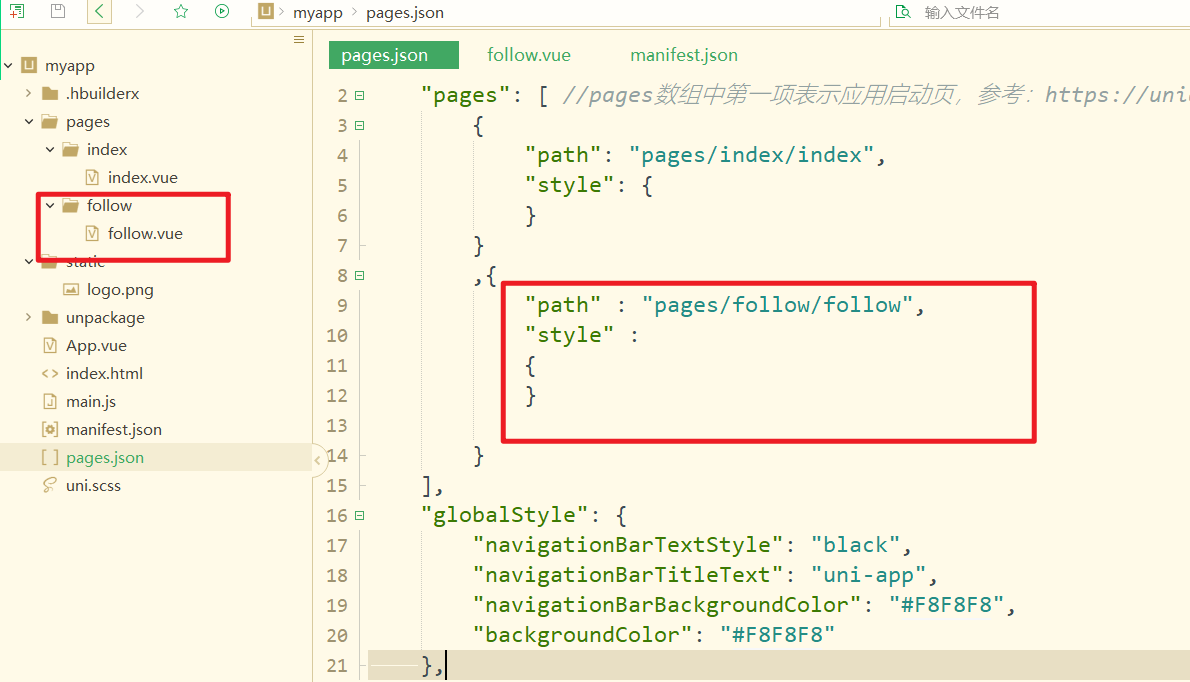
创建完毕后,在pages.json中,它会配置好,如下:
然后配置tabBar,如下:
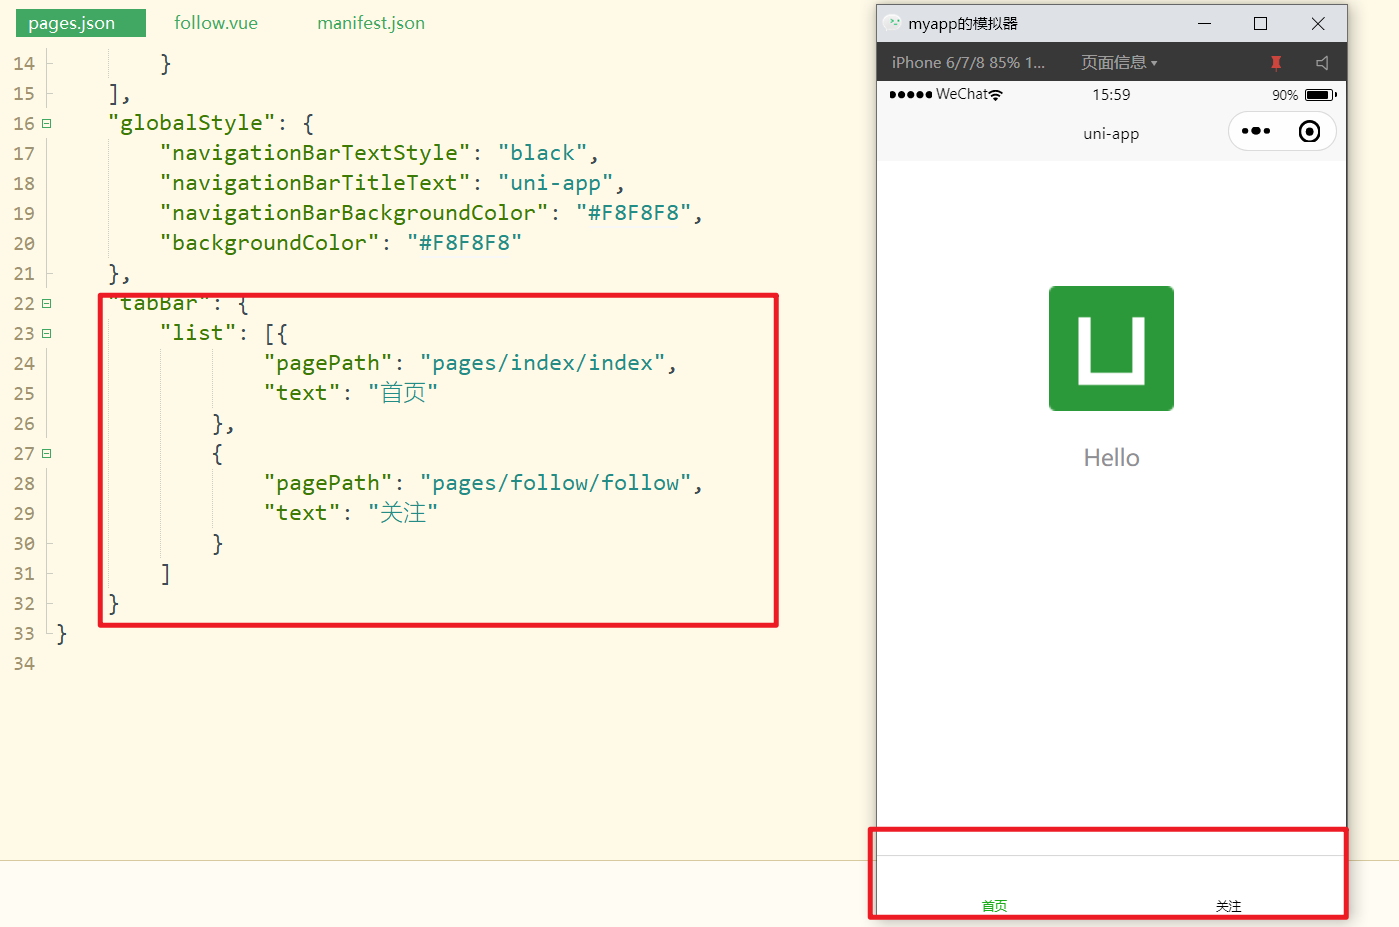
tabBar配置:
"tabBar": {
    "list": [{
            "pagePath": "pages/index/index"
        },
        {
            "pagePath": "pages/follow/follow"
        }
    ]
}
2
3
4
5
6
7
8
9
# 2,Tabbar实现
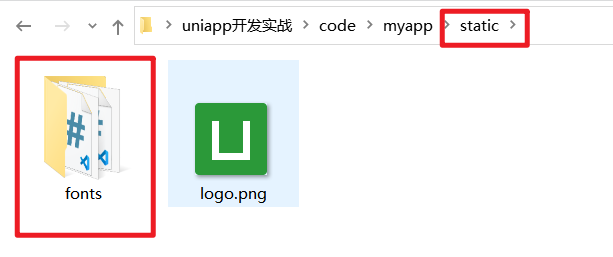
在项目中,我们需要使用字体图标,引入字体图标,如下:
在代码中引用之,如下:
创建Tabbar组件,如下:

在首页面中引用之,如下:
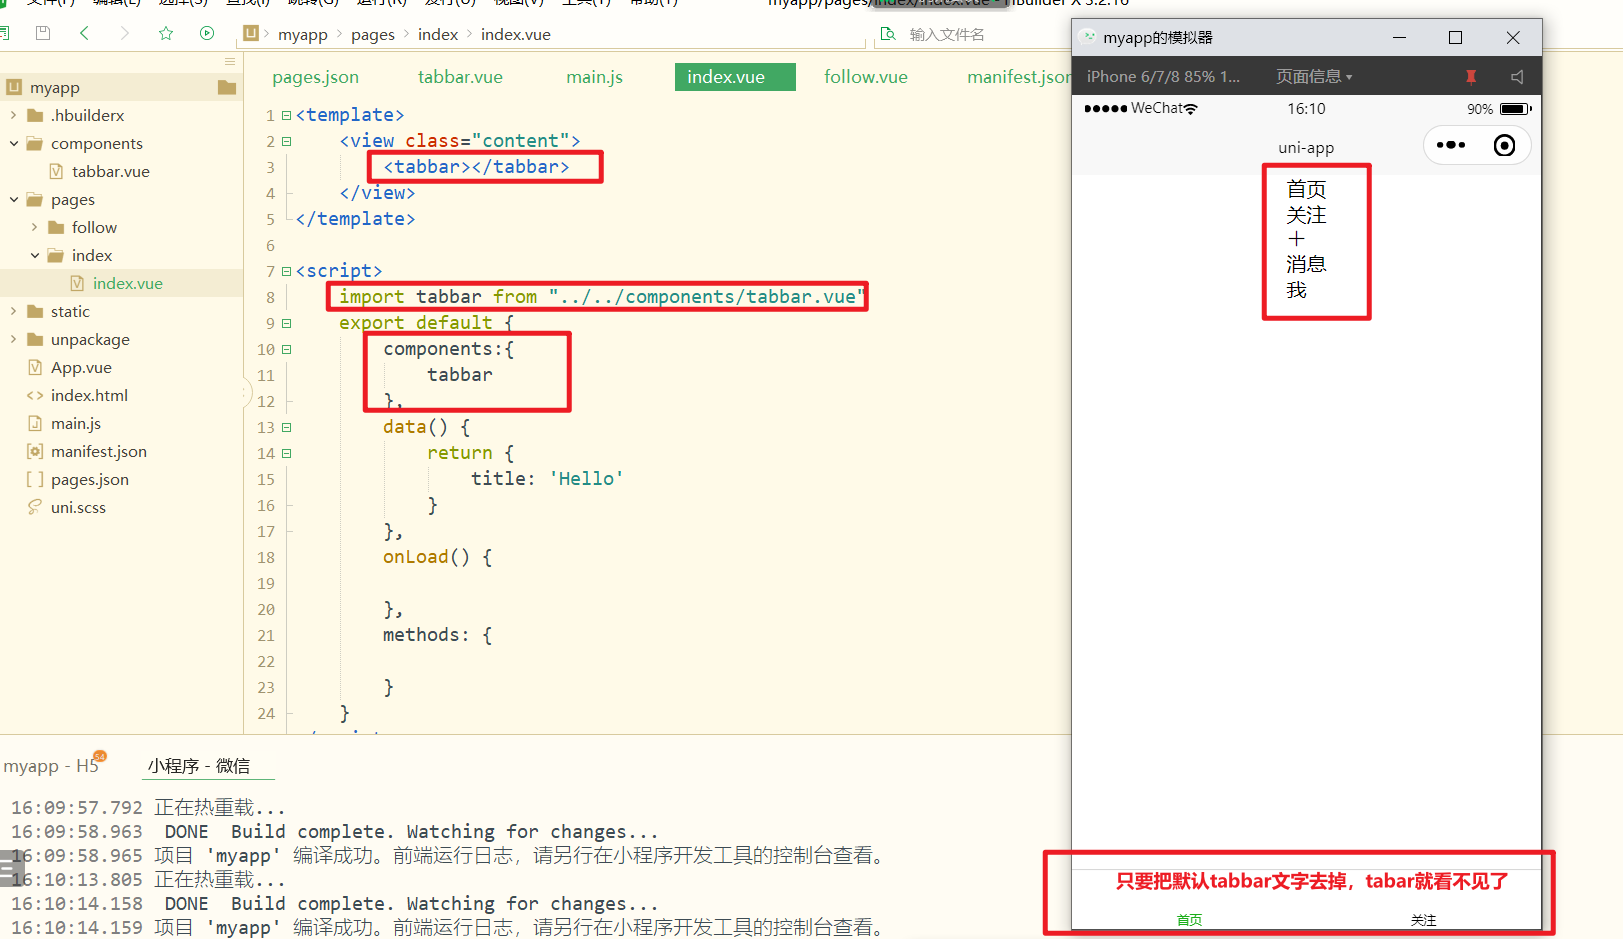
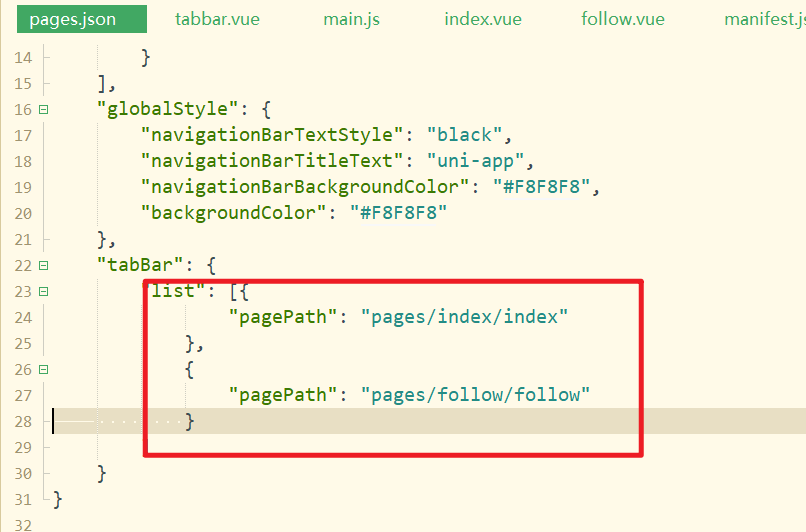
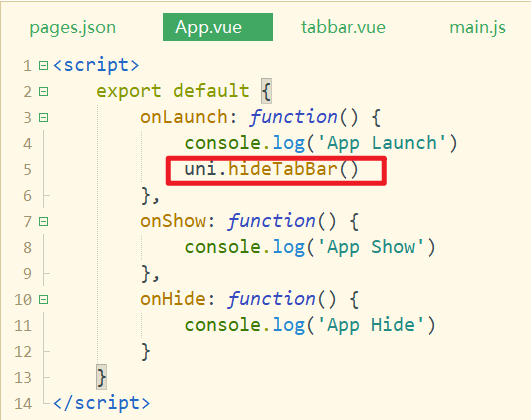
把默认tabbar文字删除掉,并且,需要隐藏tabbar,如下:
给我们的tabbar写样式,如下:
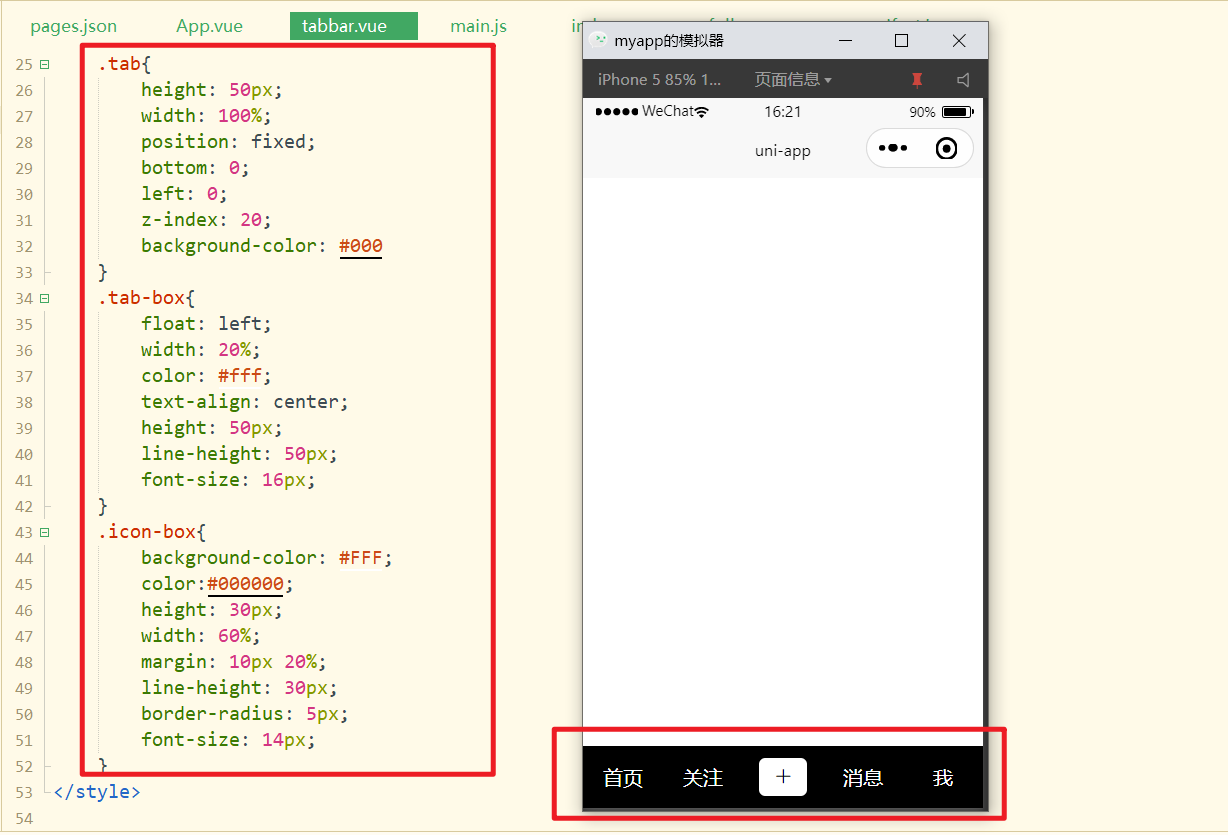
# 3,顶部导航栏开发
现在顶部导航栏,还是人家内置的,需要隐藏掉,换成我们的自己的顶部导航,隐藏如下:
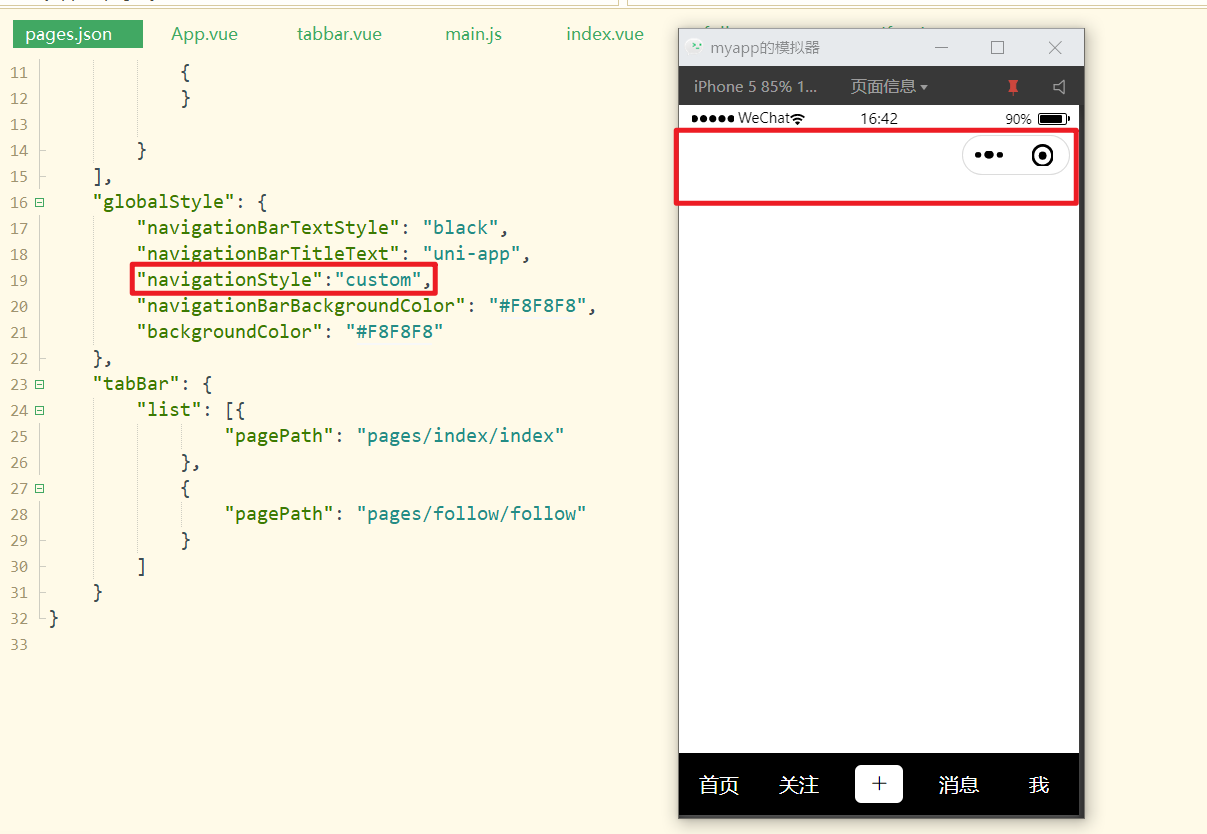
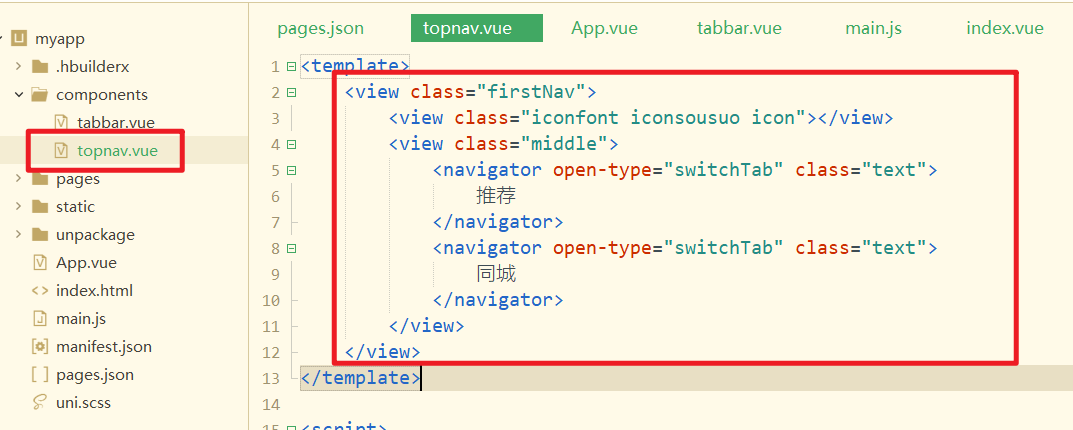
创建一个顶部导航条组件,如下:
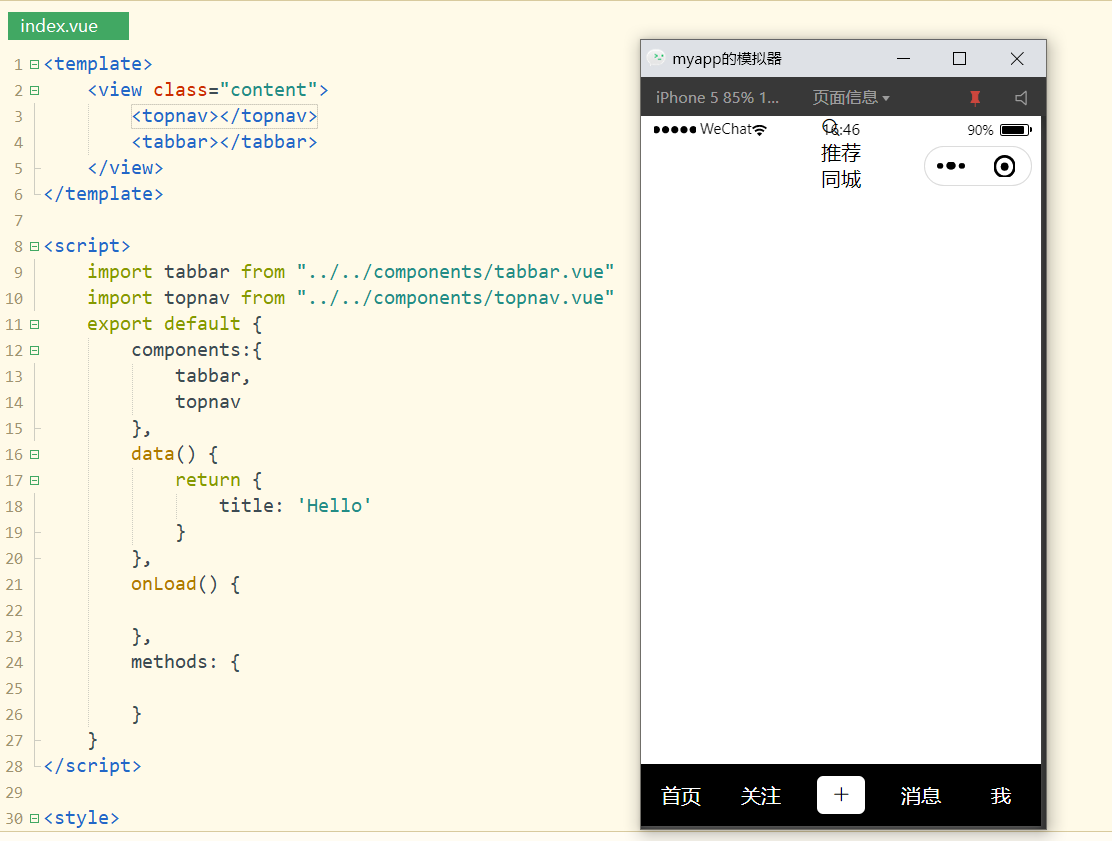
在页面中引入,注册,使用之,如下:
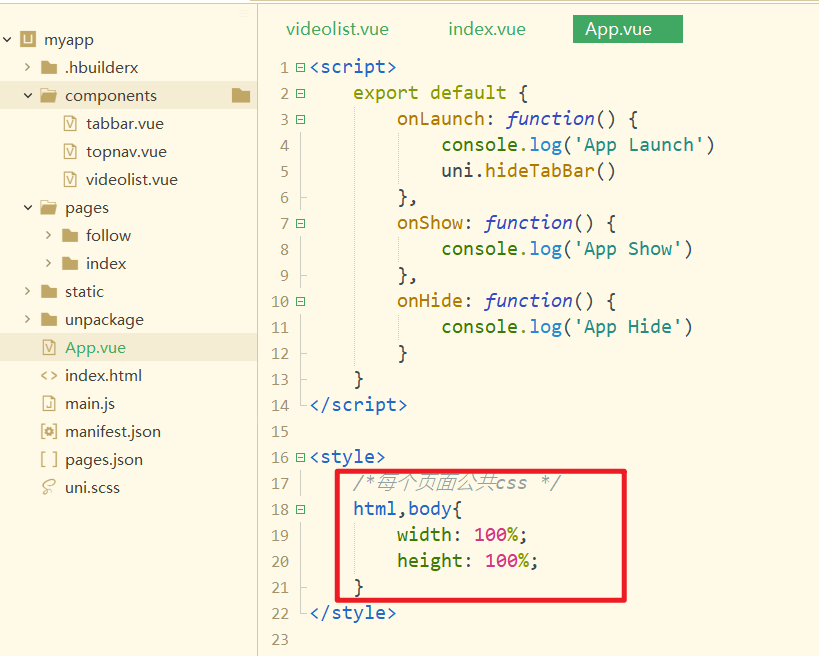
写样式,如下:
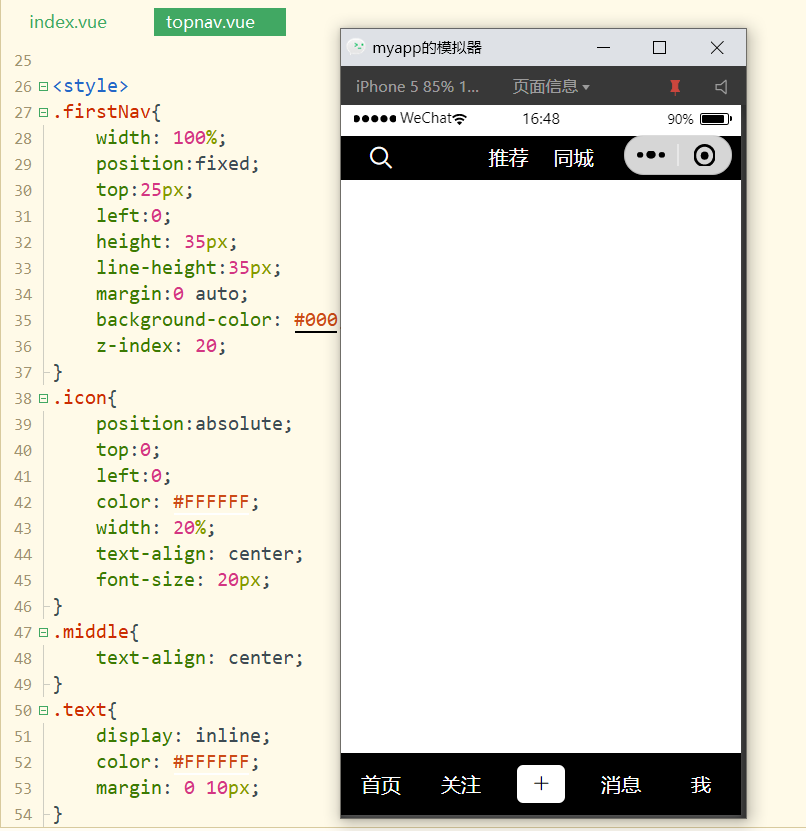
对应的样式,如下:
<style>.firstNav {
    width: 100%;
    position: fixed;
    top: 25px;
    left: 0;
    height: 35px;
    line-height: 35px;
    background-color: #000;
    margin: 0 auto;
    z-index: 20;
}

.icon {
    position: absolute;
    top: 0;
    left: 0;
    color: #FFFFFF;
    width: 20%;
    text-align: center;
    font-size: 20px;
}

.middle {
    text-align: center;
}

.text {
    display: inline;
    color: #FFFFFF;
    margin: 0 10px;
}

</style>
2
3
4
5
6
7
8
9
10
11
12
13
14
15
16
17
18
19
20
21
22
23
24
25
26
27
28
29
30
31
32
33
# 4,视频列表组件开发
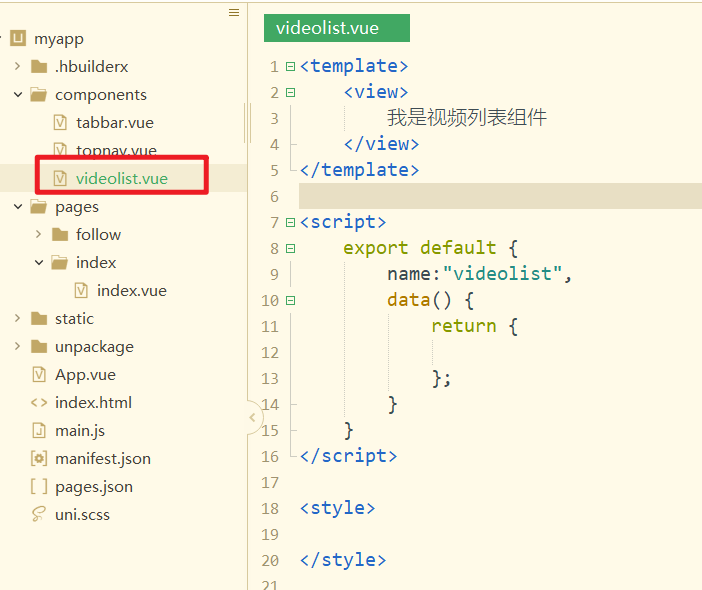
中间区域,就是视频列表组件,创建对应的组件,如下:
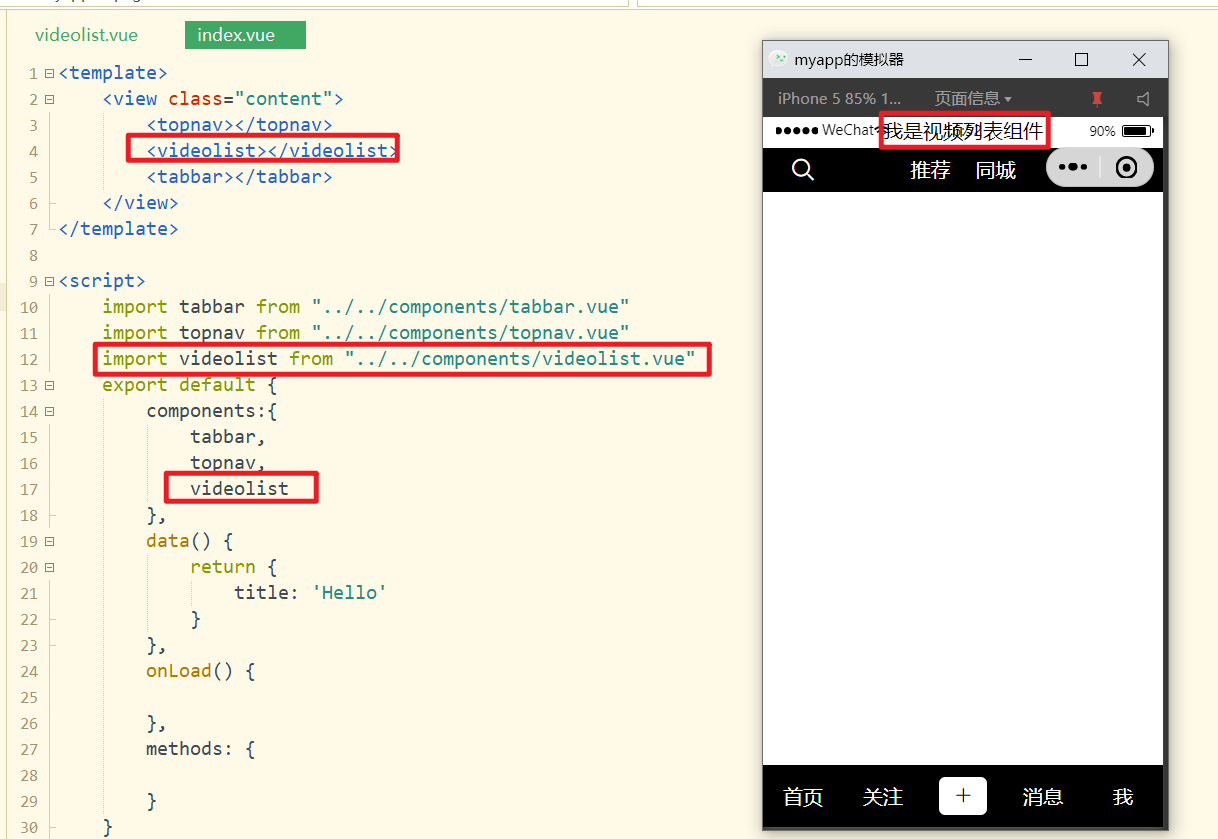
在页面中引入,注册,并使用之,如下:
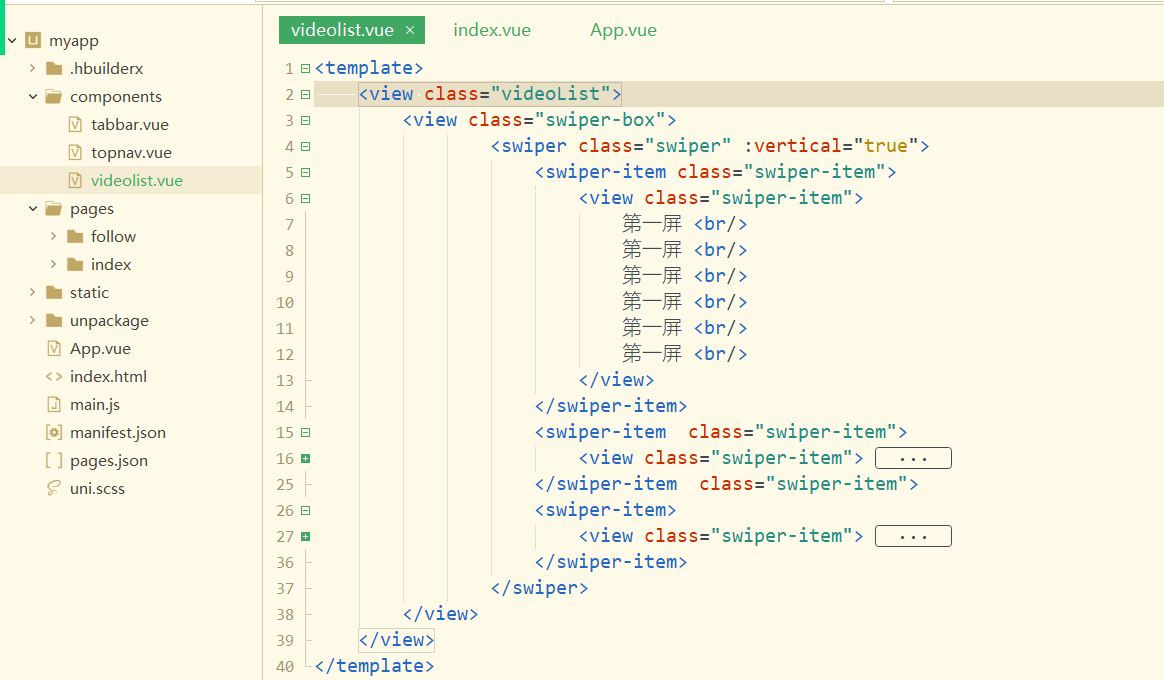
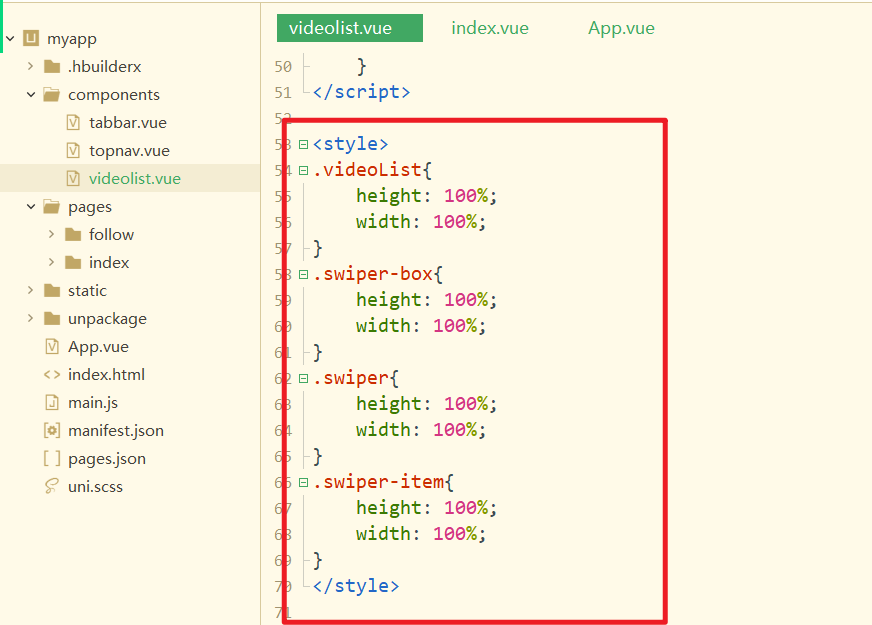
在视频列表组件中,使用swiper,如下:
对应的样式,如下:
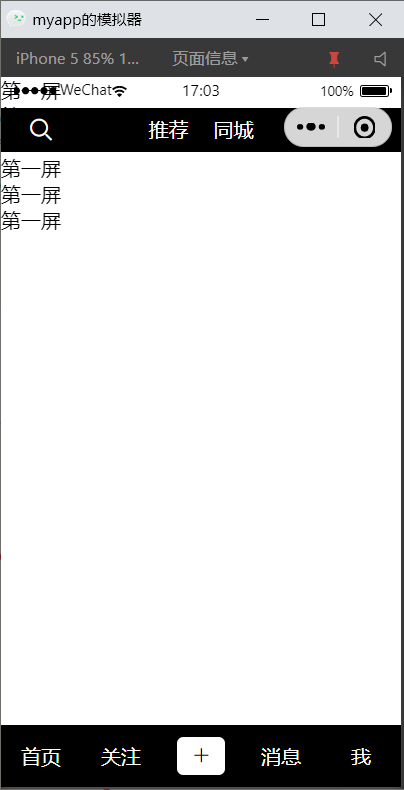
效果如下:
# 5,视频播放组件开发
免费视频接口:https://api.aa1.cn/
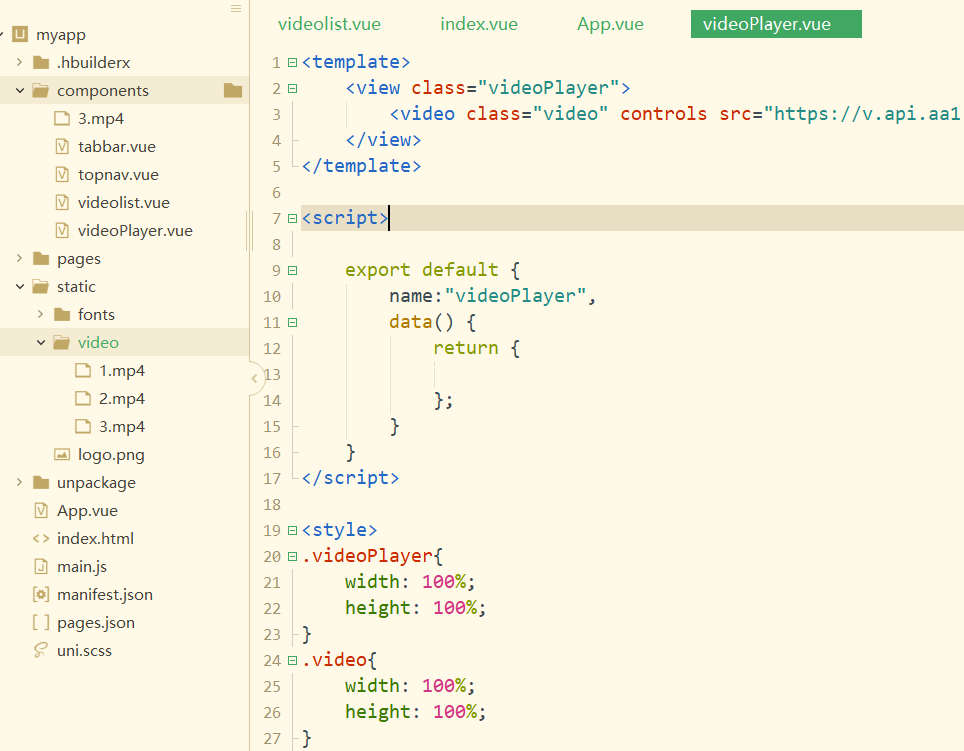
创建项目播放组件,给测试本地视频,不OK,直接使用网络上的视频,如下:
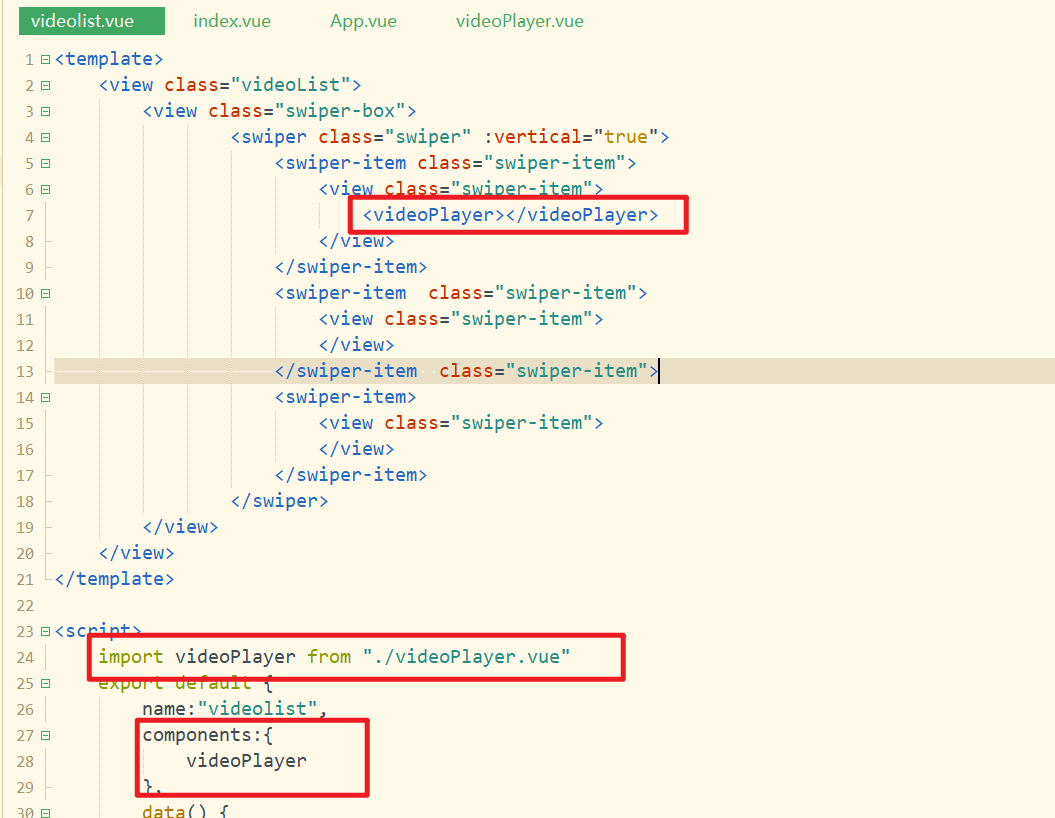
在视频列表组件中,引入,注册,使用之,如下:
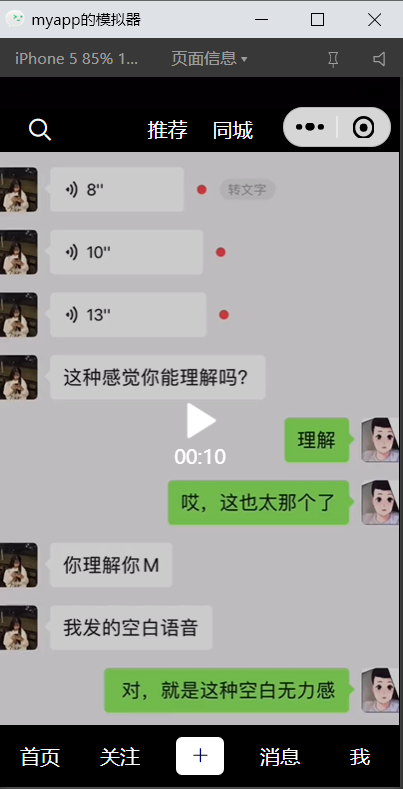
效果如下:
在video组件上的属性,如下:

# 6,ajax请求获取数据
后端代码如下:
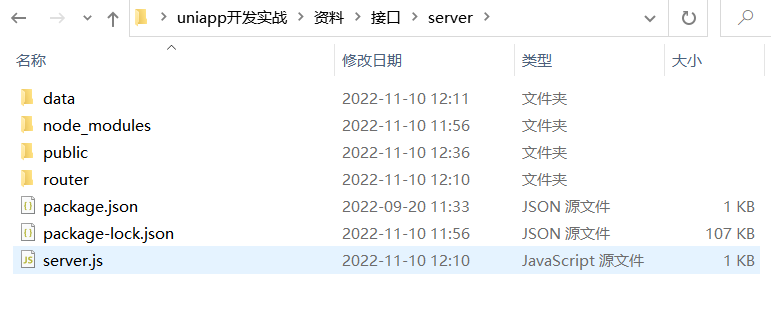
启动后端,如下:

使用浏览器测试之,如下:
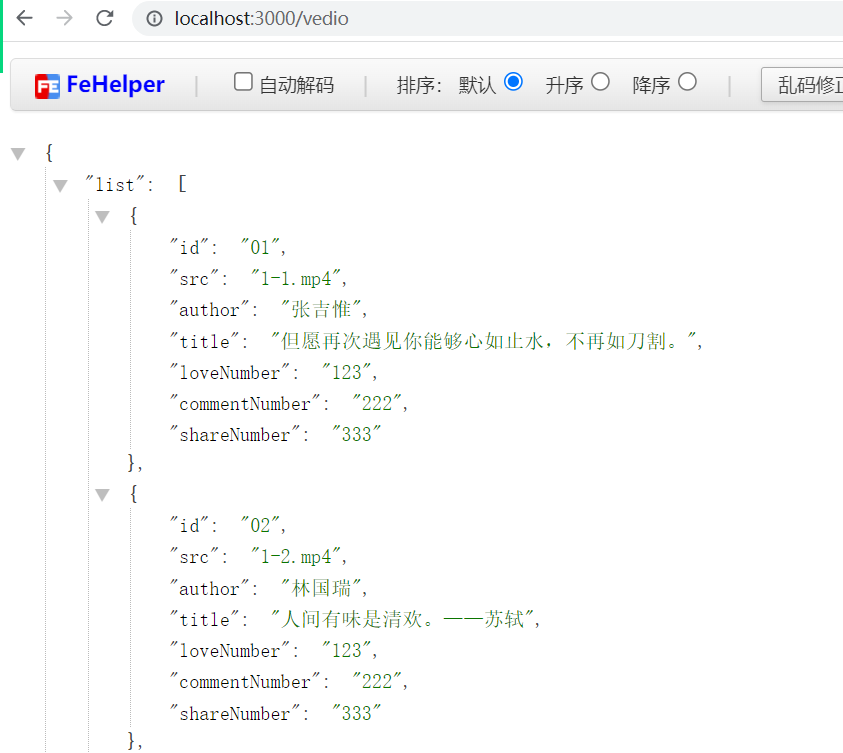
我们在代码中,放接口发请求,如下:
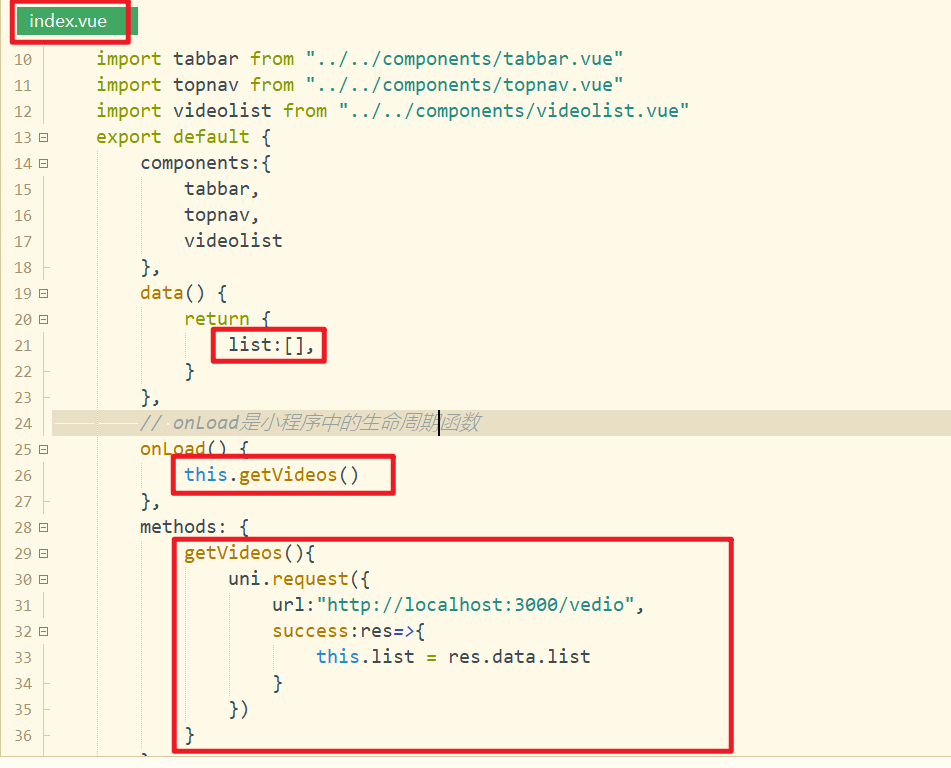
测试之如下:
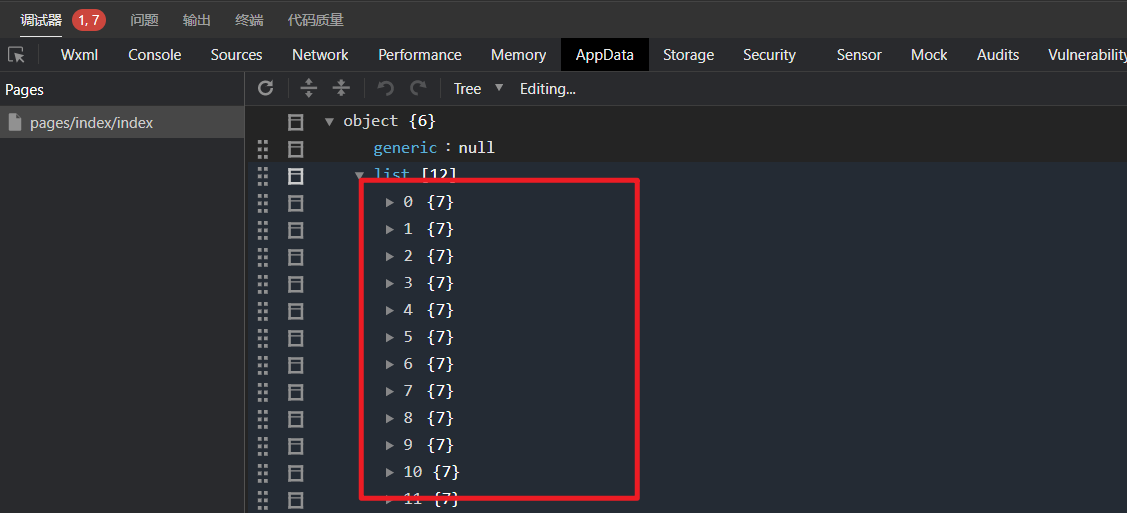
把list数据传递给子组件,如下:
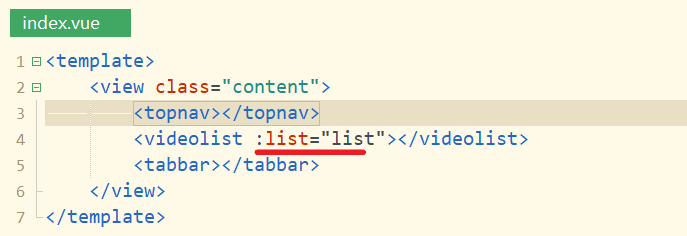
子组件接收之,如下:
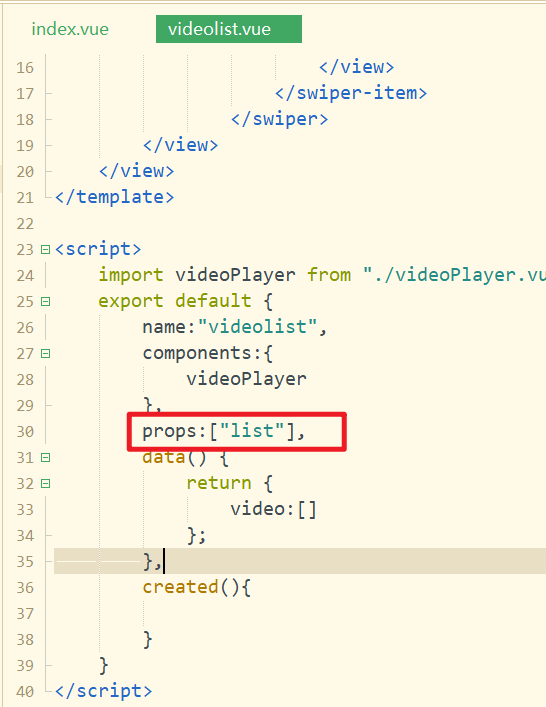
有多少个数据,就循环出多少个swiper-item,如下:
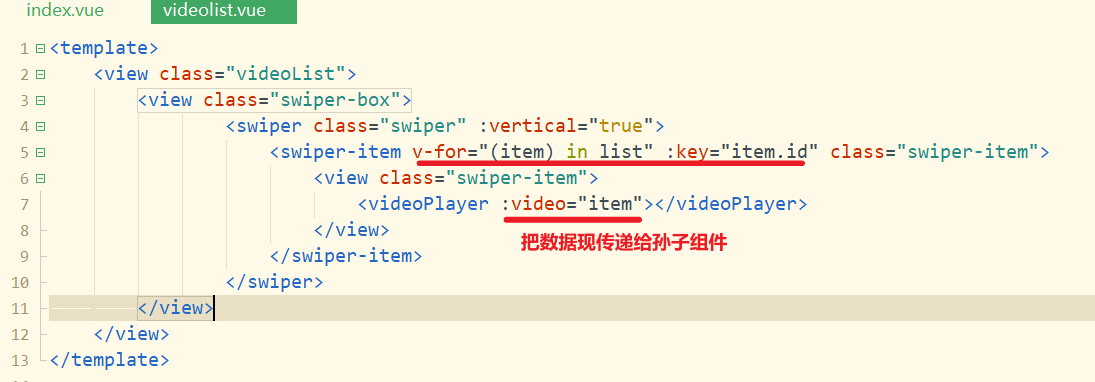
在孙子组件中,接收之,如下:
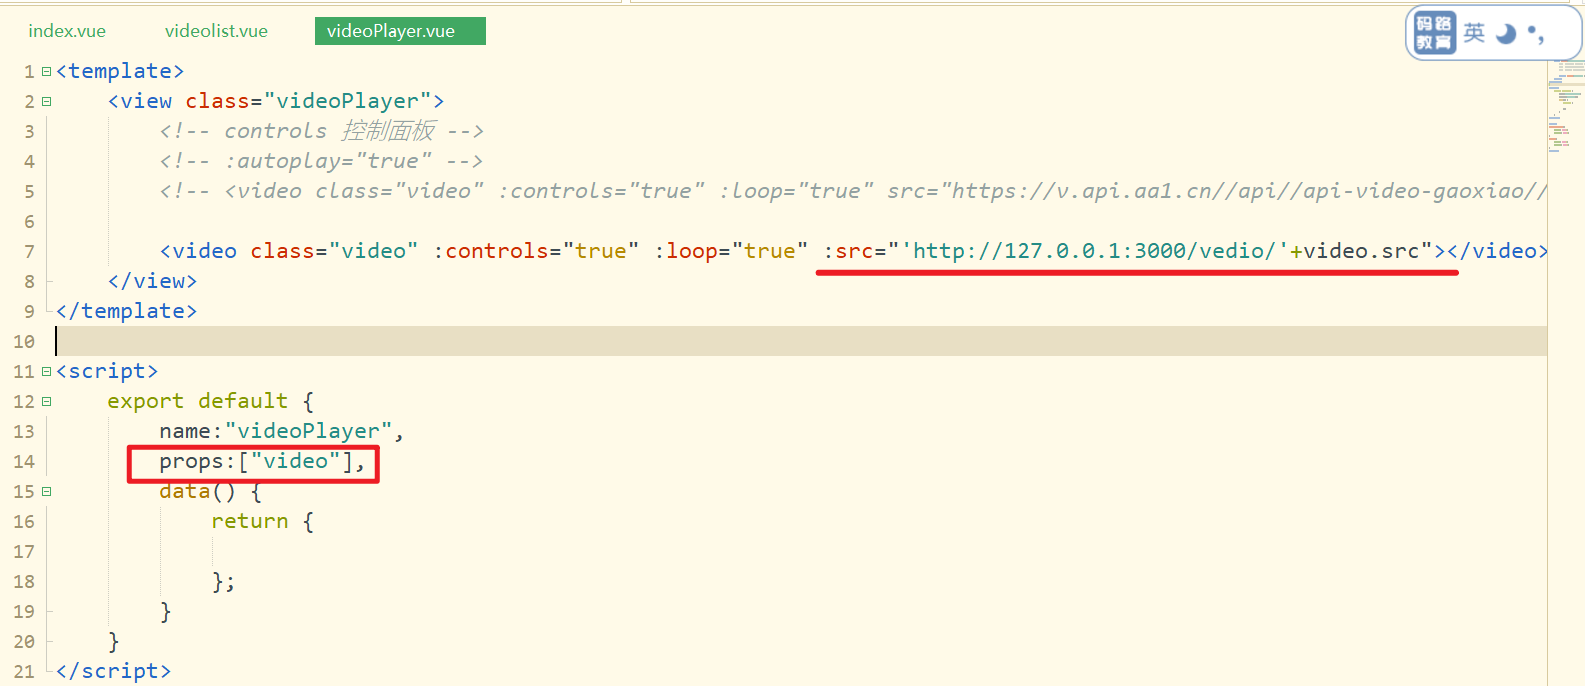
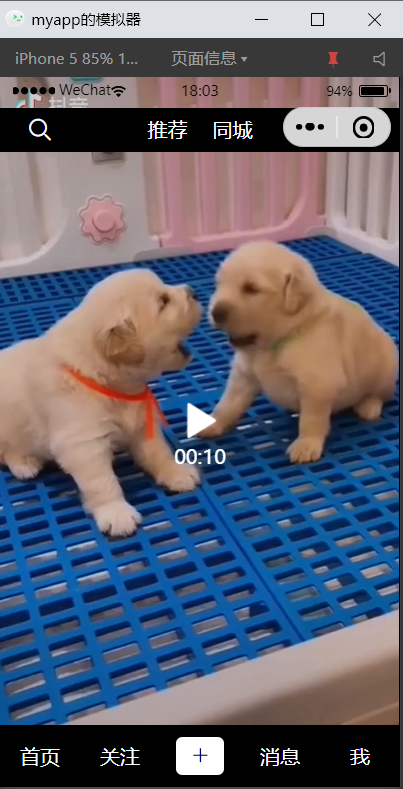
测试之,如下:
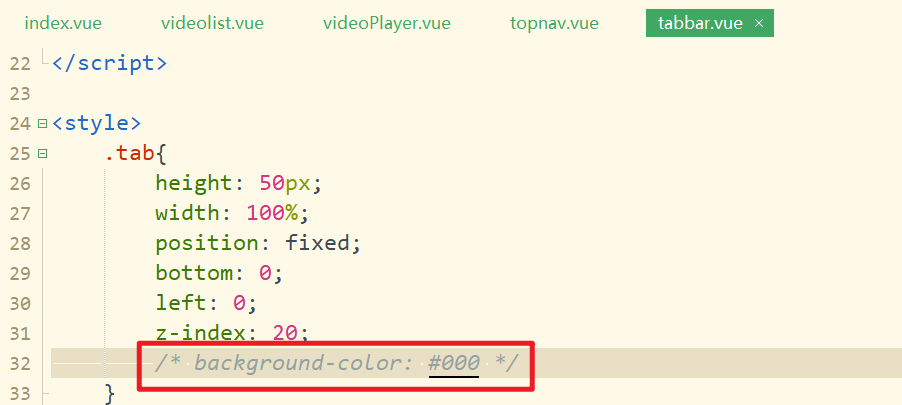
把顶部导航和底部的tabbar背景颜色去掉,如下:
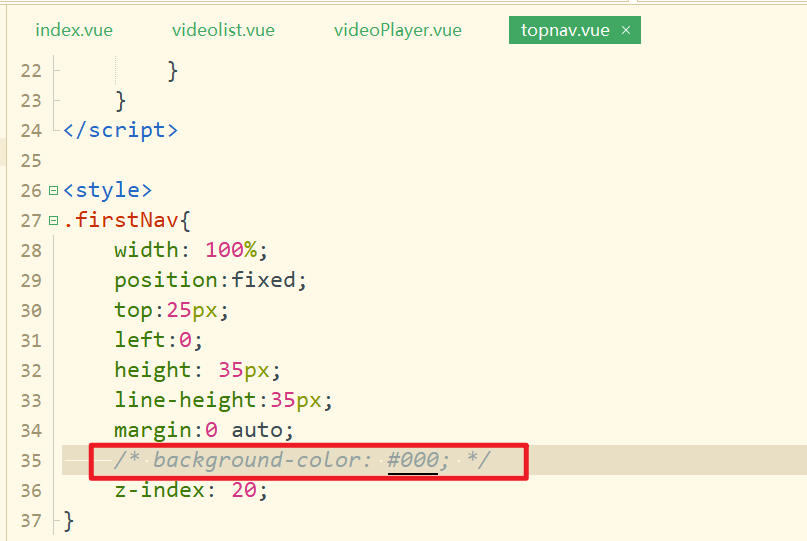
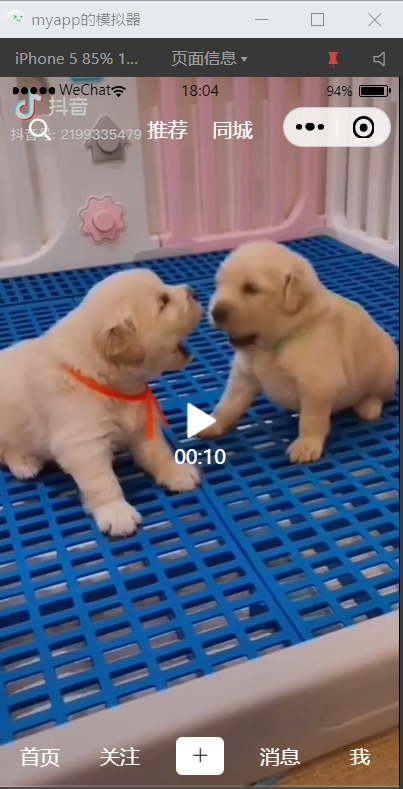
测试之,如下:
# 7,左侧信息栏开发
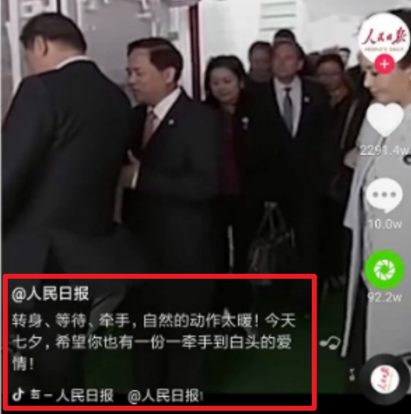
需求:
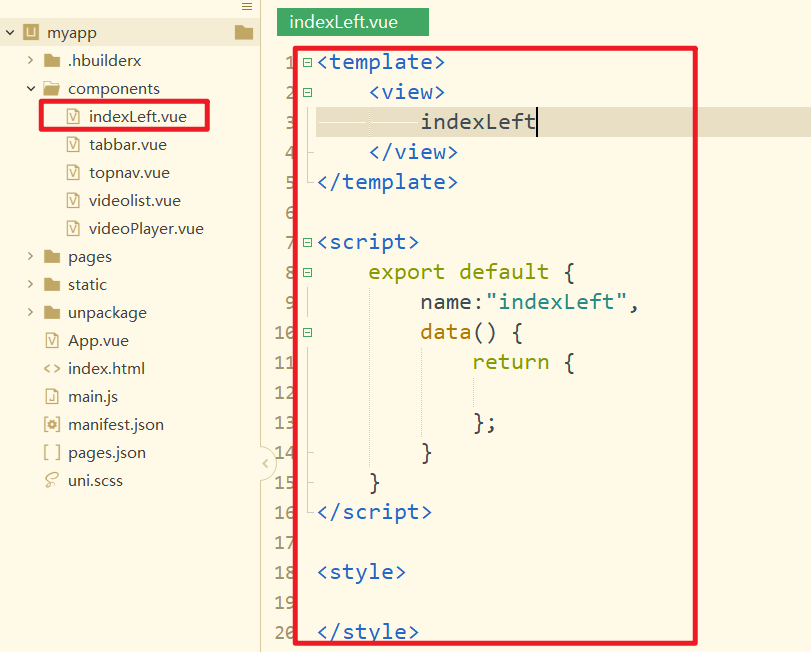
创建indexList组件,如下:
在videoList导入,注册,并使用之,如下:
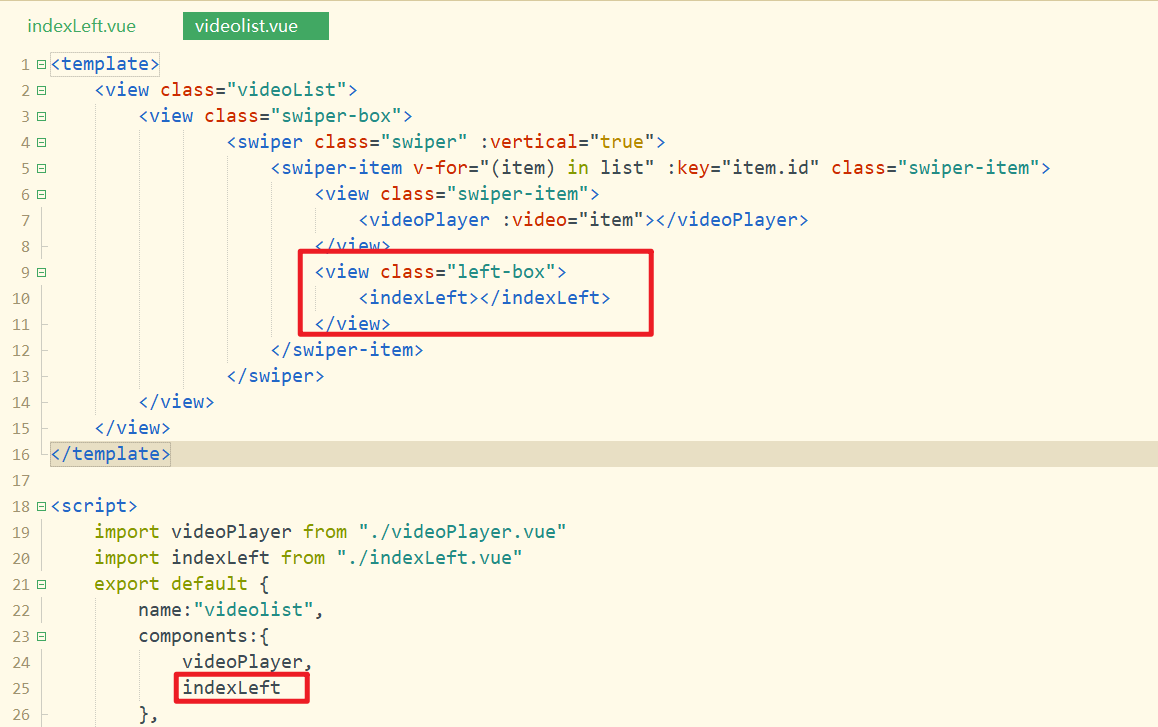
对应的样式如下:
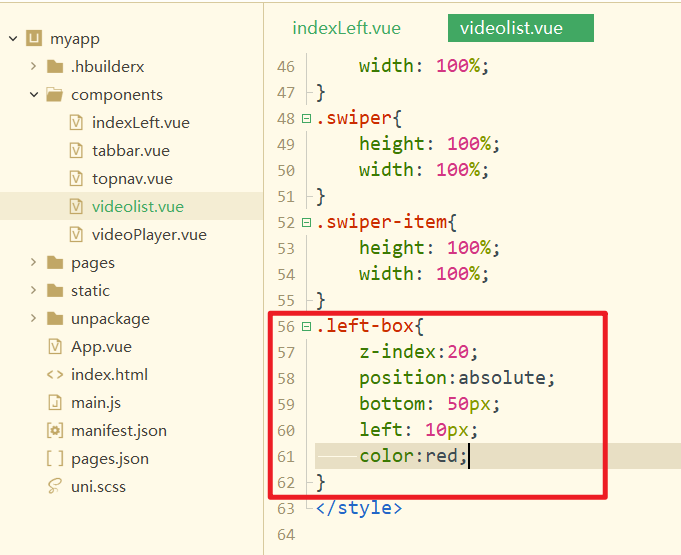
效果如下:
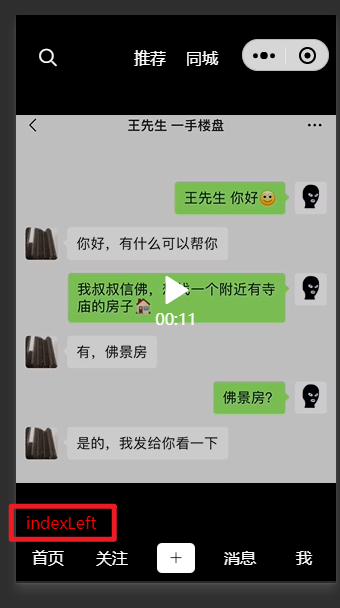
把数据传递给indexLieft组件,如下:
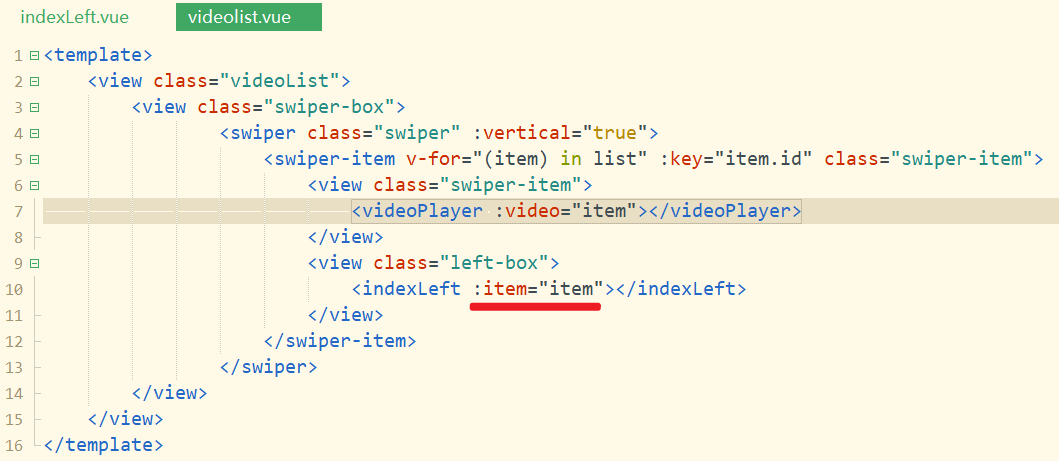
子组件接收之,并渲染数据,如下:
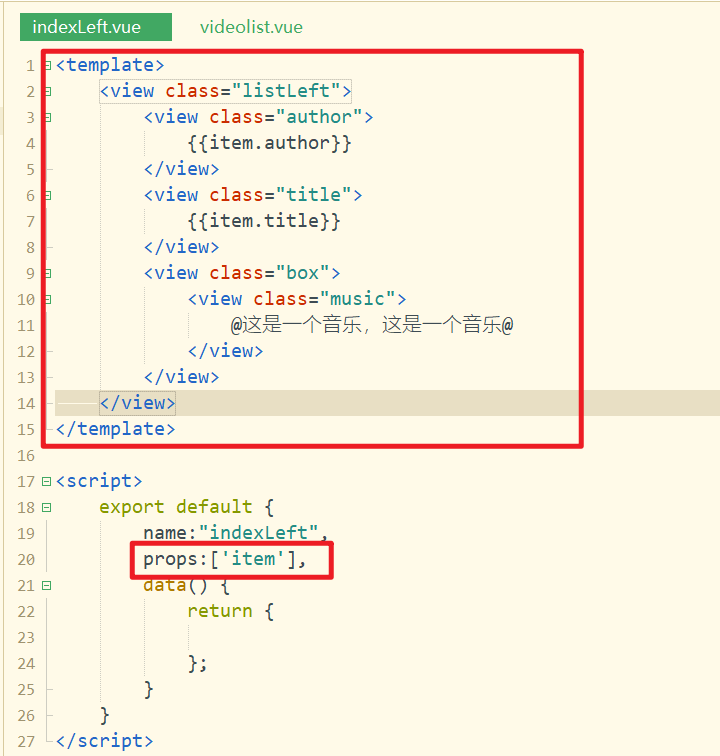
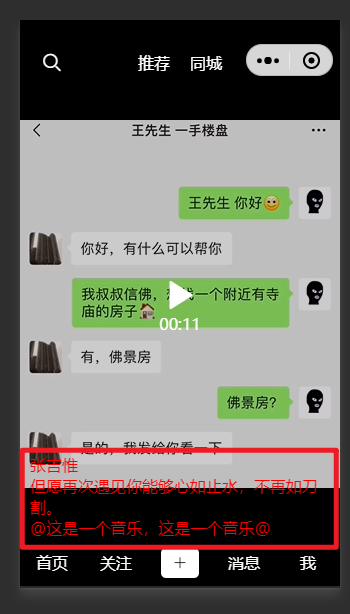
效果如下:
对应样式,如下:
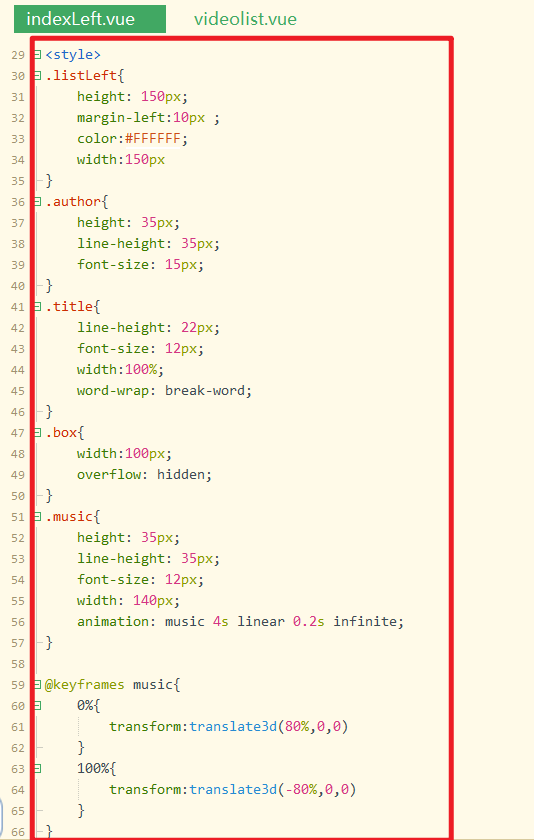
效果如下:
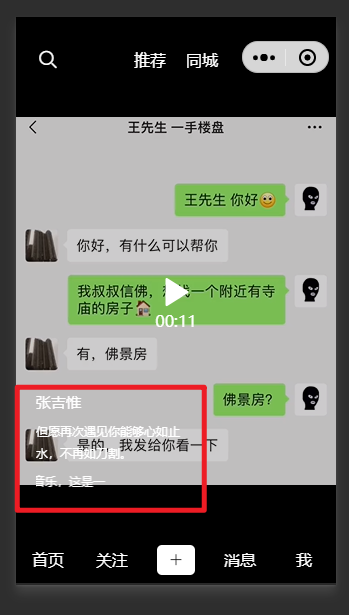
# 8,右侧图标栏开发
需求:
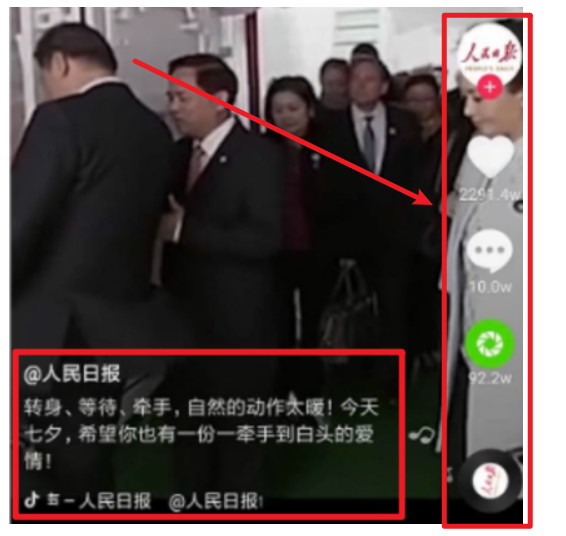
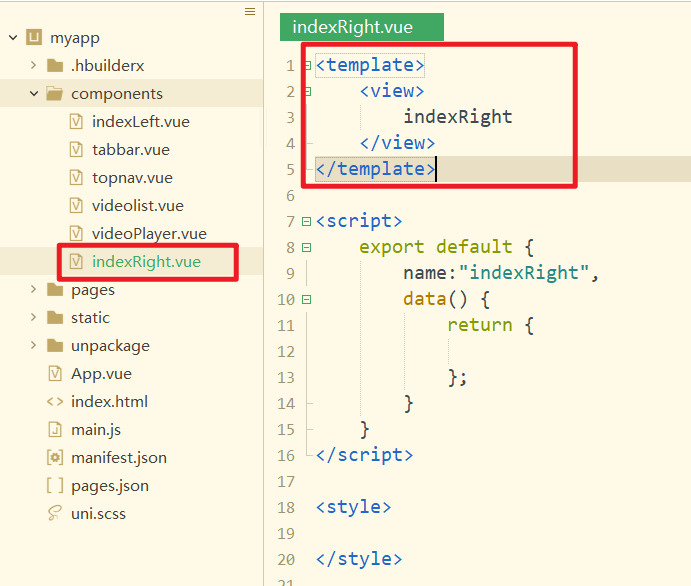
创建组件,如下:
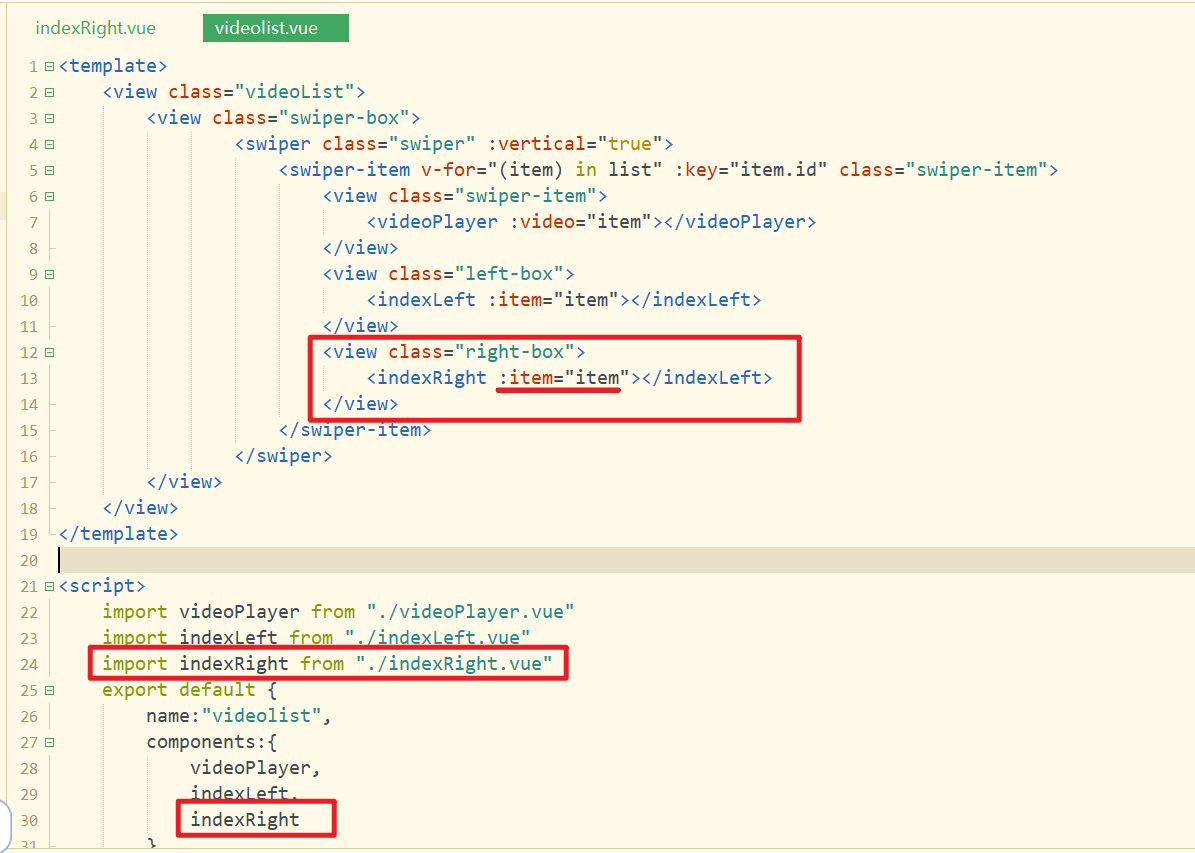
在videoList组件中,导入,注册,使用,并传递数据给子组件,如下:
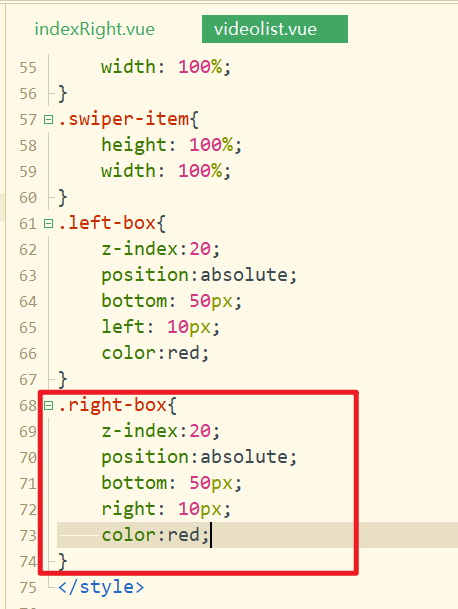
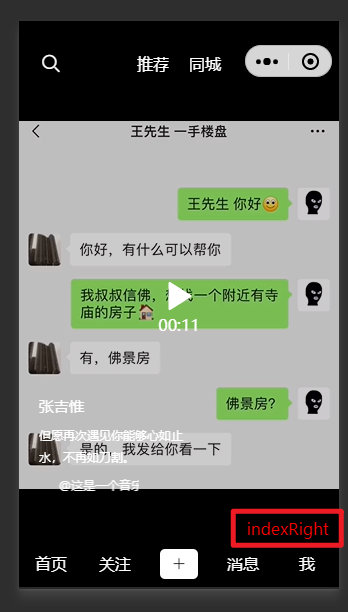
对应样式如下:
效果如下:
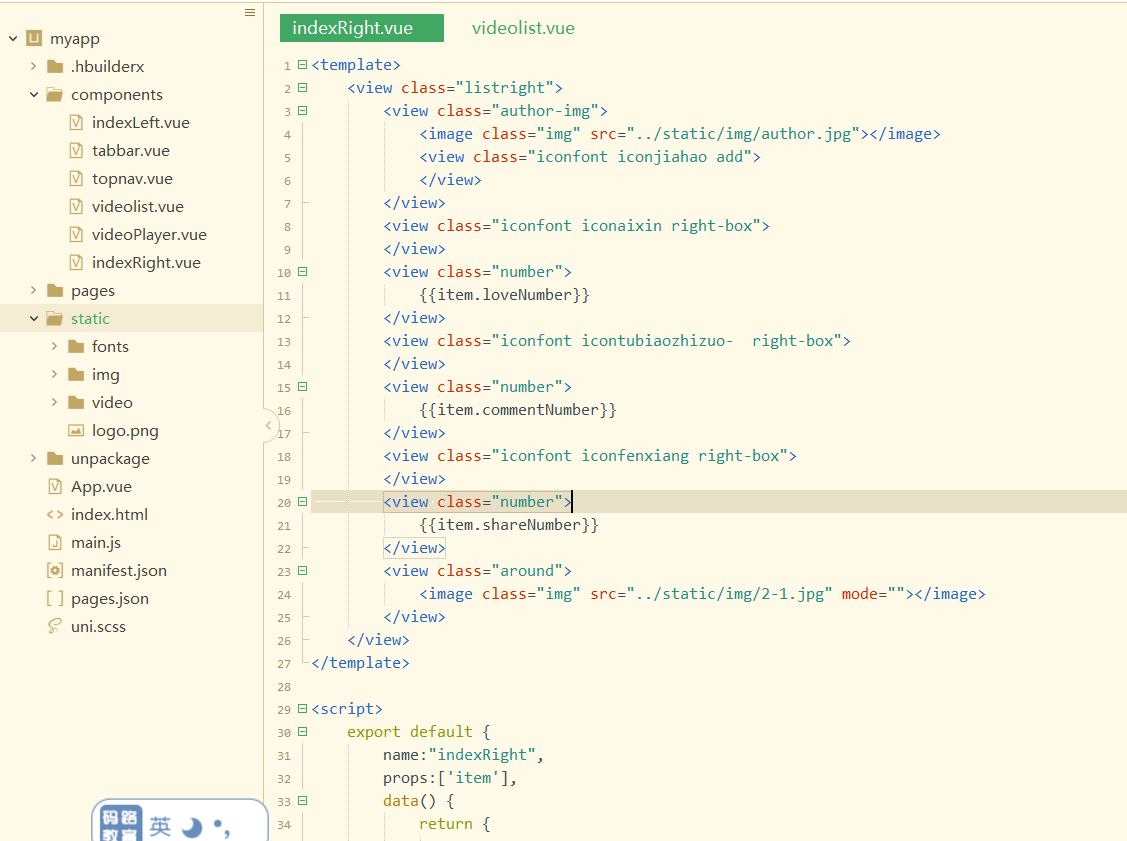
子组件接收数据,并渲染数据,如下:
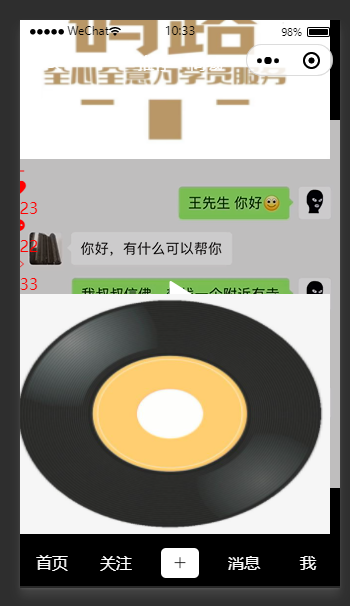
效果如下:
对应样式如下:
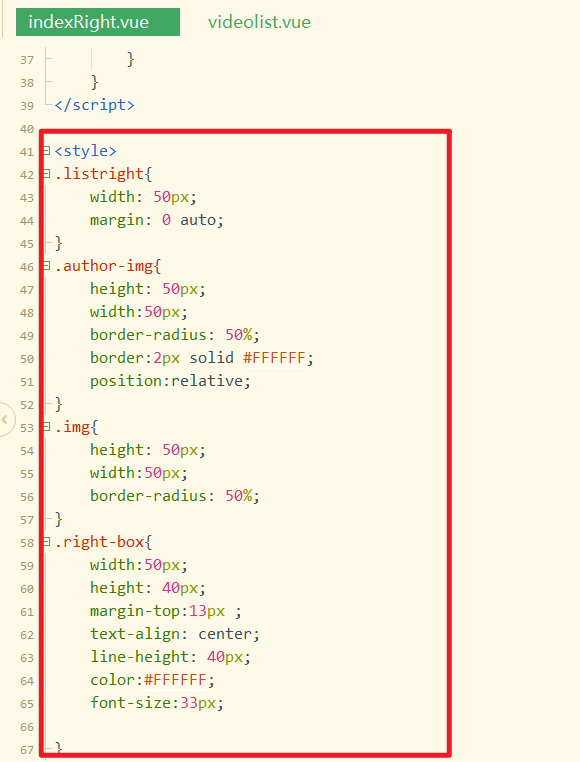
参考样式:
<style>.listright {
    width: 50px;
    margin: 0 auto;
}

.author-img {
    height: 50px;
    width: 50px;
    border-radius: 50%;
    border: 2px solid #FFFFFF;
    position: relative;
}

.img {
    height: 50px;
    width: 50px;
    border-radius: 50%;
}

.right-box {
    width: 50px;
    height: 40px;
    margin-top: 13px;
    text-align: center;
    line-height: 40px;
    color: #FFFFFF;
    font-size: 33px;

}

.number {
    font-size: 10px;
    text-align: center;
    color: #FFFFFF;
}

.around {
    margin-top: 15px;
    animation: rotate 1.5s linear 0.2s infinite;
    height: 50px;
    width: 50px;
}

.add {
    width: 18px;
    height: 18px;
    border-radius: 50%;
    background: red;
    position: absolute;
    bottom: -9px;
    left: 16px;
    text-align: center;
    line-height: 18px;
    color: #FFFFFF;
    font-size: 10px;
}

@keyframes rotate {
    0% {
        transform: rotate(0deg)
    }

    100% {
        transform: rotate(360deg)
    }
}

</style>
2
3
4
5
6
7
8
9
10
11
12
13
14
15
16
17
18
19
20
21
22
23
24
25
26
27
28
29
30
31
32
33
34
35
36
37
38
39
40
41
42
43
44
45
46
47
48
49
50
51
52
53
54
55
56
57
58
59
60
61
62
63
64
65
66
67
68
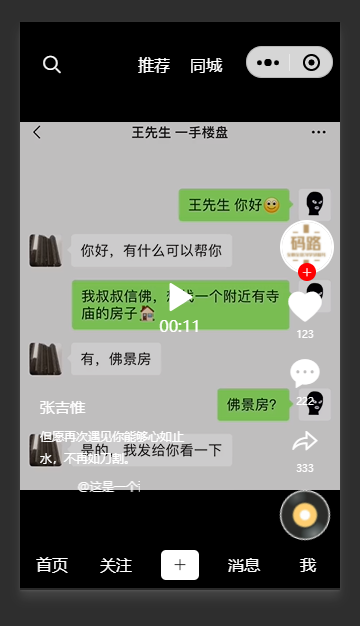
效果如下:
# 9,点击+号和小心心添加动画
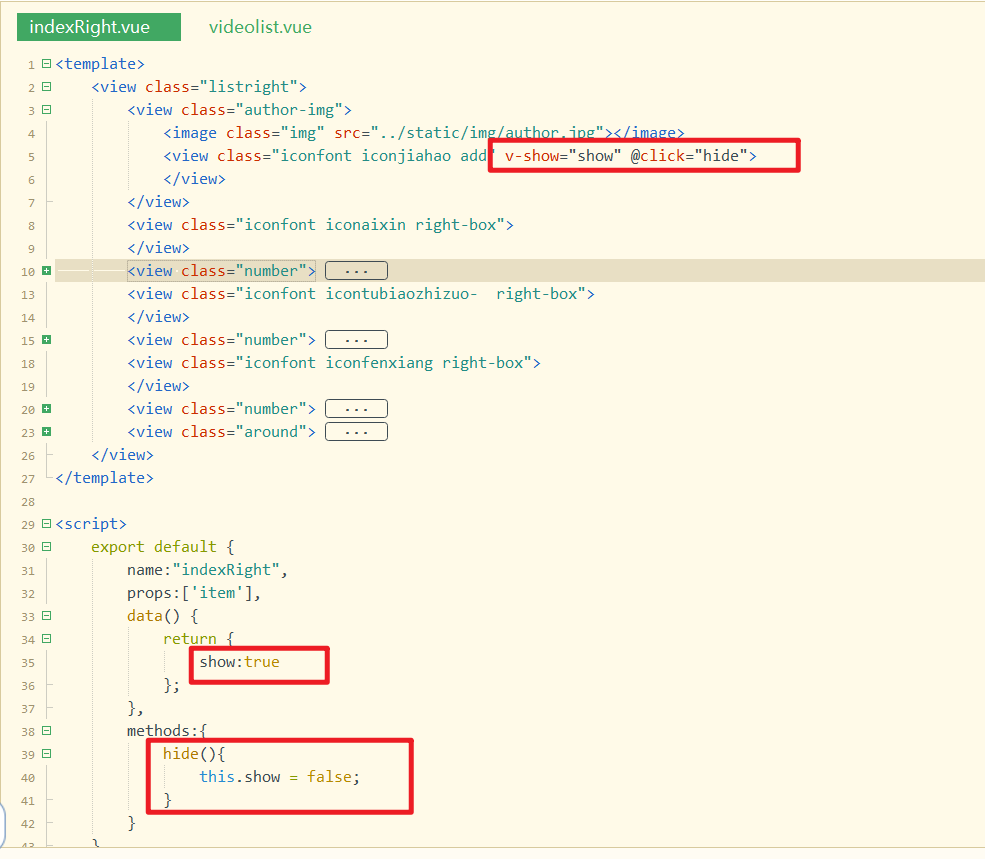
定义一个状态,控制+显示或隐藏,如下:
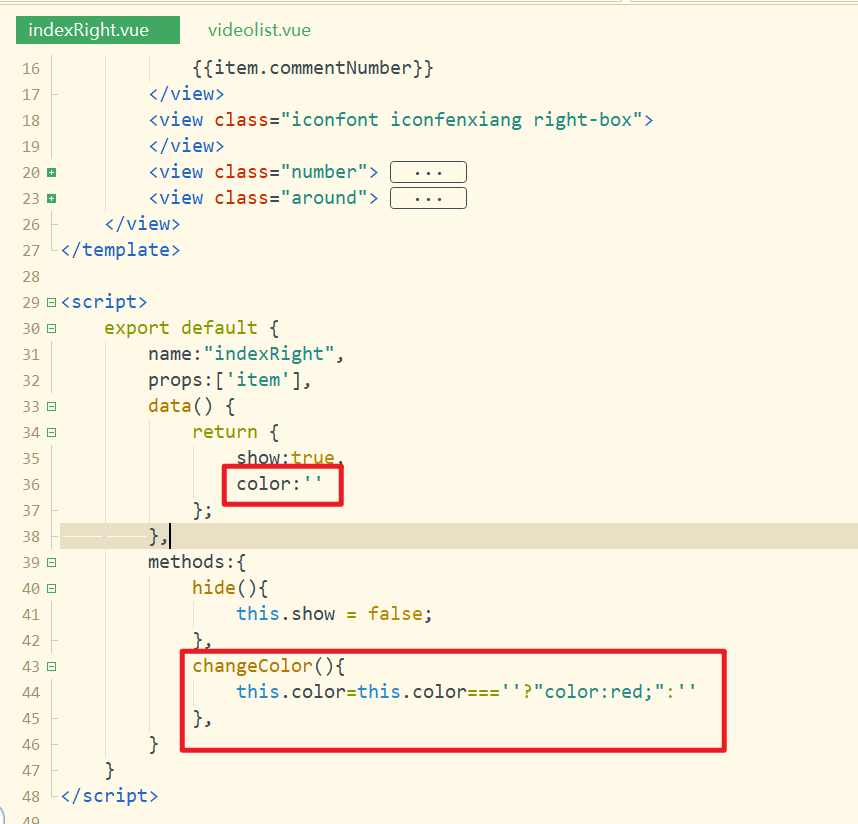
控制小心心的颜色,定义状态如下:
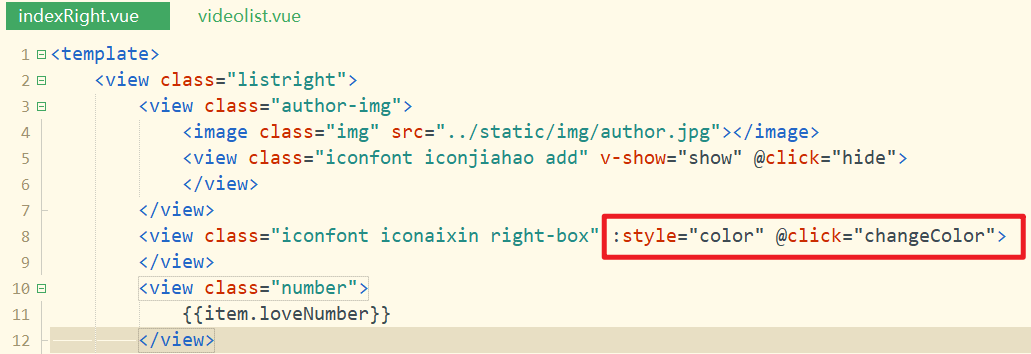
使用之,如下:
效果如下:
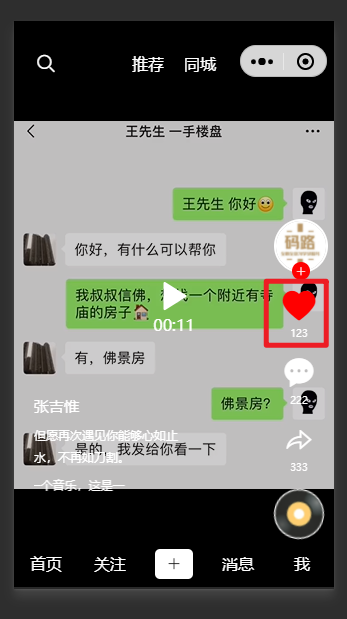
# 10,判断是上滑还是下滑
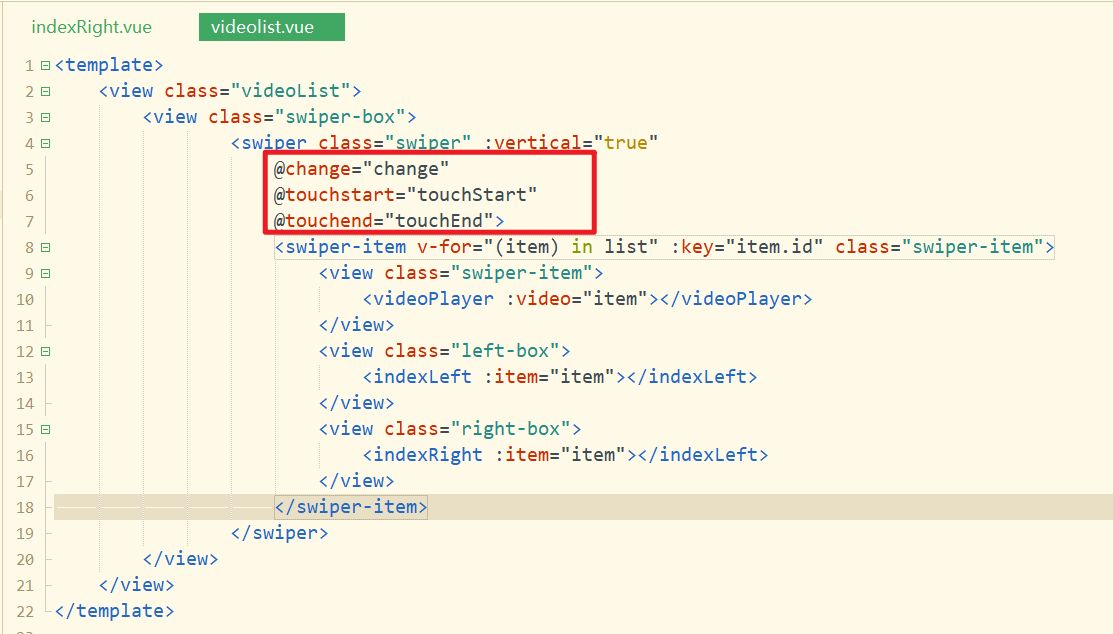
当我人滑动视频时,会触发对应的change事件,由于我们可以上滑,也可以下滑,如果判断是上滑还是下滑,所以我们再去绑定touchstart和touchend事件,如下:
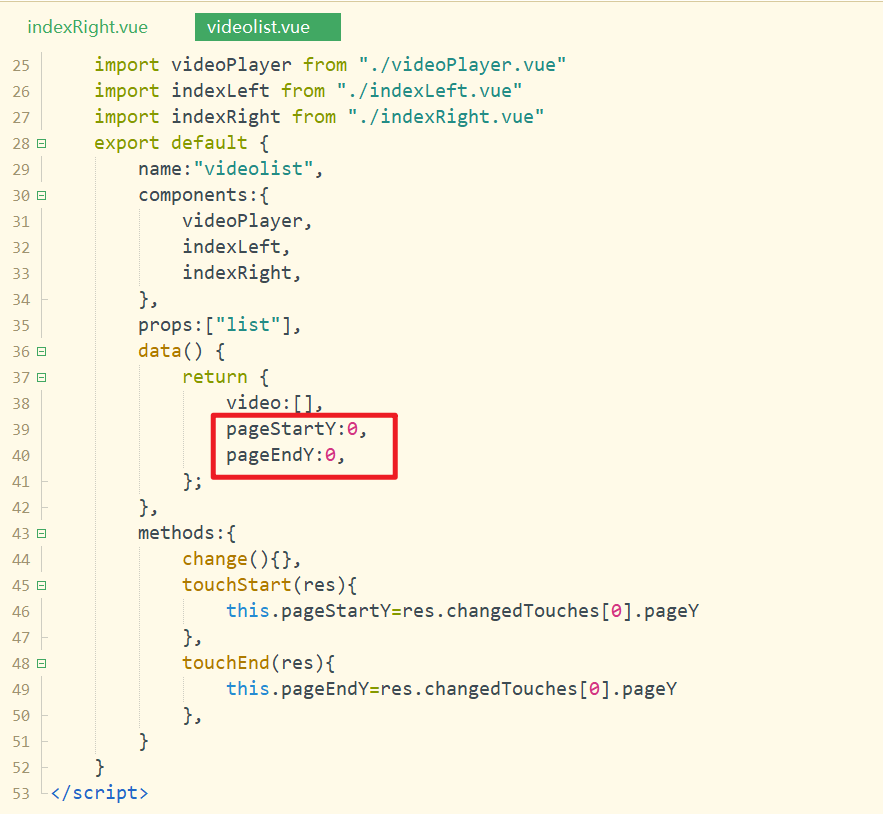
定义滑动开始与滑动结束的坐标点,如下:
给上面两个状态赋值,如下:
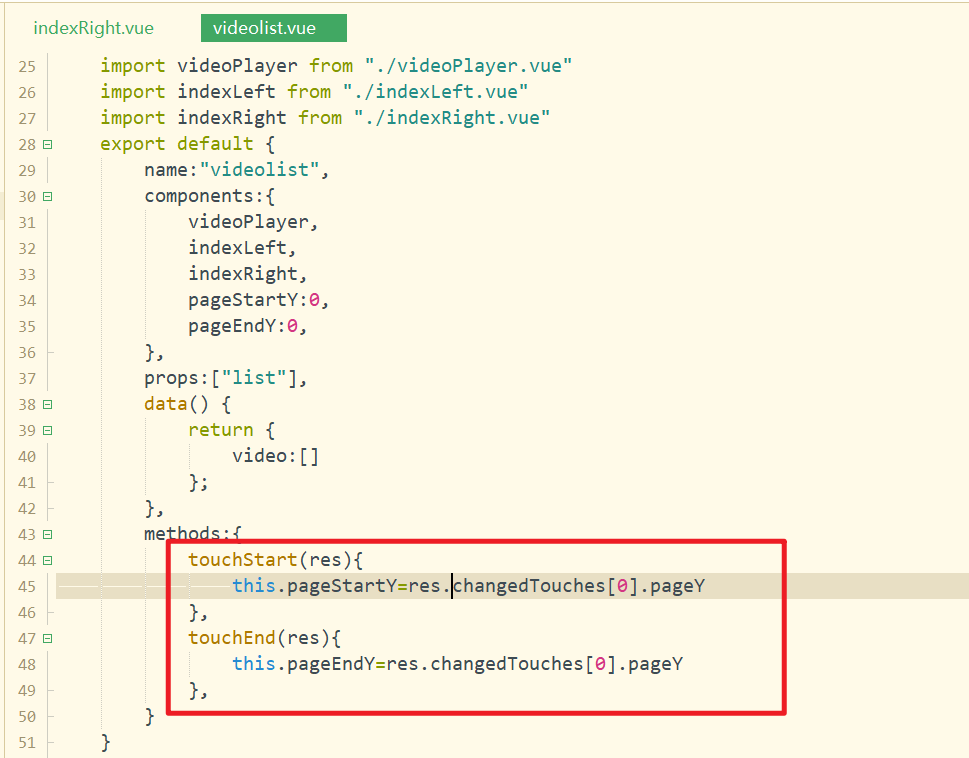
滑动视频,查看状态,如下:
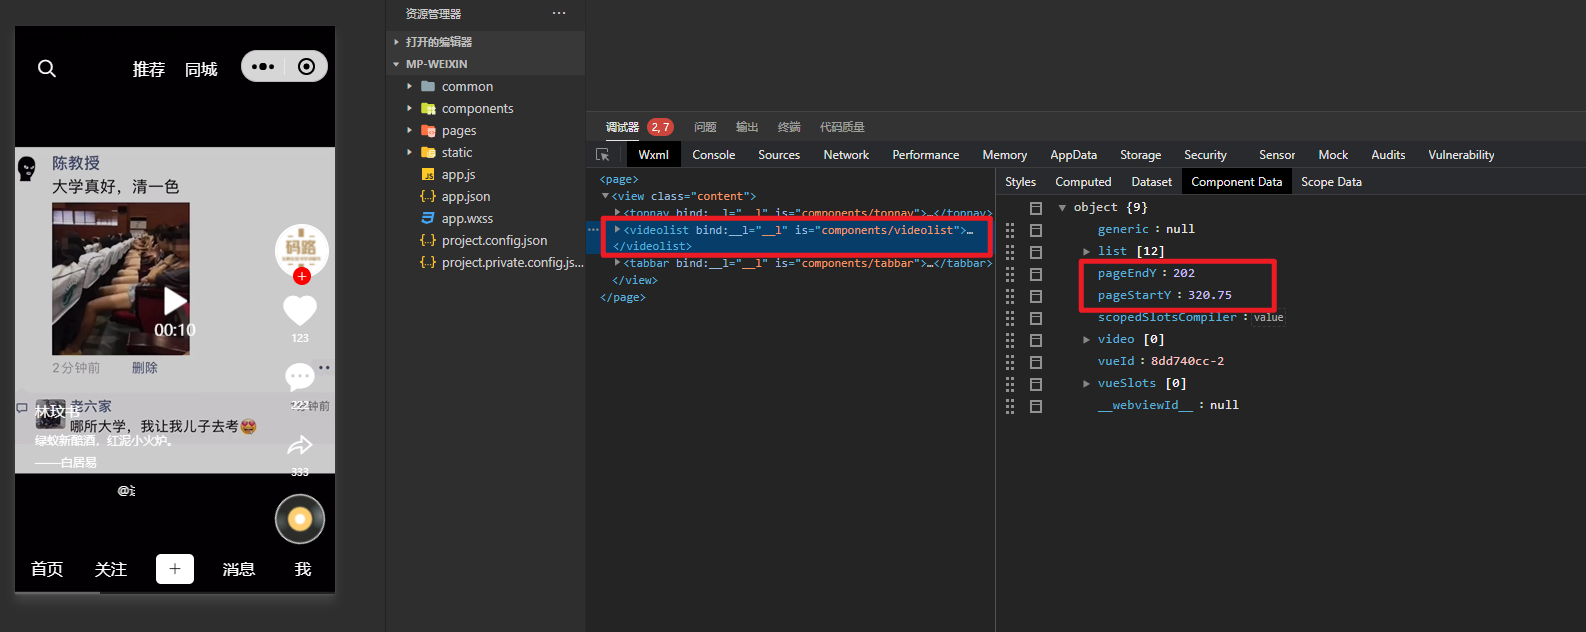
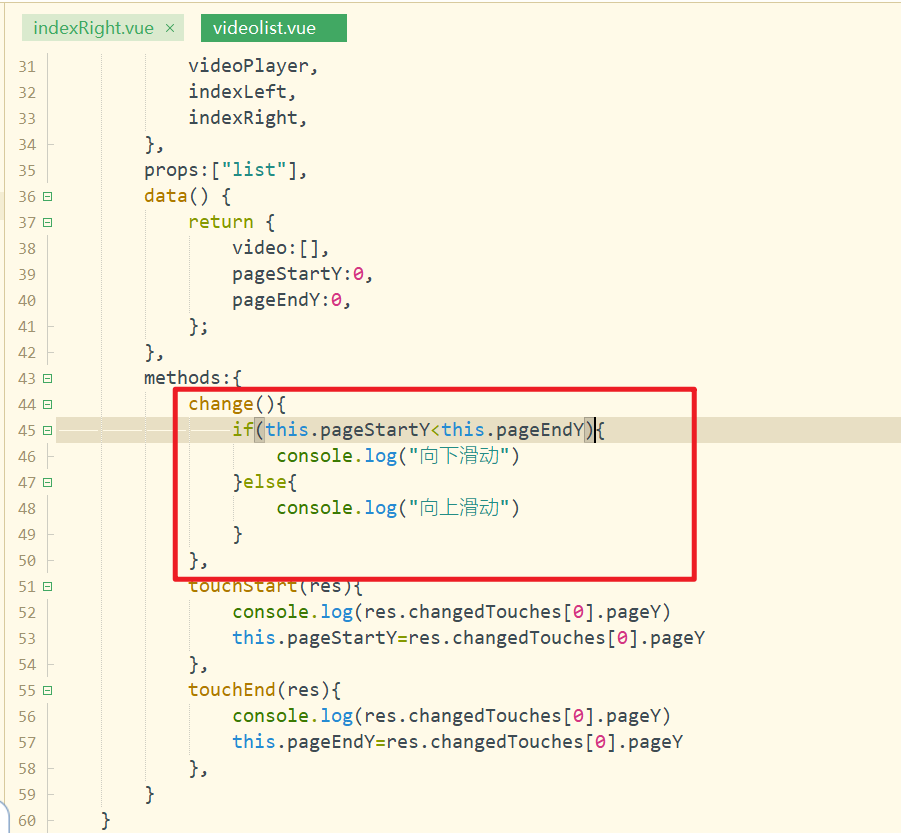
在change事件中,可以判断出是向上滑动,还是向下滑动,发下:
测试如下:
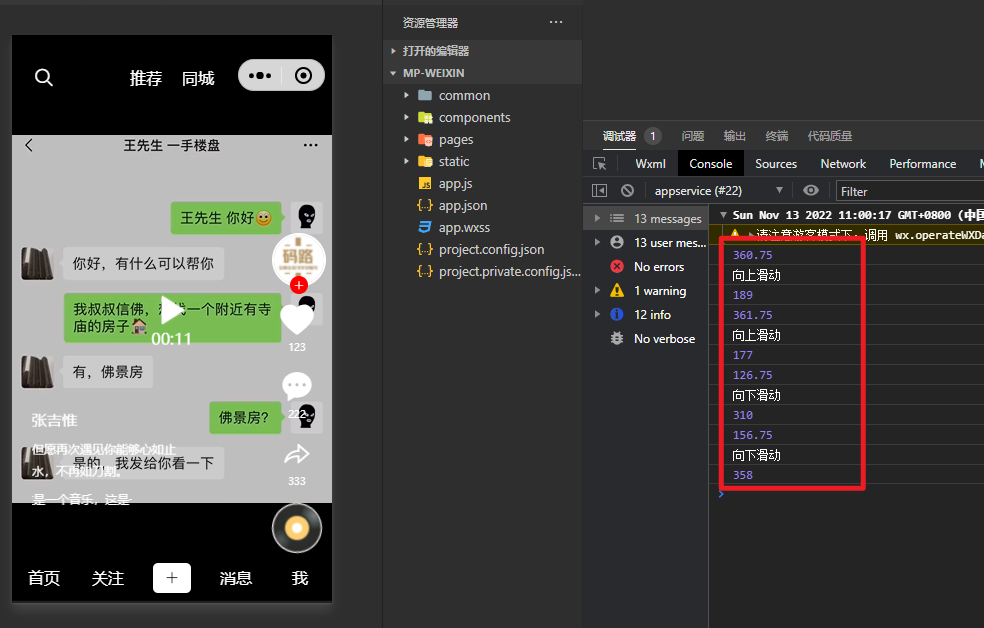
上面三个事件的触发顺序分别是touchstart,change,touchend事件,我们希望的触发顺序是touchstart,touchend,change,所以此时,我们使用一个定时器,如下:
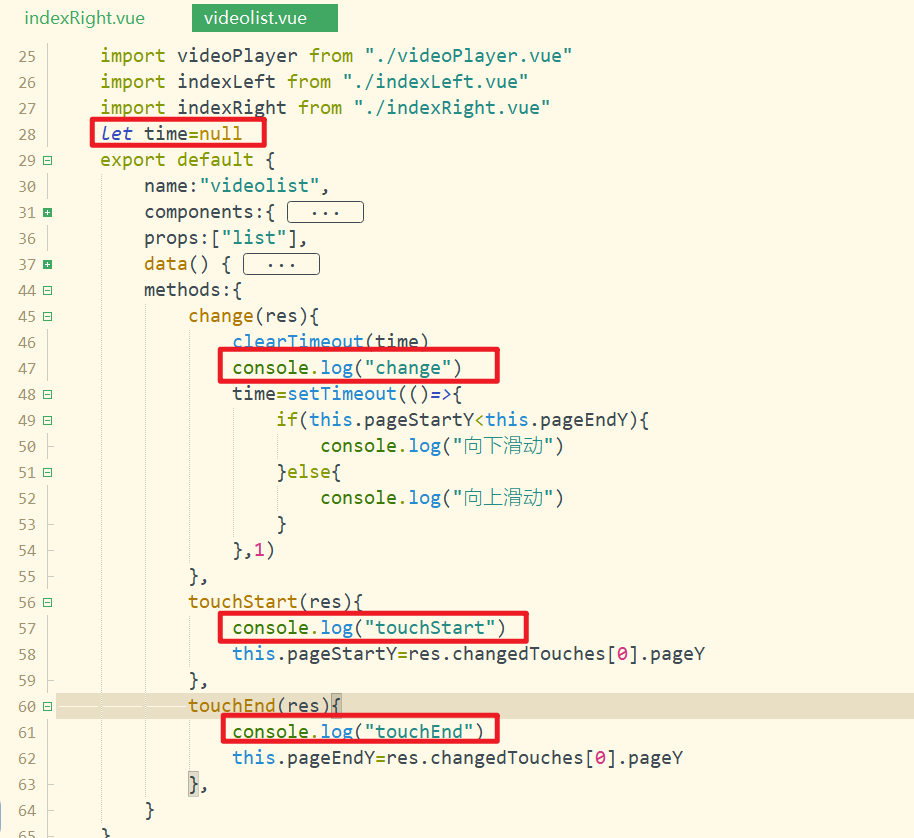
测试如下:
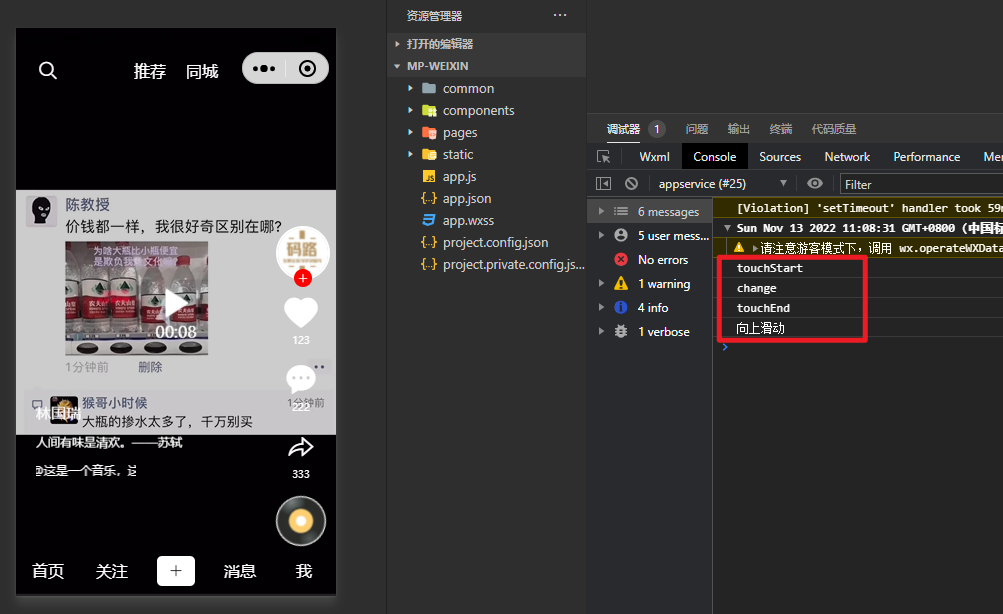
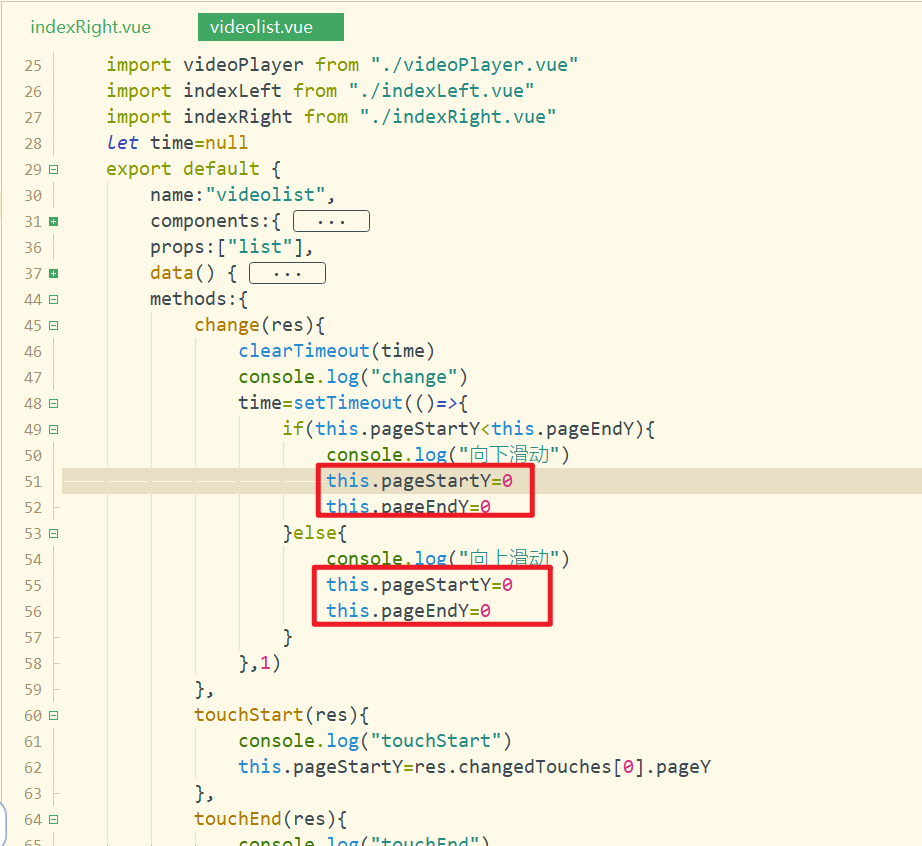
滑动结束后,还需要把pageStartY和pageEndY重置为0,如下:
# 11,播放视频
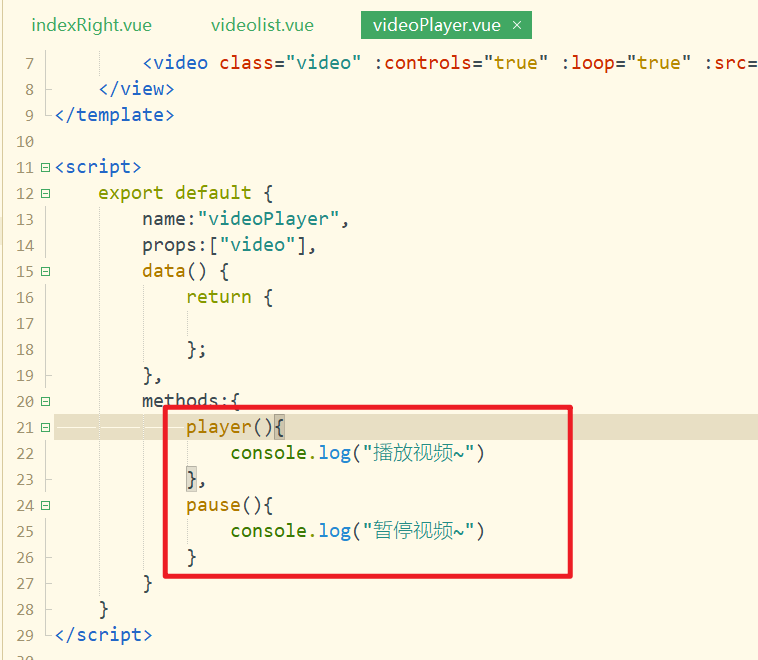
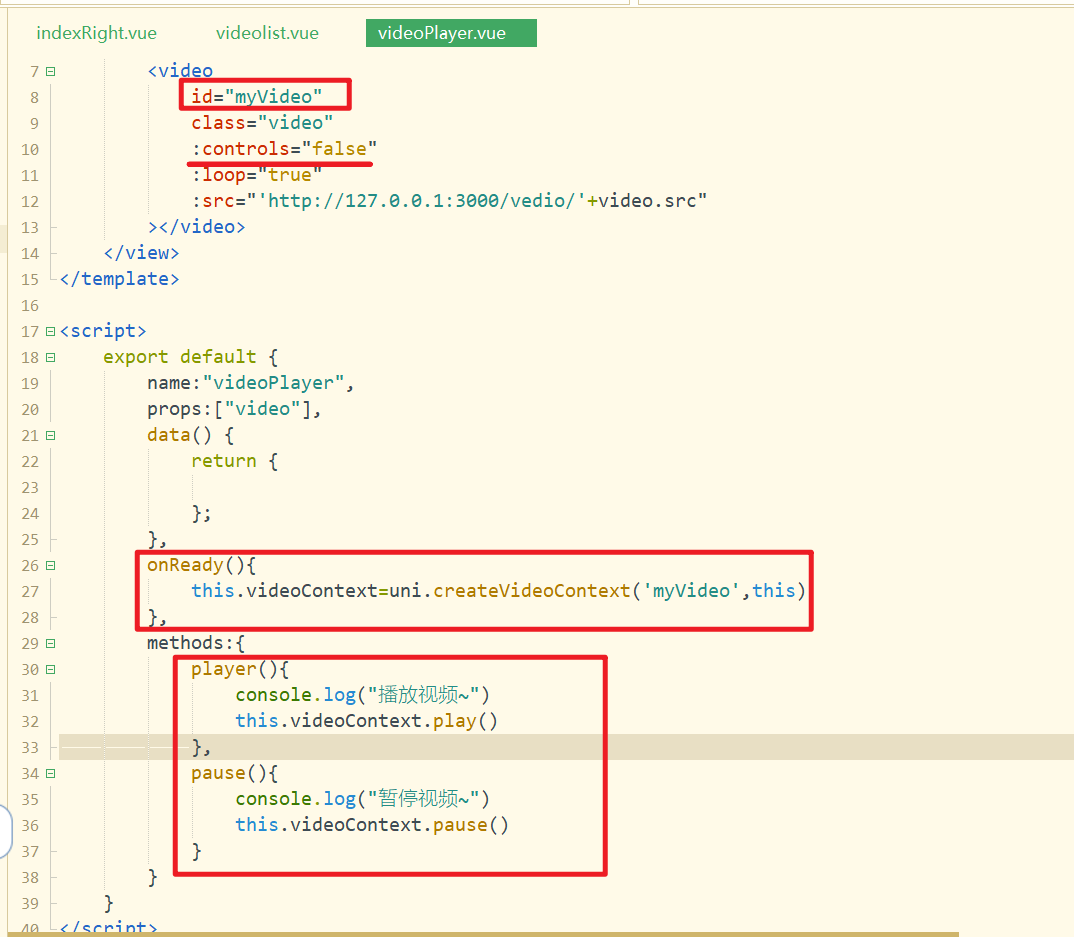
在视频播放组件中定义两个方法,一个是播放,一个是暂停,如下:
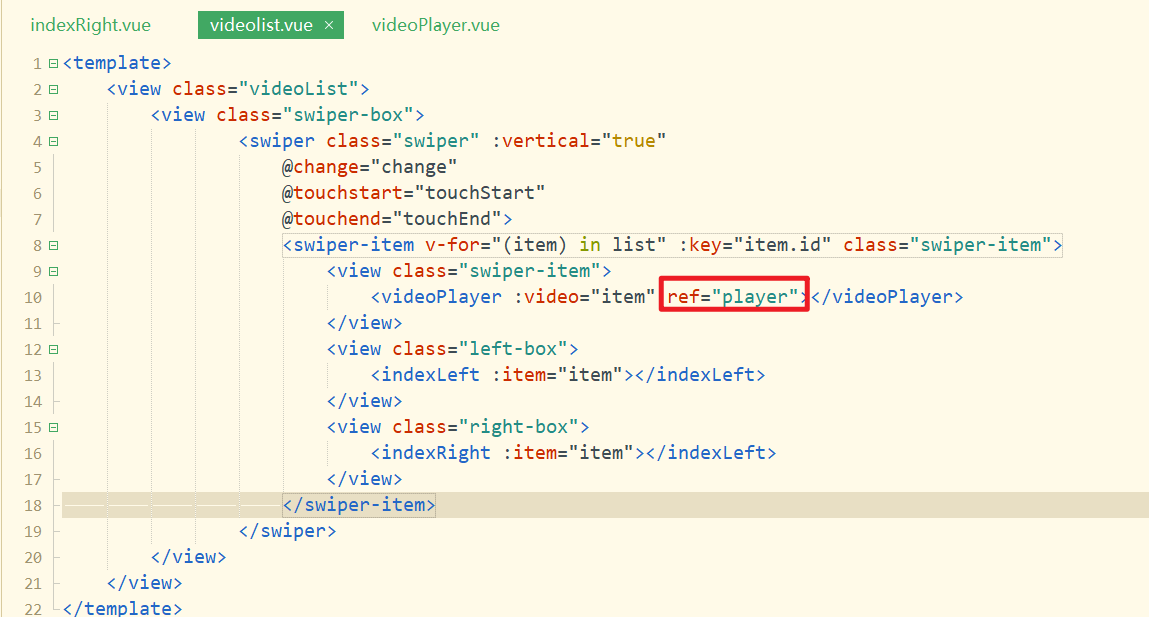
在videoPlayer组件中定义ref,用于获取对应的组件,如下:
先获取当前播放的第几个视频,视频播放,如下:
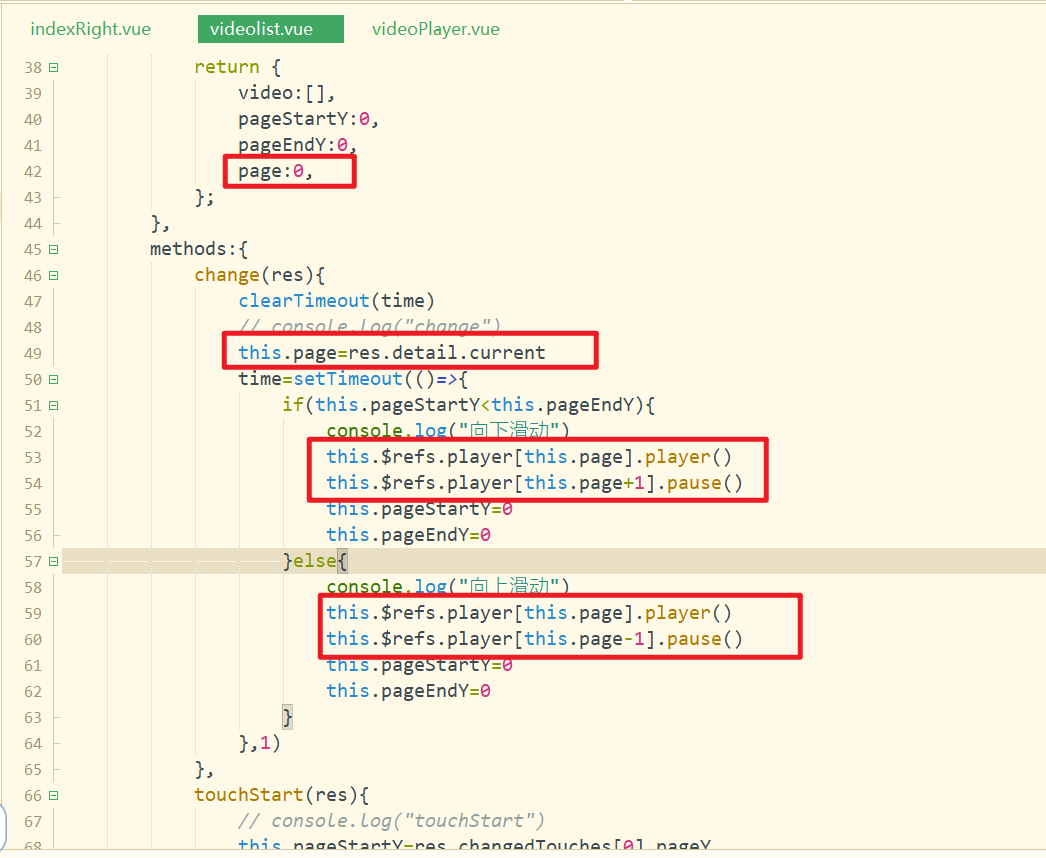
效果如下:
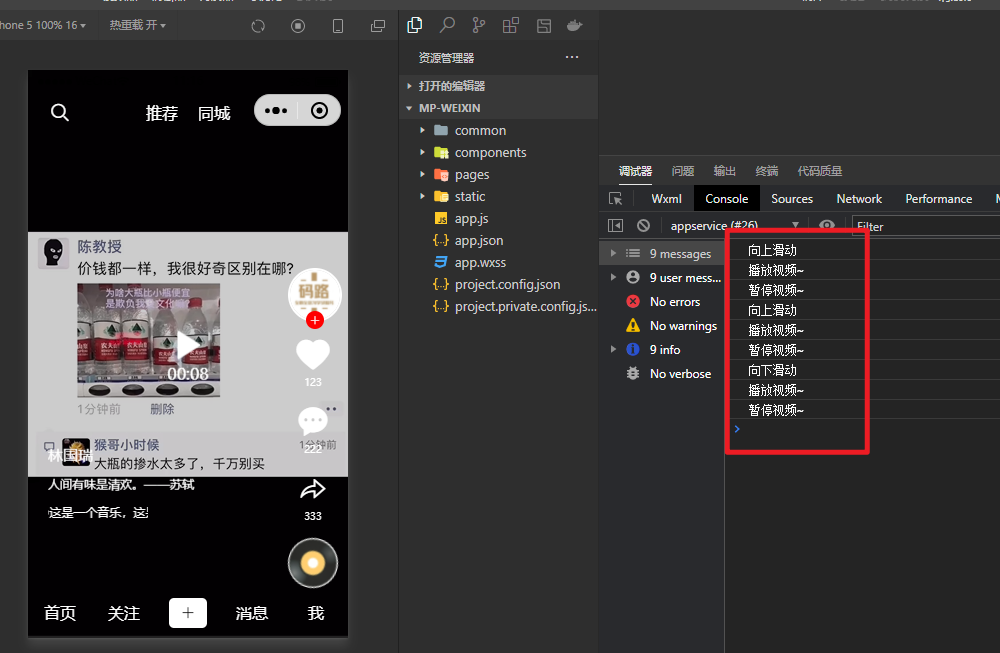
实现真正的播放与暂停,如下:
滑动视频,测试OK,如下:
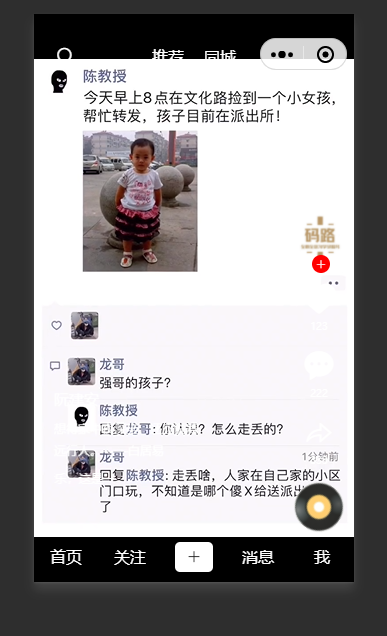
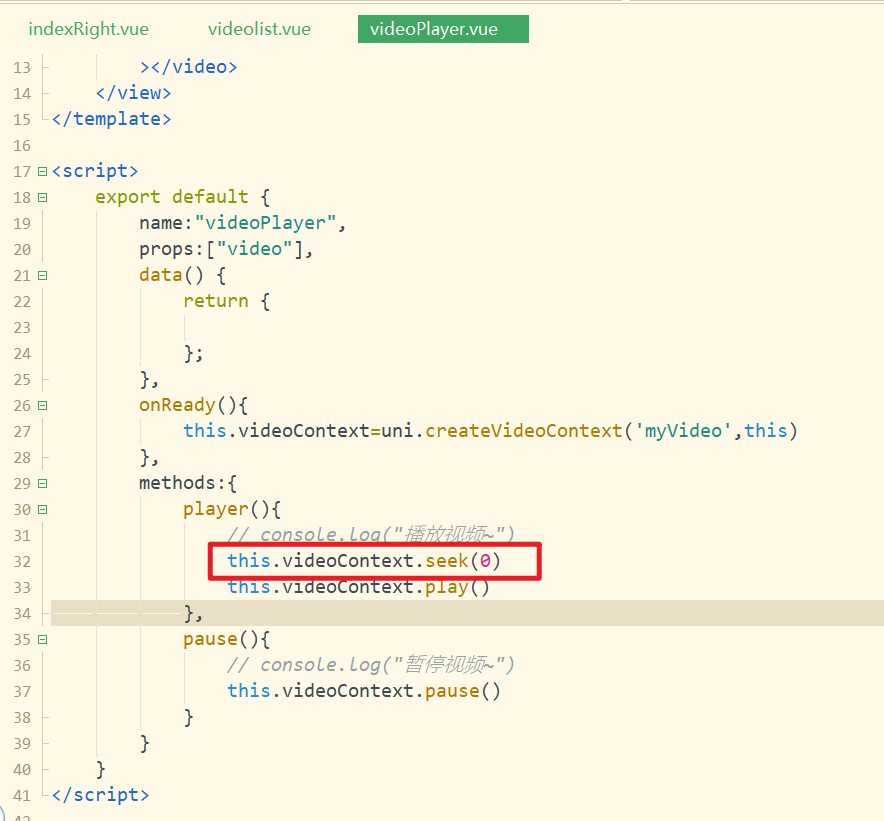
滑动播放,需要从头开始播放,设置如下:
# 12,播放,暂停实现
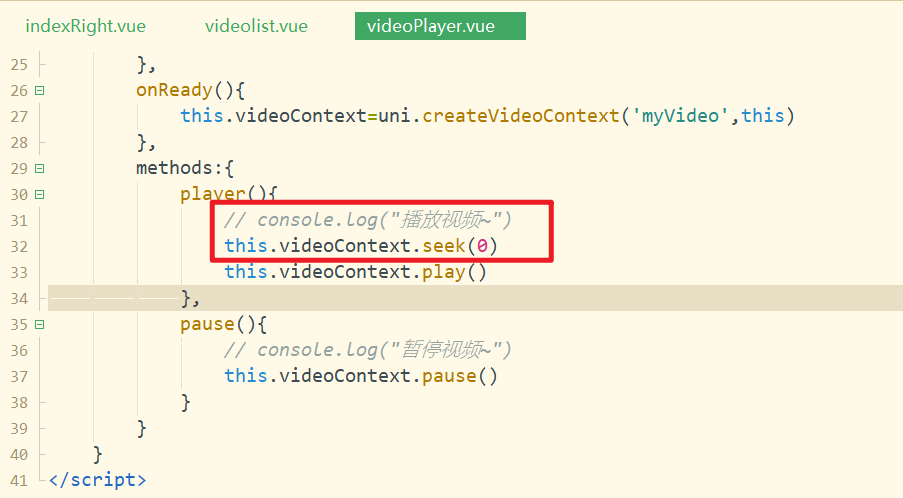
之前的播放方法是从头开始播放,如下:
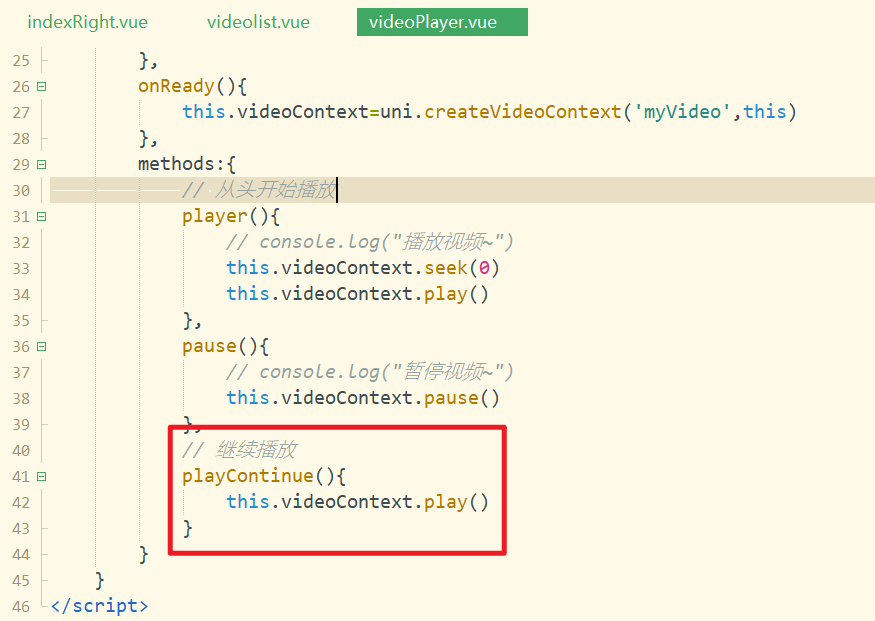
我们还需要定义一个播放方法,当暂停后,再点击时,接着之前的继续播放,如下:
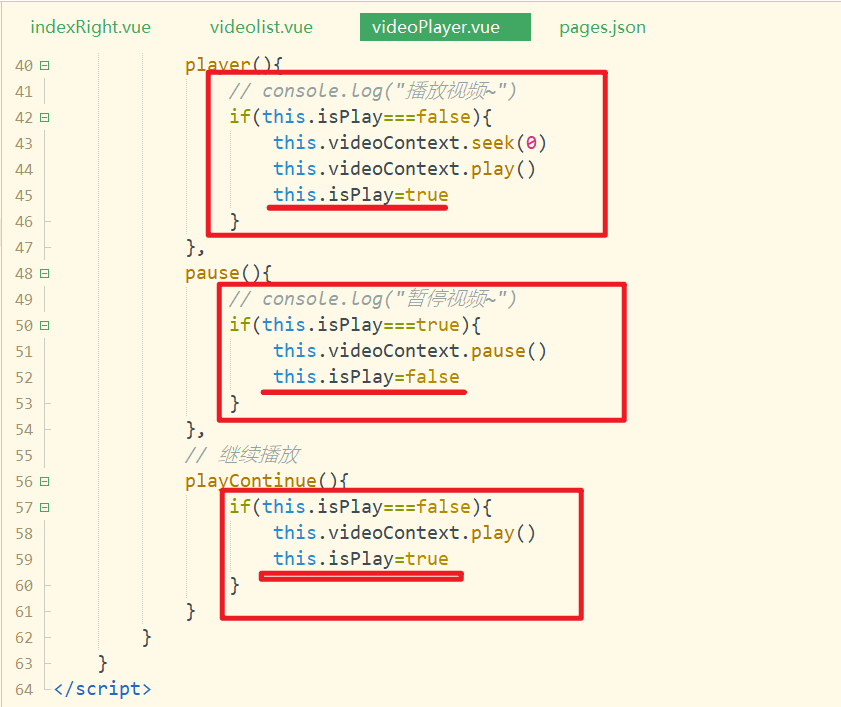
定义一个状态,表示是否处于播放状态,如下:

给播放和暂停添加判断条件,如下:
给视频绑定一个点击事件,如下:
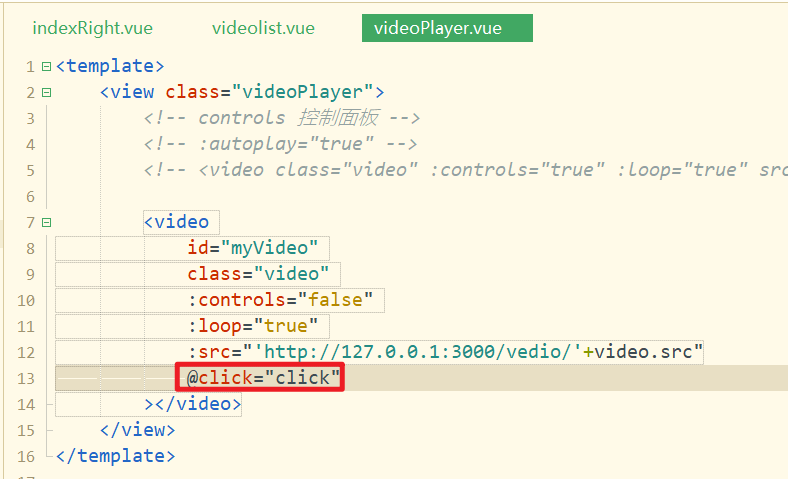
实现上面的方法,如下:
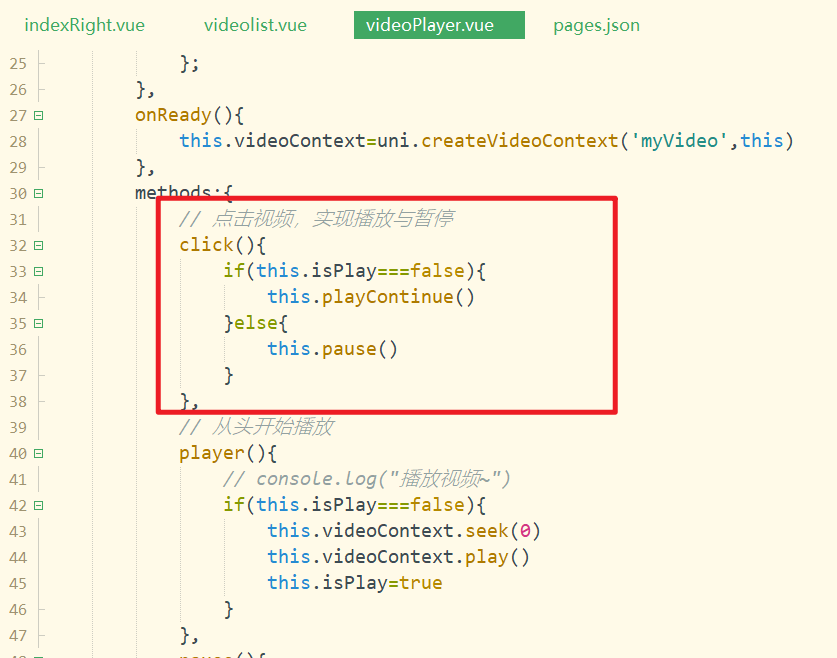
测试OK。
# 13,双击点赞实现
区分是单击还是双击,如下:
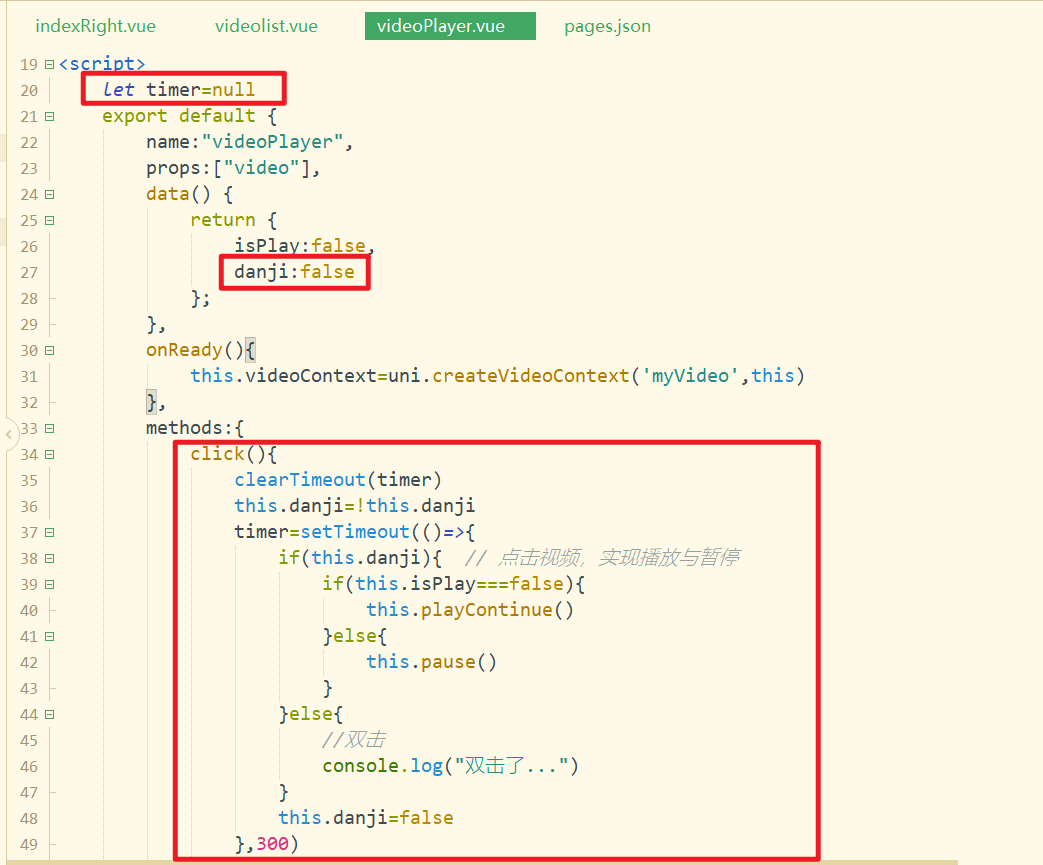
测试如下:
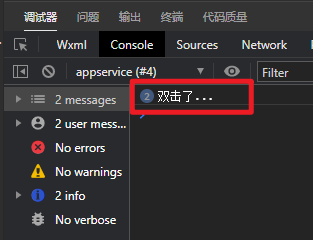
如果是双击事件,需要让小心心变亮,触发自定义方法,如下:
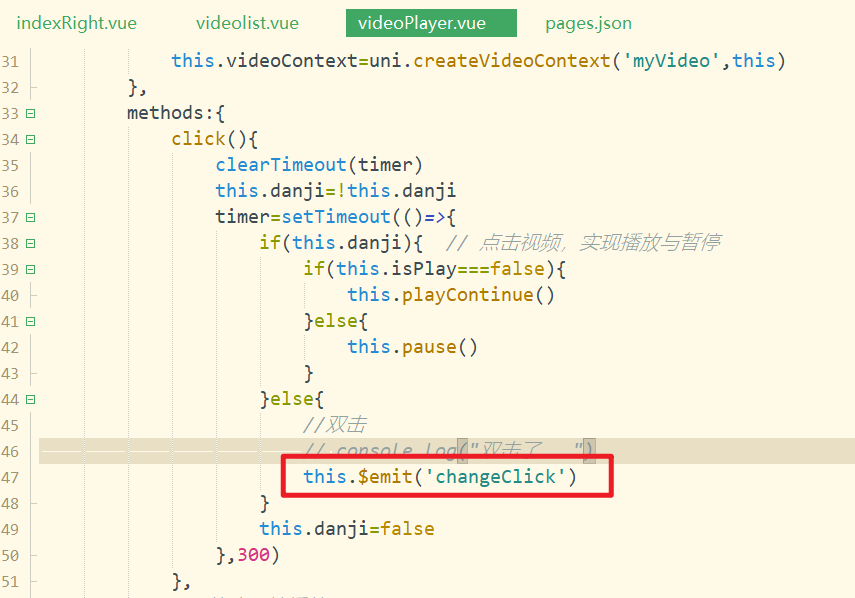
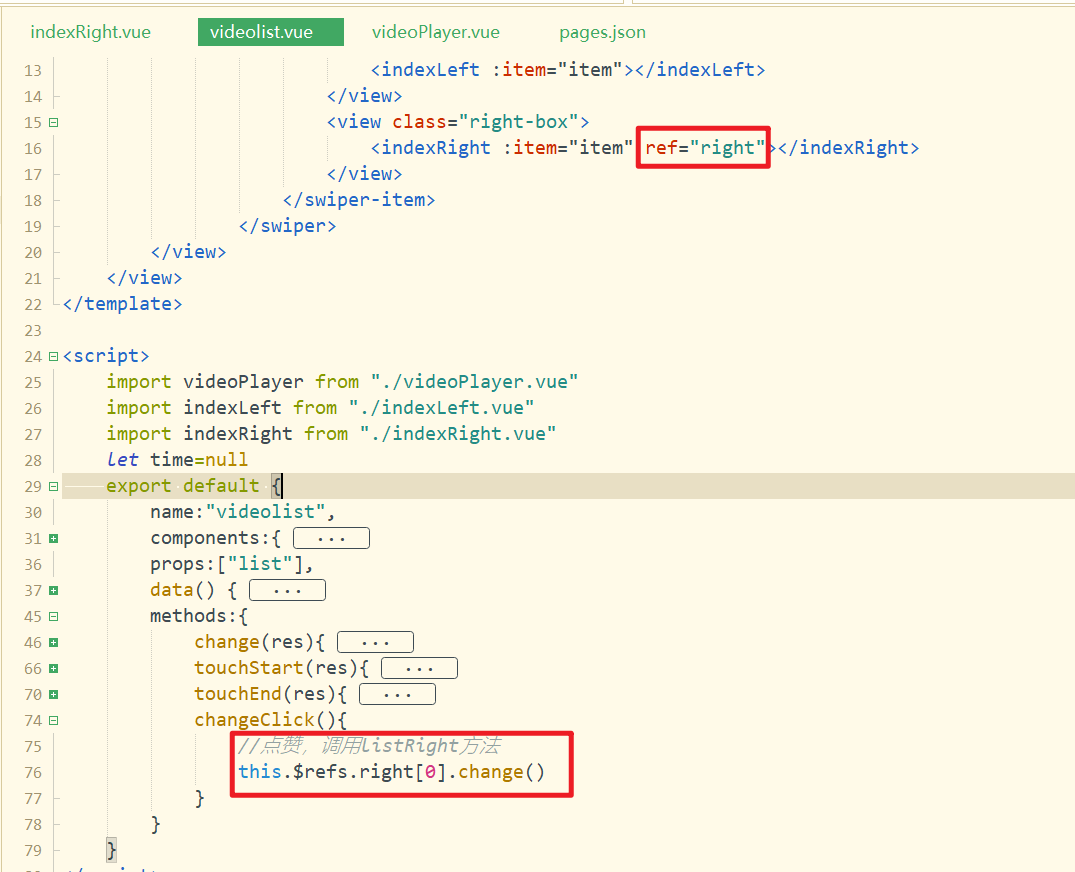
给父绑定自定义方法,如下:

实现对应的方法,如下:
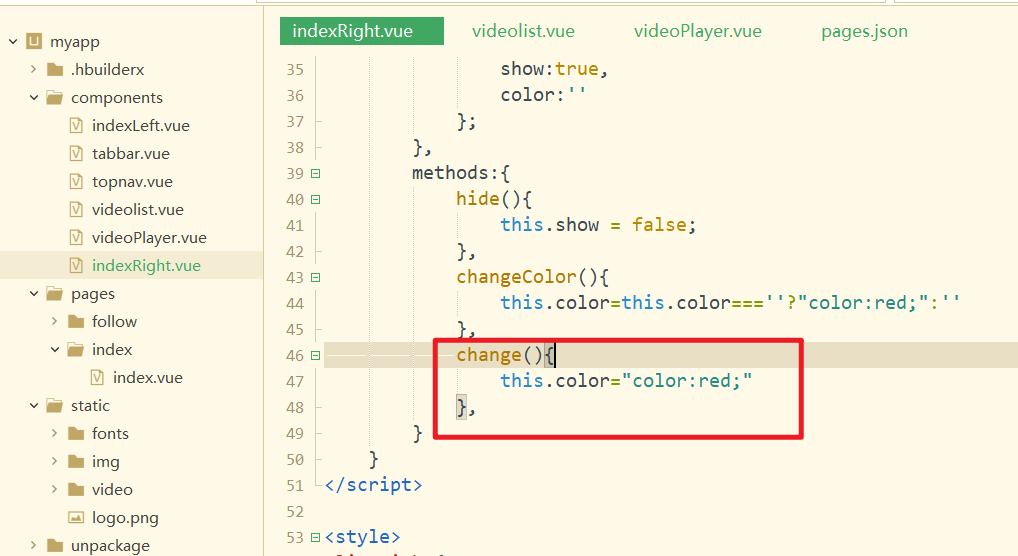
实现right中的change方法,如下:
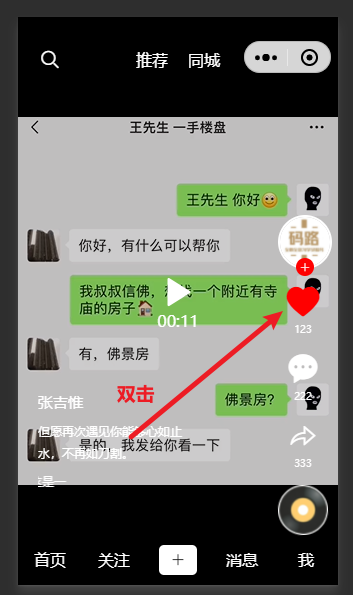
测试如下:
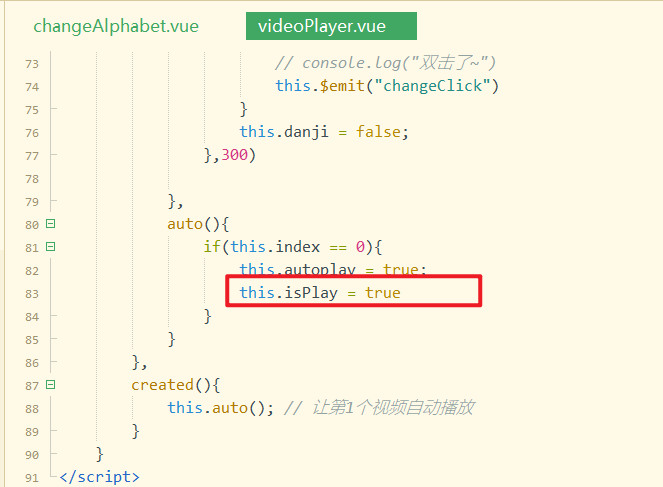
# 14,首个视频自动播放
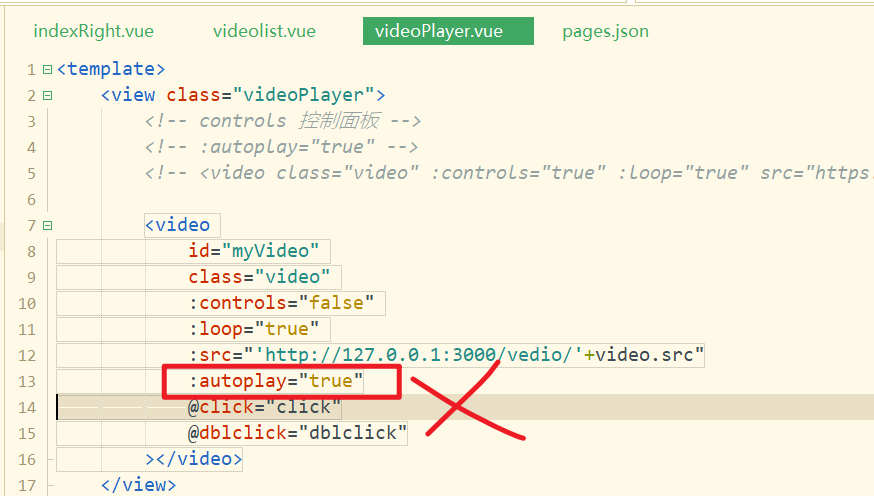
直接给video标签上,添加autoplay="true"是错误的,这样,所有视频都自动播放了。如下:
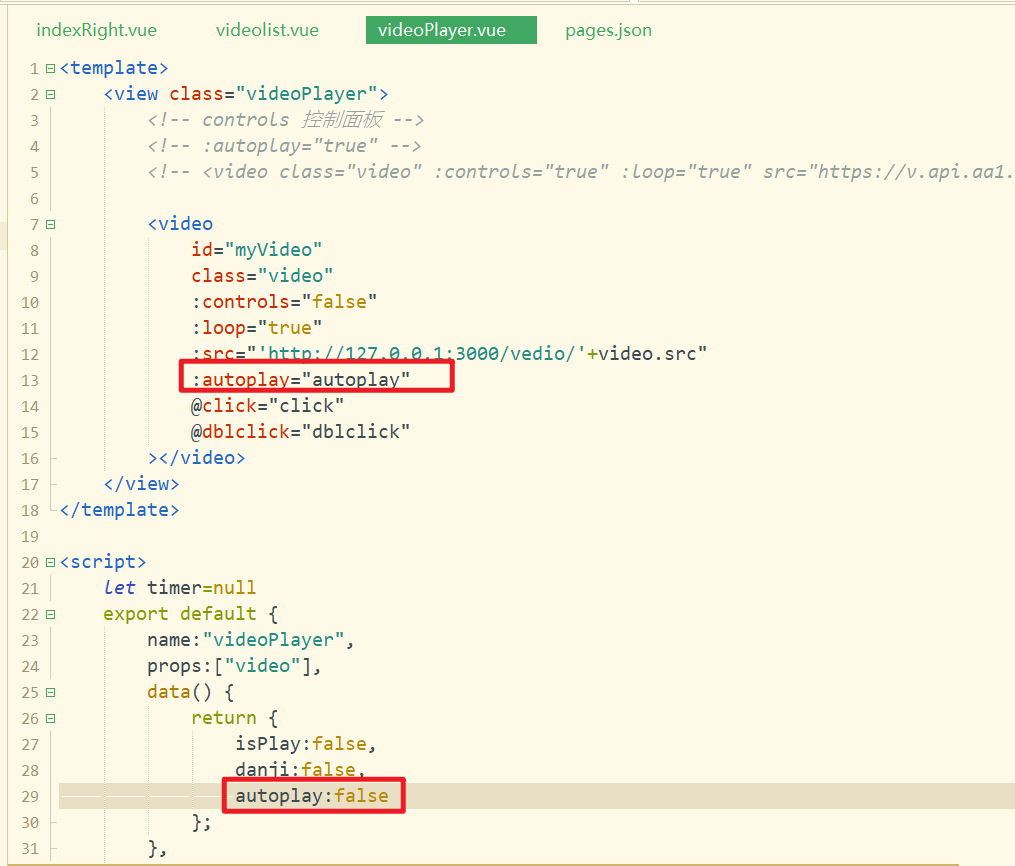
定义一个状态,控制是否自动播放,如下:
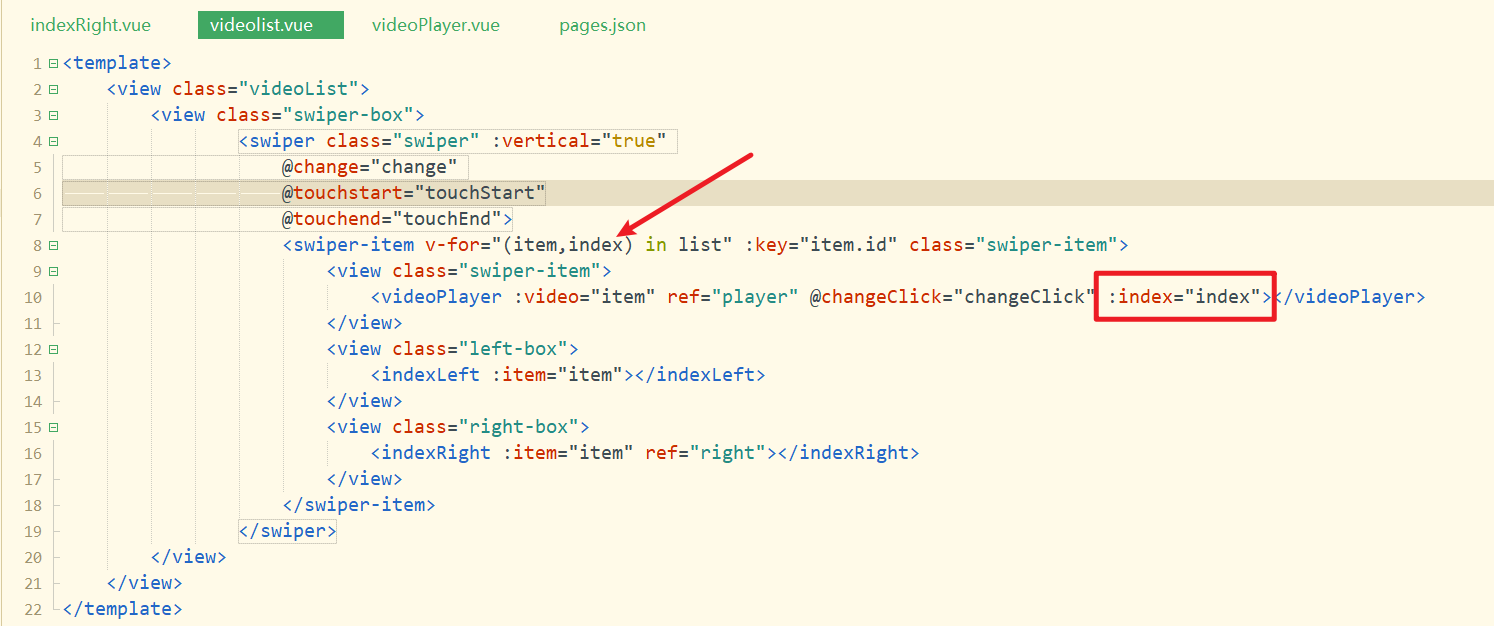
在父中把对应的索引传递给子,如下:
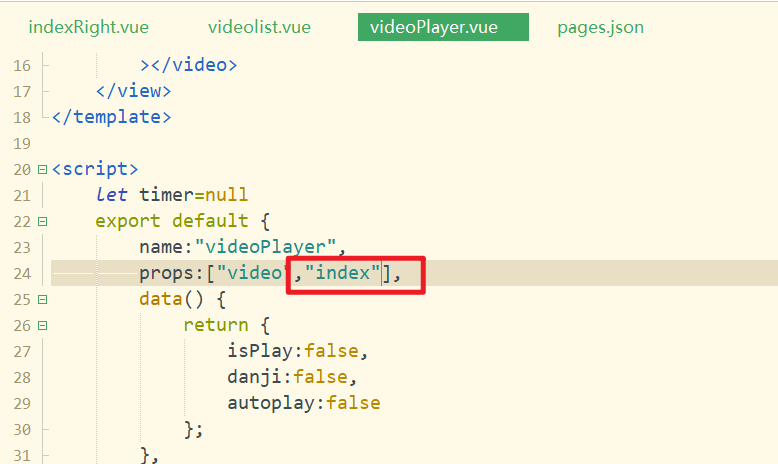
子接收之,如下:
定义自动播放的方法,并在created中调用之,如下:
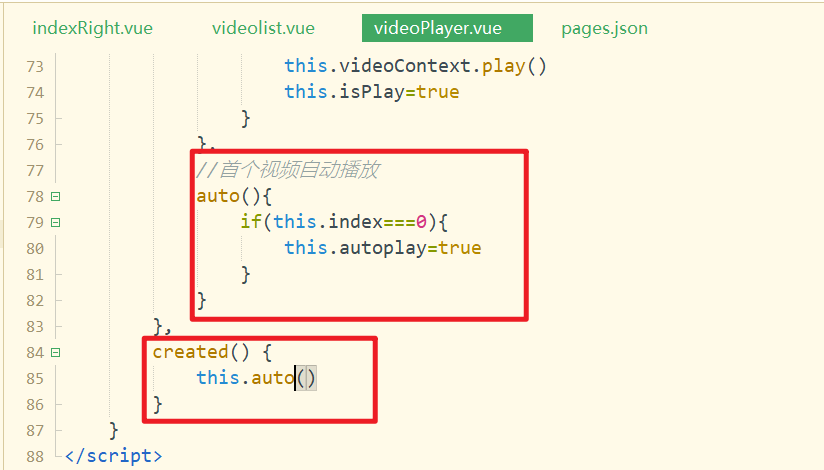
测试OK。
# 15,创建城市页面
需求:
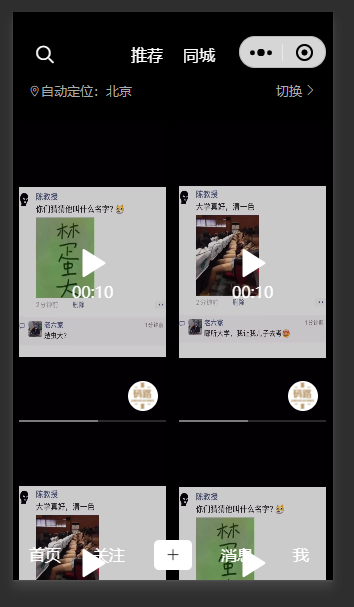
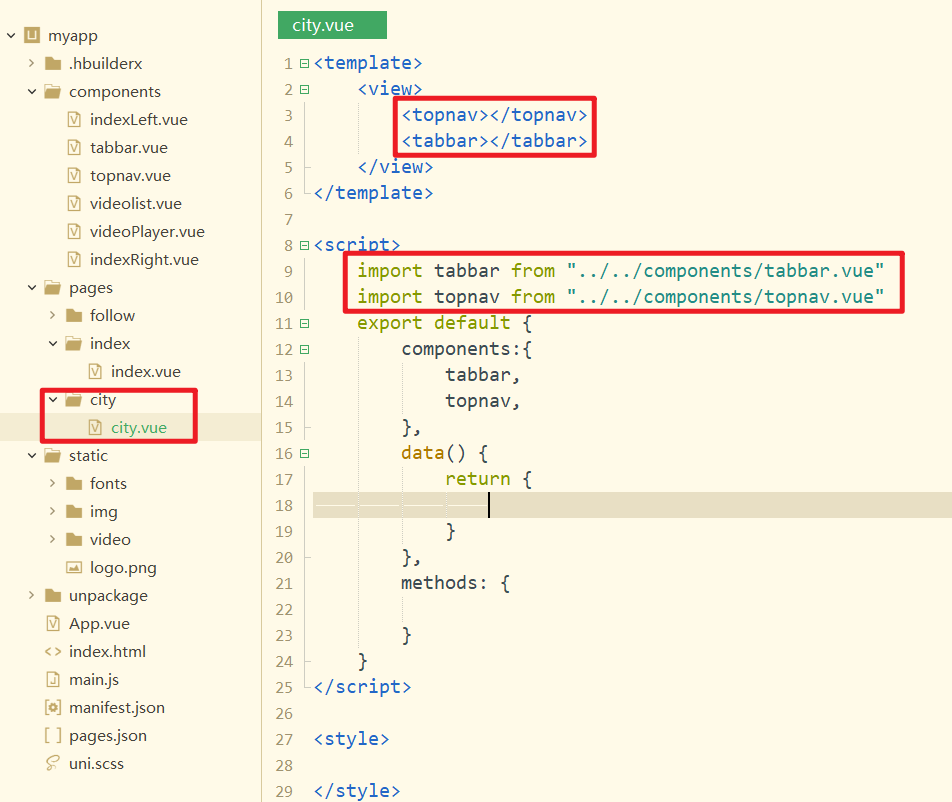
创建城市页,并引入公用组件,如下:
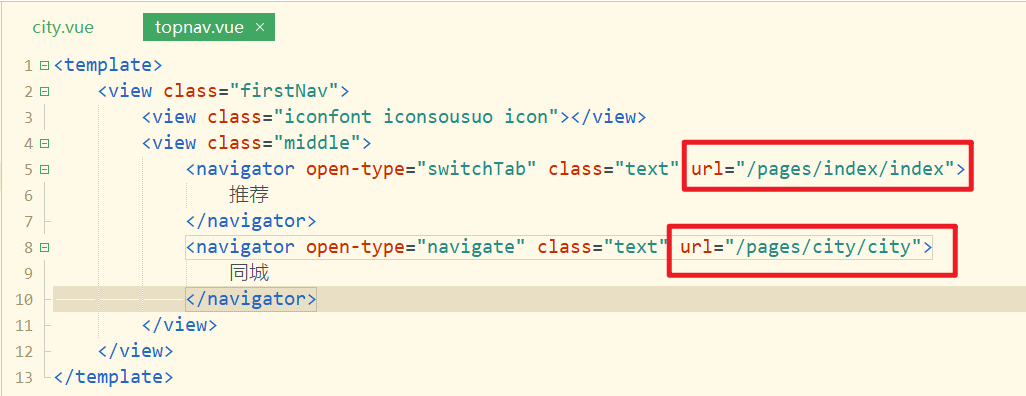
点击同城,去城市页,如下:
给城市页面,添加样式,如下:
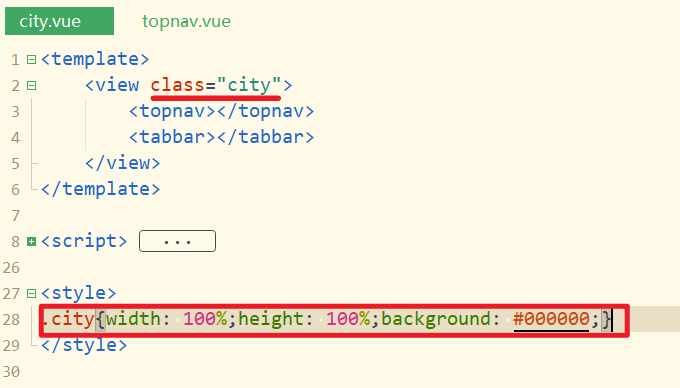
测试如下:
把同城页,放到第1位,这样编译时,就直接编译同城页面,如下:
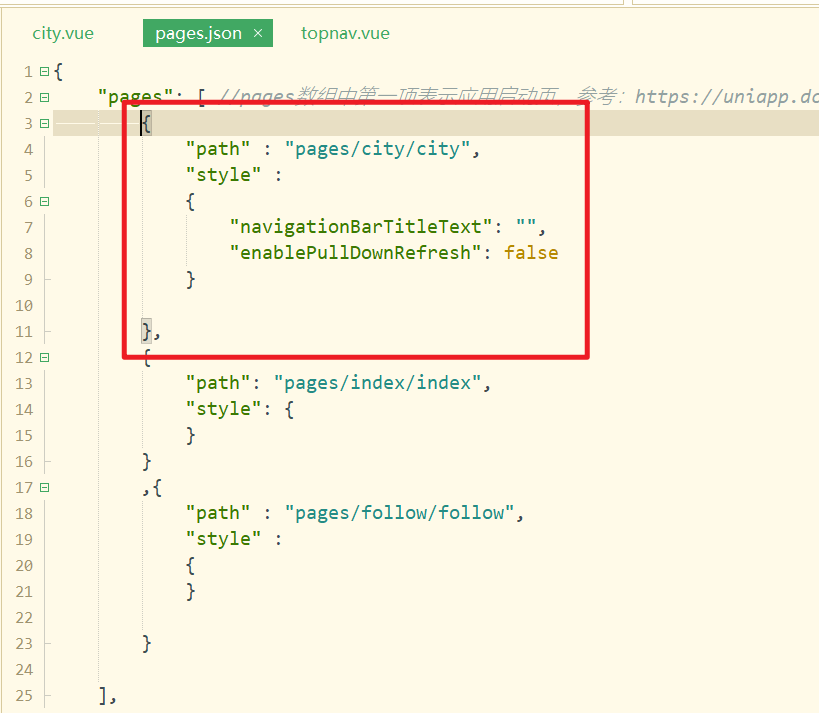
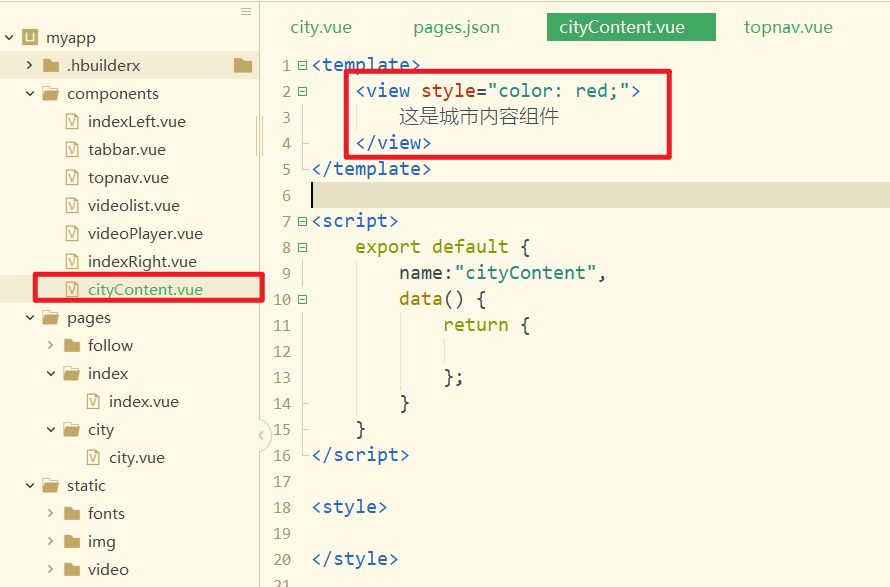
创建城市内容组件,如下:
在城市页中引入,注册,并使用之,如下:
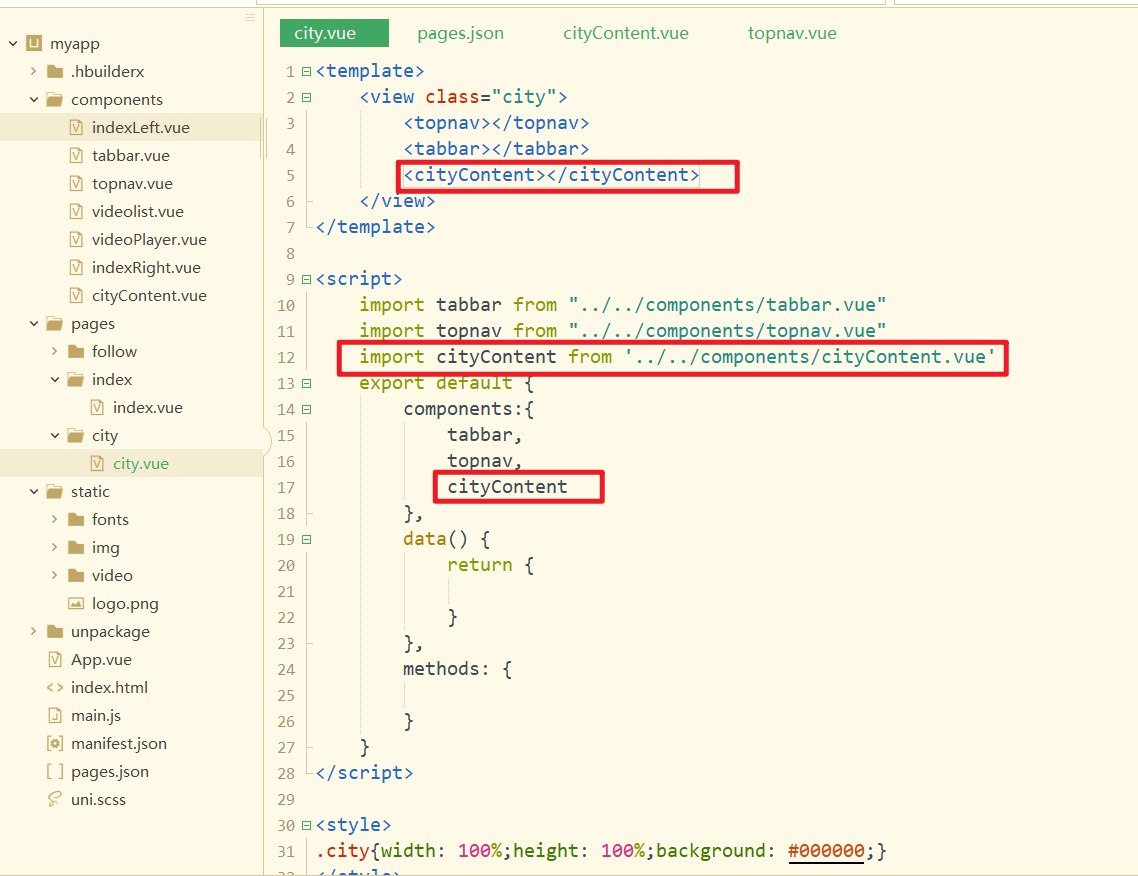
效果如下:
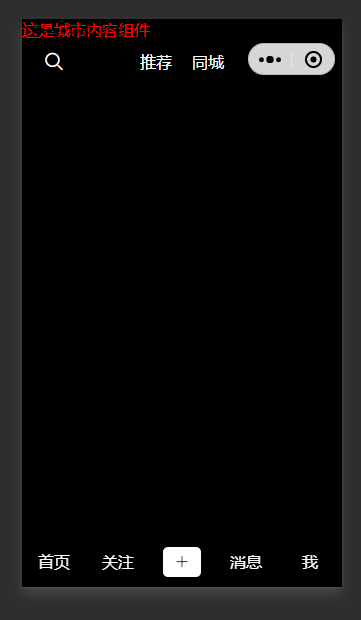
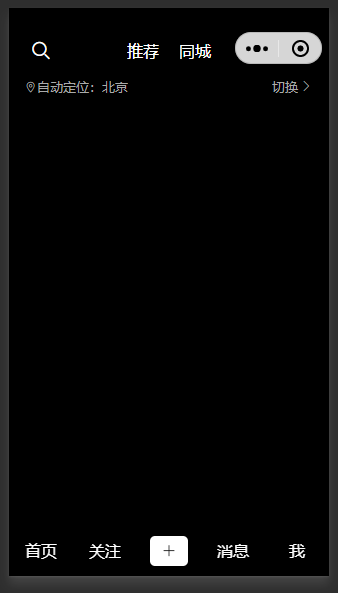
城市定位与选择城市实现,如下:
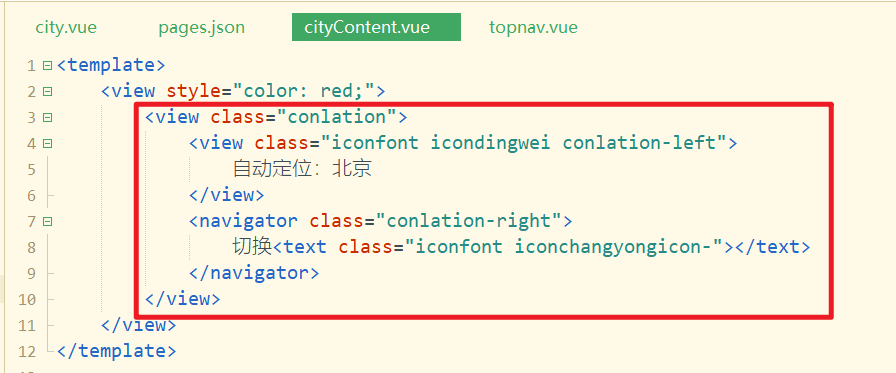
参考结构如下(直接copy):
<view class="conlation">
    <view class="iconfont icondingwei conlation-left">
        自动定位:北京
    </view>
    <navigator class="conlation-right">
        切换<text class="iconfont iconchangyongicon-"></text>
    </navigator>
</view>
2
3
4
5
6
7
8
样式如下:
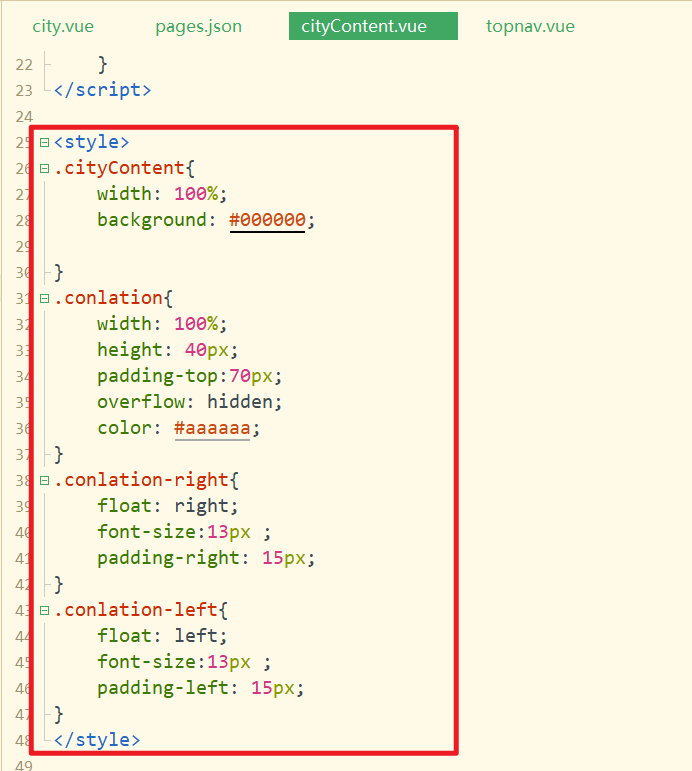
参考样式如下(直接copy):
<style>.cityContent {
    width: 100%;
    background: #000000;

}

.conlation {
    width: 100%;
    height: 40px;
    padding-top: 70px;
    overflow: hidden;
    color: #aaaaaa;
}

.conlation-right {
    float: right;
    font-size: 13px;
    padding-right: 15px;
}

.conlation-left {
    float: left;
    font-size: 13px;
    padding-left: 15px;
}

</style>
2
3
4
5
6
7
8
9
10
11
12
13
14
15
16
17
18
19
20
21
22
23
24
25
26
27
效果如下:
视频列表实现,如下:
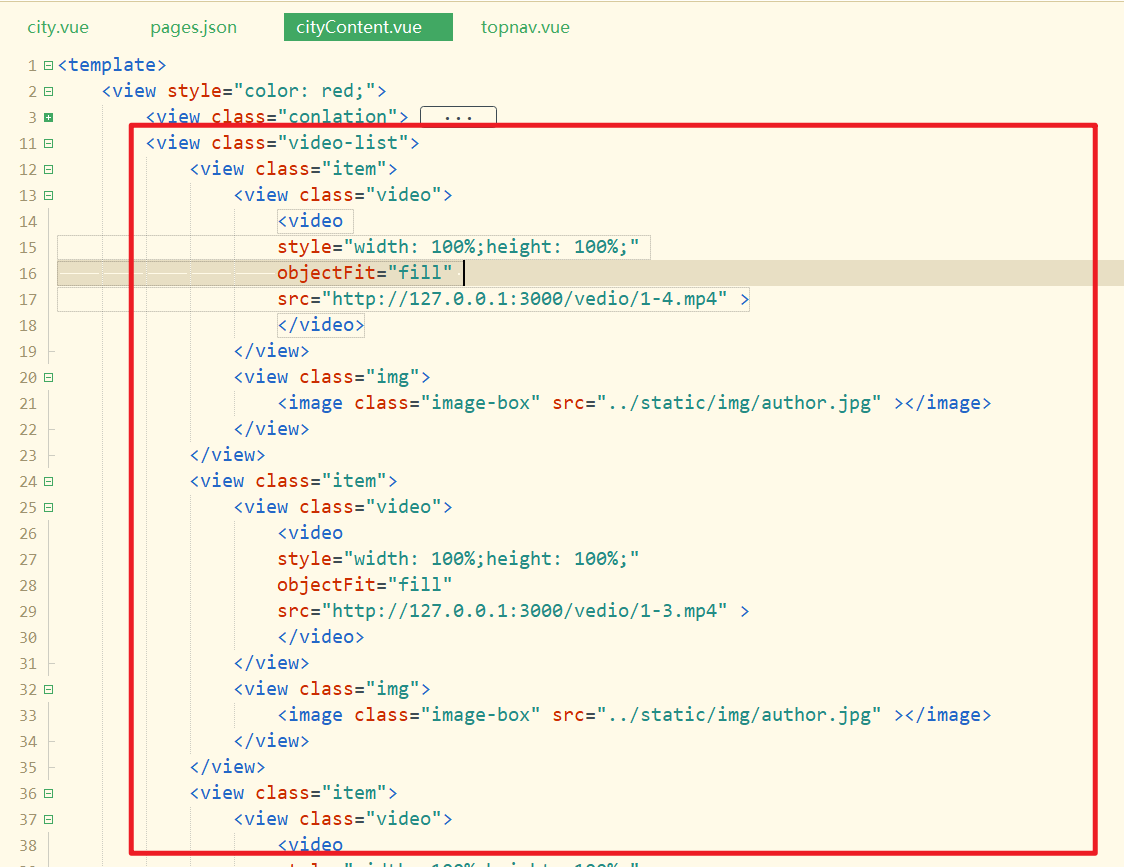
参考代码:
<view class="video-list">
    <view class="item">
        <view class="video">
            <video style="width: 100%;height: 100%;" objectFit="fill" src="http://127.0.0.1:3000/vedio/1-4.mp4">
            </video>
        </view>
        <view class="img">
            <image class="image-box" src="../static/img/author.jpg"></image>
        </view>
    </view>
    <view class="item">
        <view class="video">
            <video style="width: 100%;height: 100%;" objectFit="fill" src="http://127.0.0.1:3000/vedio/1-3.mp4">
            </video>
        </view>
        <view class="img">
            <image class="image-box" src="../static/img/author.jpg"></image>
        </view>
    </view>
    <view class="item">
        <view class="video">
            <video style="width: 100%;height: 100%;" objectFit="fill" src="http://127.0.0.1:3000/vedio/1-3.mp4">
            </video>
        </view>
        <view class="img">
            <image class="image-box" src="../static/img/author.jpg"></image>
        </view>
    </view>
    <view class="item">
        <view class="video">
            <video style="width: 100%;height: 100%;" objectFit="fill" src="http://127.0.0.1:3000/vedio/1-4.mp4">
            </video>
        </view>
        <view class="img">
            <image class="image-box" src="../static/img/author.jpg"></image>
        </view>
    </view>
</view>
2
3
4
5
6
7
8
9
10
11
12
13
14
15
16
17
18
19
20
21
22
23
24
25
26
27
28
29
30
31
32
33
34
35
36
37
38
样式如下:
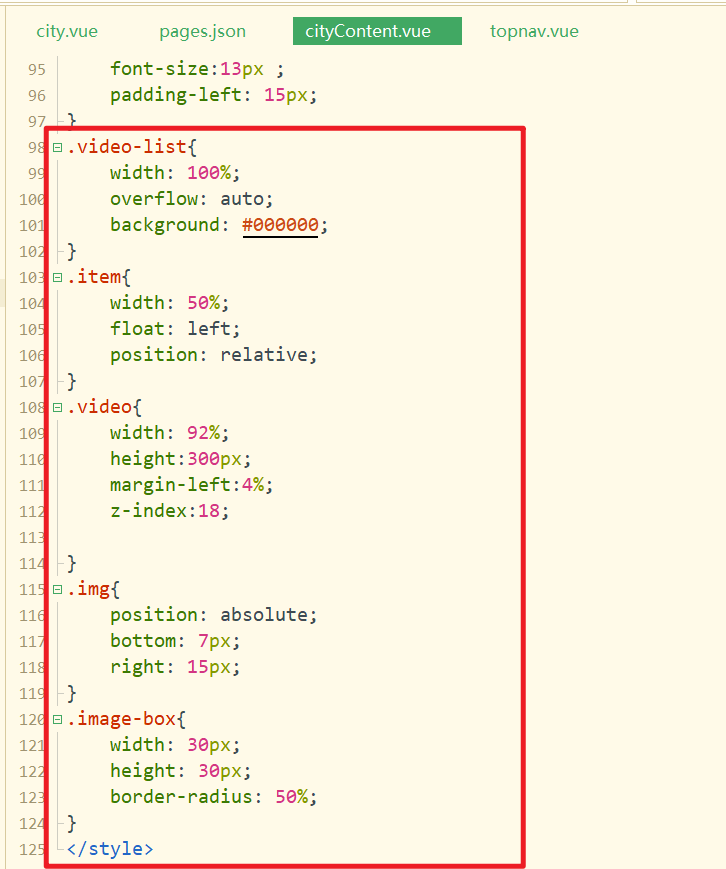
参考样式如下:
.video-list {
    width: 100%;
    overflow: auto;
    background: #000000;
}

.item {
    width: 50%;
    float: left;
    position: relative;
}

.video {
    width: 92%;
    height: 300px;
    margin-left: 4%;
    z-index: 18;

}

.img {
    position: absolute;
    bottom: 7px;
    right: 15px;
}

.image-box {
    width: 30px;
    height: 30px;
    border-radius: 50%;
}
2
3
4
5
6
7
8
9
10
11
12
13
14
15
16
17
18
19
20
21
22
23
24
25
26
27
28
29
30
31
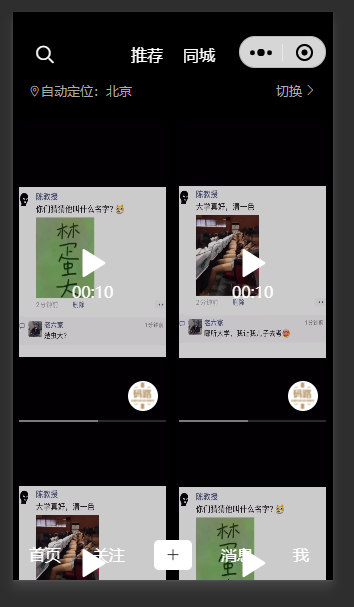
效果如下:
# 16,城市选择
需求:
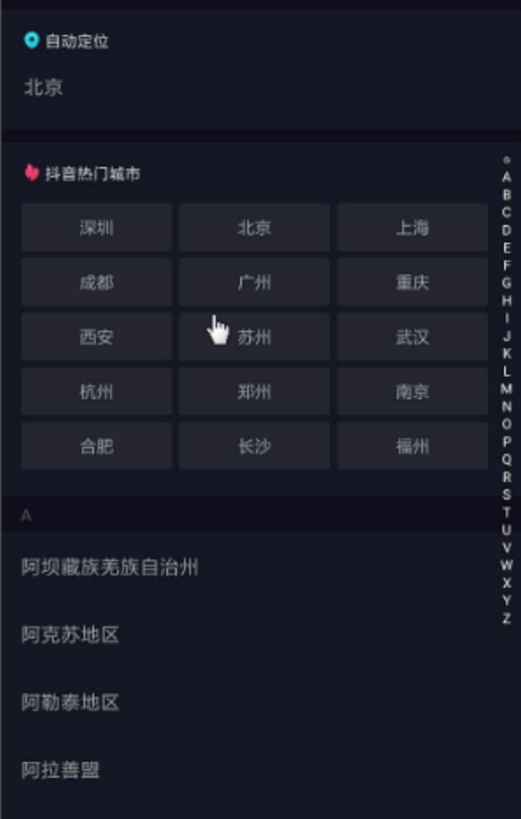
创建城市选择页面,如下:
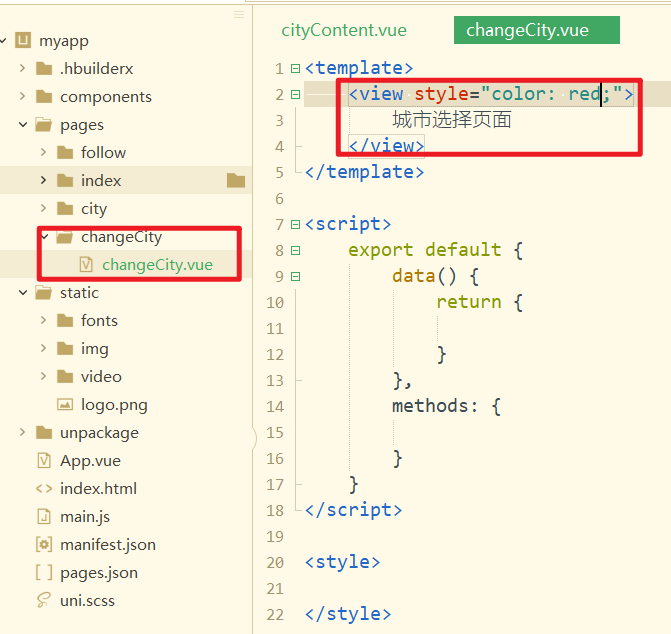
点击切换,去城市选择页面,如下:

测试如下:
将城市选择页面放到最前面,如下:
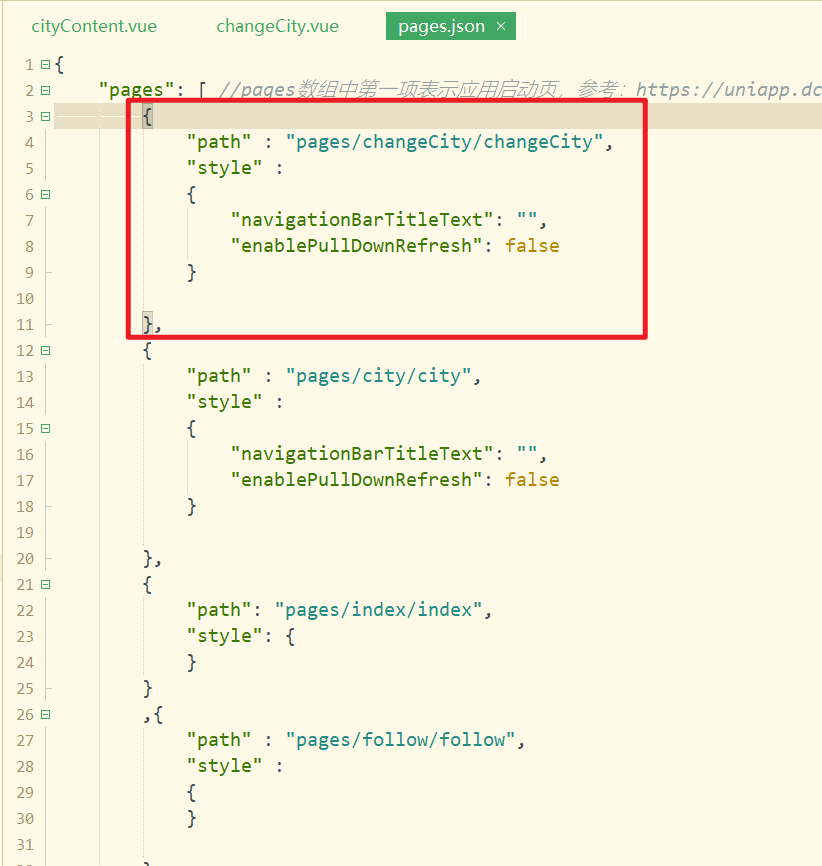
将城市选择页面的顶部封装成一个组件,chageHeader组件,创建对应的组件如下:
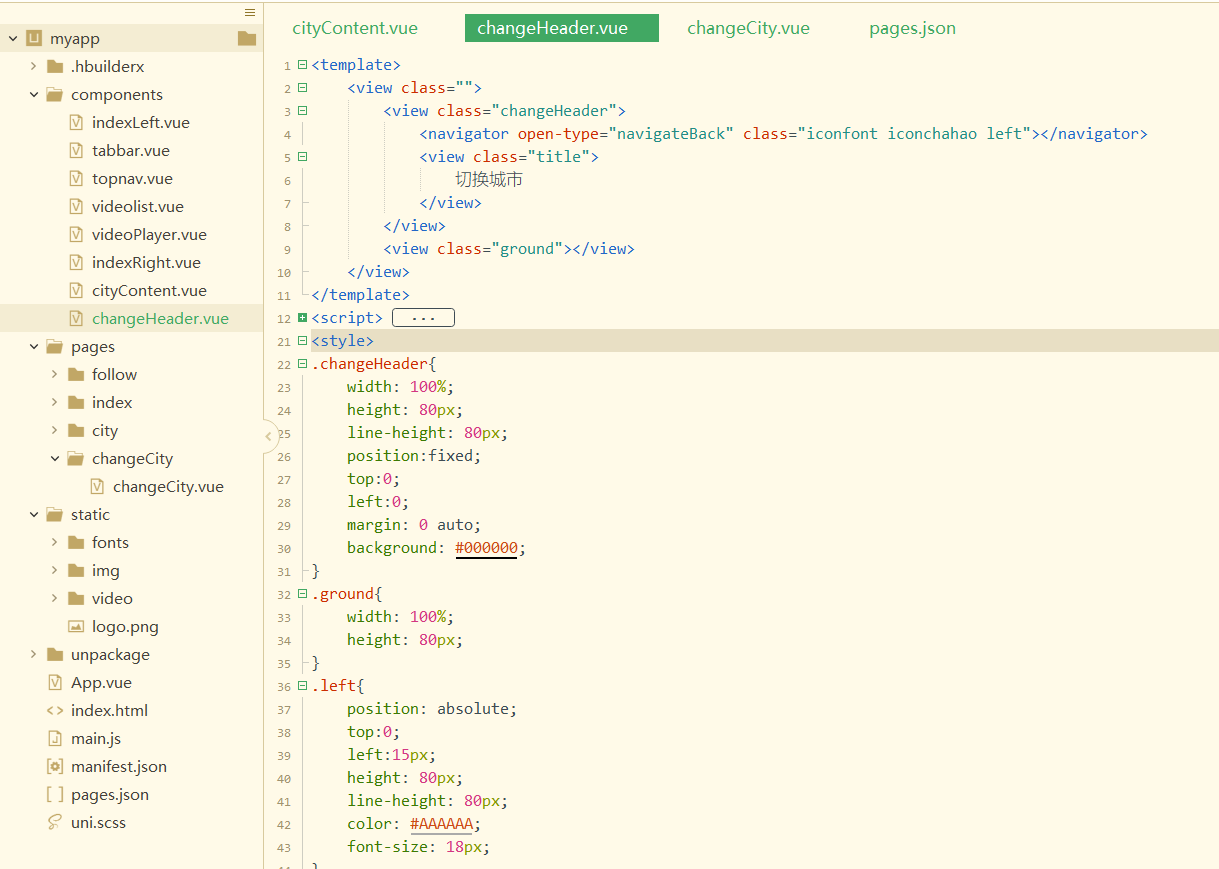
参考代码如下:
<template>
	<view class="">
		<view class="changeHeader">
			<navigator open-type="navigateBack" class="iconfont iconchahao left"></navigator>
			<view class="title">
				切换城市
			</view>
		</view>
		<view class="ground"></view>
	</view>
</template>
<script>
	export default {
		data() {
			return {

			};
		}
	}
</script>
<style>
.changeHeader{
	width: 100%;
	height: 80px;
	line-height: 80px;
	position:fixed;
	top:0;
	left:0;
	margin: 0 auto;
	background: #000000;
}
.ground{
	width: 100%;
	height: 80px;
}
.left{
	position: absolute;
	top:0;
	left:15px;
	height: 80px;
	line-height: 80px;
	color: #AAAAAA;
	font-size: 18px;
}
.title{
	font-size:17px;
	text-align: center;
	color: #FFFFFF;
}
</style>
2
3
4
5
6
7
8
9
10
11
12
13
14
15
16
17
18
19
20
21
22
23
24
25
26
27
28
29
30
31
32
33
34
35
36
37
38
39
40
41
42
43
44
45
46
47
48
49
50
在城市选择页面中引入,注册,使用之,如下:
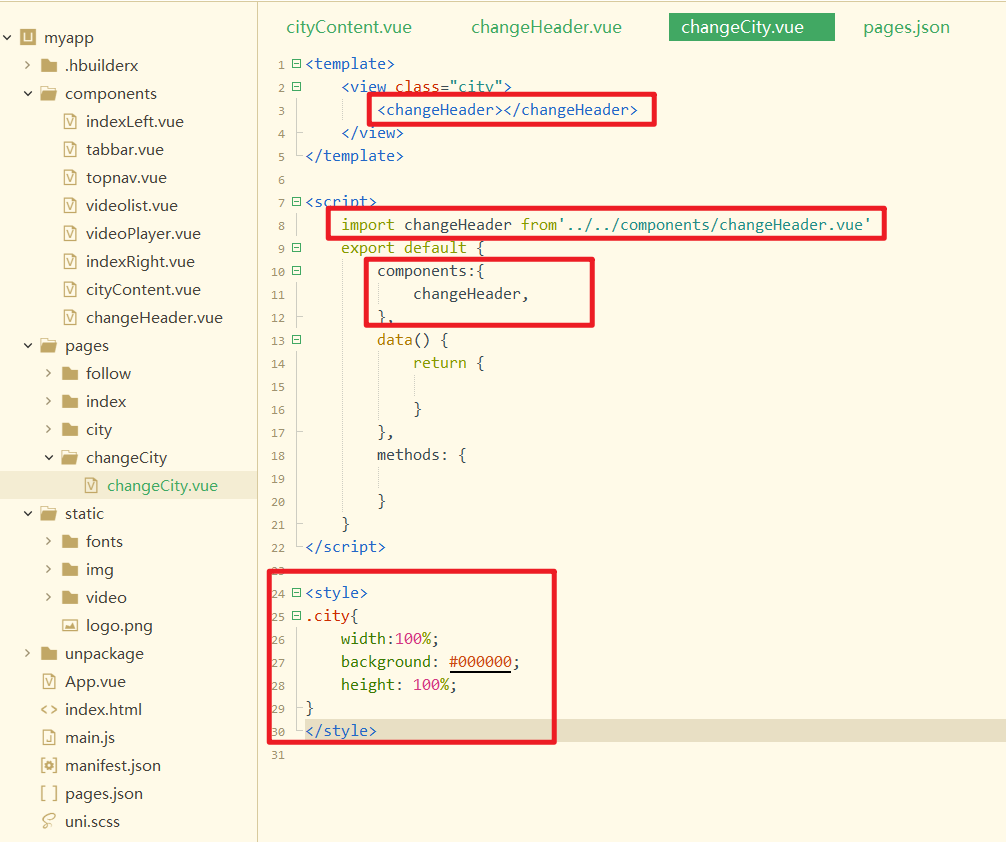
效果如下:
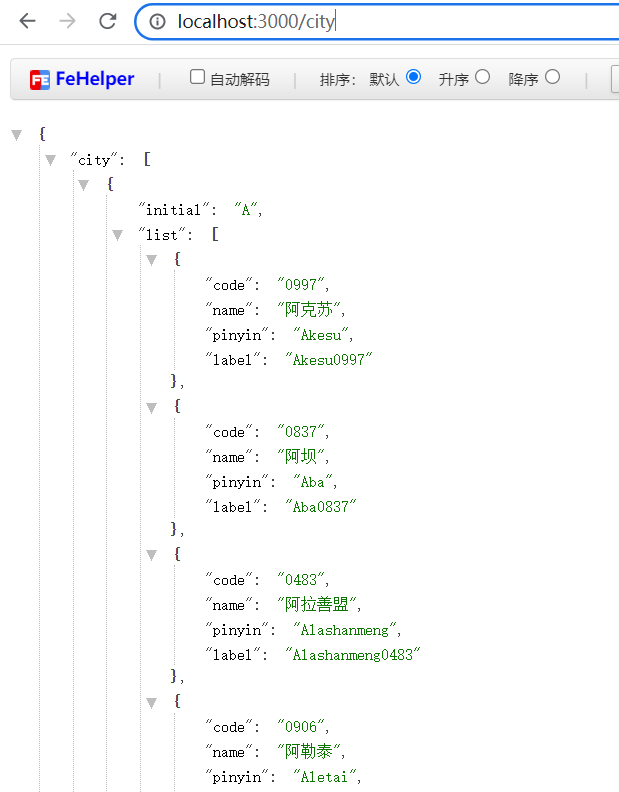
调用接口,获取城市列表数据数据,接口:http://localhost:3000/city 测试如下:
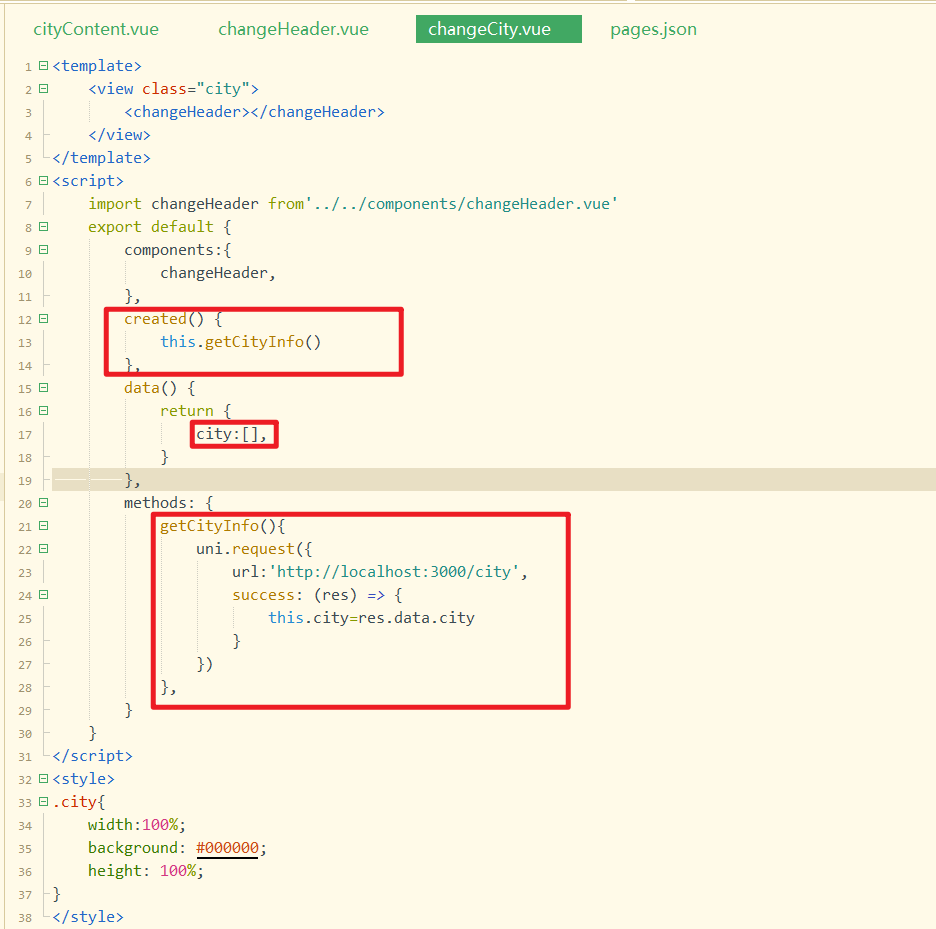
在城市选择页中调用接口,如下:
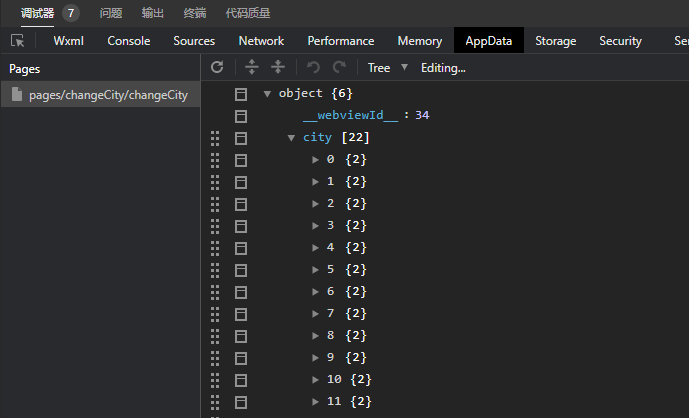
测试如下:
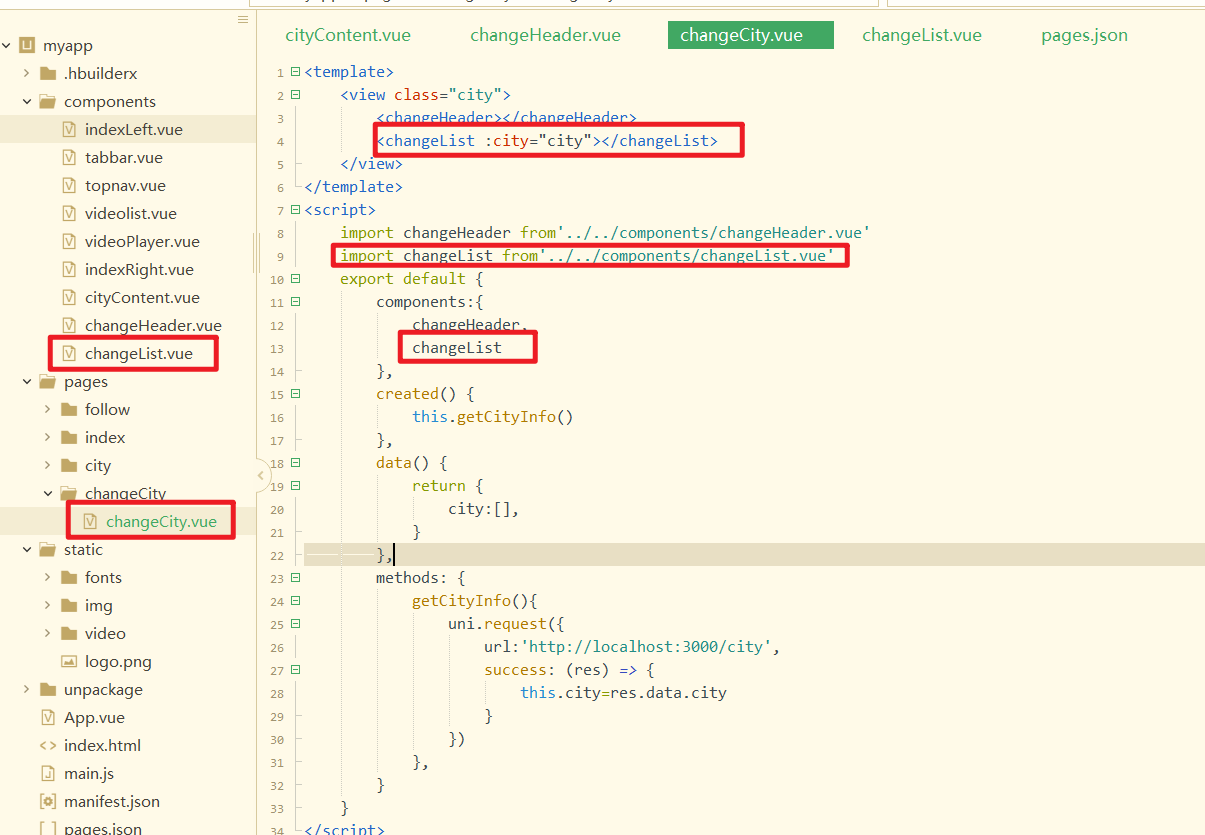
创建changeList组件,在父中引用,注册,使用,并将数据传递给子组件,如下:
在子组件中接收之,如下:

再准备好热门城市数据,如下:
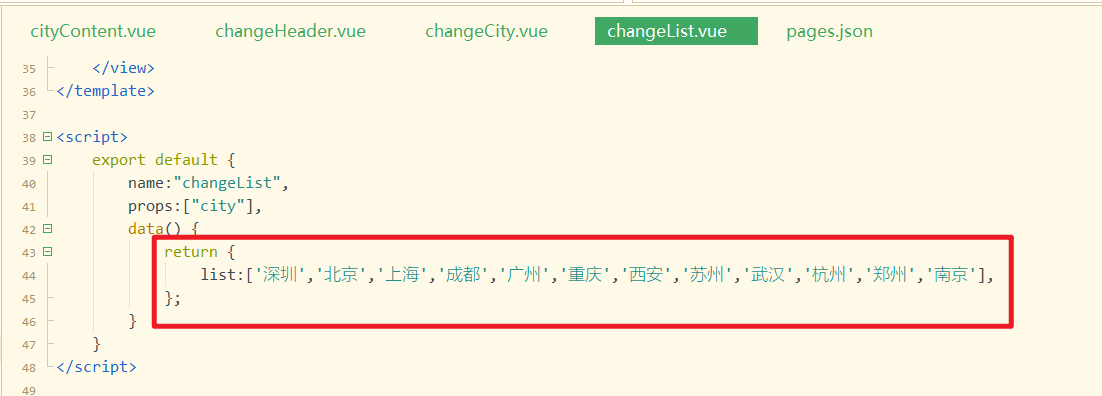
渲染之,如下:
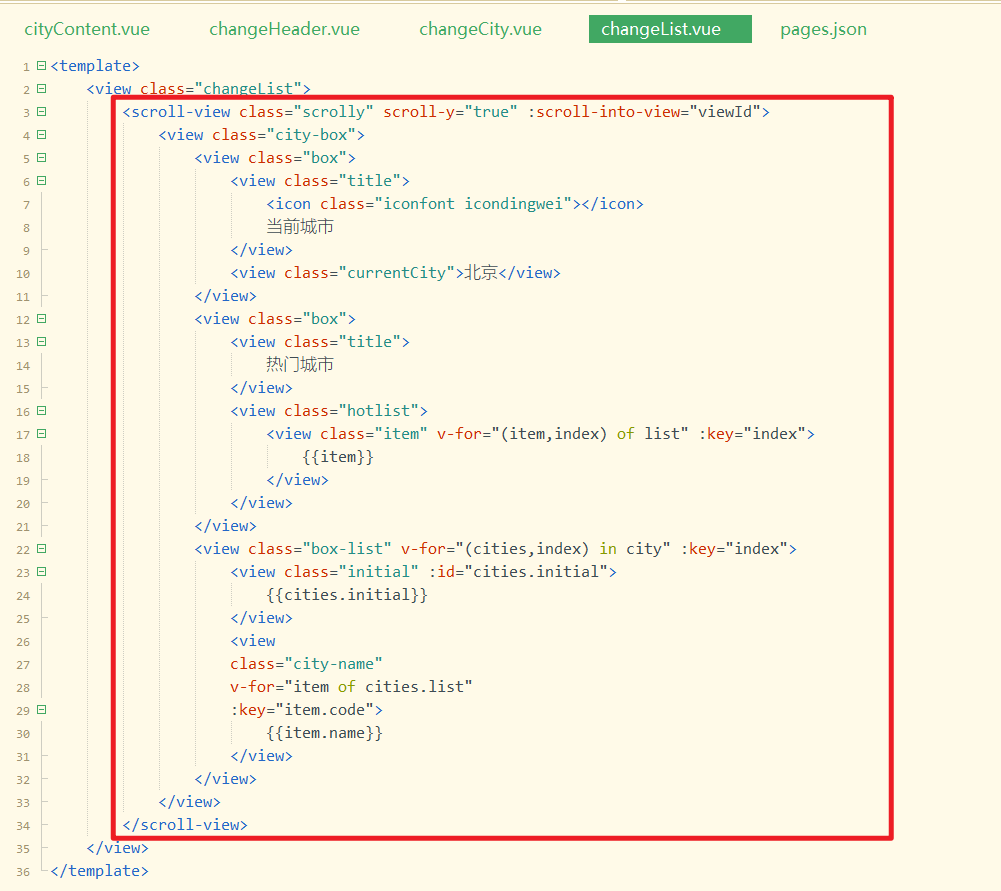
样式如下:
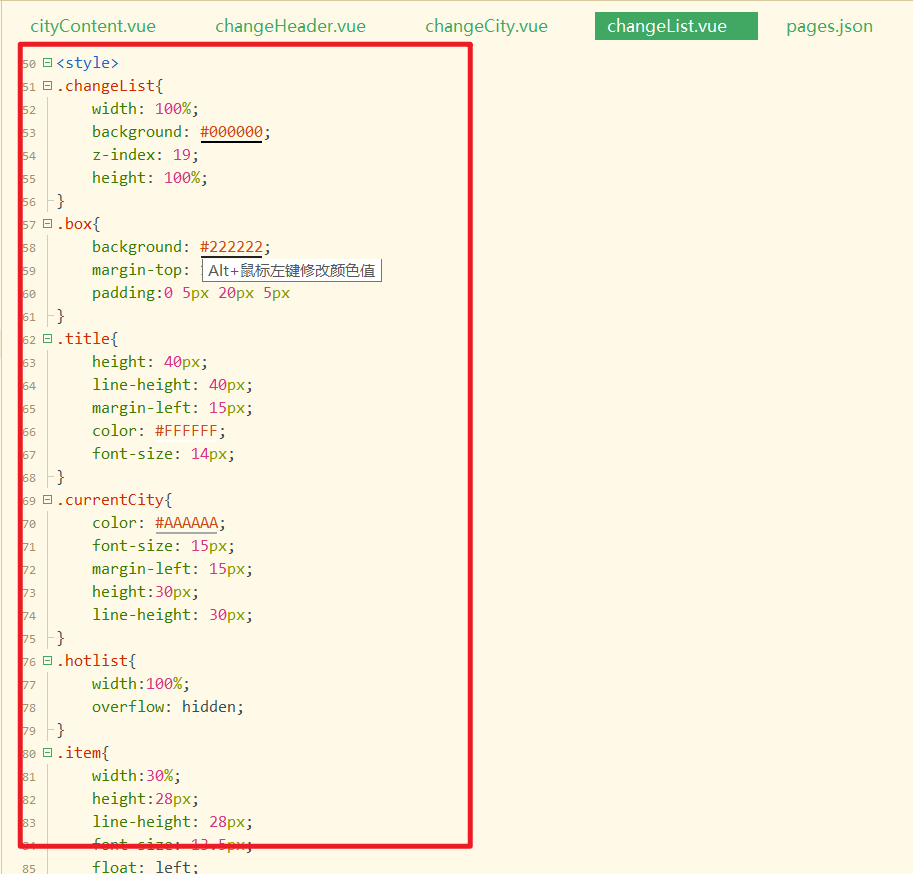
参考代码如下:
<style>.changeList {
    width: 100%;
    background: #000000;
    z-index: 19;
    height: 100%;
}

.box {
    background: #222222;
    margin-top: 10px;
    padding: 0 5px 20px 5px
}

.title {
    height: 40px;
    line-height: 40px;
    margin-left: 15px;
    color: #FFFFFF;
    font-size: 14px;
}

.currentCity {
    color: #AAAAAA;
    font-size: 15px;
    margin-left: 15px;
    height: 30px;
    line-height: 30px;
}

.hotlist {
    width: 100%;
    overflow: hidden;
}

.item {
    width: 30%;
    height: 28px;
    line-height: 28px;
    font-size: 13.5px;
    float: left;
    background: #333333;
    margin-left: 2.5%;
    margin-bottom: 10px;
    text-align: center;
    color: #AAAAAA;
}

.box-list {
    padding: 8px 5px;
}

.initial {
    height: 25px;
    line-height: 25px;
    background: #000000;
    padding-left: 10px;
    color: #666666;
    font-size: 12px;
}

.city-name {
    background: #222222;
    height: 40px;
    line-height: 40px;
    padding-left: 10px;
    color: #AAAAAA;
    font-size: 15px;
}

.scrolly {
    height: 100%;
}

</style>
2
3
4
5
6
7
8
9
10
11
12
13
14
15
16
17
18
19
20
21
22
23
24
25
26
27
28
29
30
31
32
33
34
35
36
37
38
39
40
41
42
43
44
45
46
47
48
49
50
51
52
53
54
55
56
57
58
59
60
61
62
63
64
65
66
67
68
69
70
71
72
73
74
效果如下:
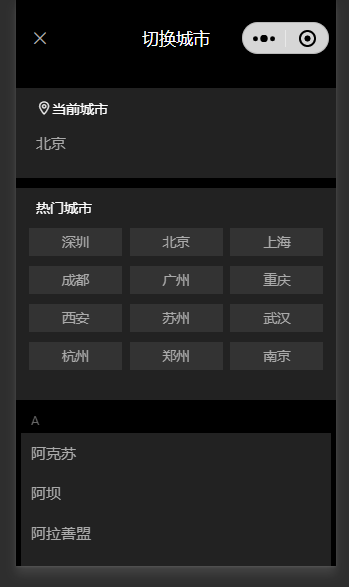
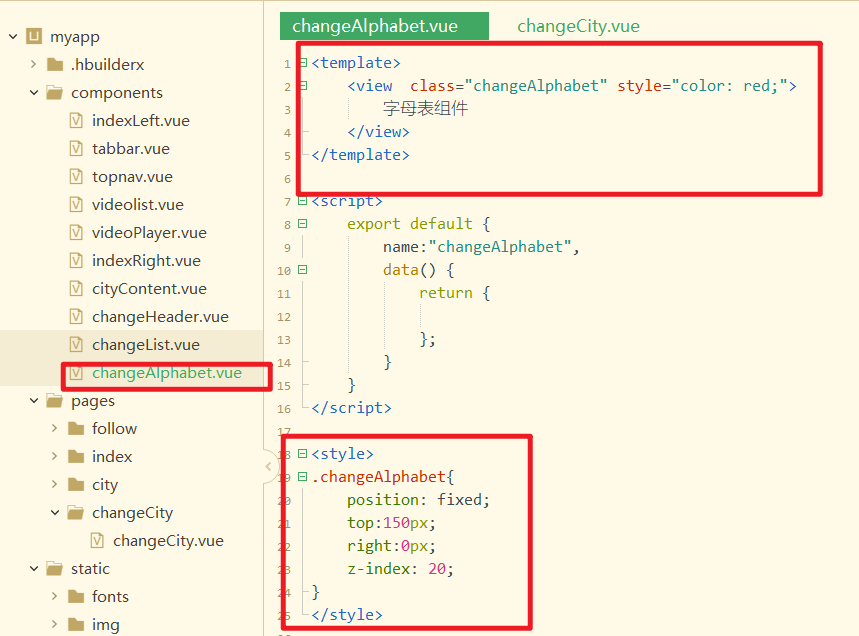
创建字母表组件,如下:
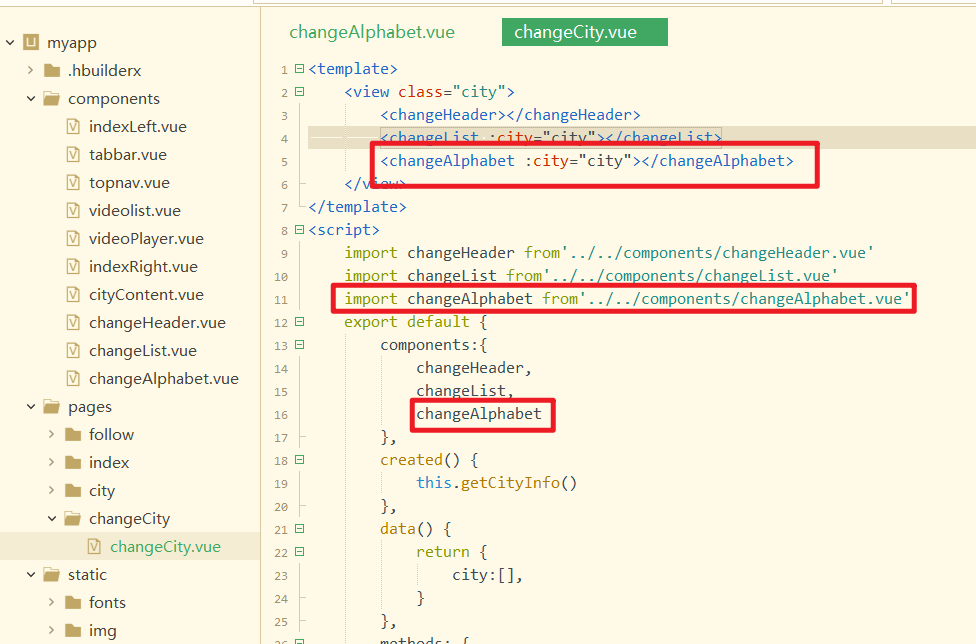
在城市选择页中引入,注册,使用,并传递数据,如下:
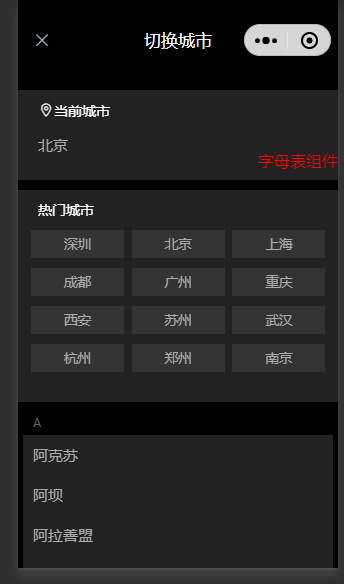
效果如下:
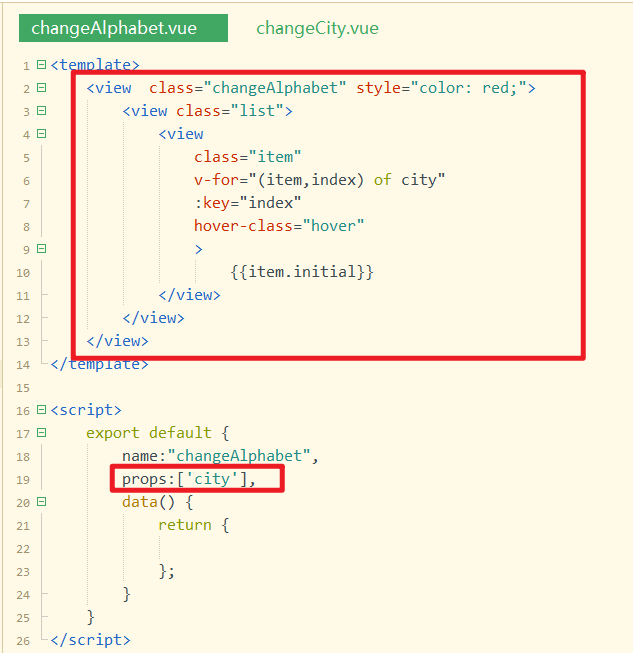
渲染字母表,如下:
样式如下:
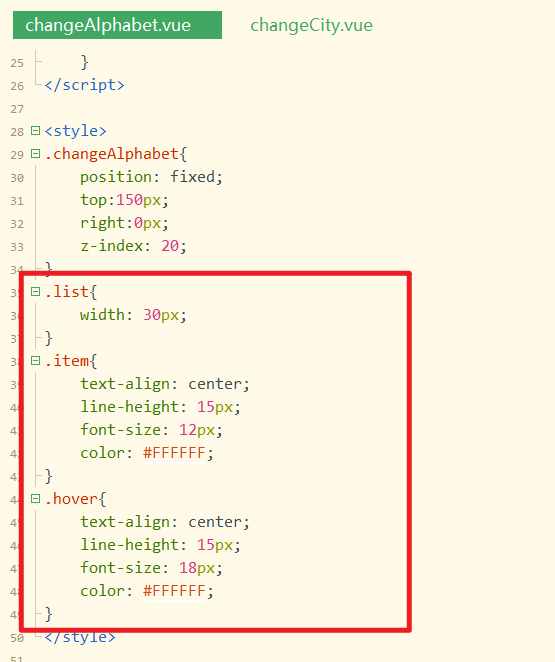
参考样式如下:
.list {
    width: 30px;
}

.item {
    text-align: center;
    line-height: 15px;
    font-size: 12px;
    color: #FFFFFF;
}

.hover {
    text-align: center;
    line-height: 15px;
    font-size: 18px;
    color: #FFFFFF;
}
2
3
4
5
6
7
8
9
10
11
12
13
14
15
16
17
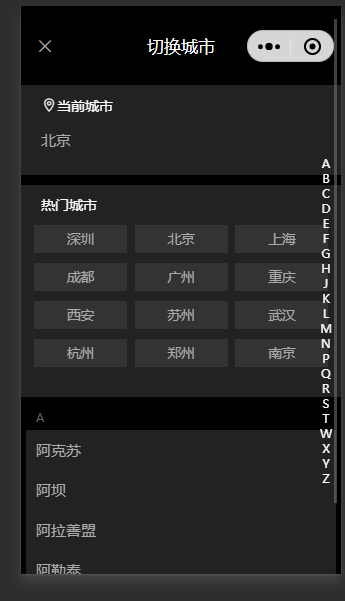
效果如下:
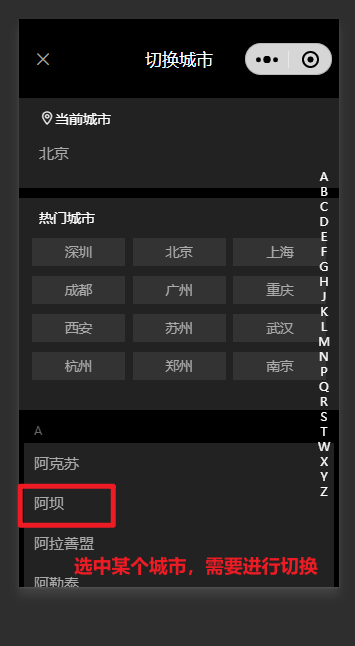
选中某个城市,进行切换,如下:
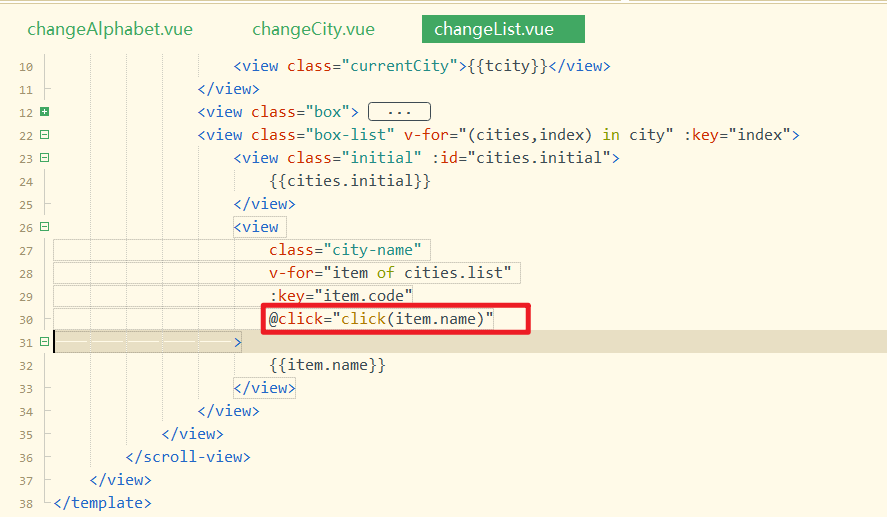
给对应的城市绑定点击事件,如下:
实现点击方法,如下:
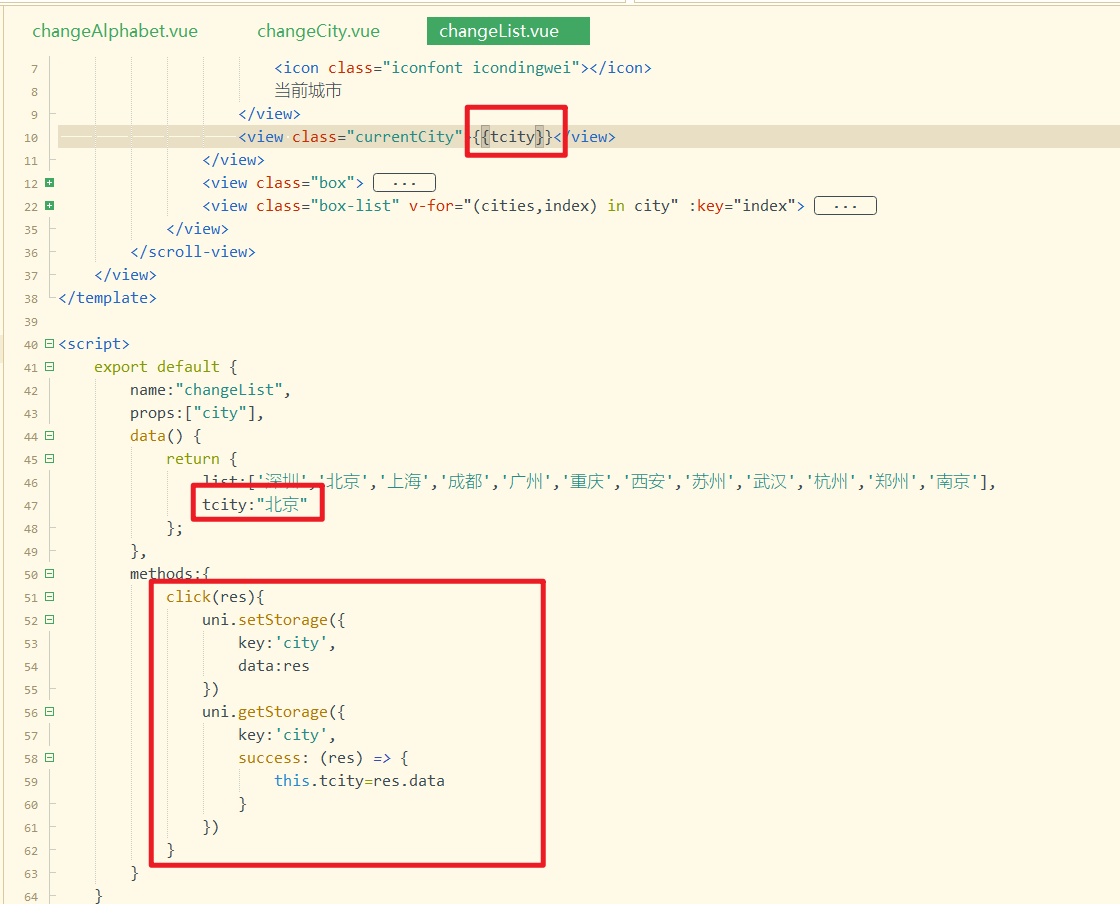
测试如下:
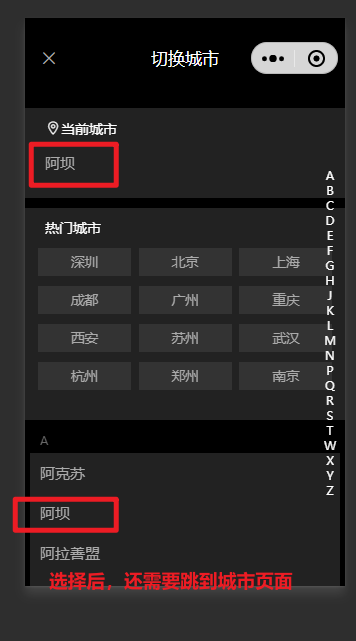
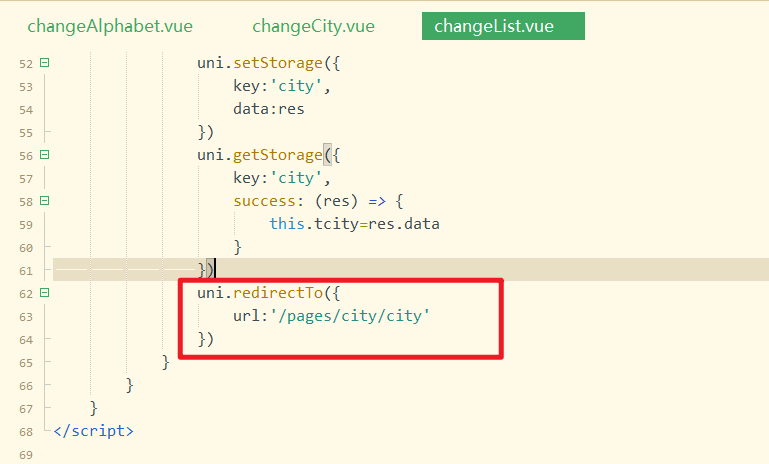
选择后,跳到城市页面,如下:
在城市页中获取数据,并传递,如下:
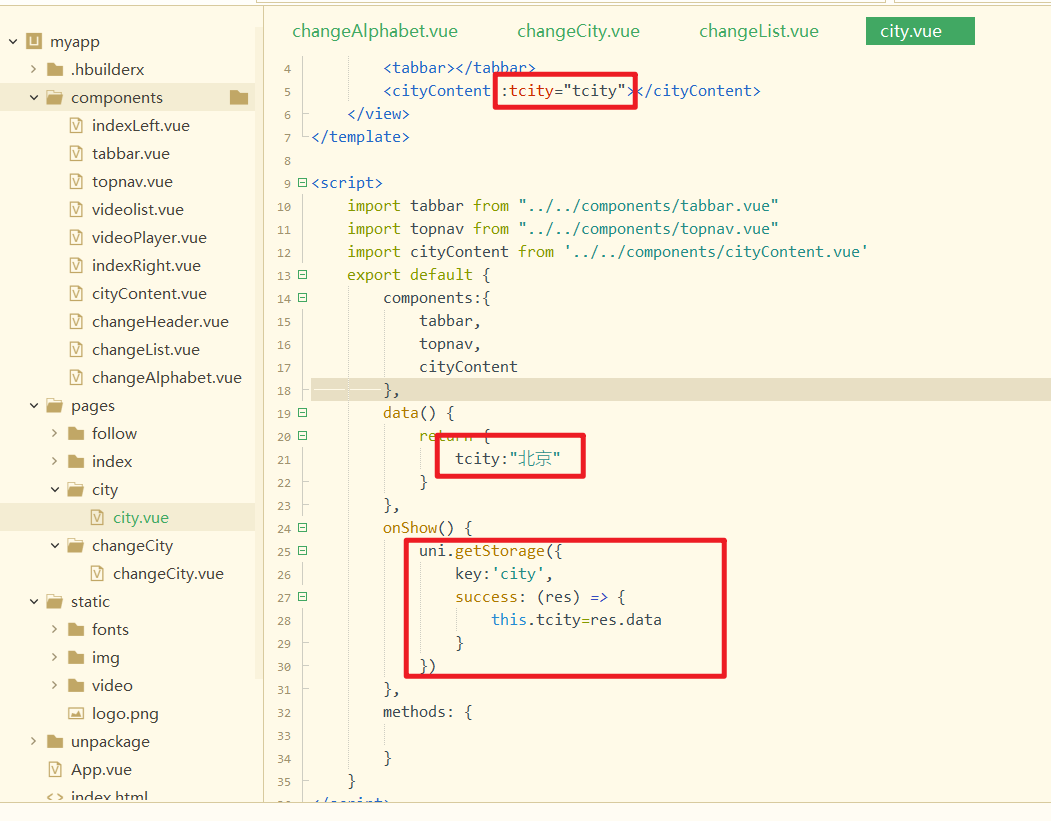
子组件,接收数据,并使用之,如下:
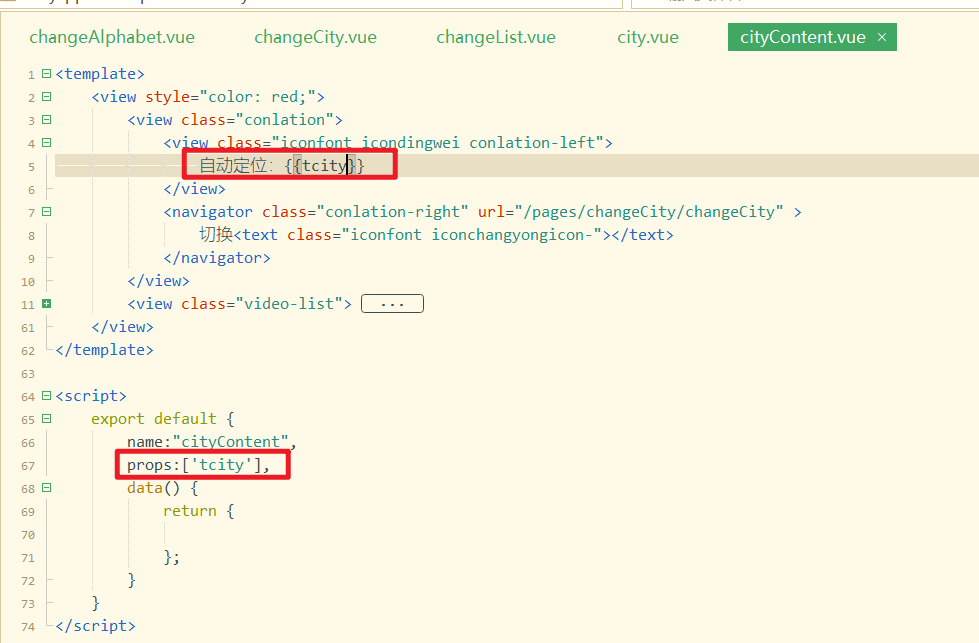
测试如下:
# 17,点击字母表中的字母实现联动
给字母表中的字母绑定点击事件,如下:
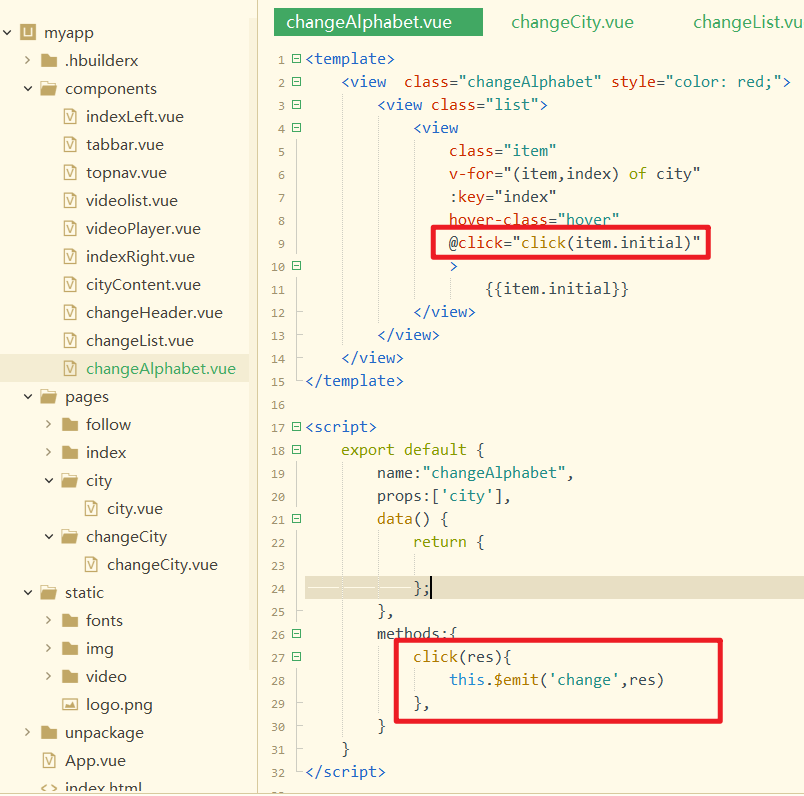
实现自定义方法,如下:

实现对应的方法,如下:
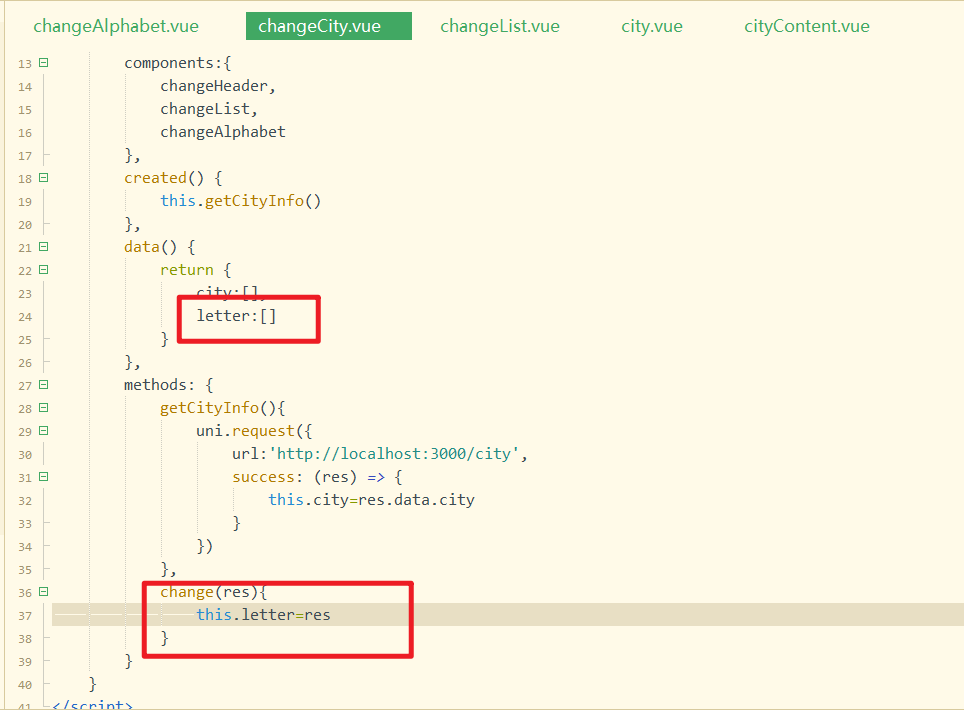
测试如下:
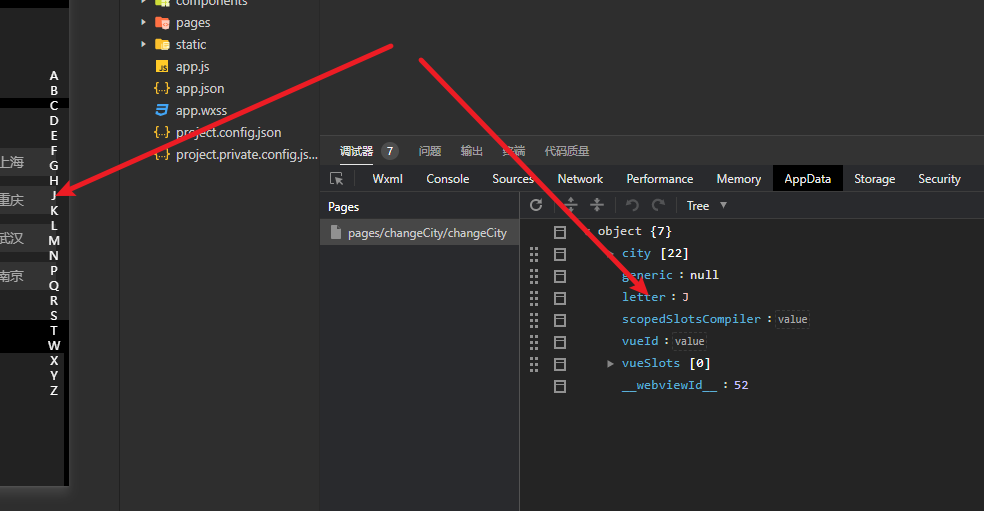
把letter再传递给子组件,如下:

子组件接收之,如下:
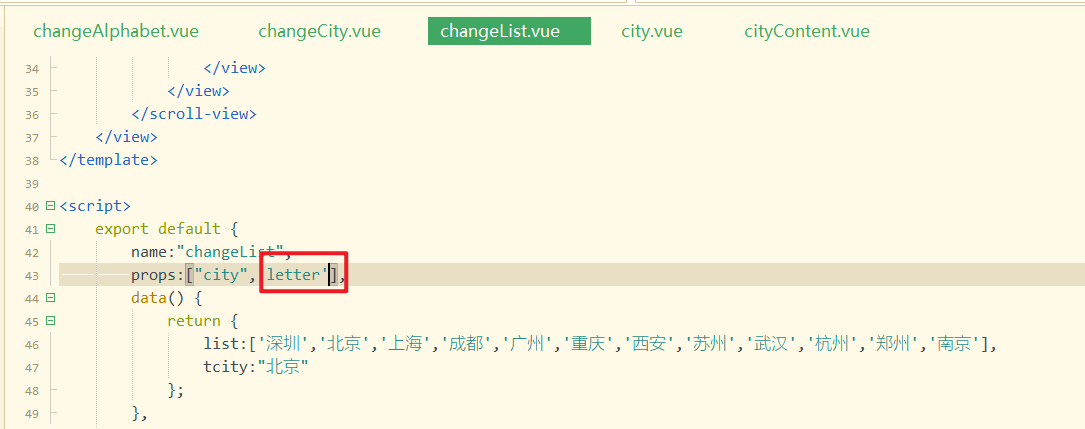
列表滚动到具体位置,如下:
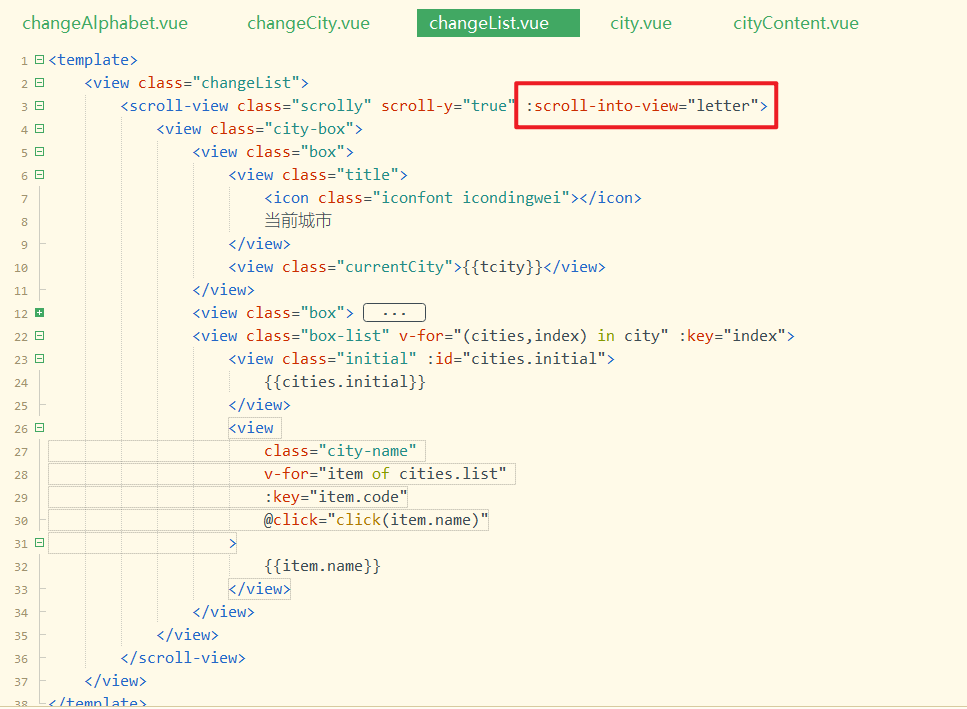
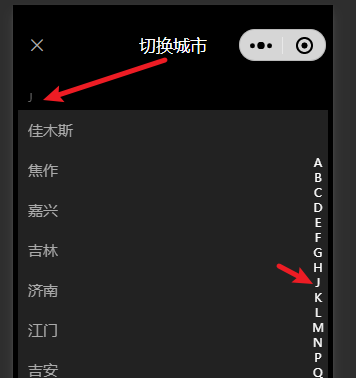
测试OK,如下:
# 18,字母表滑动选择
给字母表绑定三个对应的事件,如下:
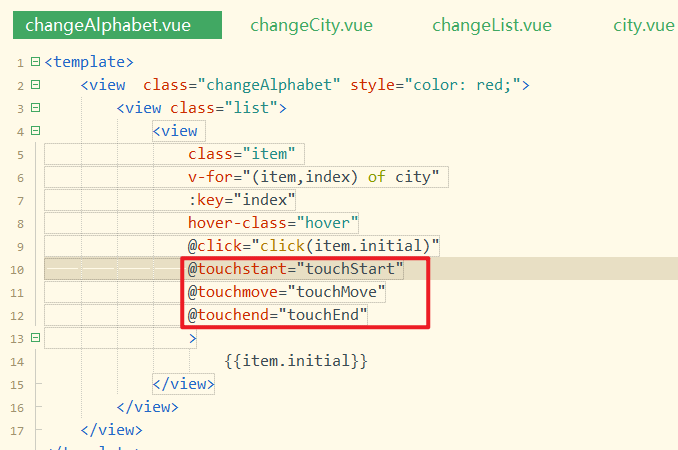
实现对应的方法,如下:
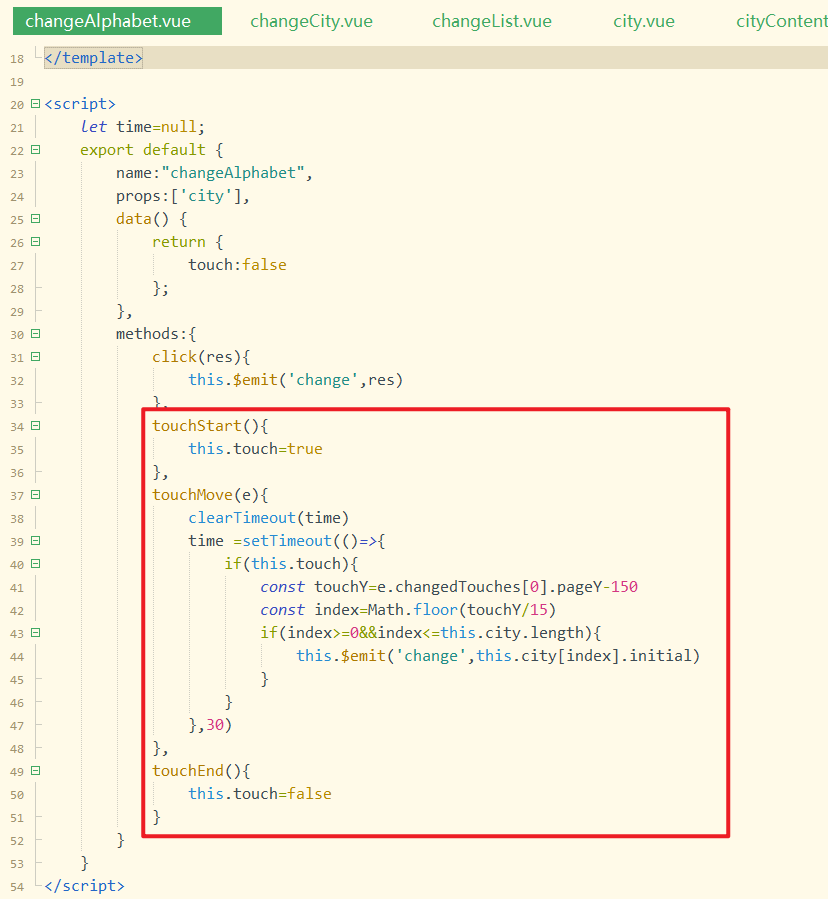
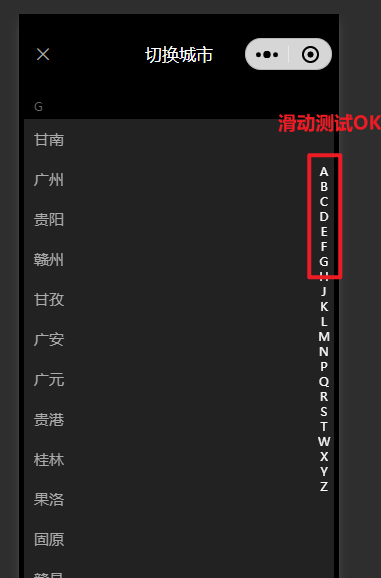
效果如下:
修改一个bug,如下:
# 19,关注页面顶部导航开发
需求:
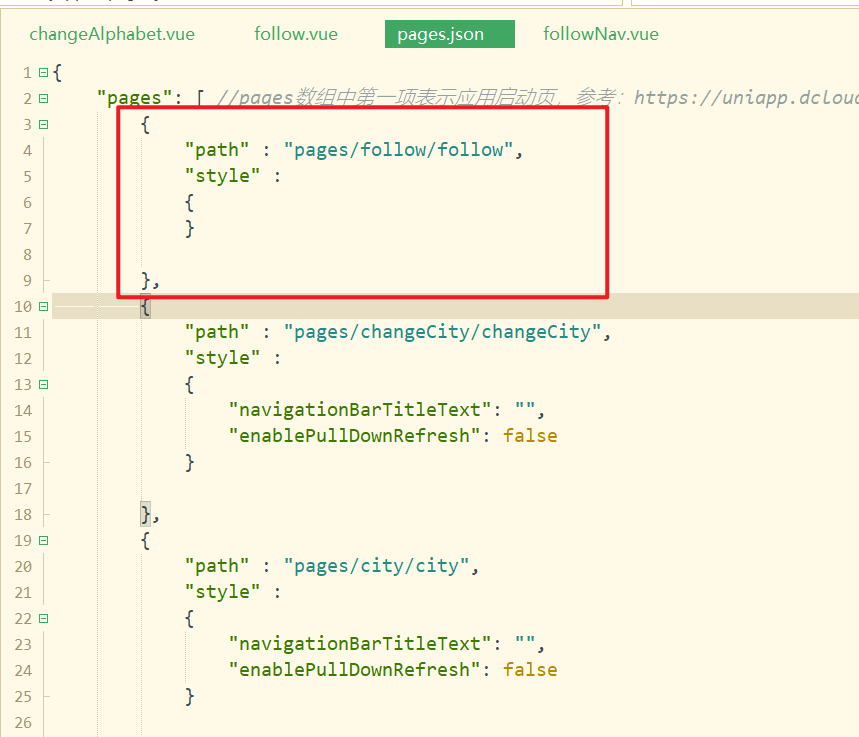
把关注页面移动到最前面,如下:
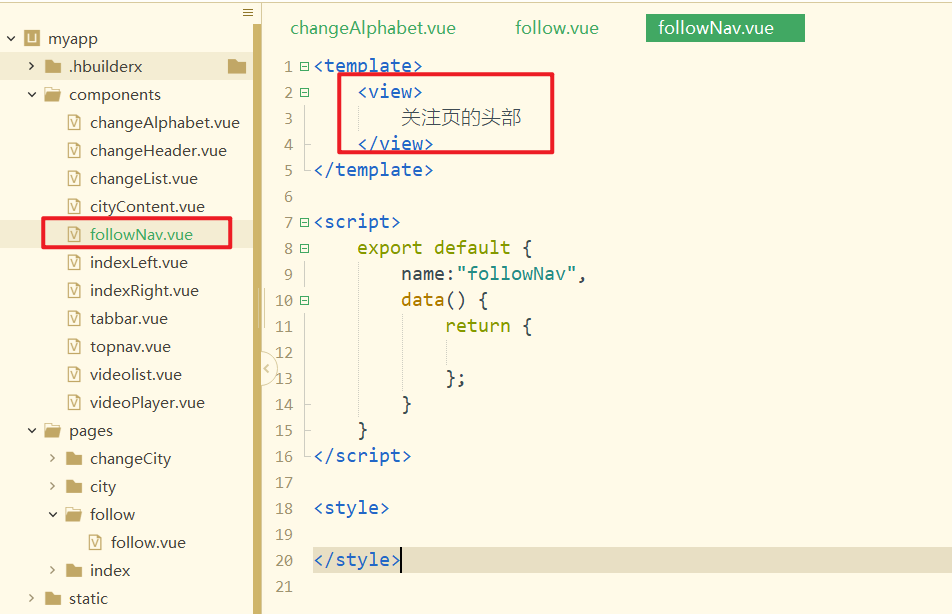
经过分析知道关注页也有一个头部,我们把这个头部抽离成一个组件,叫followNav,创建对应的组件如下:
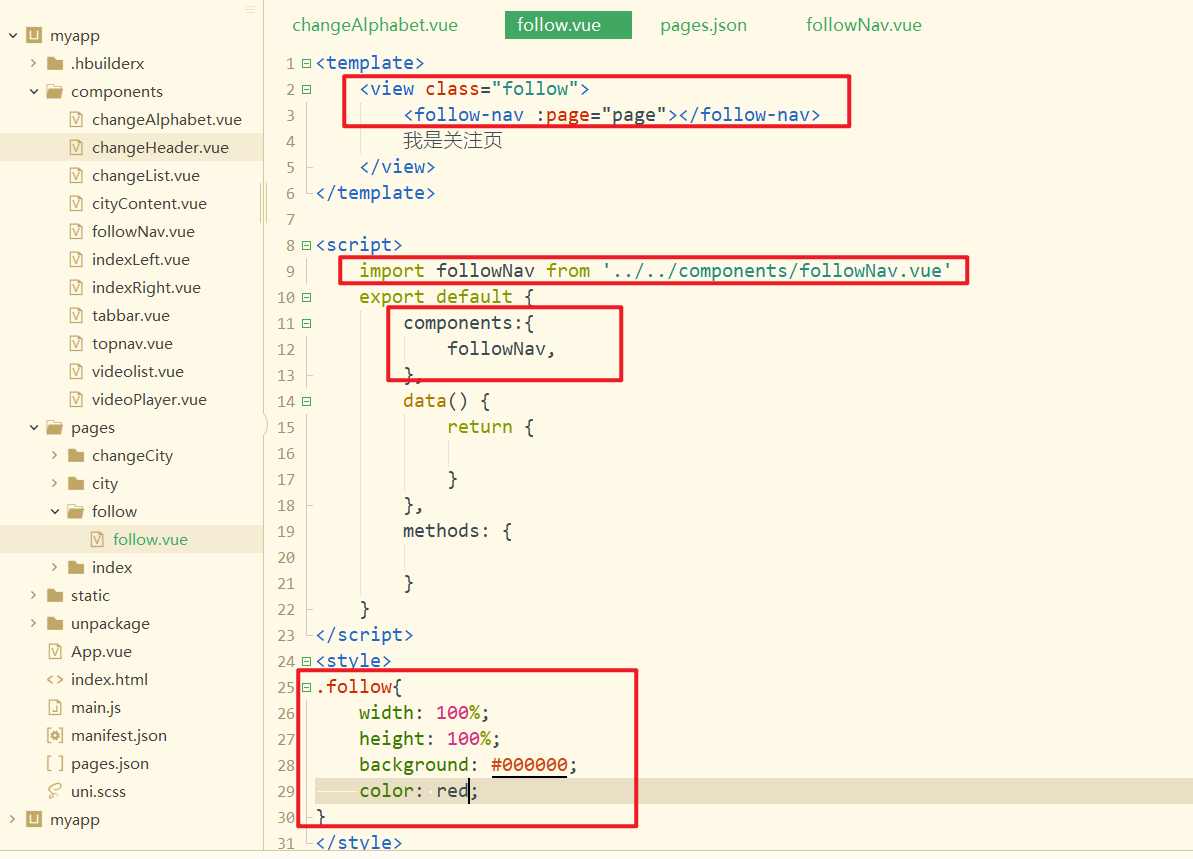
在关注页面中引入,注册,并使用之,如下:
效果如下:
开始开发关注页面的头部,如下:
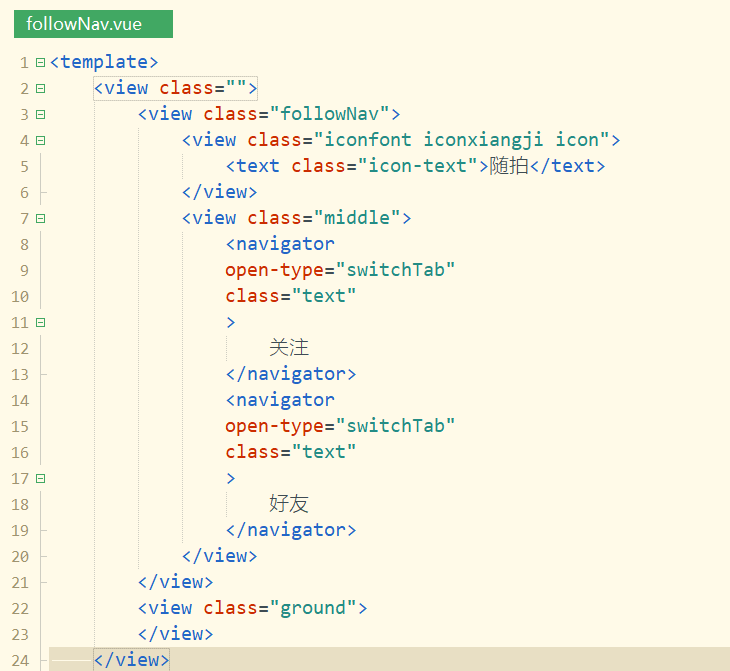
对应的代码如下:
<template>
    <view class="">
        <view class="followNav">
            <view class="iconfont iconxiangji icon">
                <text class="icon-text">随拍</text>
            </view>
            <view class="middle">
                <navigator open-type="switchTab" class="text">
                    关注
                </navigator>
                <navigator open-type="switchTab" class="text">
                    好友
                </navigator>
            </view>
        </view>
        <view class="ground">
        </view>
    </view>
</template>
2
3
4
5
6
7
8
9
10
11
12
13
14
15
16
17
18
19
样式如下:
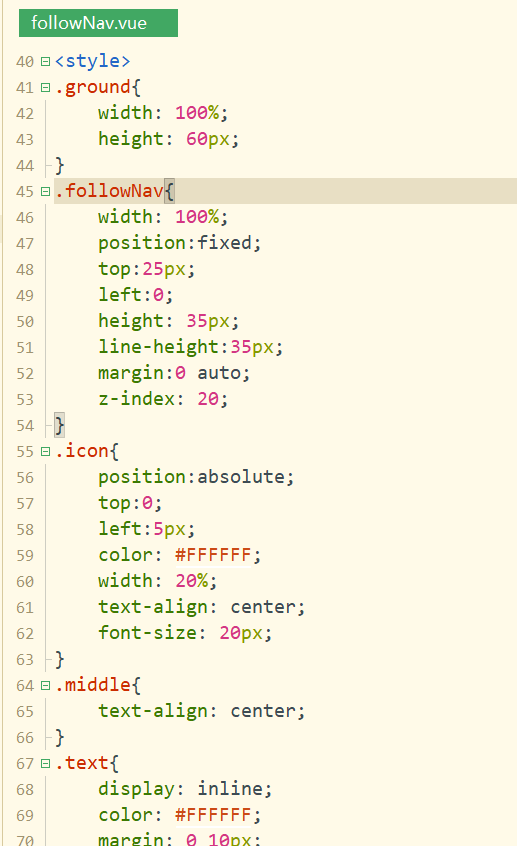
样式代码如下:
.ground {
    width: 100%;
    height: 60px;
}

.followNav {
    width: 100%;
    position: fixed;
    top: 25px;
    left: 0;
    height: 35px;
    line-height: 35px;
    margin: 0 auto;
    z-index: 20;
}

.icon {
    position: absolute;
    top: 0;
    left: 5px;
    color: #FFFFFF;
    width: 20%;
    text-align: center;
    font-size: 20px;
}

.middle {
    text-align: center;
}

.text {
    display: inline;
    color: #FFFFFF;
    margin: 0 10px;
    font-size: 15px
}

.icon-text {
    font-size: 15px;
    margin-left: 10px;
}
2
3
4
5
6
7
8
9
10
11
12
13
14
15
16
17
18
19
20
21
22
23
24
25
26
27
28
29
30
31
32
33
34
35
36
37
38
39
40
41
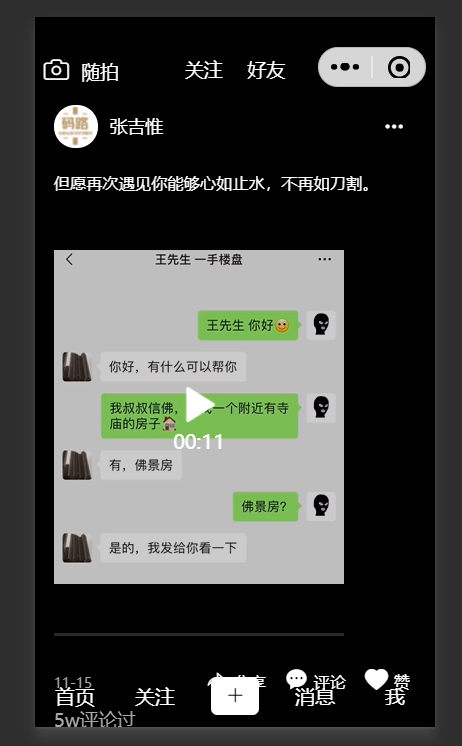
效果如下:
在关注页面中也引用tabbar组件,如下:
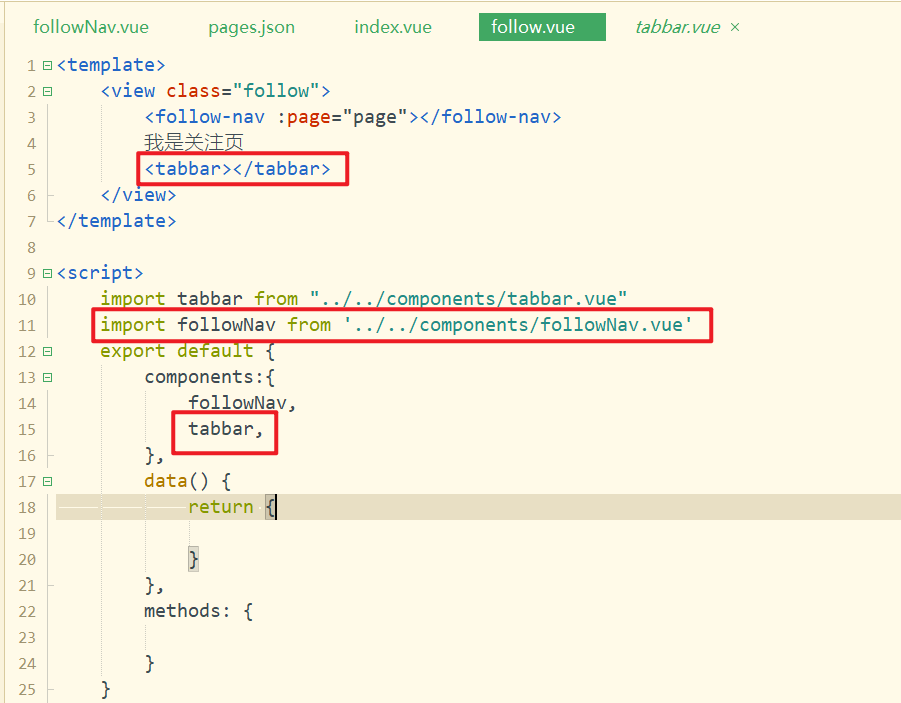
效果如下:
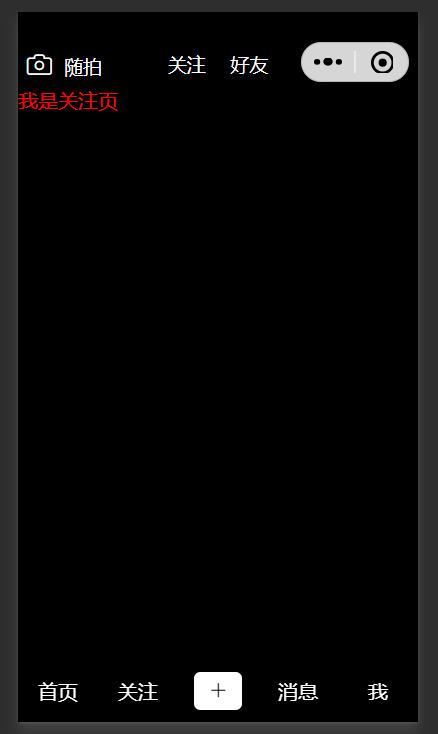
# 20,关注页面中间视频列表开发
创建项目列表组件,如下:
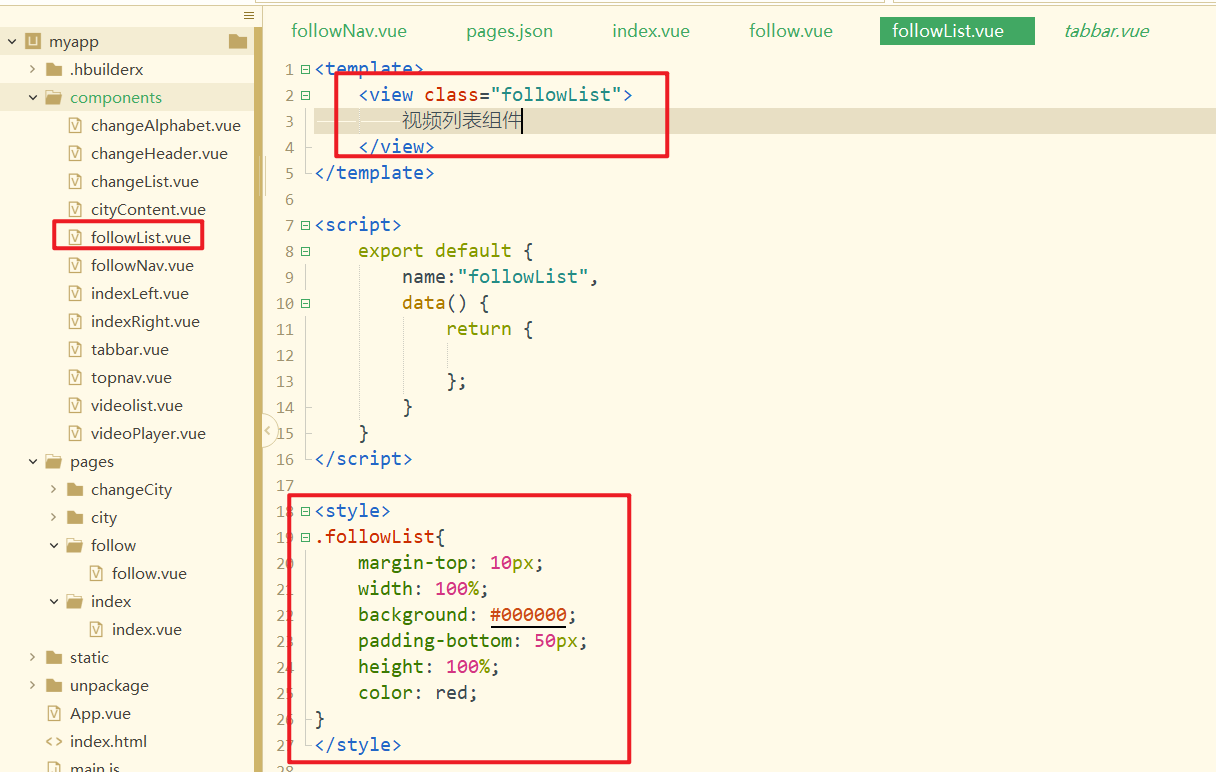
在关注页面中引入,注册,并使用之,如下:
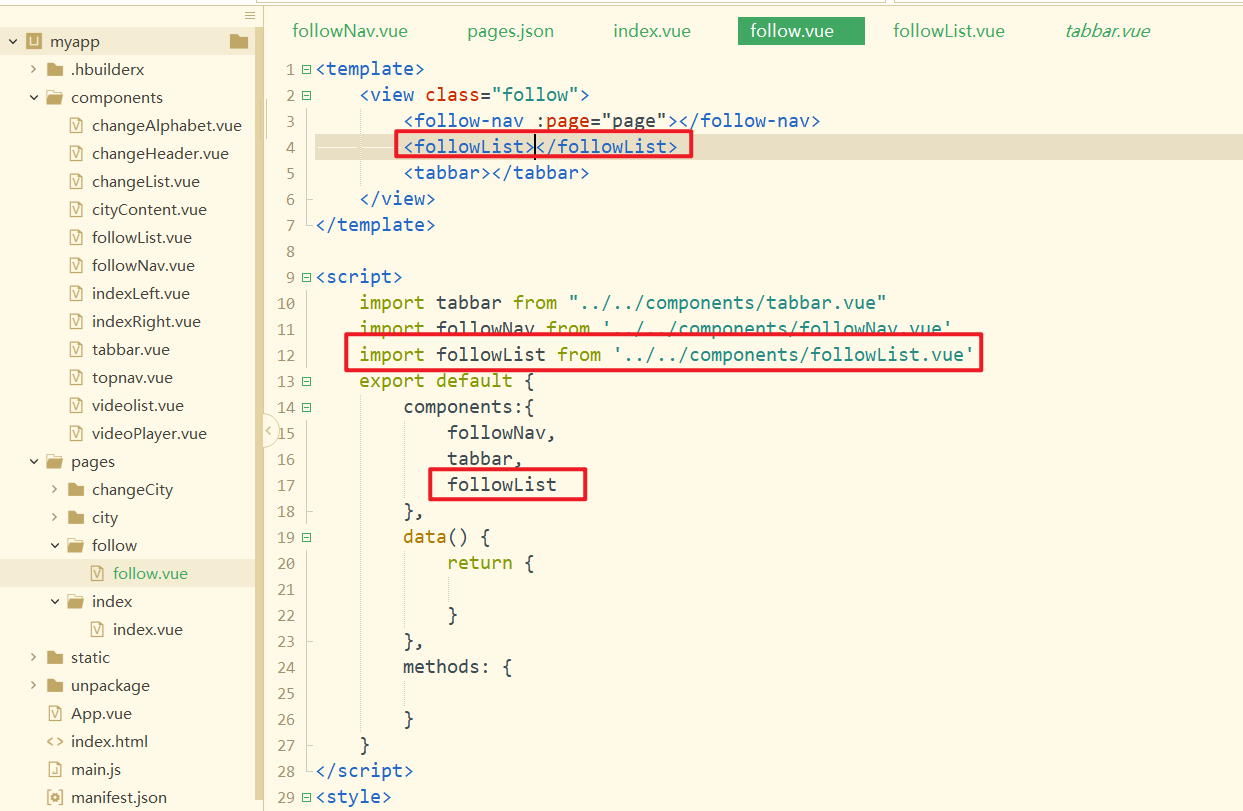
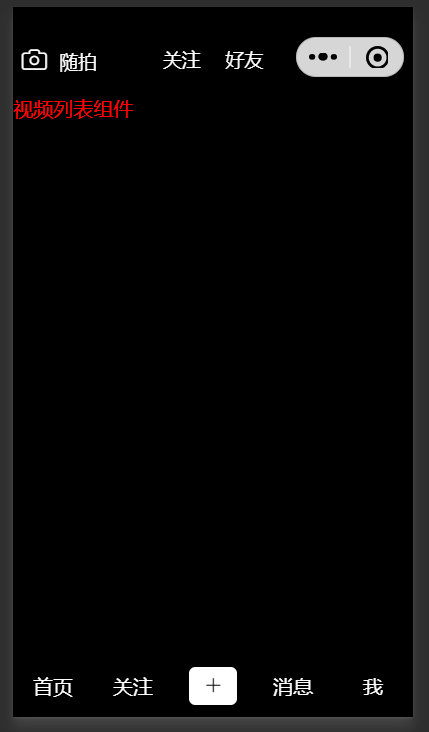
效果如下:
开发视频列表组件,如下:
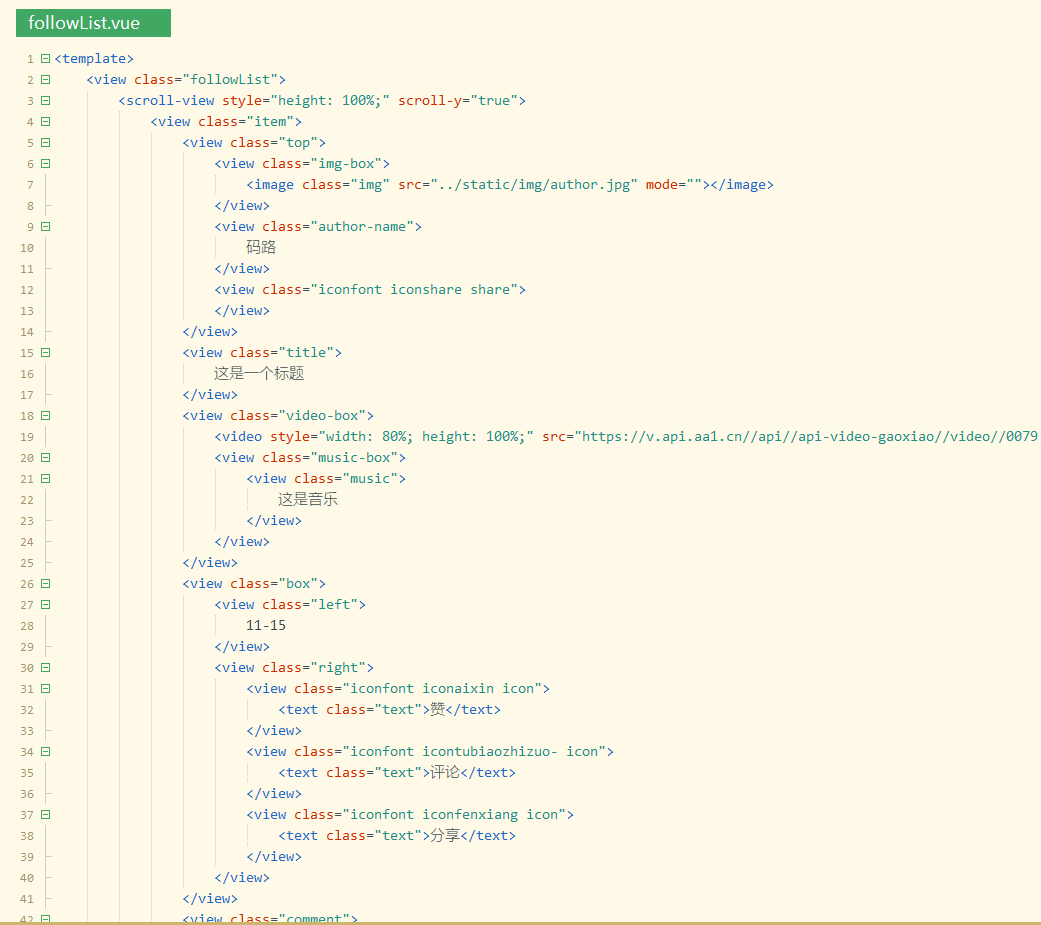
参考代码如下:
<view class="item">
    <view class="top">
        <view class="img-box">
            <image class="img" src="../static/img/author.jpg" mode=""></image>
        </view>
        <view class="author-name">
            码路
        </view>
        <view class="iconfont iconshare share">
        </view>
    </view>
    <view class="title">
        这是一个标题
    </view>
    <view class="video-box">
        <video style="width: 80%; height: 100%;" src="https://v.api.aa1.cn//api//api-video-gaoxiao//video//0079.mp4%20%E5%AE%98%E7%BD%91api.aa1.cn%20%E6%B0%B8%E4%B9%85%E5%85%8D%E8%B4%B9API.mp4"></video>
        <view class="music-box">
            <view class="music">
                这是音乐
            </view>
        </view>
    </view>
    <view class="box">
        <view class="left">
            11-15
        </view>
        <view class="right">
            <view class="iconfont iconaixin icon">
                <text class="text">赞</text>
            </view>
            <view class="iconfont icontubiaozhizuo- icon">
                <text class="text">评论</text>
            </view>
            <view class="iconfont iconfenxiang icon">
                <text class="text">分享</text>
            </view>
        </view>
    </view>
    <view class="comment">
        <view class="Number">
            5w评论过
        </view>
        <view class="comment-box">
            <view class="iconfont iconpen icon-pen">

            </view>
            <input class="input-box" type="text" placeholder="添加评论..." />
        </view>
    </view>
</view>
2
3
4
5
6
7
8
9
10
11
12
13
14
15
16
17
18
19
20
21
22
23
24
25
26
27
28
29
30
31
32
33
34
35
36
37
38
39
40
41
42
43
44
45
46
47
48
49
50
对应的样式如下:
.followList {
    margin-top: 10px;
    width: 100%;
    background: #000000;
    padding-bottom: 50px;
    height: 100%;
}

.item {
    padding: 0 15px;
    height: 550px;
}

.top {
    height: 35px;
}

.img-box {
    float: left;
}

.img {
    width: 35px;
    height: 35px;
    border-radius: 50%;
}

.author-name {
    float: left;
    font-size: 14px;
    height: 35px;
    line-height: 35px;
    color: #FFFFFF;
    margin-left: 10px;

}

.share {
    float: right;
    font-size: 25px;
    margin-right: 5px;
    height: 35px;
    line-height: 35px;
    color: #FFFFFF;
}

.title {
    width: 1005;
    font-size: 13px;
    margin-top: 15px;
    height: 25px;
    line-height: 25px;
    color: #FFFFFF;
}

.video-box {
    width: 100%;
    height: 350px;
    position: relative
}

.music-box {
    z-index: 20;
    position: absolute;
    bottom: 10px;
    left: 10px;
    width: 100px;
    overflow: hidden;
}

.music {
    color: #FFFFFF;
    font-size: 14px;
    width: 200px;
    animation: music 4s linear infinite;
}

.box {
    height: 25px;
    margin-top: 25px;

}

.left {
    float: left;
    font-size: 11px;
    height: 25px;
    line-height: 25px;
    color: #AAAAAA;
}

.right {
    float: right;
    height: 25px;
}

.icon {
    float: right;
    color: #FFFFFF;
    font-size: 18px;
    margin-left: 10px;
}

.text {
    padding: 0 5px;
    font-size: 13px;
}

.comment {
    width: 100%;
}

.Number {
    width: 100%;
    height: 25px;
    font-size: 15px;
    line-height: 15px;
    color: #AAAAAA;
    margin: 10px 0;
}

.comment-box {
    position: relative;
}

.icon-pen {
    height: 30px;
    color: #FFFFFF;
    position: absolute;
    top: 0;
    left: 0;
}

.input-box {
    margin-left: 28px;
    font-size: 15px;
}

@keyframes music {
    0% {
        transform: translate3d(80%, 0, 0)
    }

    100% {
        transform: translate3d(-80%, 0, 0)
    }
}
2
3
4
5
6
7
8
9
10
11
12
13
14
15
16
17
18
19
20
21
22
23
24
25
26
27
28
29
30
31
32
33
34
35
36
37
38
39
40
41
42
43
44
45
46
47
48
49
50
51
52
53
54
55
56
57
58
59
60
61
62
63
64
65
66
67
68
69
70
71
72
73
74
75
76
77
78
79
80
81
82
83
84
85
86
87
88
89
90
91
92
93
94
95
96
97
98
99
100
101
102
103
104
105
106
107
108
109
110
111
112
113
114
115
116
117
118
119
120
121
122
123
124
125
126
127
128
129
130
131
132
133
134
135
136
137
138
139
140
141
142
143
144
145
146
147
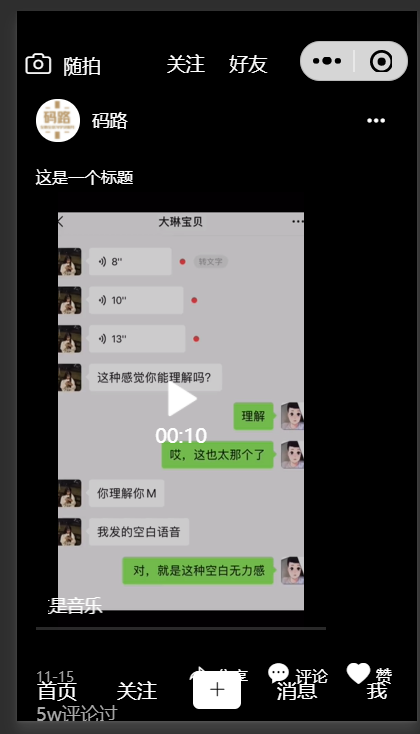
效果如下:
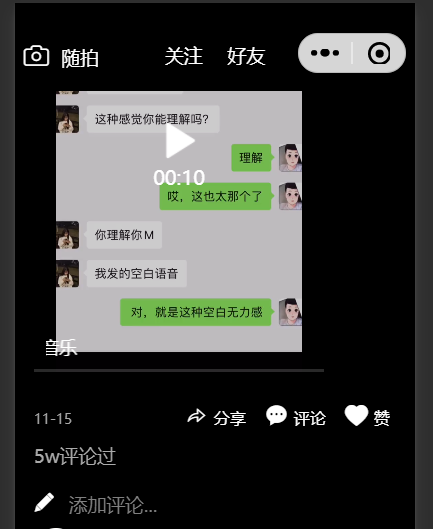
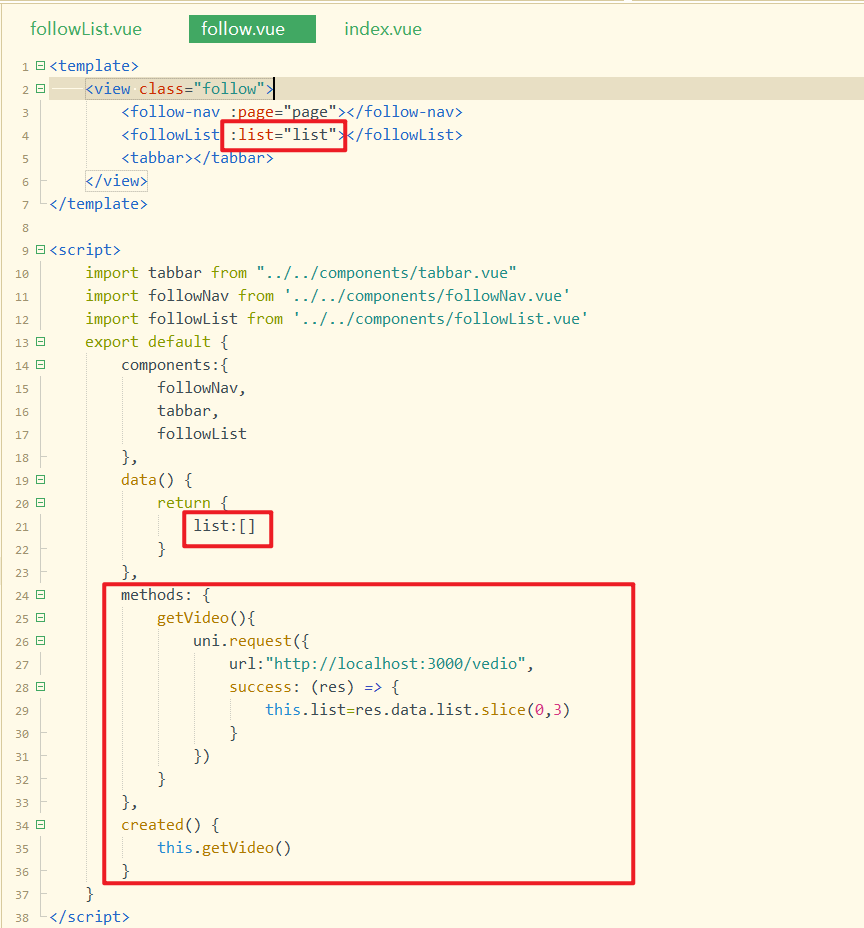
在关注页面,发送ajax请求,获取数据,传递到视频列表组件中,如下:
子组件进行接收之,如下:
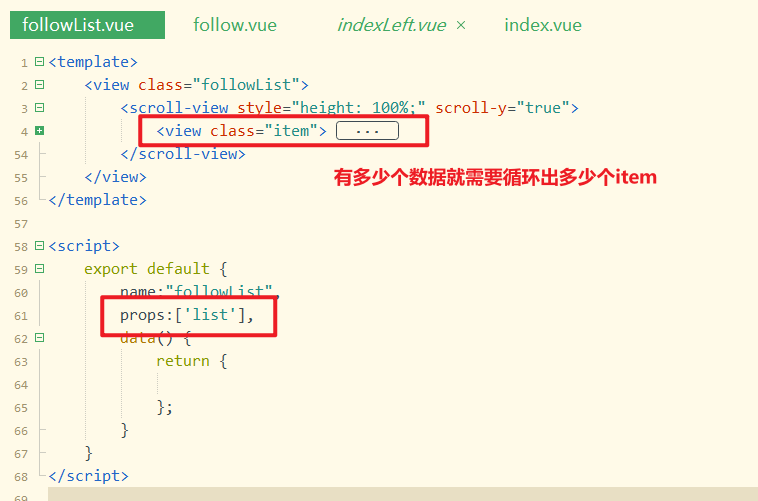
有多少个数据,就需要循环出多少个item,如下:
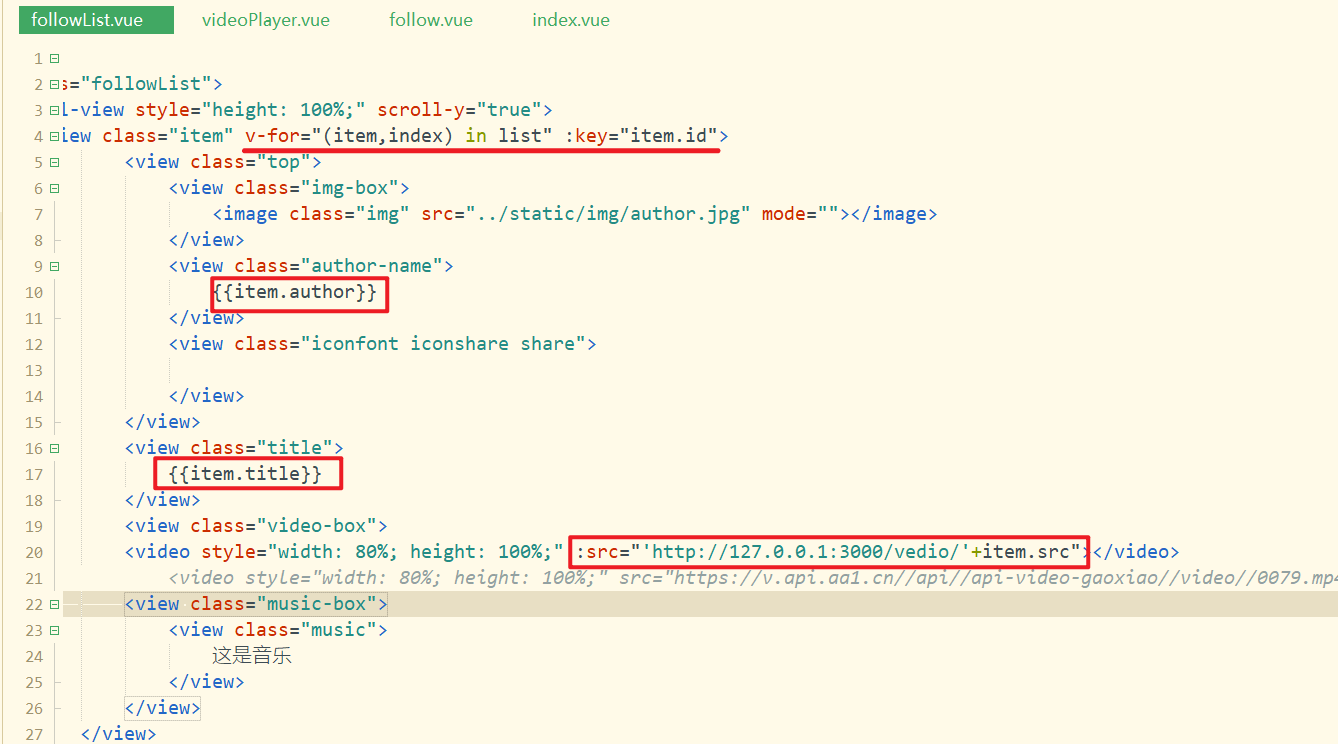
效果如下:

# 21,创建好友页面
好友页面和关注页面基本上都类似,首先创建出对应的页面如下:
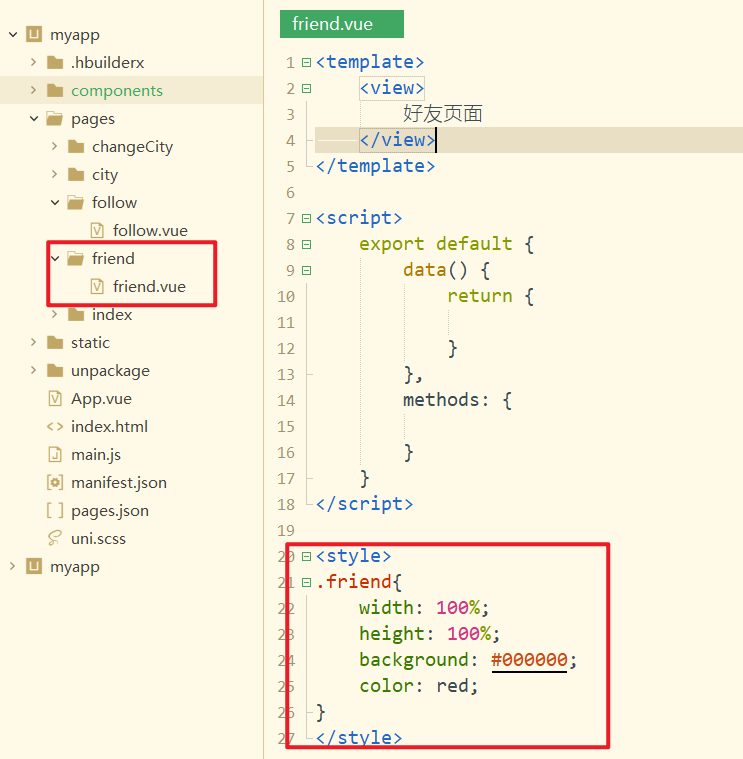
配置对应的tabbar,如下:
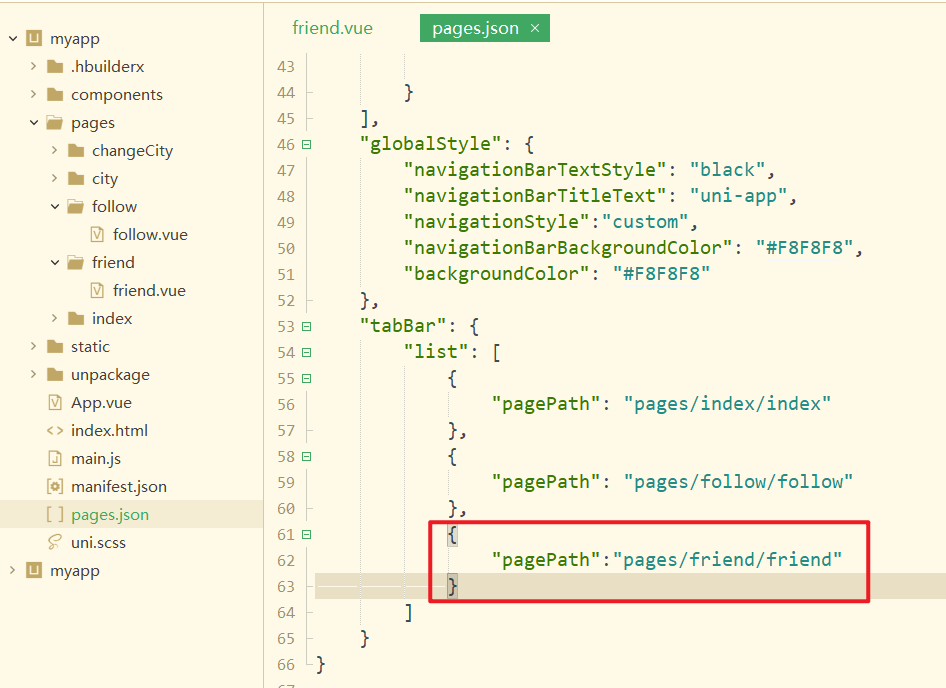
点击实现跳转,如下:
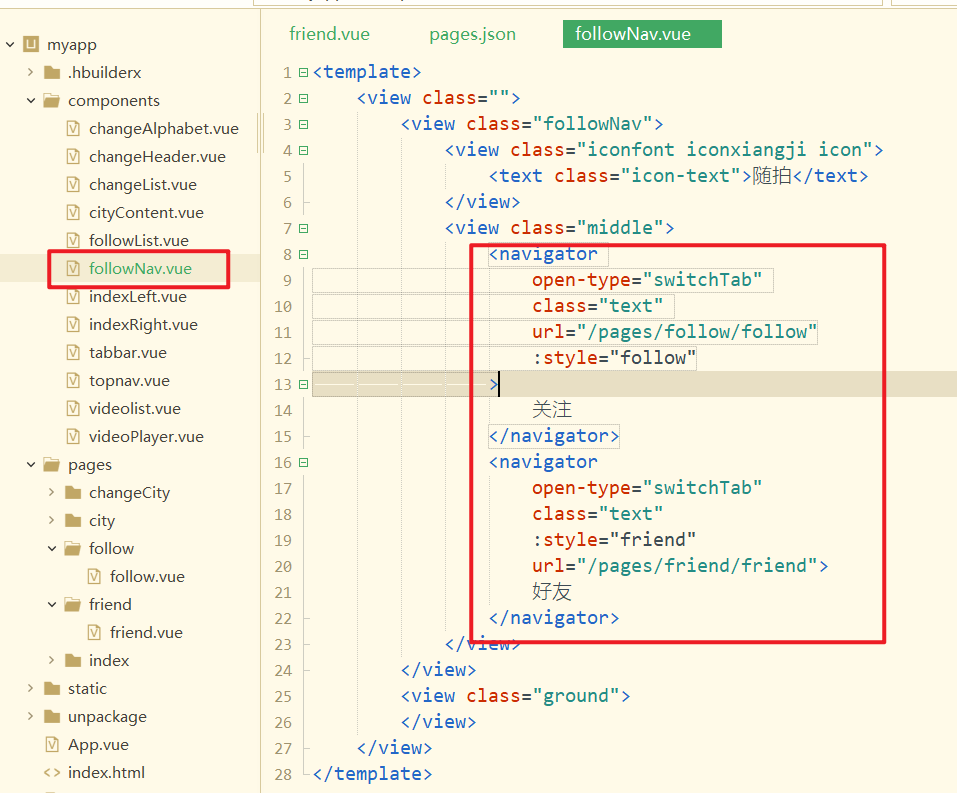
点击测试如下:
好友页面和关注页面类似,直接copy对应的代码如下:
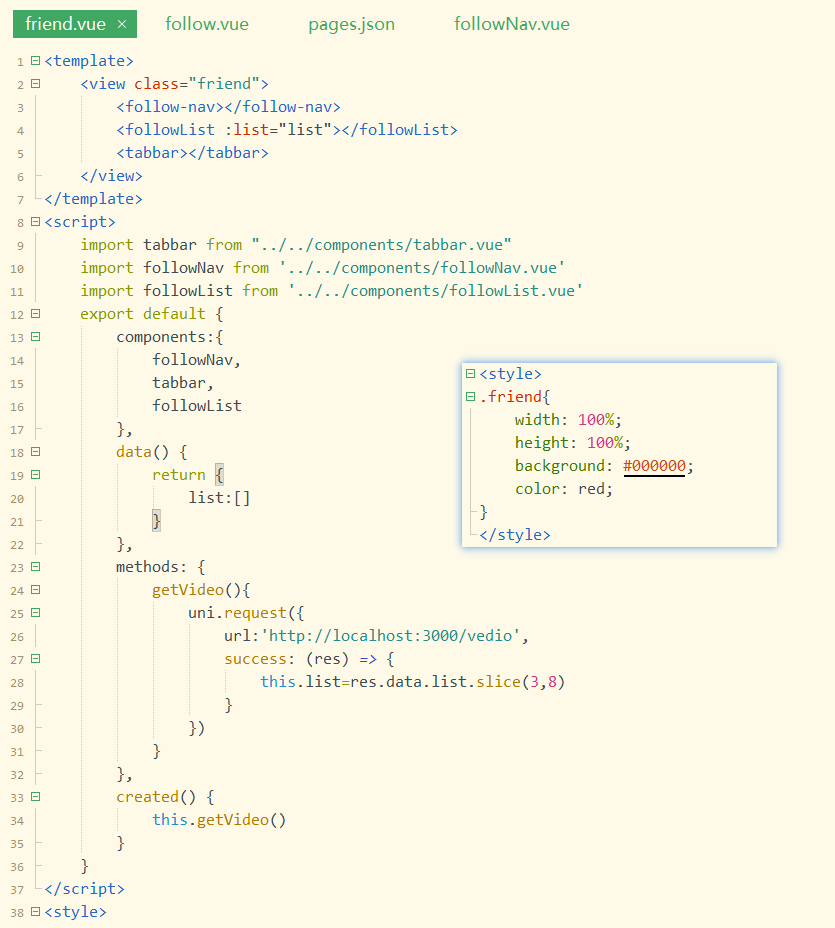
效果如下:
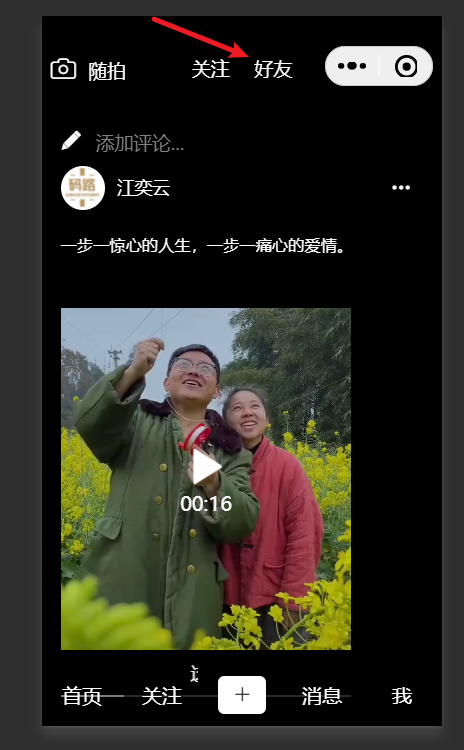
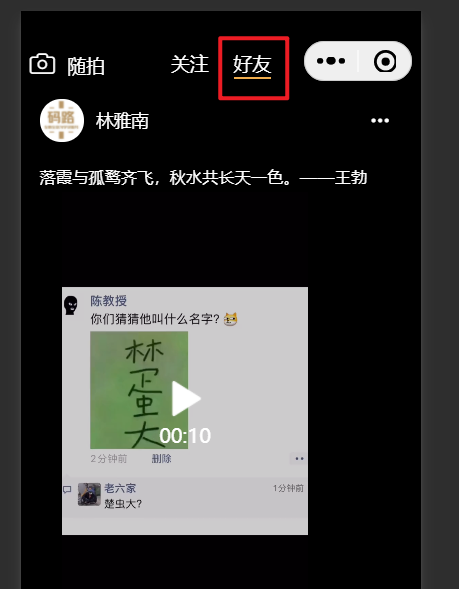
当点击了关注或好友时,添加对应的选中效果,如下:
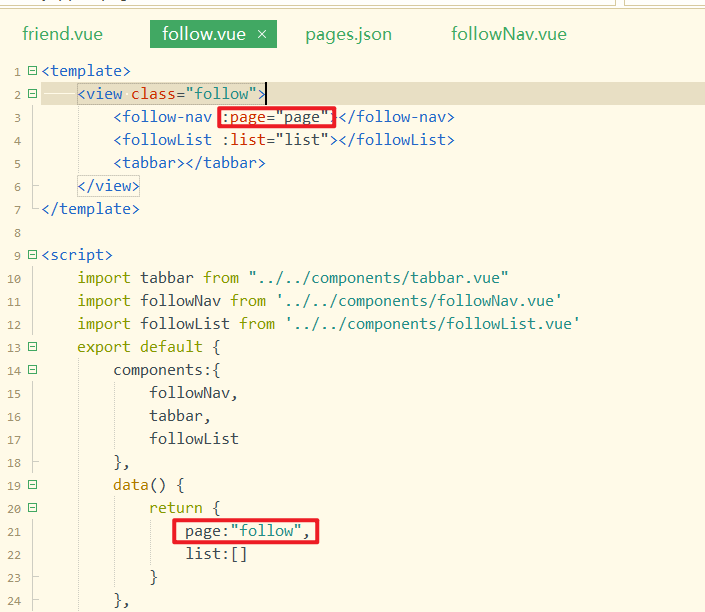
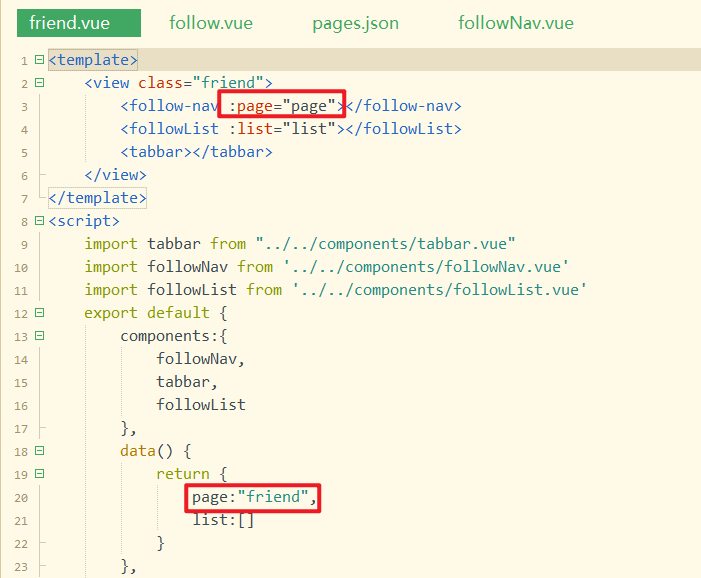
在子组件中接收之,并定义两个状态如下:
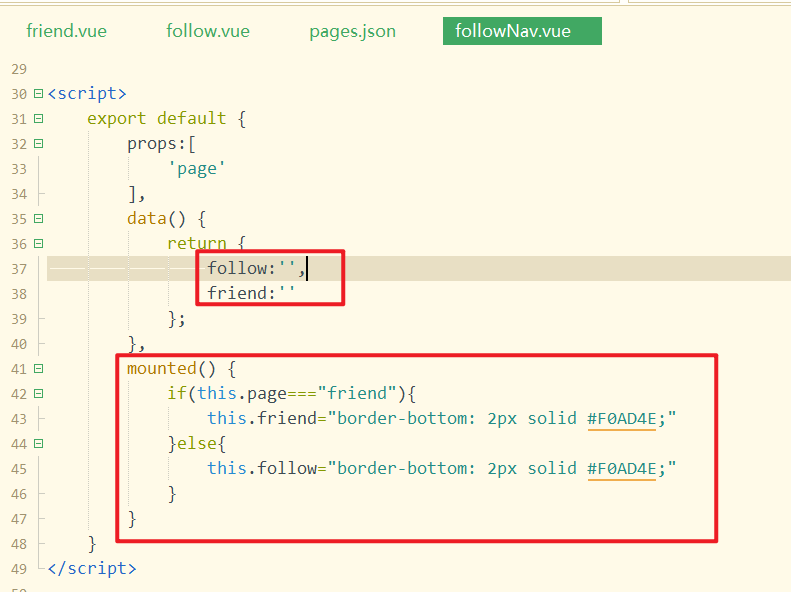
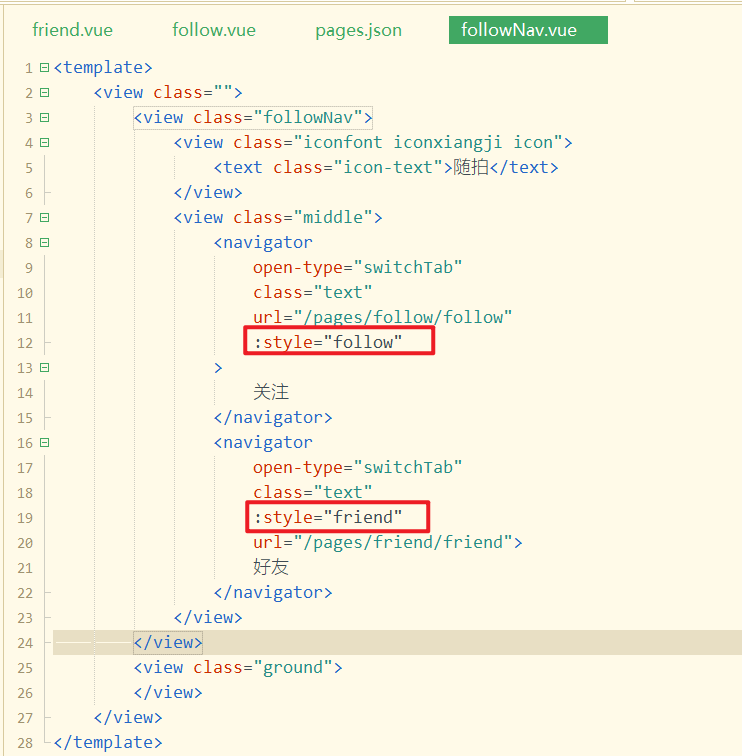
效果如下:
# 22,关注和好友页面视频播放
把关注页和好友页中的视频播放抽离成一个组件,创建组件如下:
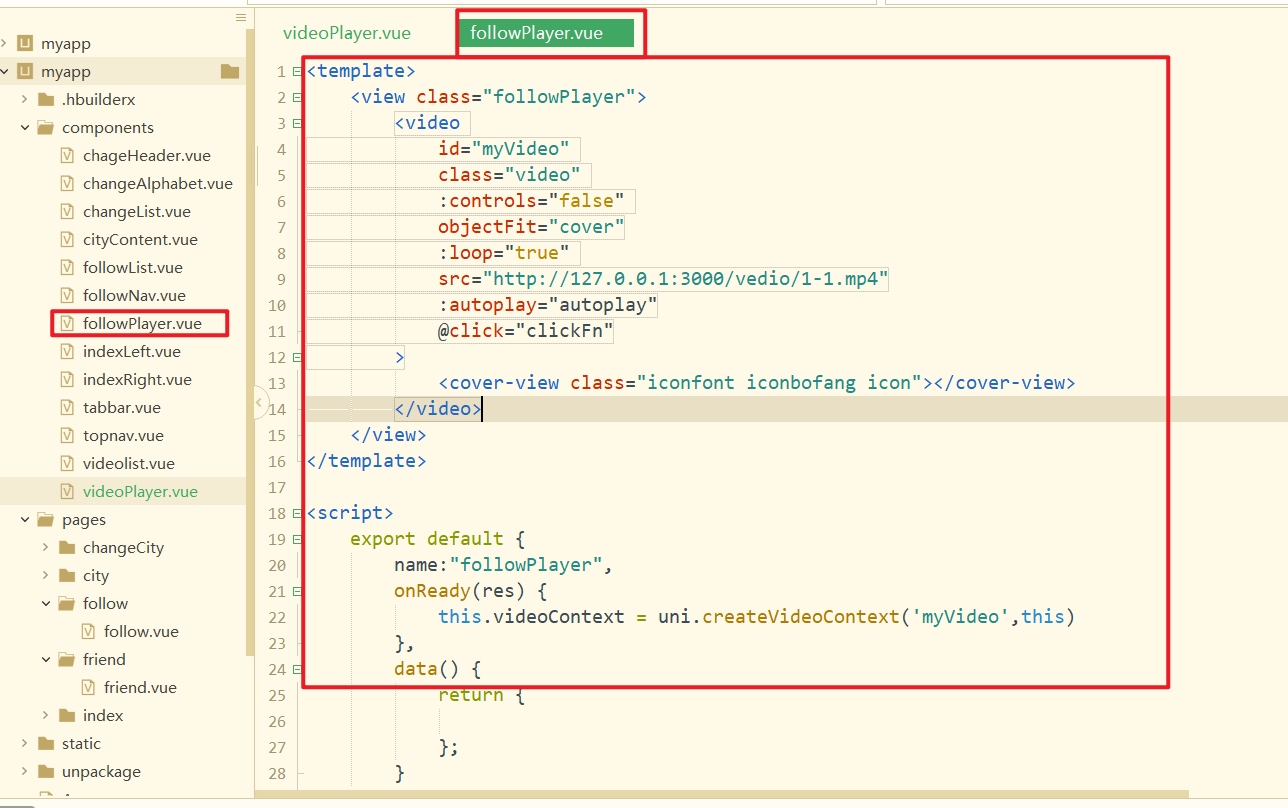
在followList页面中使用上面的组件,如下:
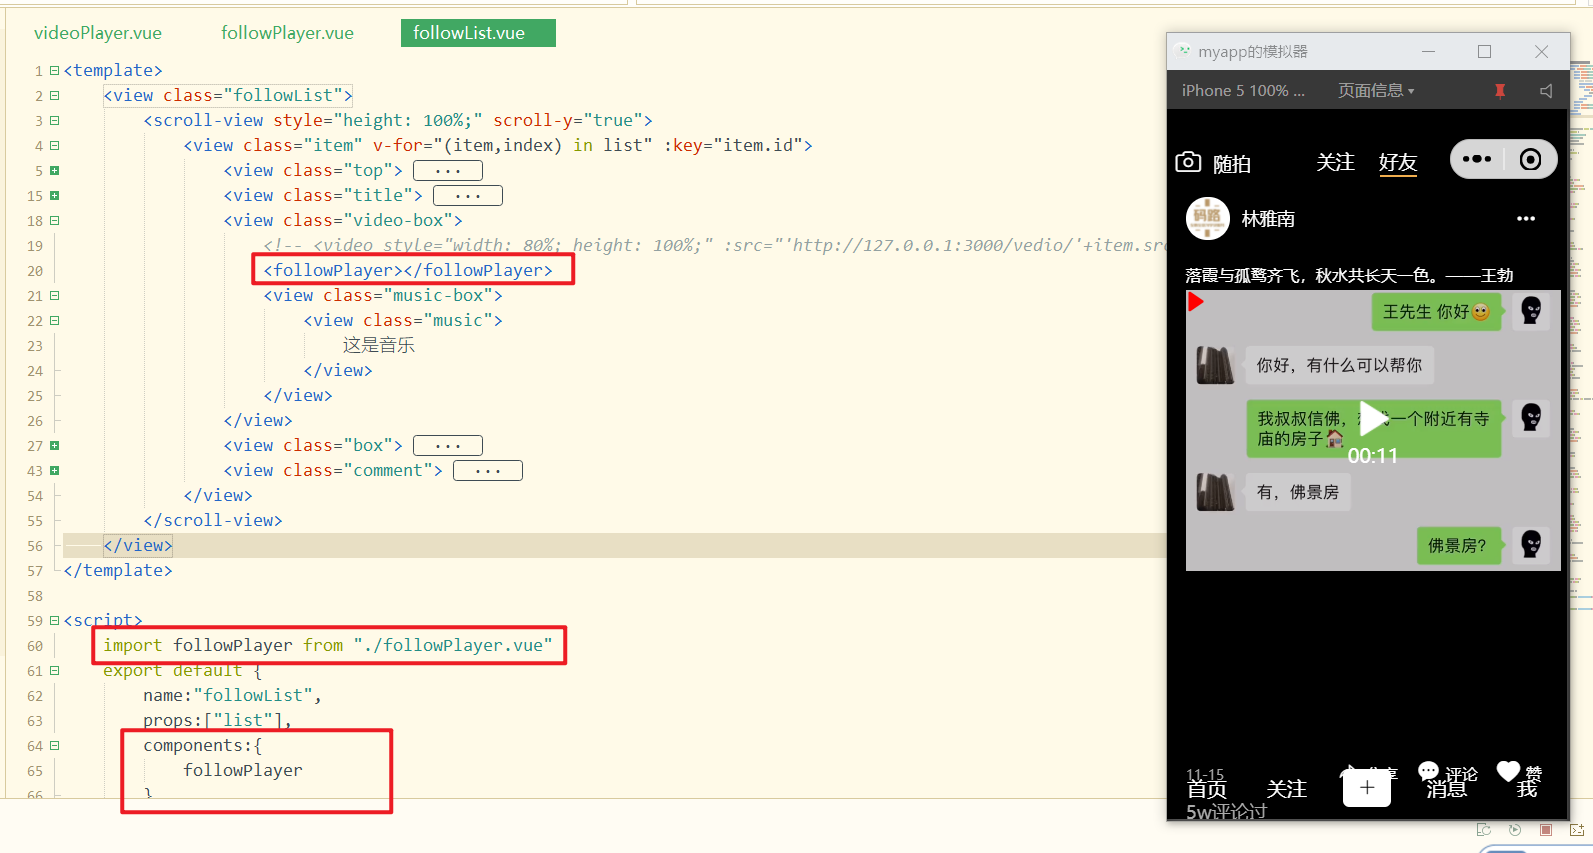
效果如下:
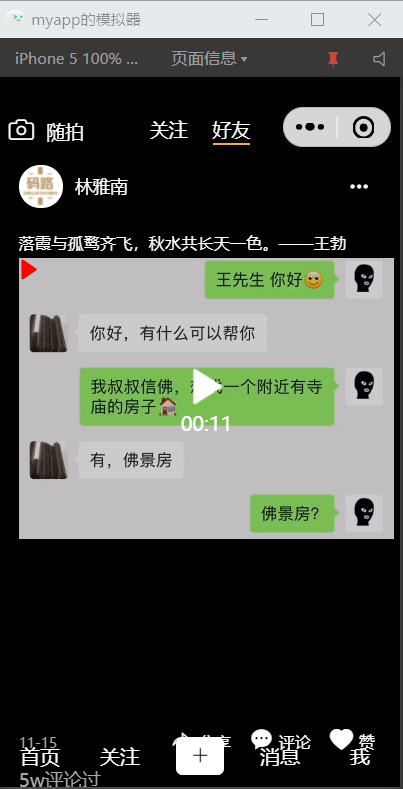
对于followPlayer,写一点样式,如下:
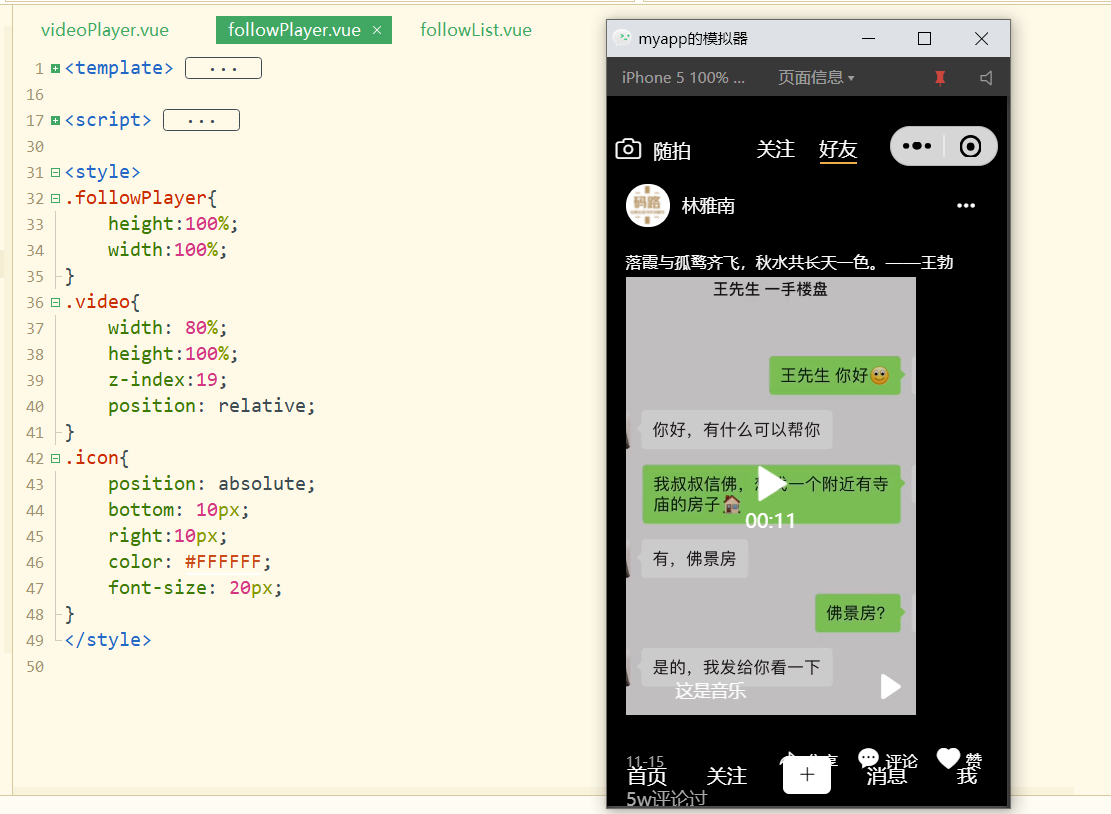
对应的样式如下:
.followPlayer {
    height: 100%;
    width: 100%;
}

.video {
    width: 80%;
    height: 100%;
    z-index: 19;
    position: relative;
}

.icon {
    position: absolute;
    bottom: 10px;
    right: 10px;
    color: #FFFFFF;
    font-size: 20px;
}
2
3
4
5
6
7
8
9
10
11
12
13
14
15
16
17
18
19
在滚动视频列表时,我们需要让某个视频播放,让某些视频暂停,绑定scroll事件,如下:
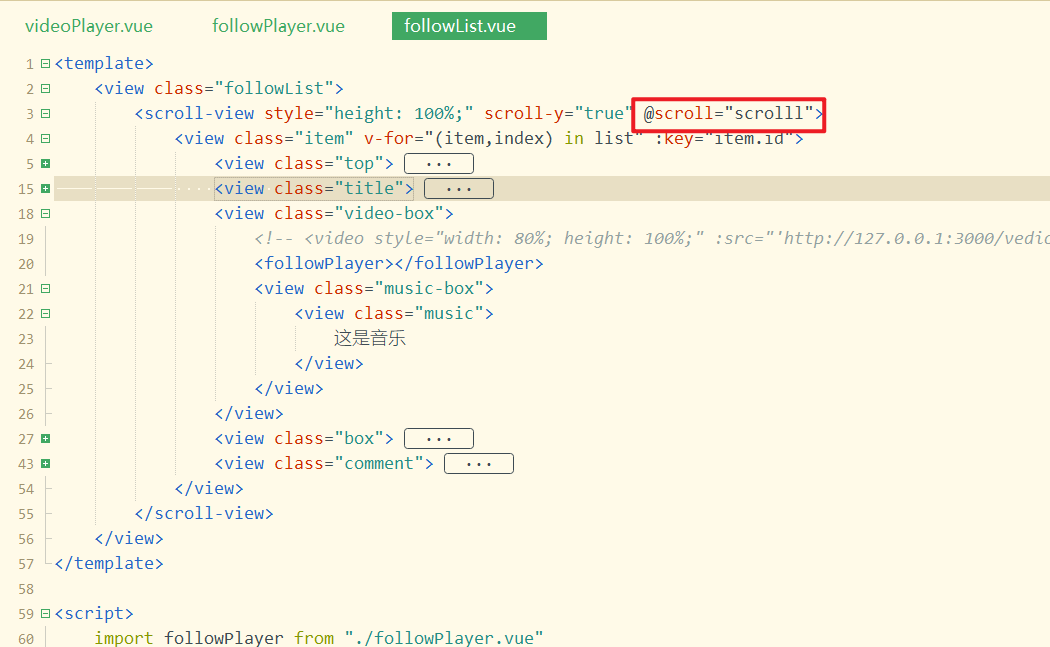
实现上面的方法,如下:
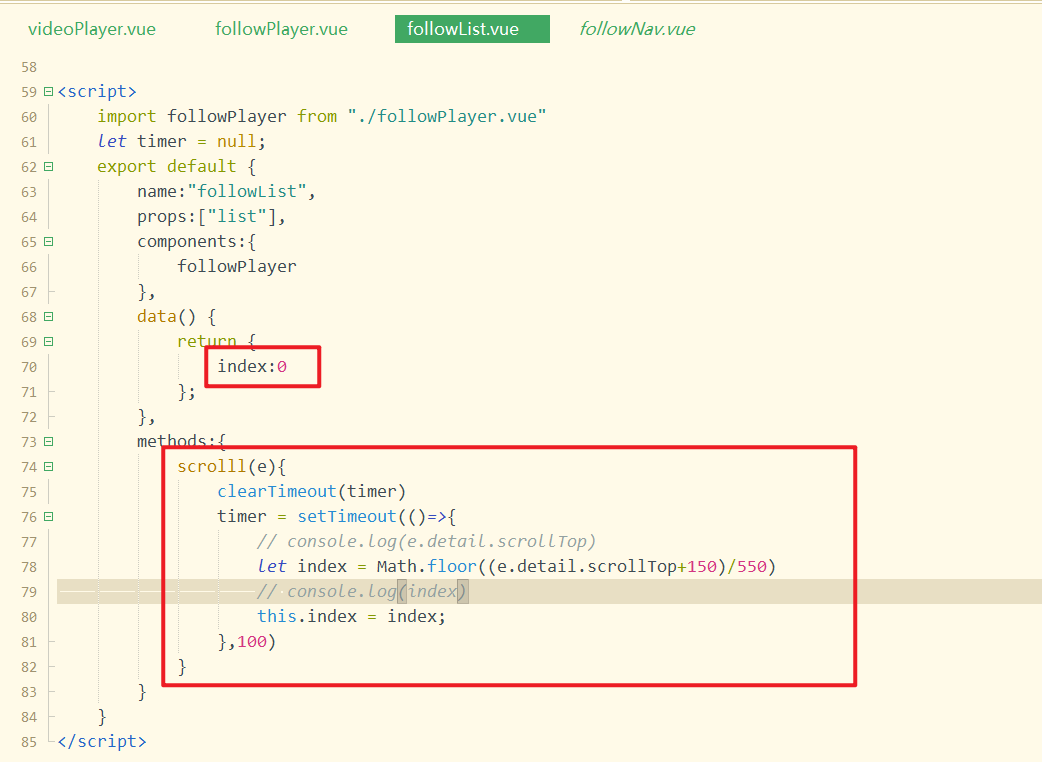
把index传递给播放组件,还需要把整个数据列表和当前数据也需要传递给播放组件,如下:
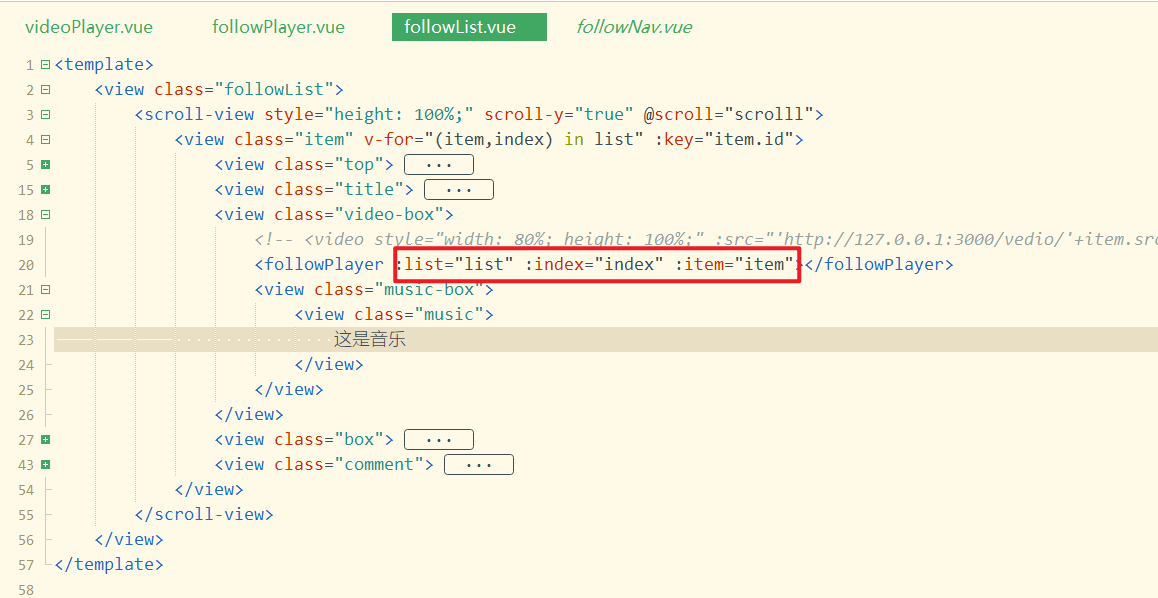
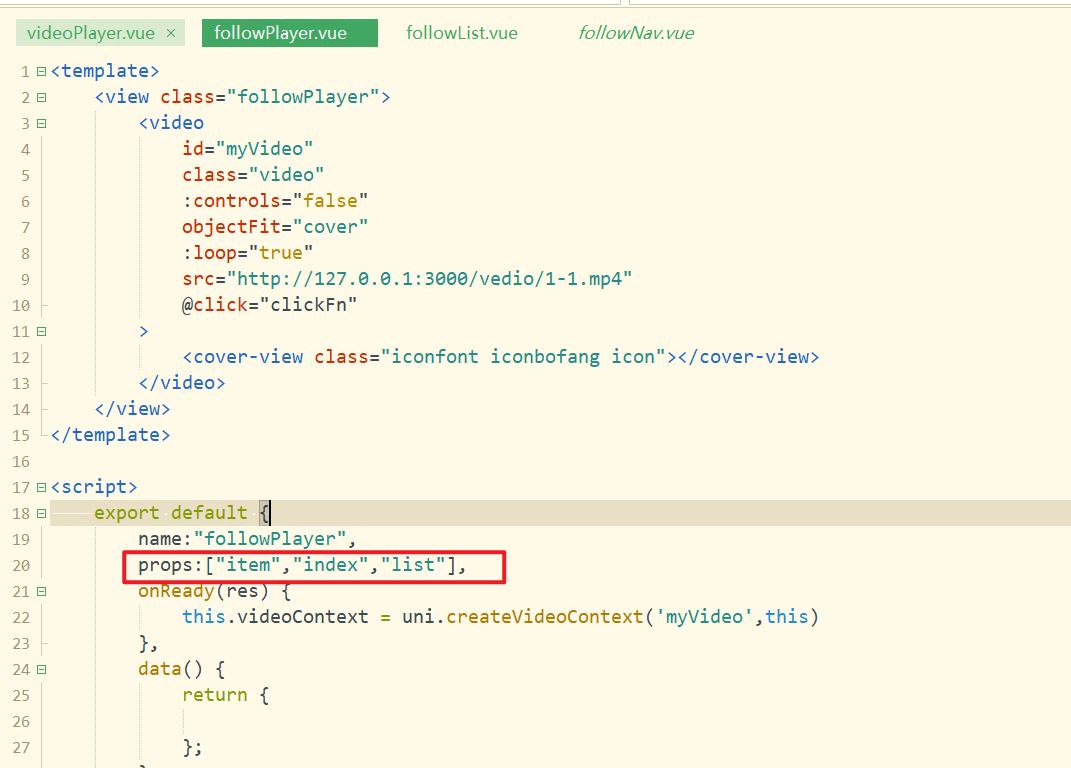
在子组件中接收之,如下:
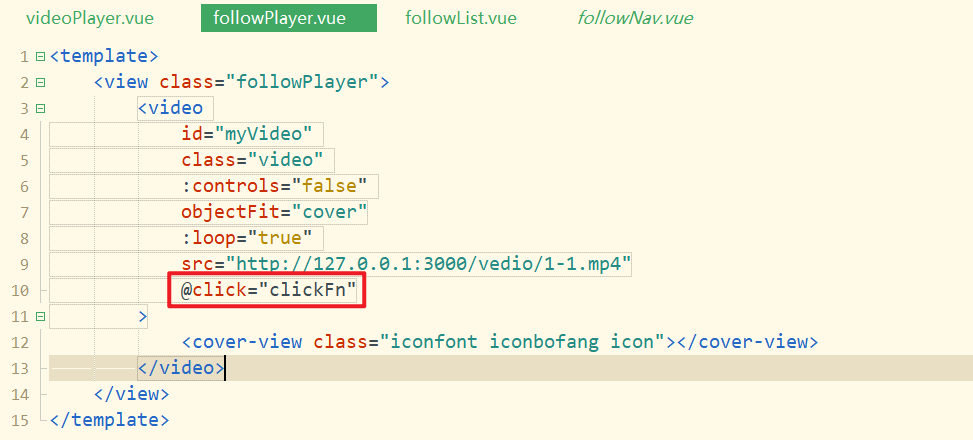
在子组件中定义播放,暂停方法,以及给视频绑定点击方法,如下:
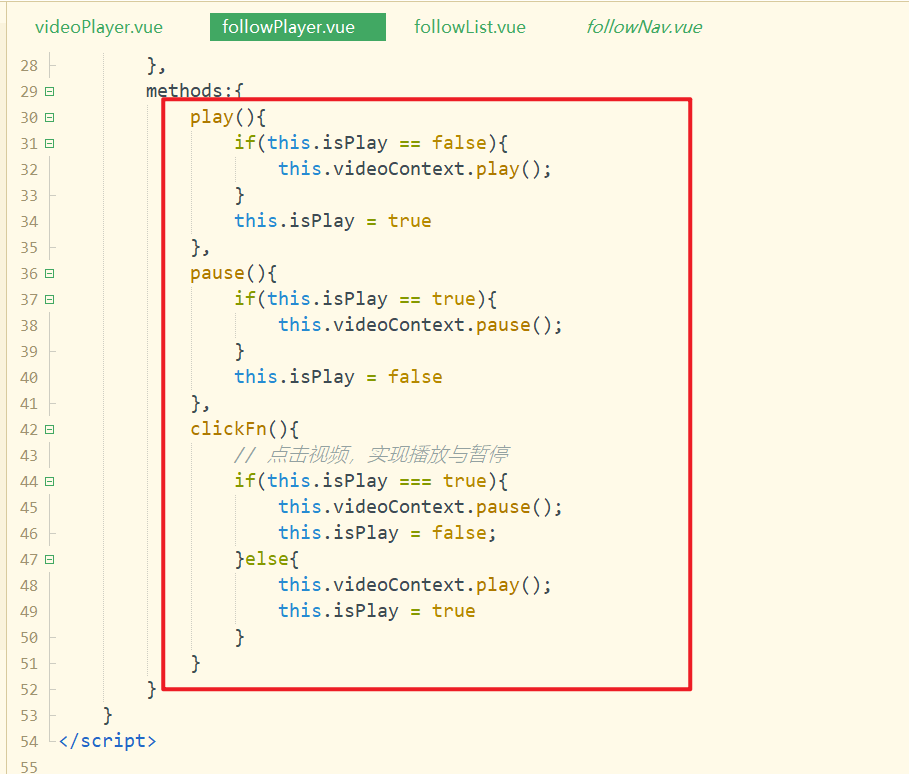
在滚动时,index变化了,监听到它的变化,进行播放与暂停,如下:
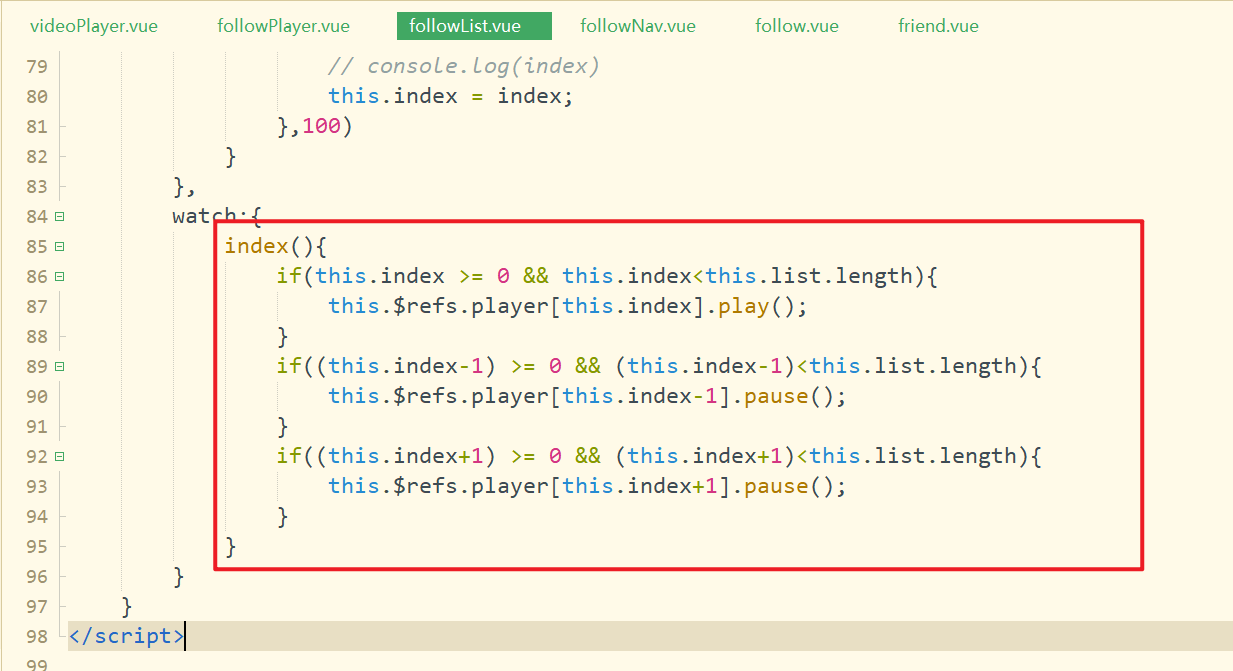
测试OK。
默认也需要让第1个视频直接播放。如果是第1个视频,index是0,直接判断,如下:
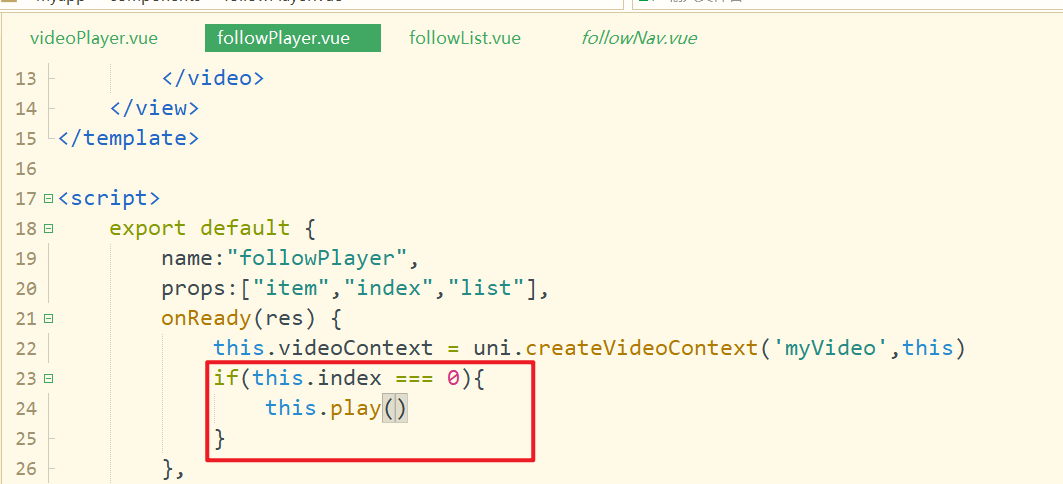
这样,默认第1个视频,就自动播放了。
followPlay中视频,需要替换一下,如下:
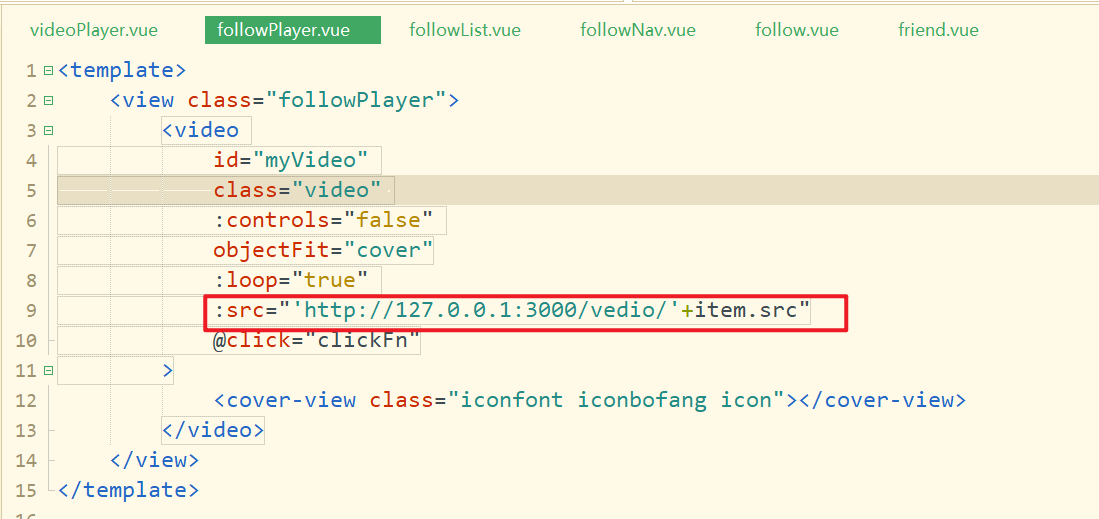
测试OK。
