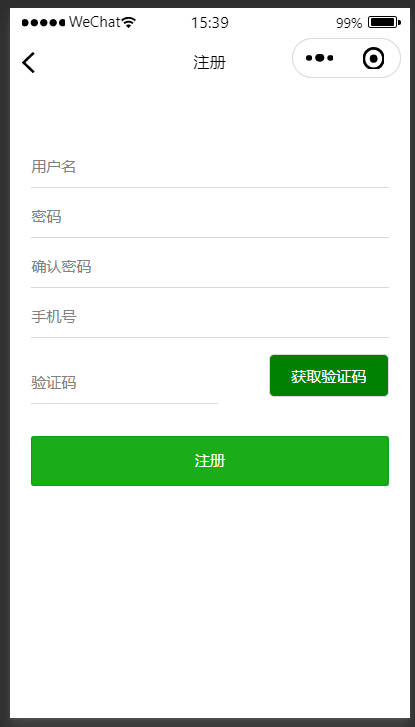
15-小程序项目
# 一,项目的环境搭建
# 1,配置JDK
要想跑java项目,必须依赖jdk。
后端使用的是java,需要在电脑上安装jdk。大家把群中的jdk软件下载下来,傻瓜式安装,你需要知道你安装的路径,参考文档,如下:https://blog.csdn.net/wumingxiaozei/article/details/95628747
# 2,配置mysql数据库
# 1)安装phpstudy
软件地址如下:https://www.xp.cn/
下载软件:
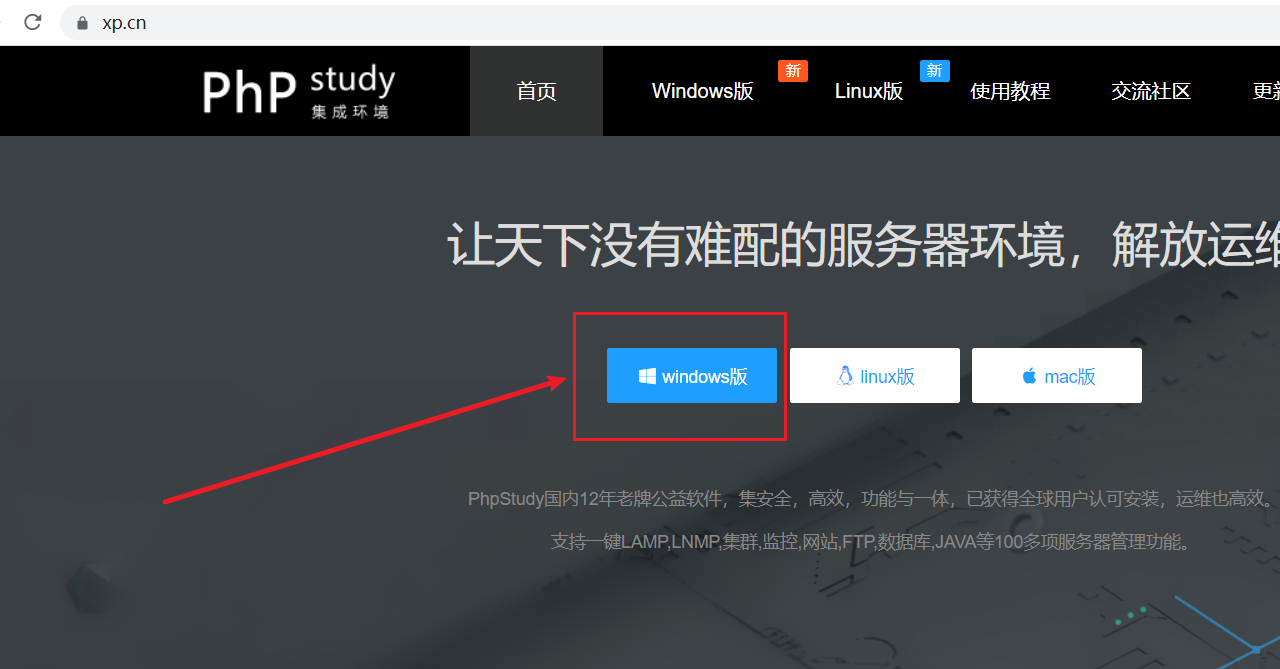
下载完后,解压,安装过程也是傻瓜式的。安装完后,桌面上就有如下图标,如下:
双击打开软件,如下:
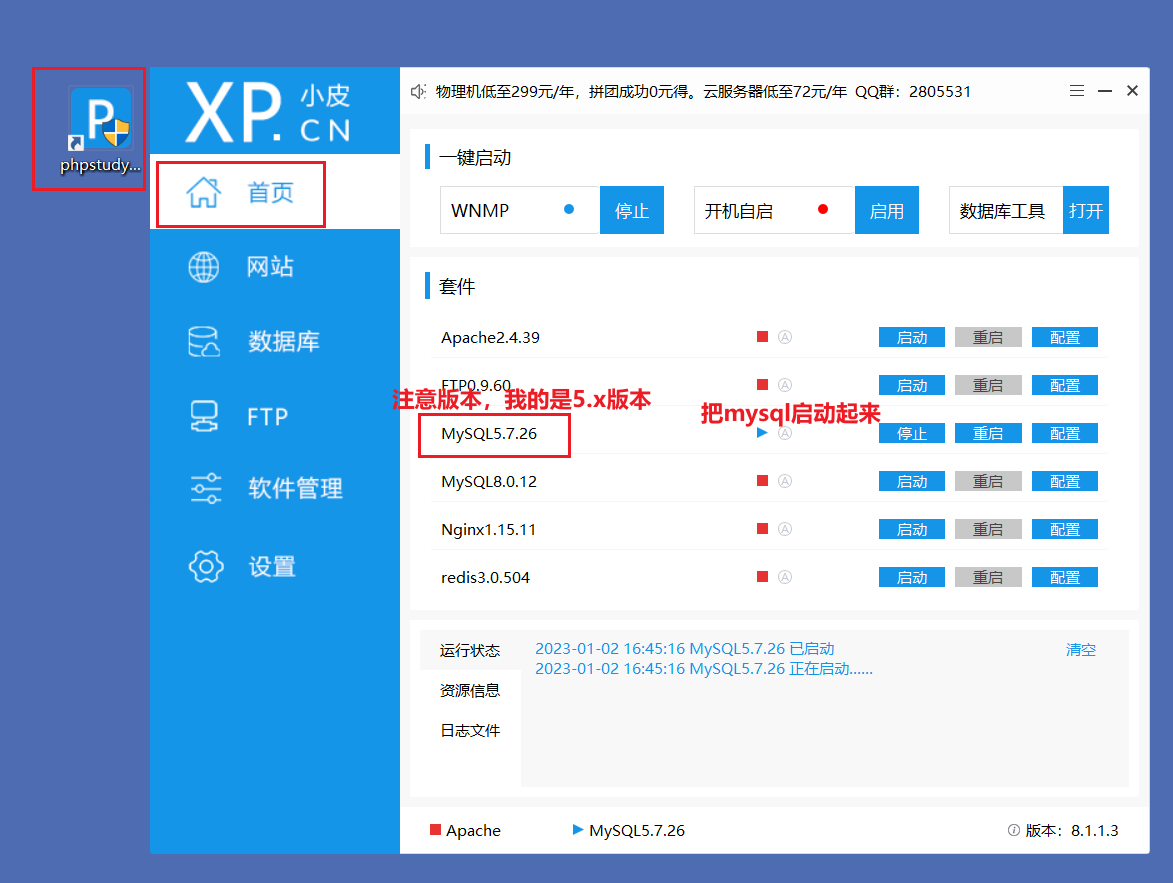
默认phpstudy的mysql的用户名是root,密码是root,不要动,不要改。需要保证都是root。
# 2)安装sqlyog
软件如下:
安装也是傻瓜式的,安装完后,在桌面上多一个图标,如下:
此软件是一个收费软件,有个注册码会自动破解,安装完,打开软件,输入姓名和序列号,序列号如下:
姓名(Name):cr173

序列号(Code):8d8120df-a5c3-4989-8f47-5afc79c56e7c

或者(OR)

姓名(Name):cr173

序列号(Code):59adfdfe-bcb0-4762-8267-d7fccf16beda

或者(OR)

姓名(Name):cr173

序列号(Code):ec38d297-0543-4679-b098-4baadf91f983
2
3
4
5
6
7
8
9
10
11
12
13
14
15
打开如下:
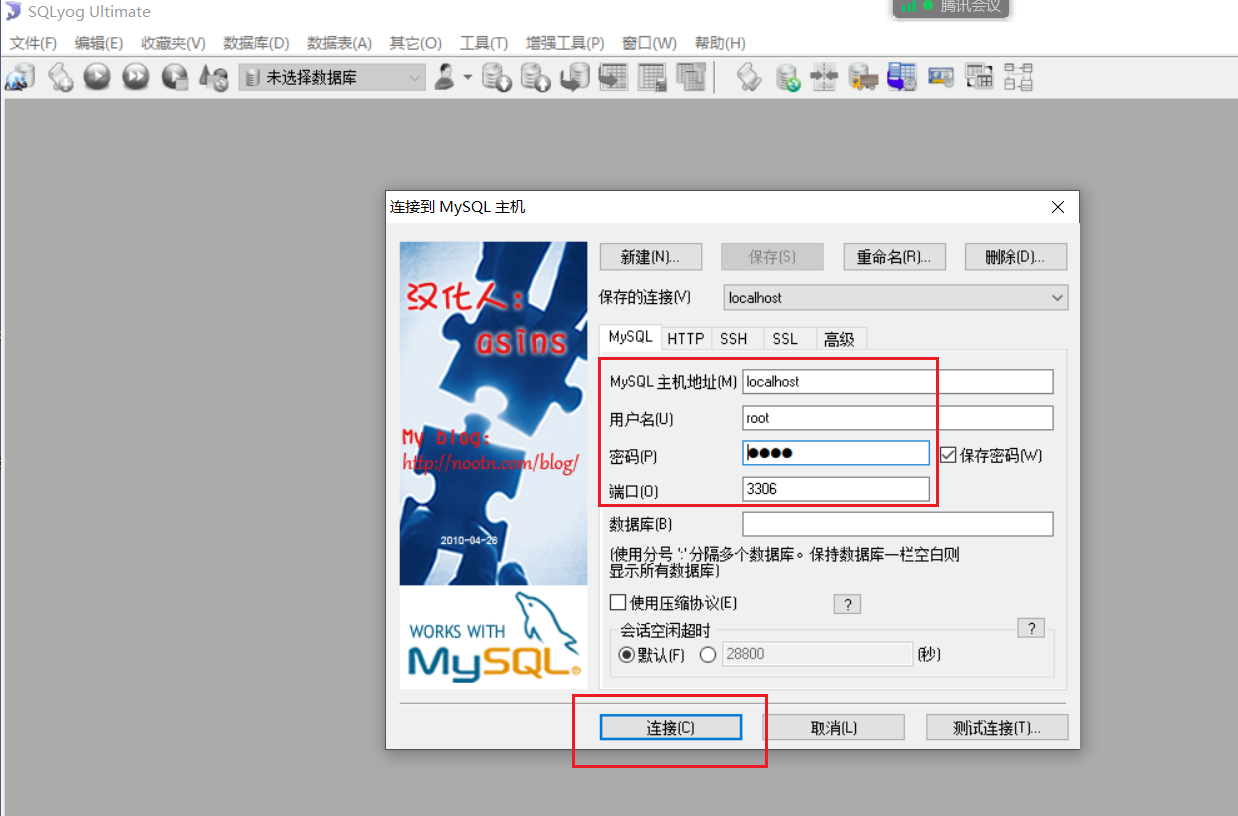

如果能连接上去,意味着mysql服务安装成功了。
# 3,把项目中用到的数据导入到数据库
大家在群中找到如下的数据库:
我们需要通过sqlyog创建一个数据库,如下:
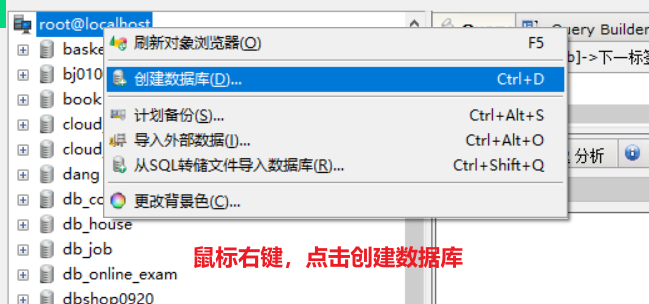
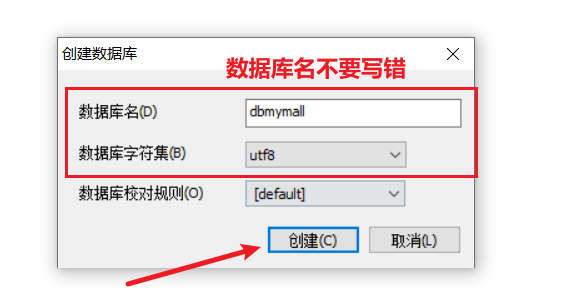
点击创建,就有数据库了,需要把sql文件导入到数据库,如下:

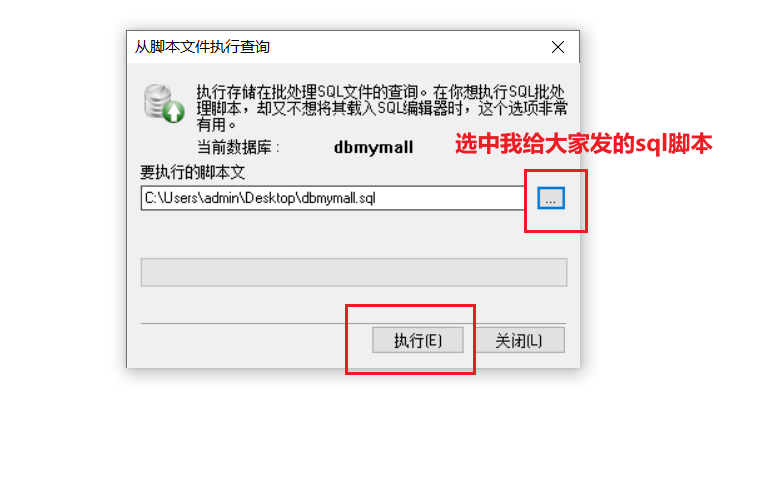
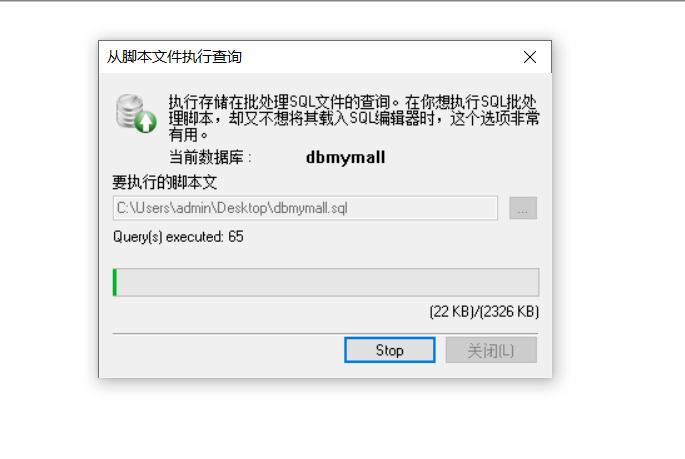
等执行完毕,点击完成就OK了,此时数据库中就有数据了,如下:
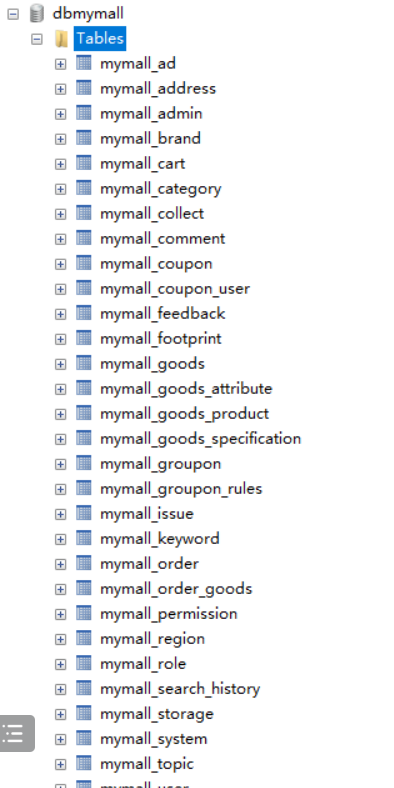
大家,需要保存你的数据库中有这些表。
# 4,打包后端代码
# 1)演示打包
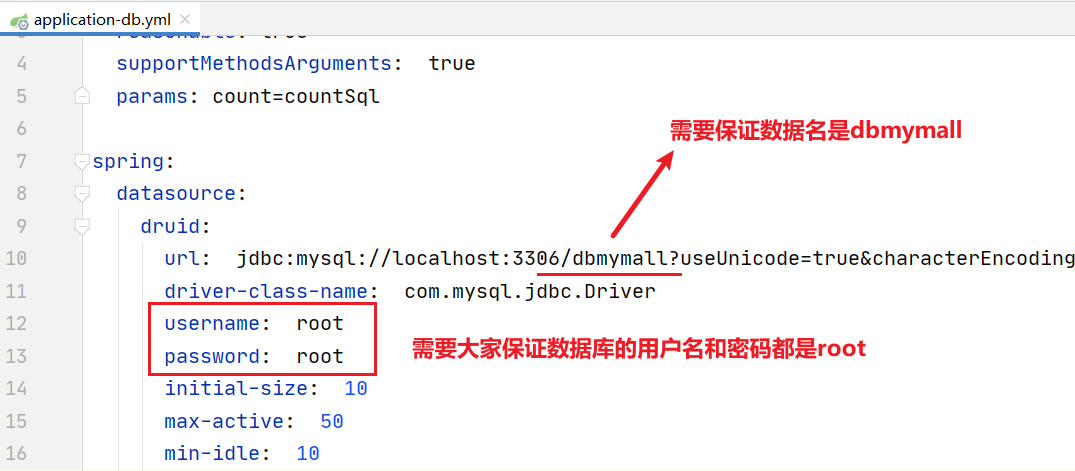
我把我的appid和app秘钥放到代码中,如下:
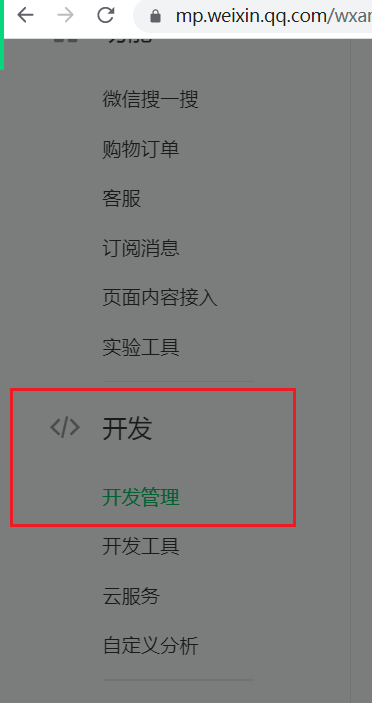
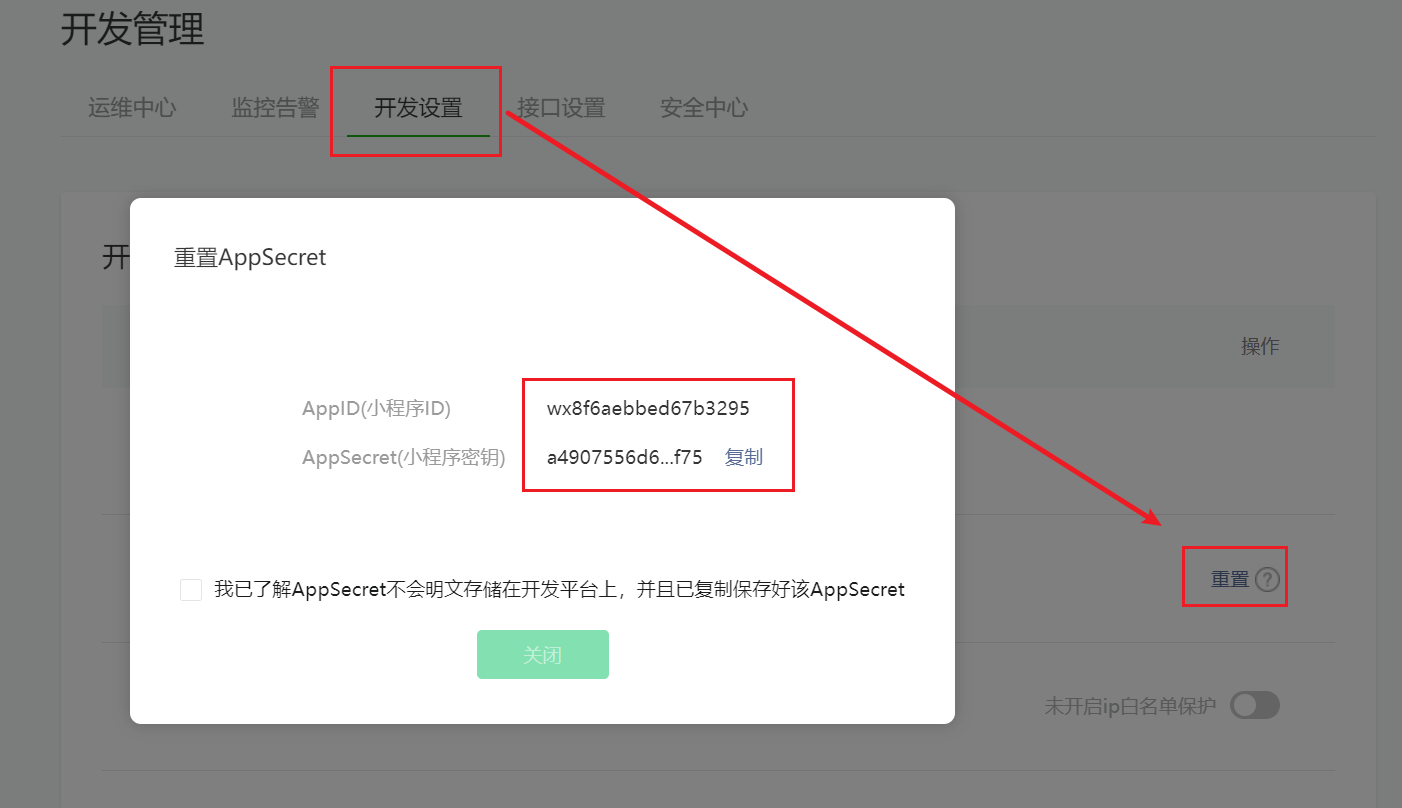
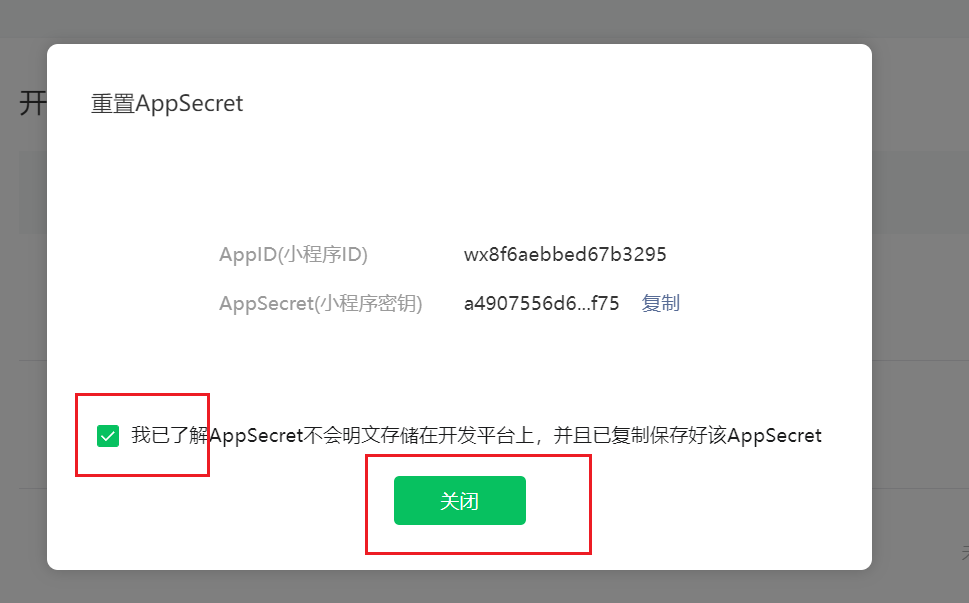
我的Appid和app秘钥如下:
appid:wx8f6aebbed67b3295
app秘钥:a4907556d619fbb3cac232628e168f75
2
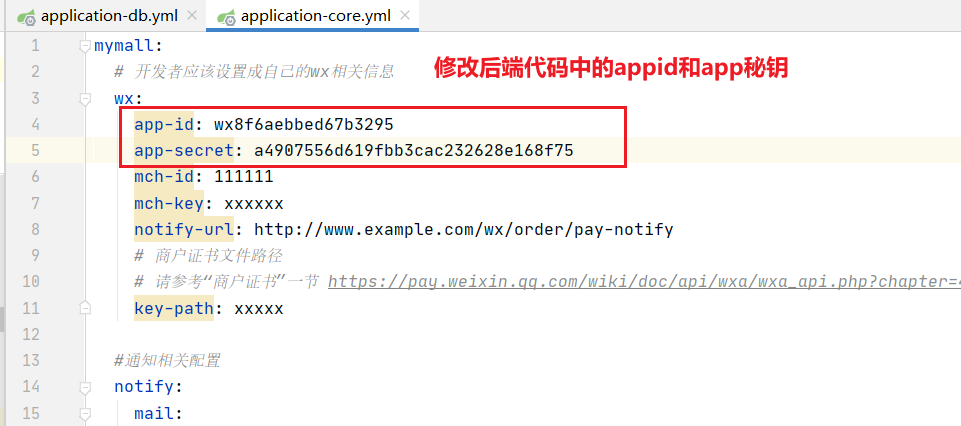
修改后端代码的appid和app秘钥,如下:
然后开始打包,如下:
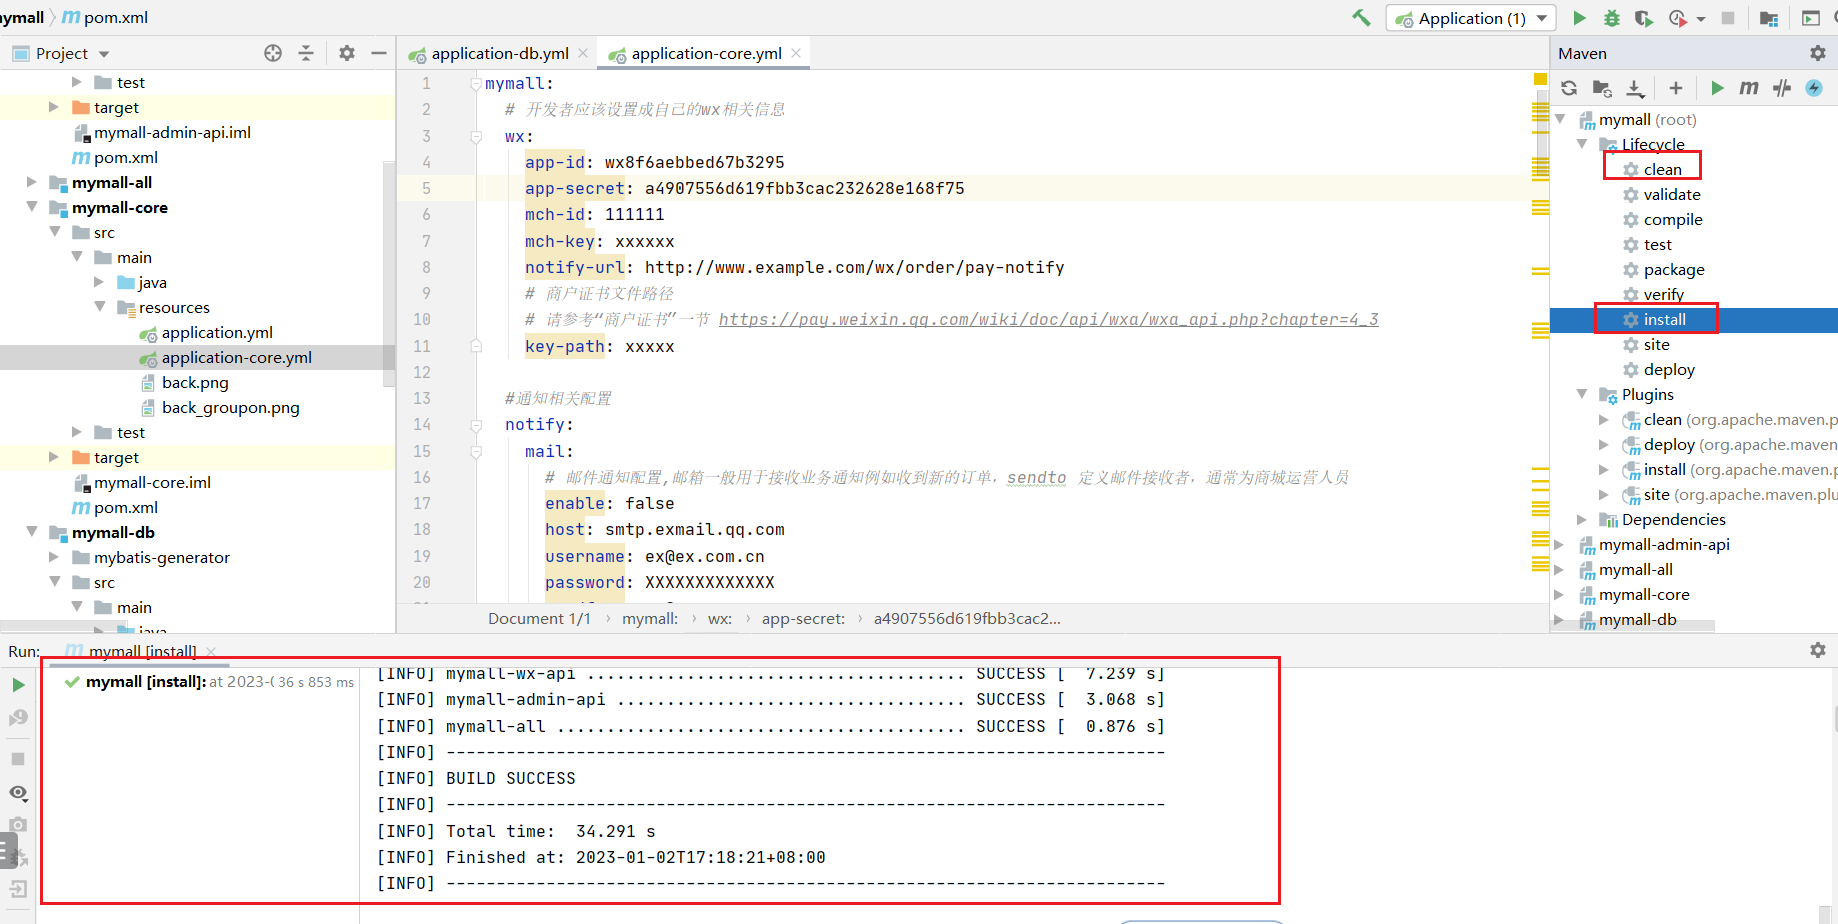
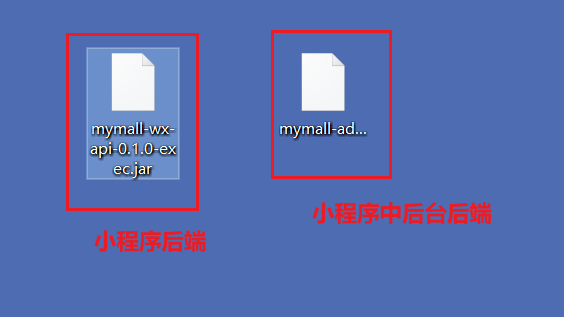
打包成功后,可以得到两上东西,如下:
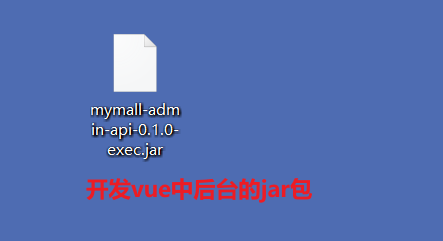
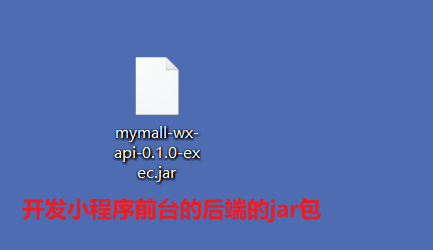
现在我要开发小程序,需要把小程序的jar包起来如下,如下:
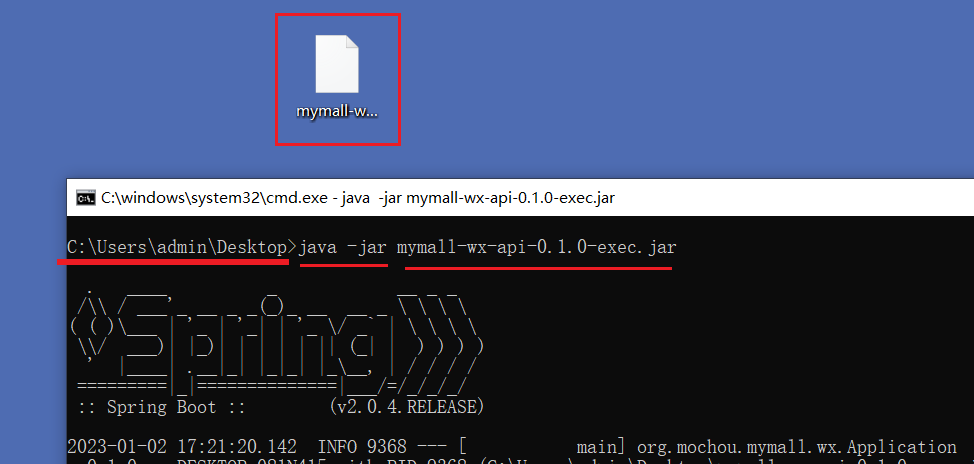

测试一下,后端注册接口是否可以使用,如下:
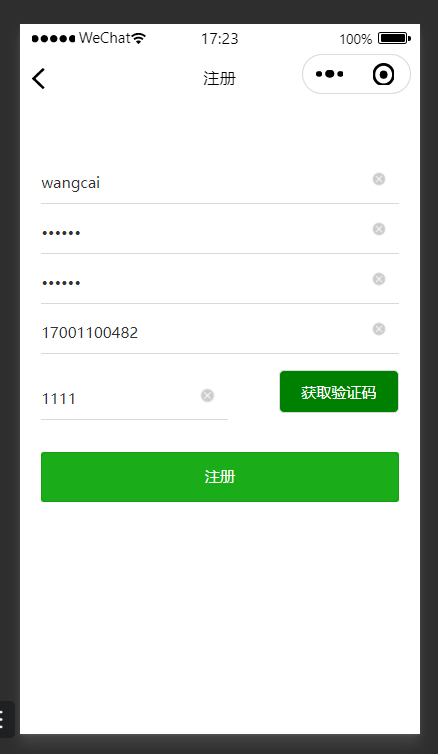
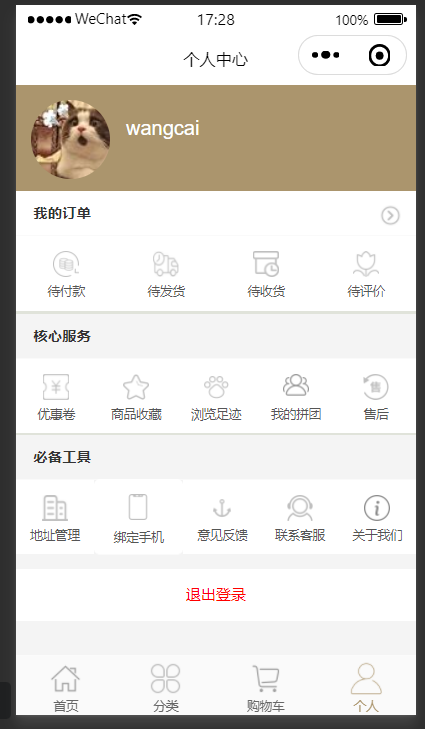
到此,说明后端环境就OK了。
# 2)各位同学的APPID和APP秘钥
我需要给大家发两个jar包,如下:
七月班:
熊峰:
AppID: wxf1a5474a5c3bd14b
App密钥:935a3101014f29a55a79011ef8bfd28a

赵泽康:
AppID: wxb77f9e70ac96051e
App密钥:f1d84cf4d460c6ab47c2126479ca44af

张继伟:
AppID:wx5dd5abedc75bedfd
App密钥:15635258009b7e54ed340a48d1d04780

李海雨:
AppID:wx47feb9e5870e34df
App密钥:90decb48aaf798f262f8cda2302c2337

朱桥盛:
AppID:wx55cc1346aabc8e08
App密钥:b616225ff6dff09abaa7a03e081ad6e7

曹颖龙:
AppID:wxce2ff93d0914164c
App密钥:d99b3871548420892b56215a939444f6

刘继柱:
AppID:wxff80c9971aab7b55
App密钥:ec674f03ae777b97e03c6138b576751d

徐仕泽:
AppID:wx97975ce8a1ef2cb7
App密钥:1b2bf8817341271db2588ae877a271cf

朱帅:
AppID:wx73d1f91bd1f88b5f
App密钥:0333a595b6a541f616aef963a38323e8

胡金磊
AppID:wxe8abf625434c5385
App密钥:167f1029dc39762113d75792affaad77

小明:
AppID:wx390de6e215e15712
App密匙:4de959d512bb2db291e29e4c52bfb534

毛毛:
AppID:wxc78c47935e29b446
App密匙:f0c89aed0b1969e00071438900927ba2

明港:
AppID: wx295a2b54b02b1329
App密匙:6718c5f0b4701352a5673e44718def5b

海波:
AppID: wxb1aa0305d75789df
App密钥:fe03457e7638e052b55f9f011b0c6108

刘博:
AppID: wx0881d9f408d2bc03
App密钥:779ebe7ac97a1d4235efe9116452c3fc
2
3
4
5
6
7
8
9
10
11
12
13
14
15
16
17
18
19
20
21
22
23
24
25
26
27
28
29
30
31
32
33
34
35
36
37
38
39
40
41
42
43
44
45
46
47
48
49
50
51
52
53
54
55
56
57
58
59
八月班:
李朝阁:
appid:wx85dbda037f5f25f6
app密钥:fe76305cb02fd5c00a67acf56d93bfc6

文双:
appid:wx0d45d4cc4ef81971
app密钥:946f0f993b993d2111be74c75740fb31

张潇威:
appid:wx51fb1c268d6ddf66
app秘钥:48de5bbbd0d0d3e140c2c4809f9ca32f

唐玮:
appid:wx679ae1386747c181
app秘钥:f4ea062ebc494047e61f2c06d8268ec7

尚帅:
appid:wxc7cecc775202a7a1
app秘钥:e9be1a133dc4a56c1db97d1d9ca5c904

张辉:
AppID:wx440524434ff0f1a8
app秘钥:a5b86871c6f50da756fd110a59d1e0b5

宋沛霖:
appid:wx02470e4b60dc49b1
app秘钥:1b8ca0c71944784a6bc968a76e258d49

常卉卉:
appid:wx06cd04842a502768
app密钥:1badea0cdd067daeb8361f98cfaaf856

彭嘉伟:
appid:  wx7a6093d15e549e26
app秘钥:f94219c792d7f546bcdf005b231d462d

吴迪
appid:wx999efd5520f77c7e
app密钥:e9f353b5eda04ee3add4e85e30db2e58

冯金磊:
appid:wxece61c1c7c41d158
app秘钥:2cbc0985e8e026758166a22c1785fb99

李长彬:
appid:wx40660530ee426303
app秘钥:dbd37795a0adcf0cf159ec4afab88e9f

韩志成:
appid:wx42f7ff3fb44b2a66
app密钥:8ebf5e99e1332fe43fd3448d9ef77d87

吕学伟
AppID :wxe824a250fecf105e
App密钥:85dfda94e303c51e2e185bc5e2881cdb

张红平:
appid:wx45c43602218a8214
app密钥:4c577872c0d8cfb1b44301841ce6a2a5

朱健鑫:
appid:wx8b9275cf5921fc05
app秘钥:687e6efd6c6497491683ecbfeb956c71

郑皓轩:
appid:wxe6be199759669768
app密钥:d1ac8911d537facbdafa3c9af743d437

李雄奇
AppID:wxefd1d64e4e24ef97
app密钥:05df599e96ac5a384c78b820e9d672c4

秦宇轩:
AppID:wx1db1b7b2cfbcbea8
app密钥:538d1dbb64d48a9cc7e15e0b98f0d91b

王馨雩
AppID:wx4490f5060d716e19
App密钥:a454fb6867999b2cf431ead2f310e7e7

马斌洋:
appid: wx09c4e9162bf64b09
app密钥:819ac9e5ca3569f96e667fd7975bb3d6

付元旭:
appid: wx0aa3b1aa0817e0a5
app密钥:101cb690fac7b73365ed5accc388448a
2
3
4
5
6
7
8
9
10
11
12
13
14
15
16
17
18
19
20
21
22
23
24
25
26
27
28
29
30
31
32
33
34
35
36
37
38
39
40
41
42
43
44
45
46
47
48
49
50
51
52
53
54
55
56
57
58
59
60
61
62
63
64
65
66
67
68
69
70
71
72
73
74
75
76
77
78
79
80
81
82
83
84
85
86
87
# 二,项目tabbar和项目首页面渲染
# 1,每天写项目前要做的事件
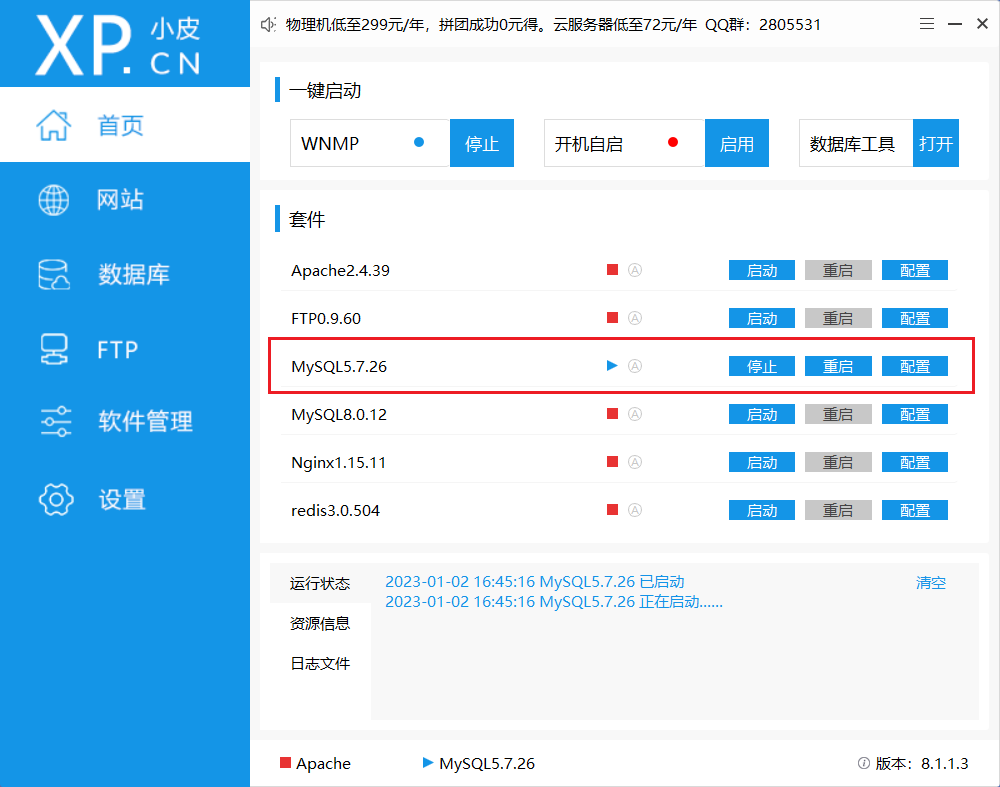
# 1)第一步:把PHPstudy打开,并且打开mysql数据库服务器
打开mysql服务器,如下 :
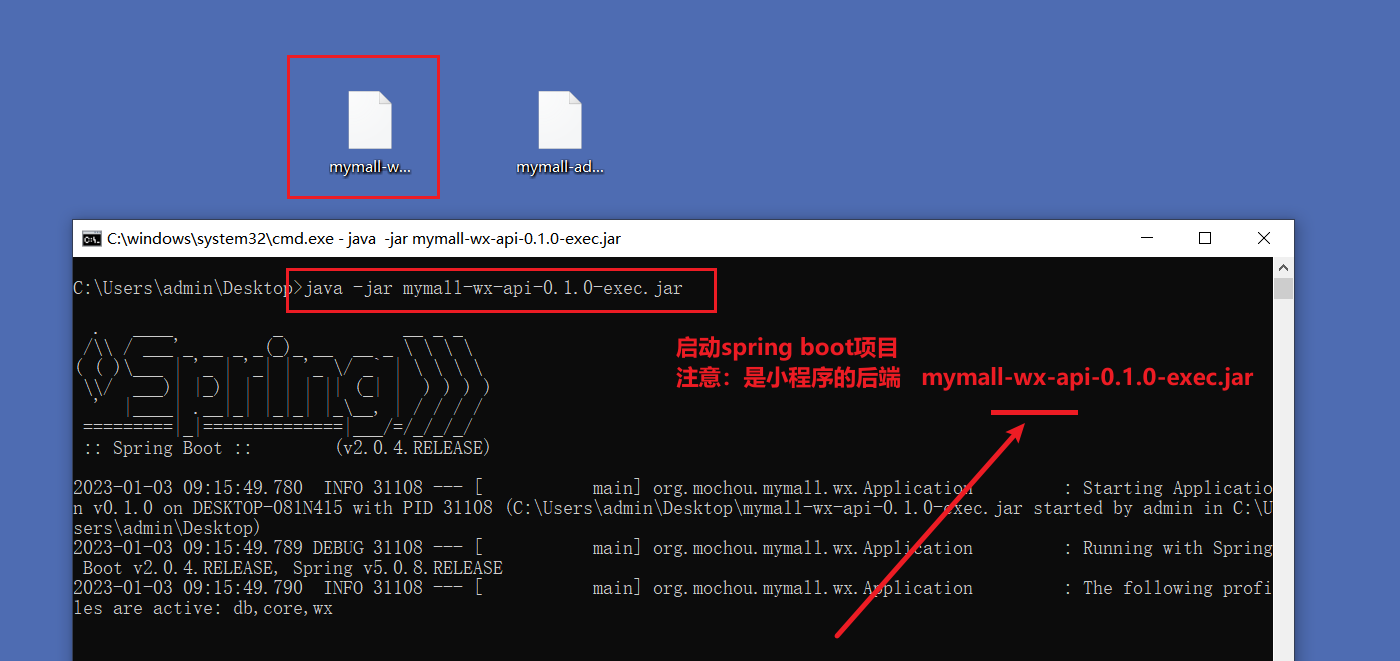
# 2)第二步:把Java后端运行起来
把java后端运行起来,如下:

# 3)第三步:通过接口文档调试后端接口
打开接口文档,地址如下:
接口文档:https://www.apifox.cn/apidoc/shared-d5f6d022-d57c-4a11-bd3c-921b98d6cf22
找开,如下:
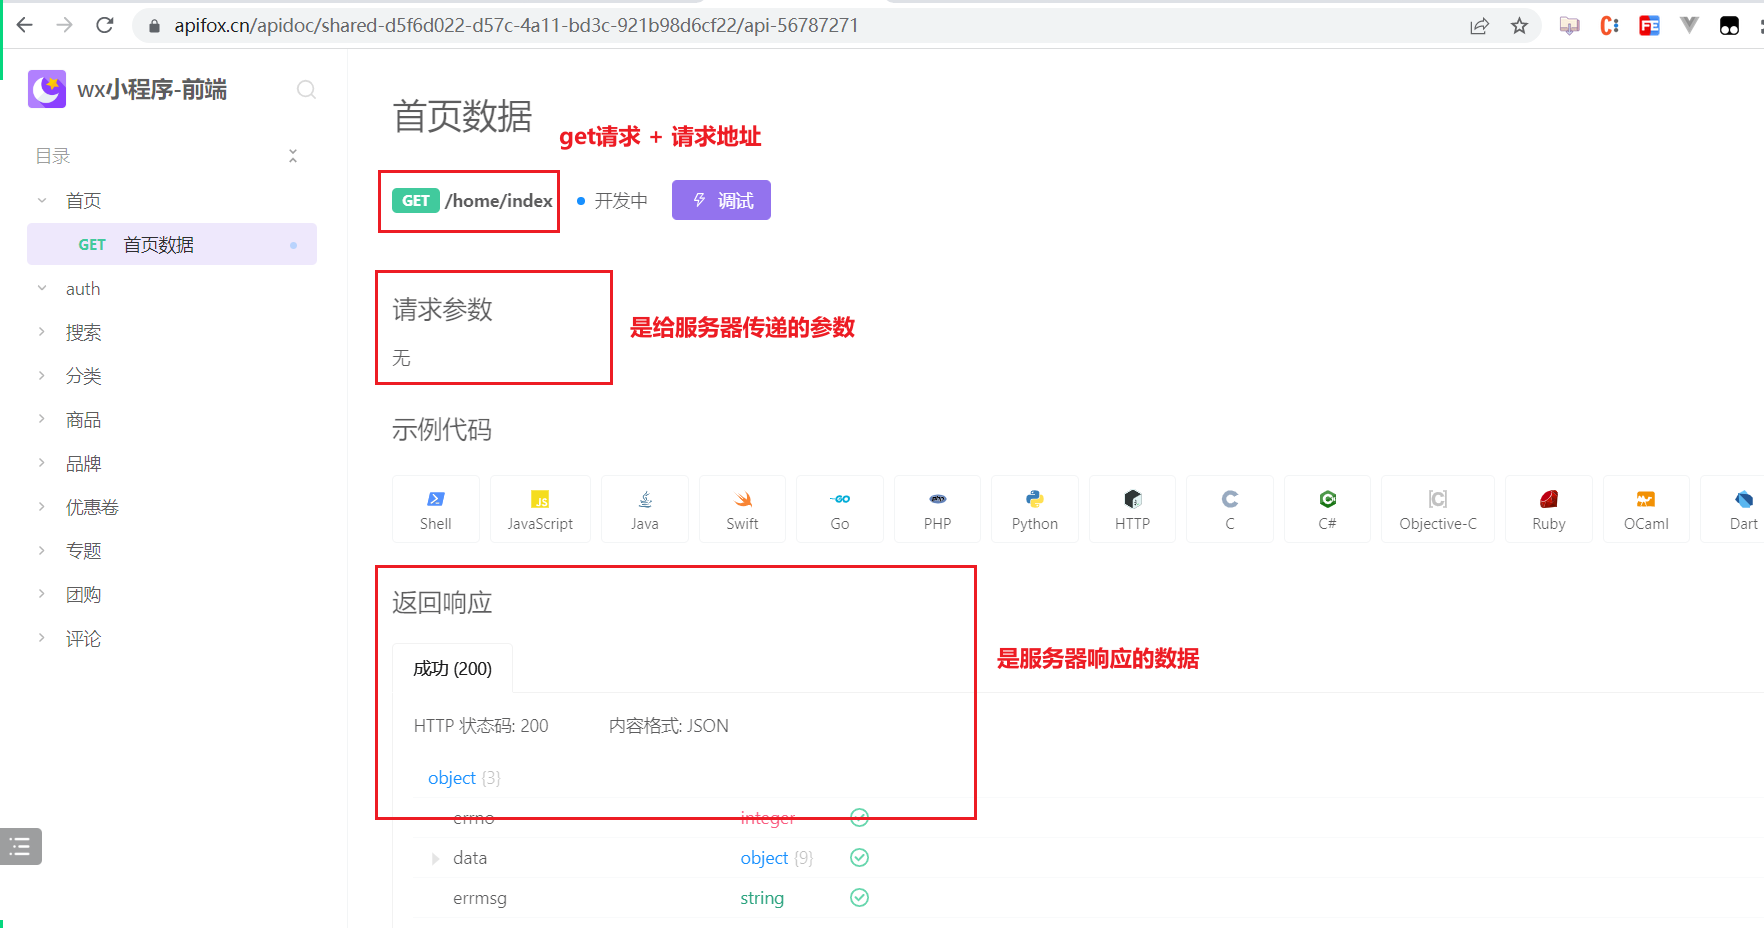
可以在线调试,用法和postman类似,如下:
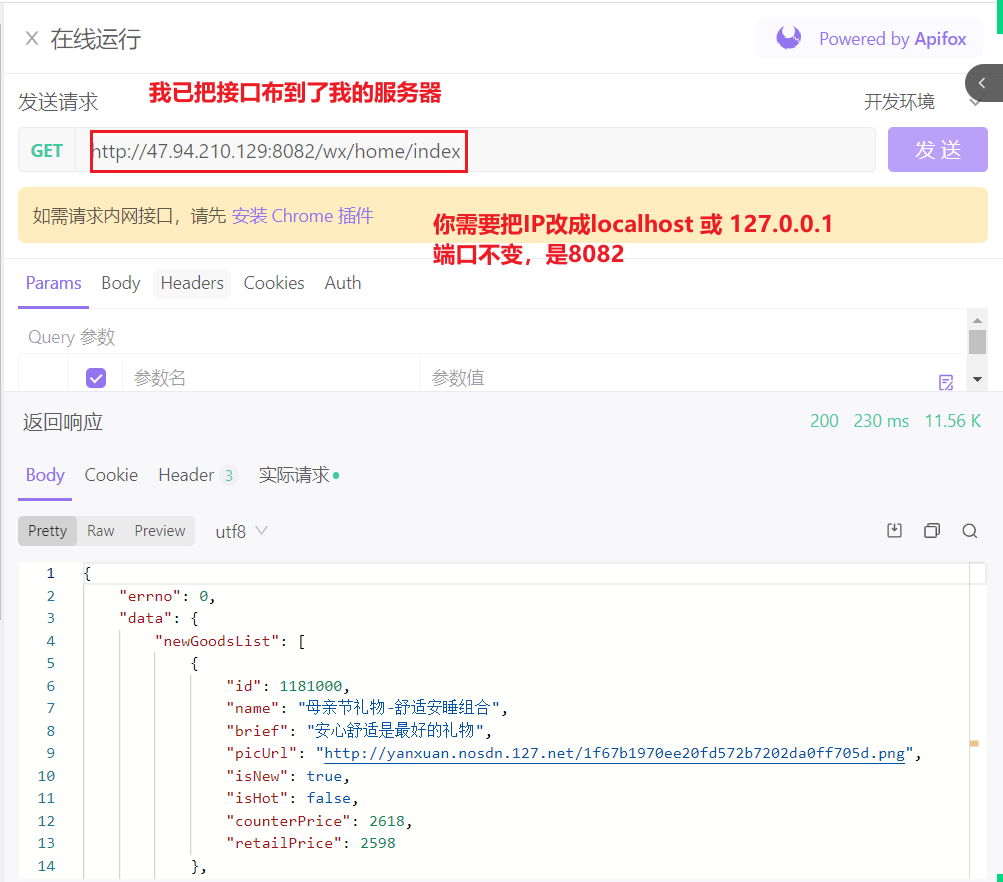
如果地址是本机地址(127.0.0.1),需要安装谷歌浏览器插件,如下:
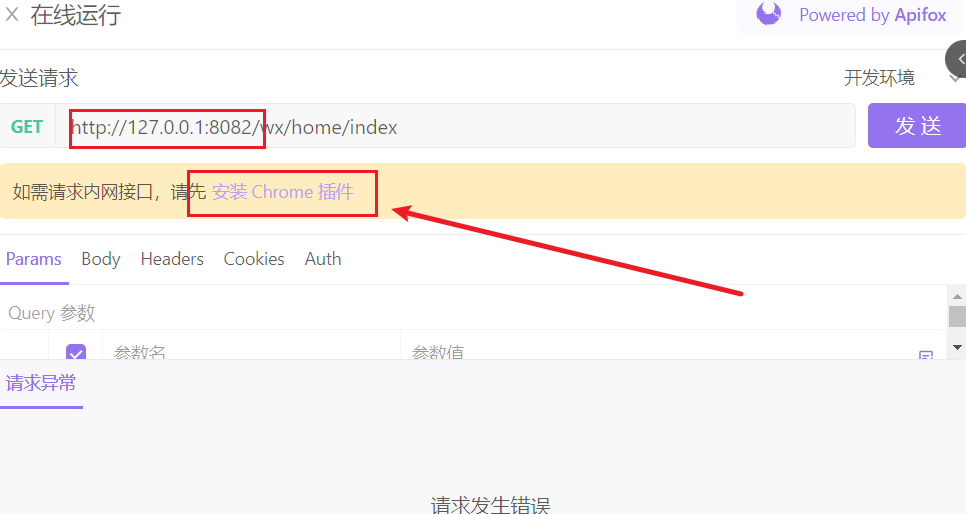
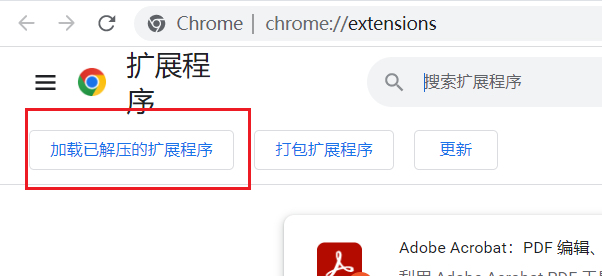
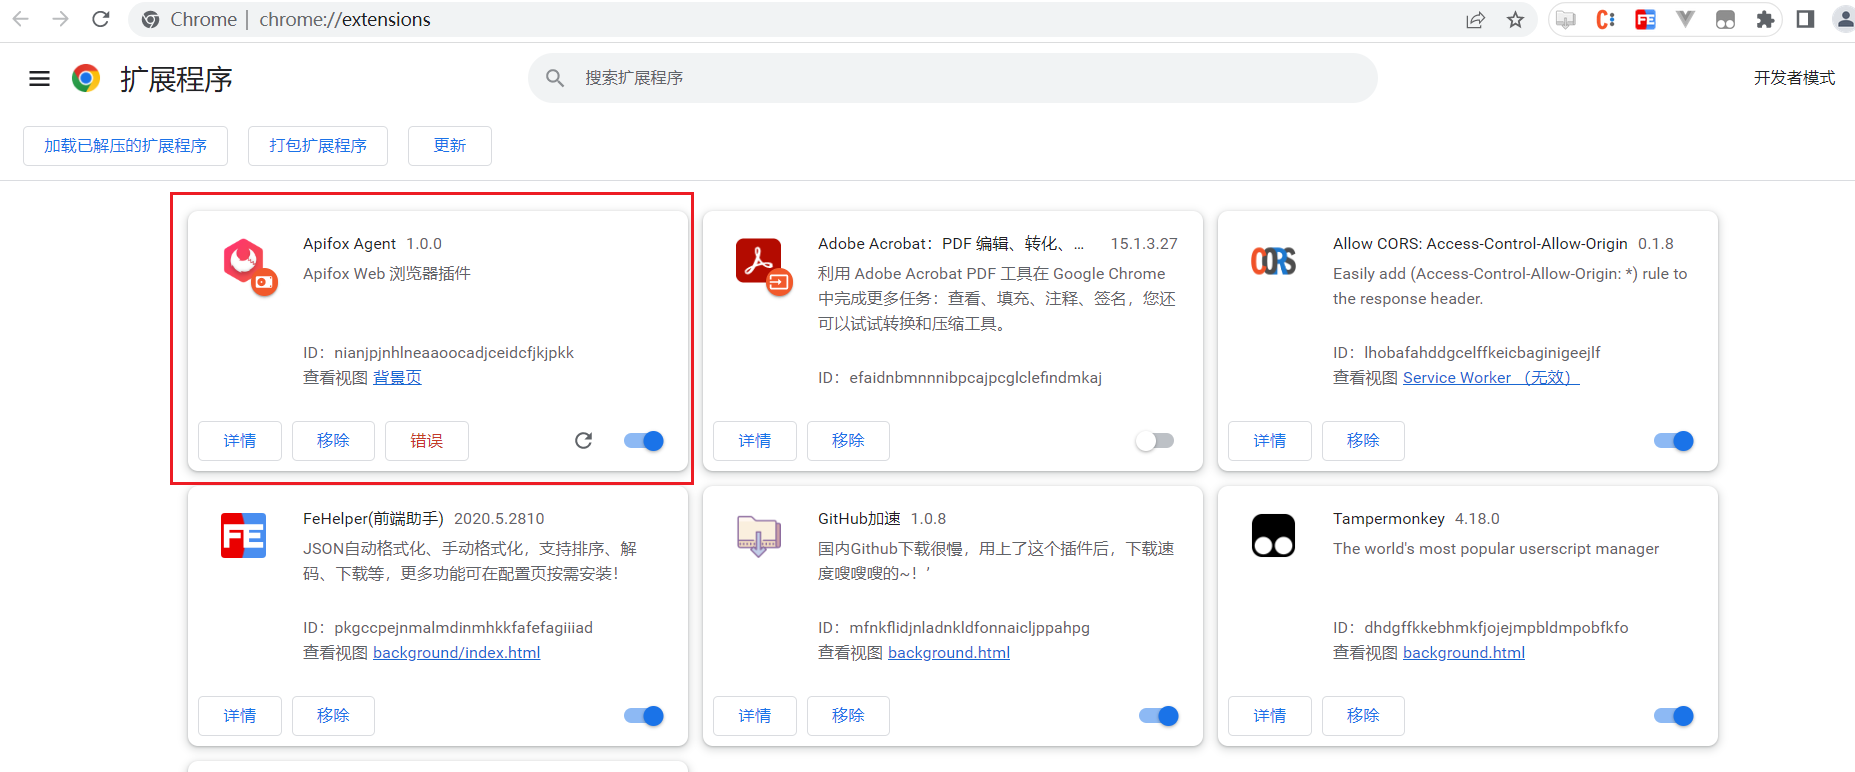
再次测试之,如下:
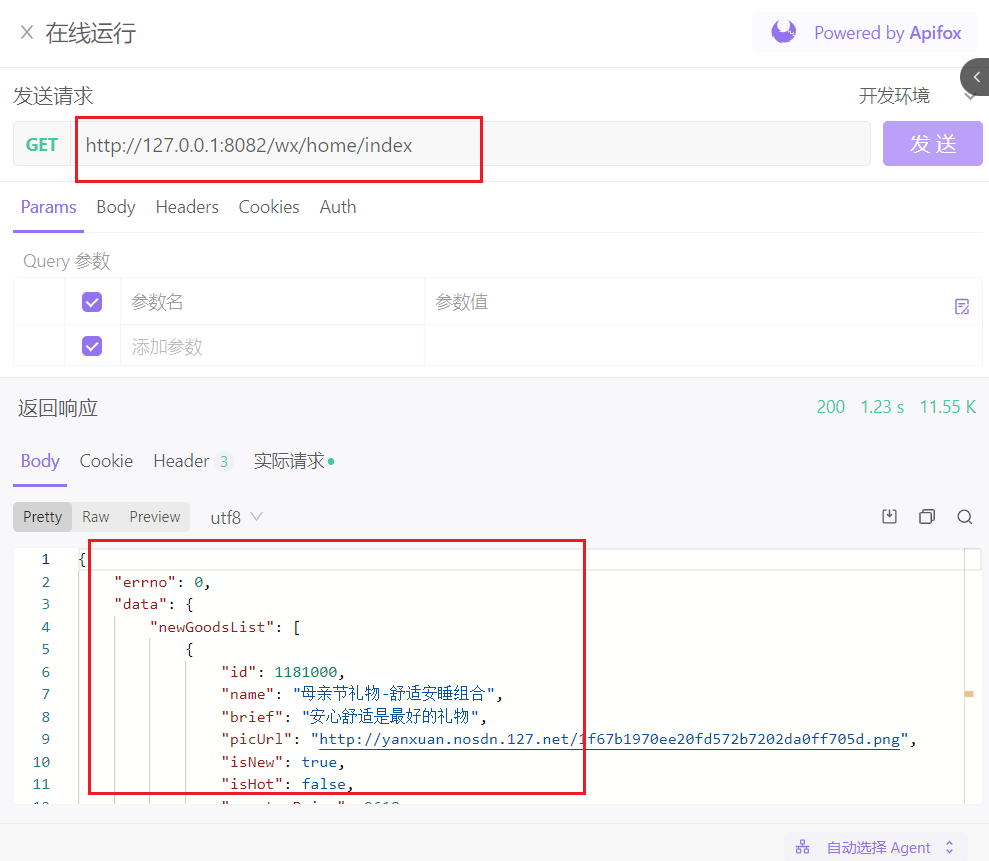
如果在调用接口时有问题,直接把问题发群中。
如果实在没有思路,就参考下面的文档。
# 2,创建项目

创建小程序项目,如下:
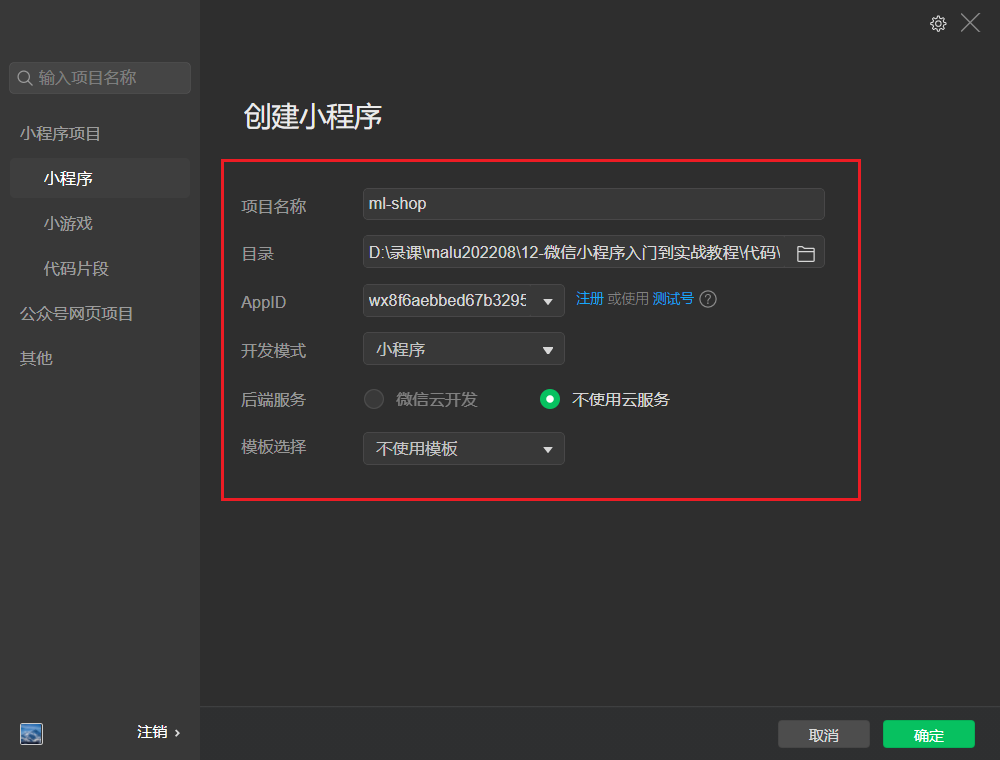
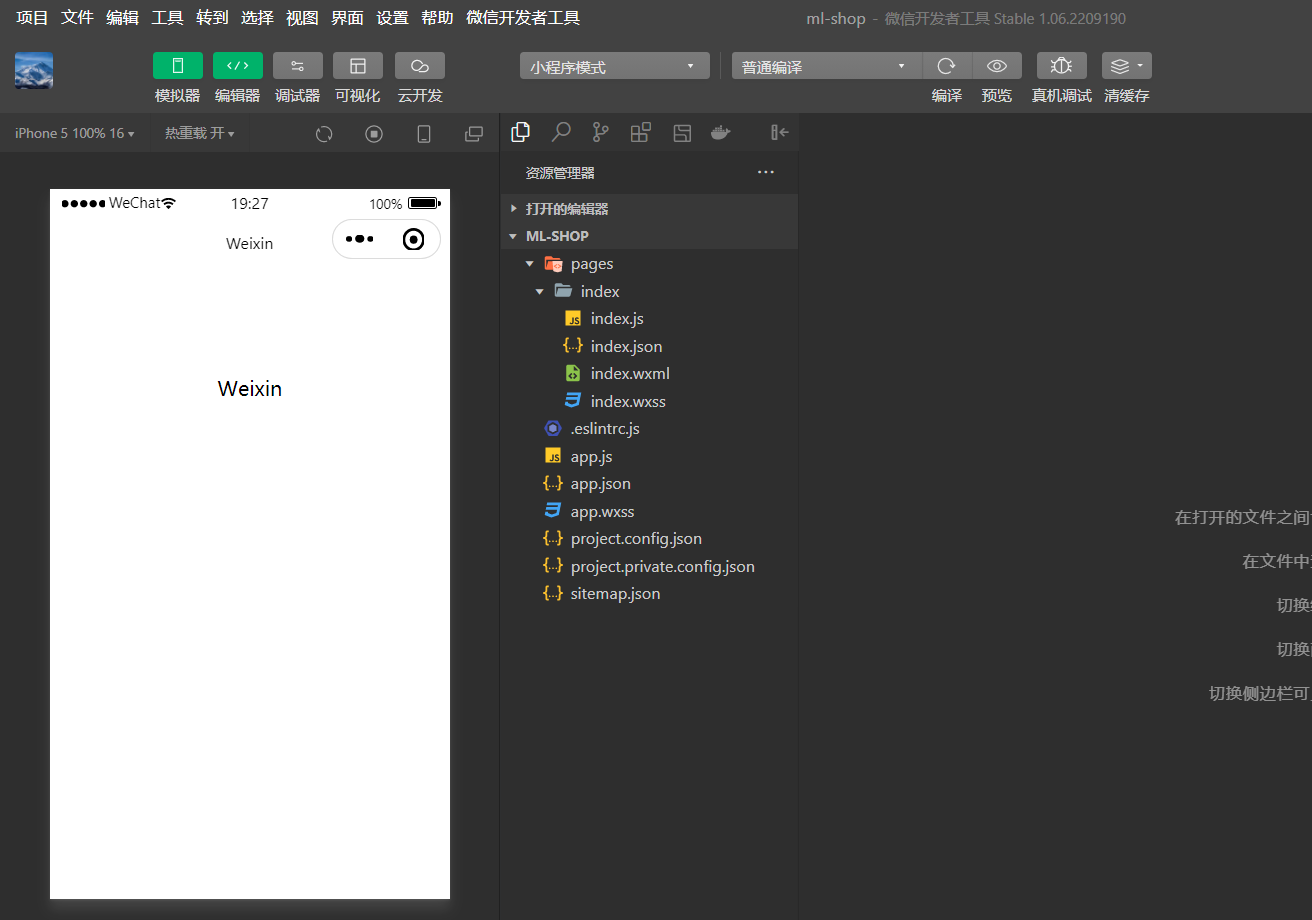
这样我们就得到一个非常干净的空项目,如下:
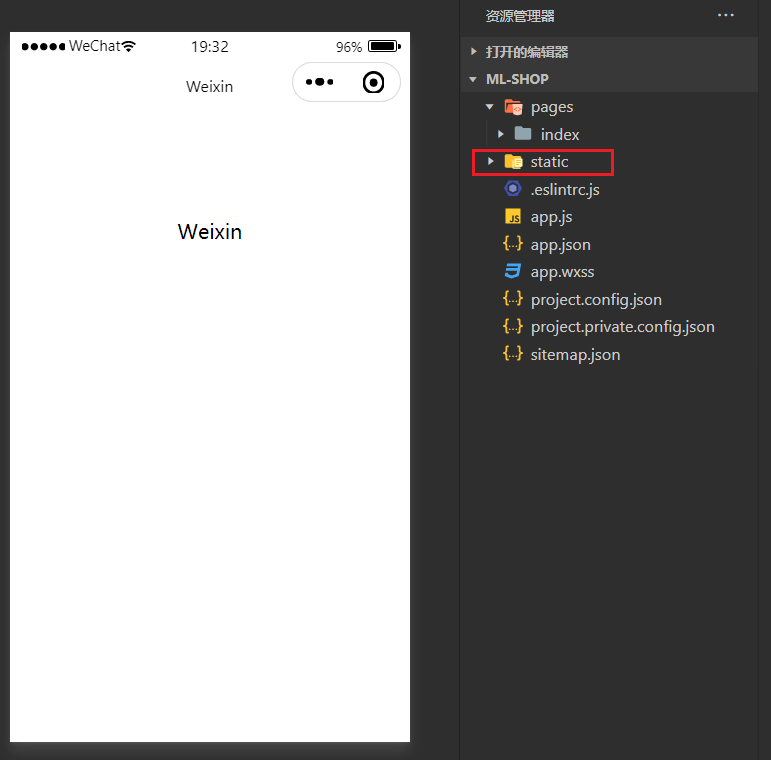
copy项目中使用到的图片到项目的根目录下:
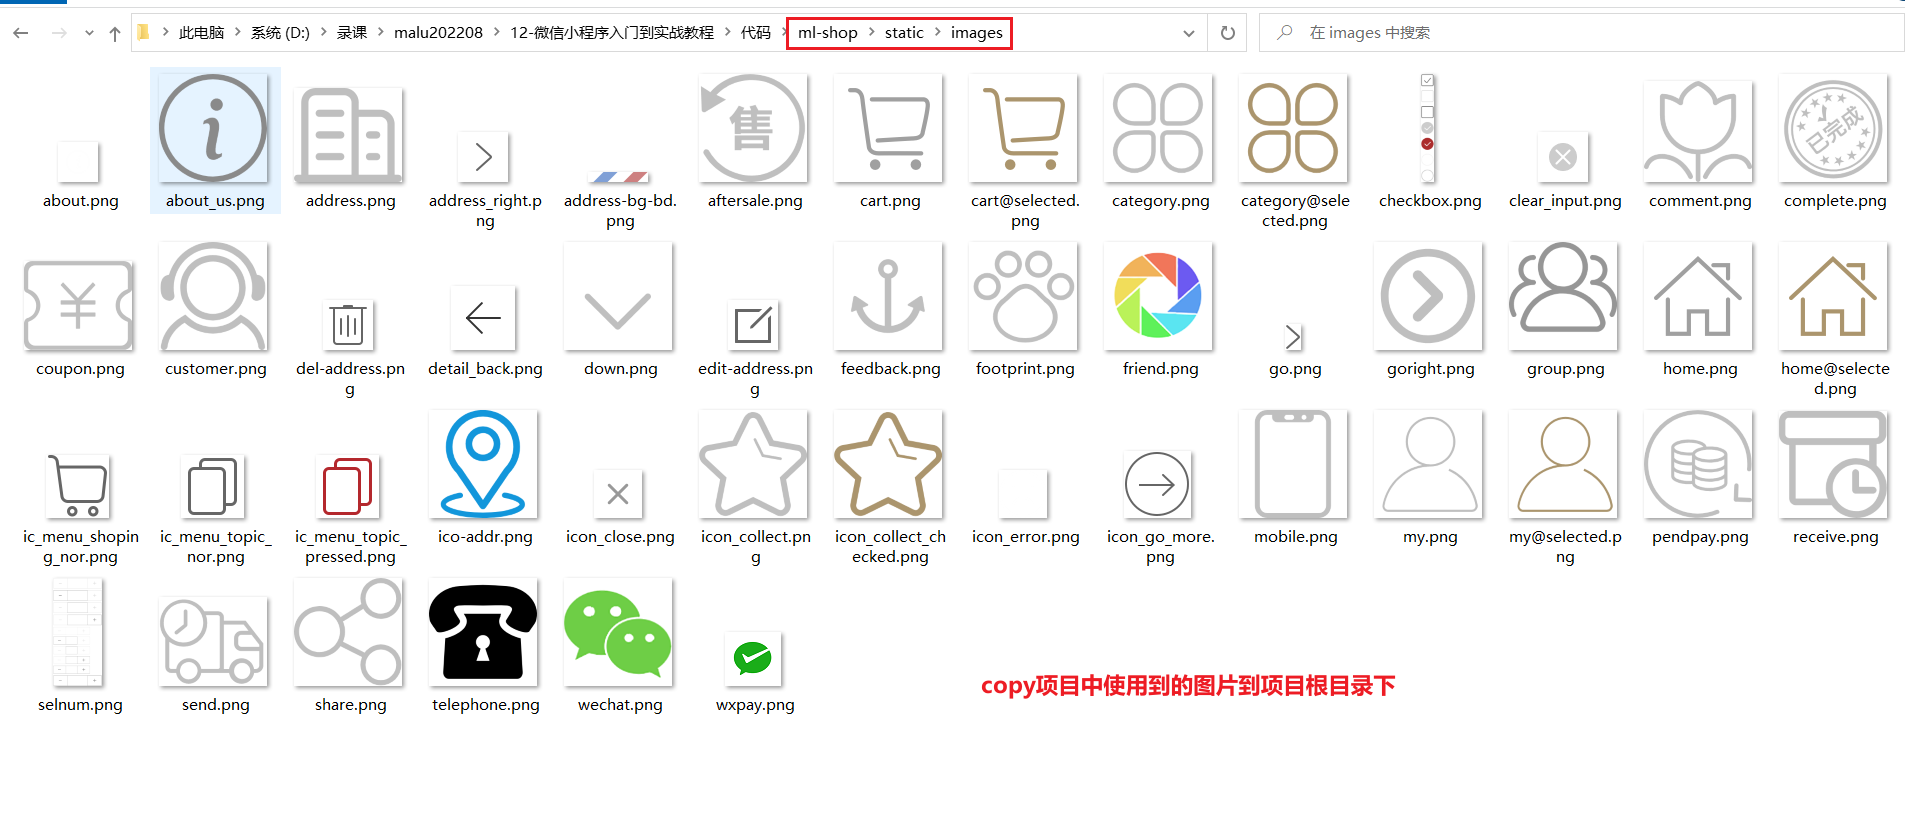
此时项目目录如下:
# 3,创建Tabbar对应的四张页面并配置tabbar
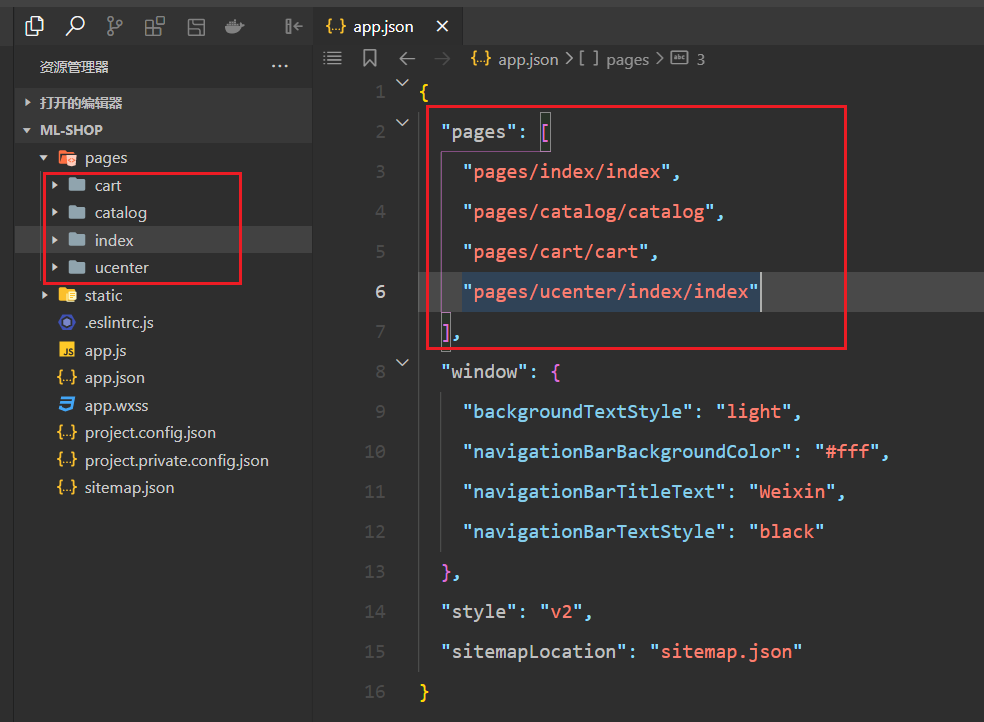
创建Tabbar对应的四张页面,如下:
配置Tabbar如下:
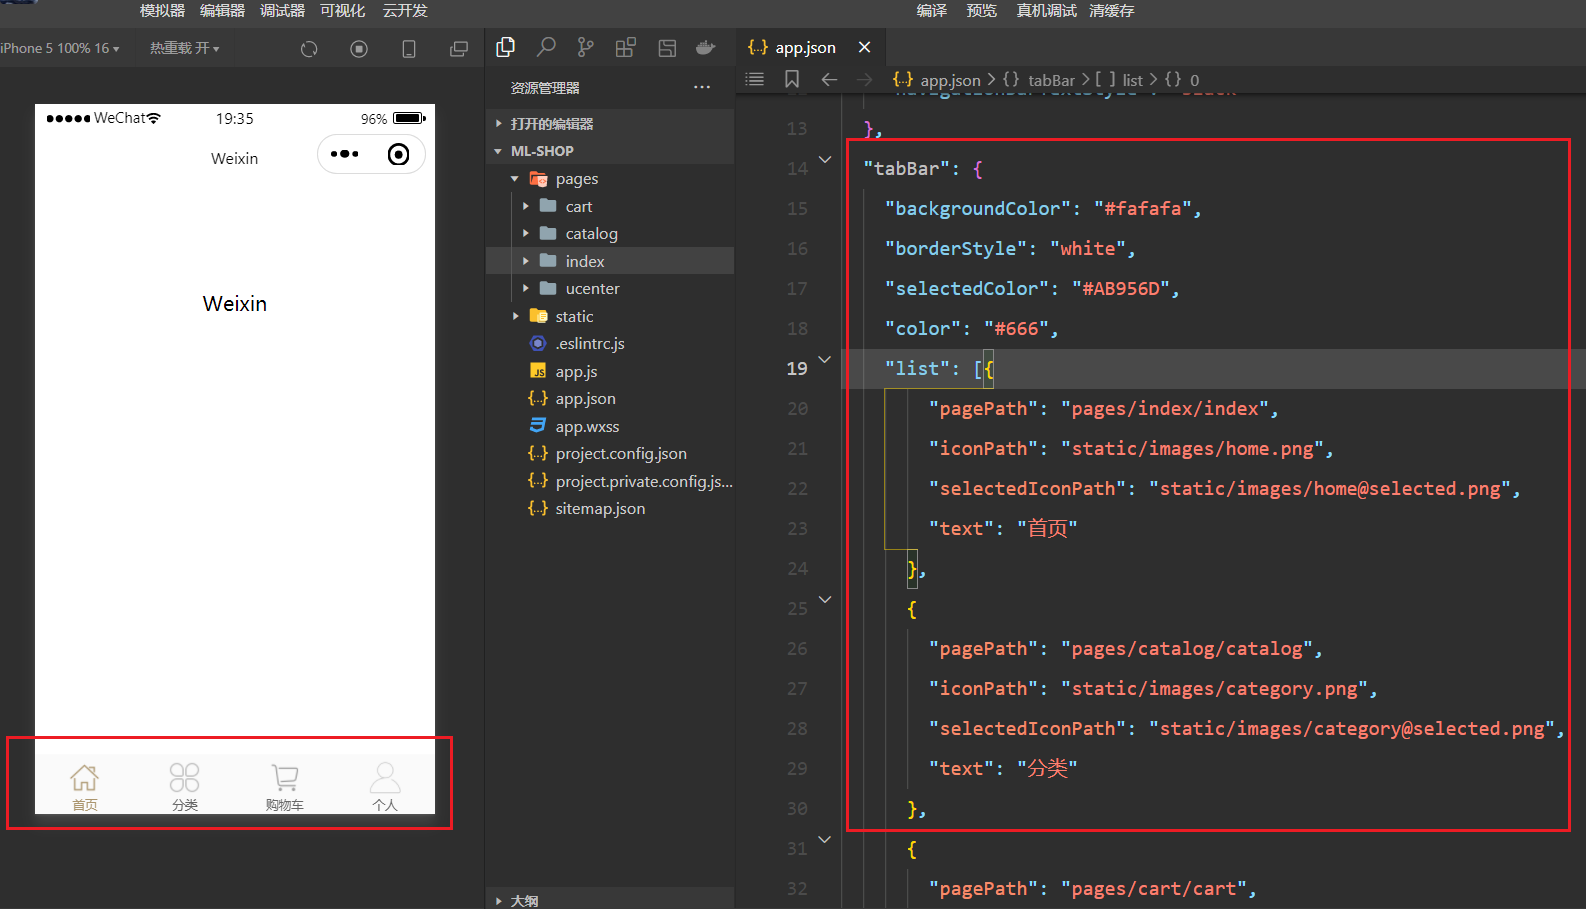
tabbar参考代码如下:
 "tabBar": {
    "backgroundColor": "#fafafa",
    "borderStyle": "white",
    "selectedColor": "#AB956D",
    "color": "#666",
    "list": [{
        "pagePath": "pages/index/index",
        "iconPath": "static/images/home.png",
        "selectedIconPath": "static/images/home@selected.png",
        "text": "首页"
      },
      {
        "pagePath": "pages/catalog/catalog",
        "iconPath": "static/images/category.png",
        "selectedIconPath": "static/images/category@selected.png",
        "text": "分类"
      },
      {
        "pagePath": "pages/cart/cart",
        "iconPath": "static/images/cart.png",
        "selectedIconPath": "static/images/cart@selected.png",
        "text": "购物车"
      },
      {
        "pagePath": "pages/ucenter/index/index",
        "iconPath": "static/images/my.png",
        "selectedIconPath": "static/images/my@selected.png",
        "text": "个人"
      }
    ]
  },
2
3
4
5
6
7
8
9
10
11
12
13
14
15
16
17
18
19
20
21
22
23
24
25
26
27
28
29
30
31
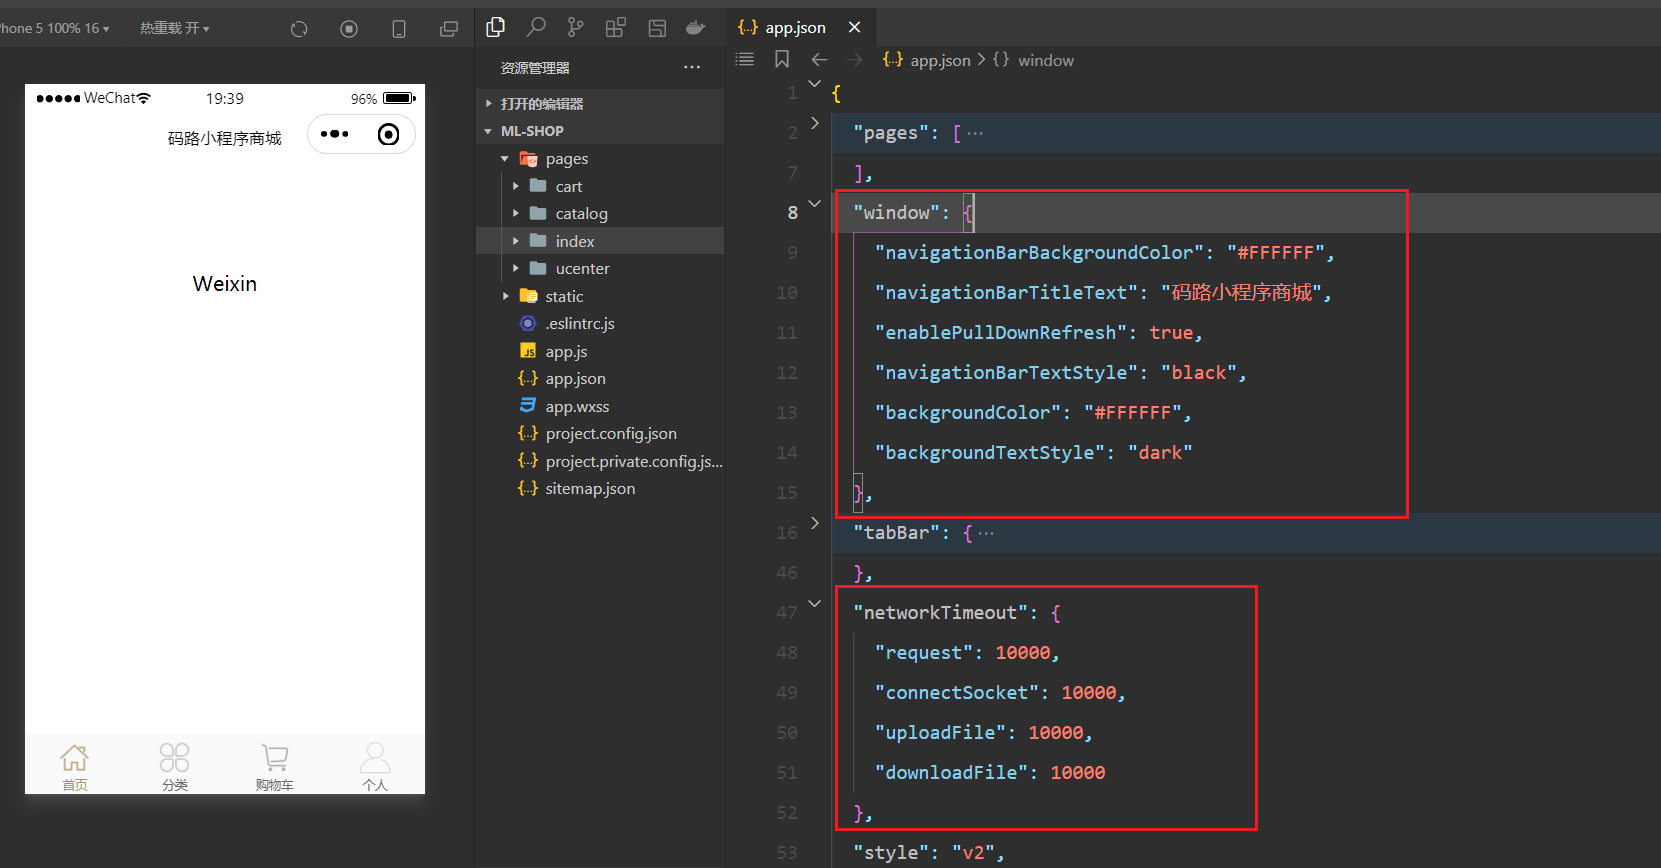
# 4,配置window和网络超时请求
配置如下:
# 5,ajax二次封装与API请求地址封装
创建一个utils文件夹,在utils文件夹下创建一个util.js文件,在里面对ajax进行二次封装,如下:
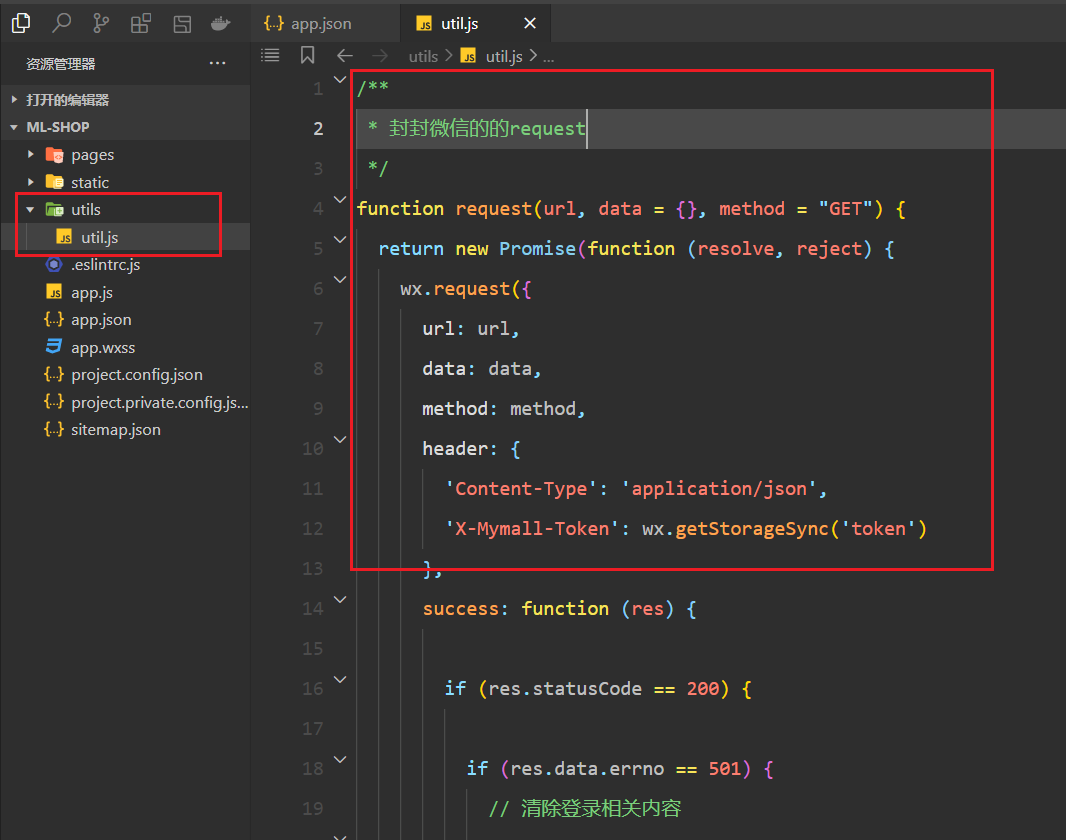
参考代码如下:
/**
 * 封封微信的的request
 */
function request(url, data = {}, method = "GET") {
    return new Promise(function(resolve, reject) {
        wx.request({
            url: url,
            data: data,
            method: method,
            header: {
                'Content-Type': 'application/json', // 表示数据以json的形式传给服务器
                'X-Mymall-Token': wx.getStorageSync('token') // 后面有些接口是我们需要带上token才能获取到数据
            },
            success: function(res) {
                // 200 表示响应回来数据
                if (res.statusCode == 200) {
                    // if先不要管,后面写到登录时再回头看
                    if (res.data.errno == 501) {
                        // 清除登录相关内容
                        try {
                            wx.removeStorageSync('userInfo');
                            wx.removeStorageSync('token');
                        } catch (e) {
                            // Do something when catch error
                        }
                        // 切换到登录页面
                        wx.navigateTo({
                            url: '/pages/auth/login/login'
                        });
                    } else {
                        // 服务器响应的数据就在res.data中
                        resolve(res.data);
                    }
                } else {
                    // statusCode不等于200表示没有响应成功的数据
                    reject(res.errMsg);
                }

            },
            fail: function(err) {
                reject(err)
            }
        })
    });
}

// 小程序中的模块化是commonjs模块化
module.exports = {
    request
}
2
3
4
5
6
7
8
9
10
11
12
13
14
15
16
17
18
19
20
21
22
23
24
25
26
27
28
29
30
31
32
33
34
35
36
37
38
39
40
41
42
43
44
45
46
47
48
49
50
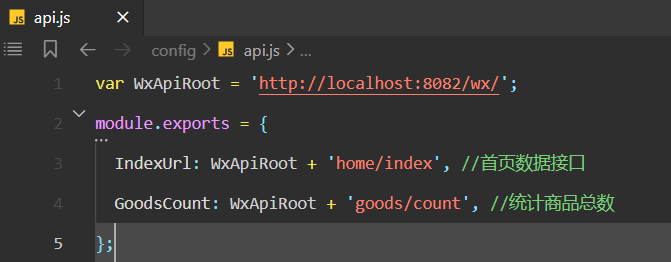
接口的请求地址都放在config文件夹下(和我们之前的写法不同,换一个写法),如下:
api.js里面仅仅封装了请求的url,如下:
# 6,首页面数据获取
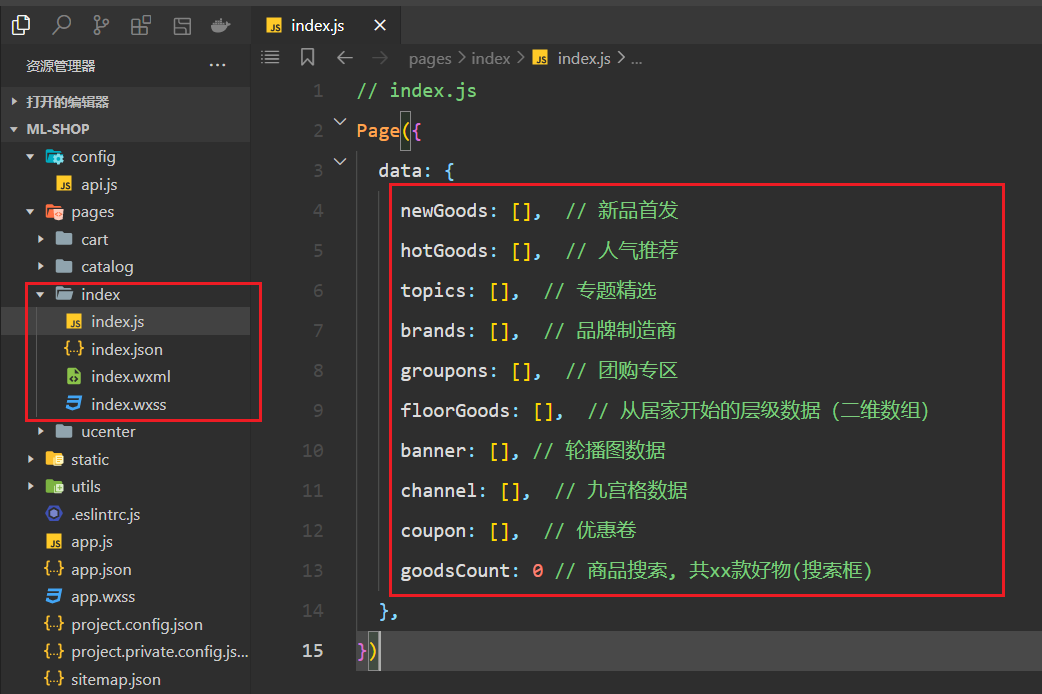
定义首页面相关的状态,如下:
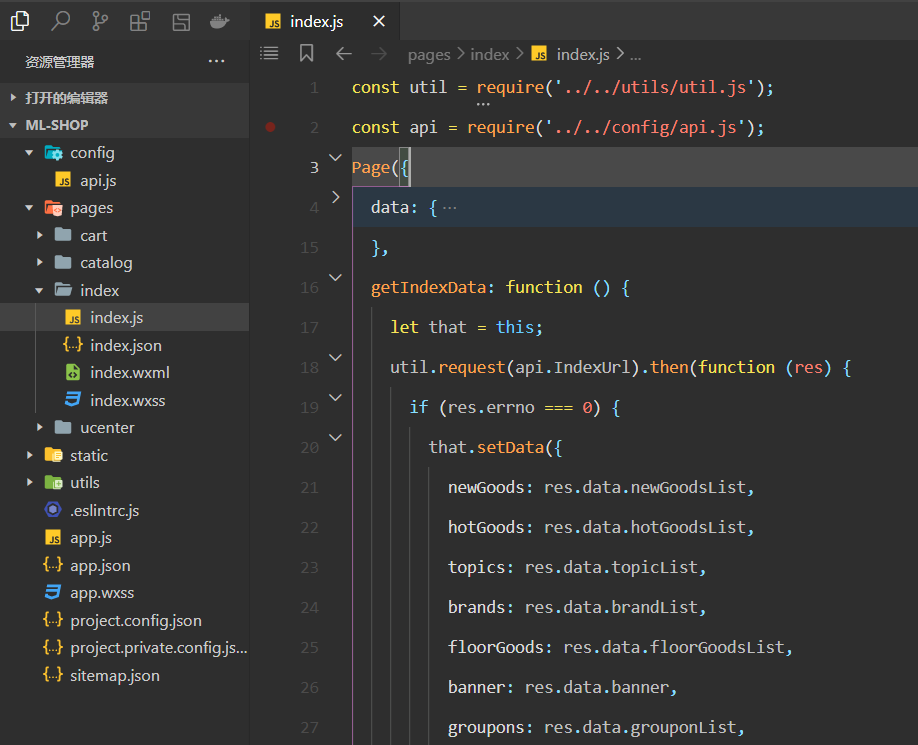
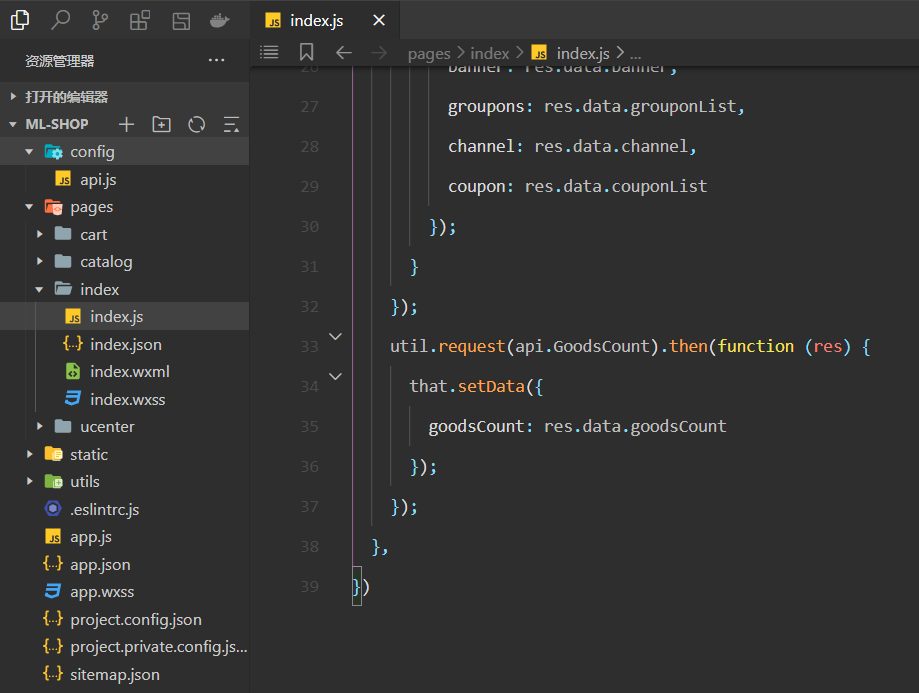
获取首页面的数据,如下:
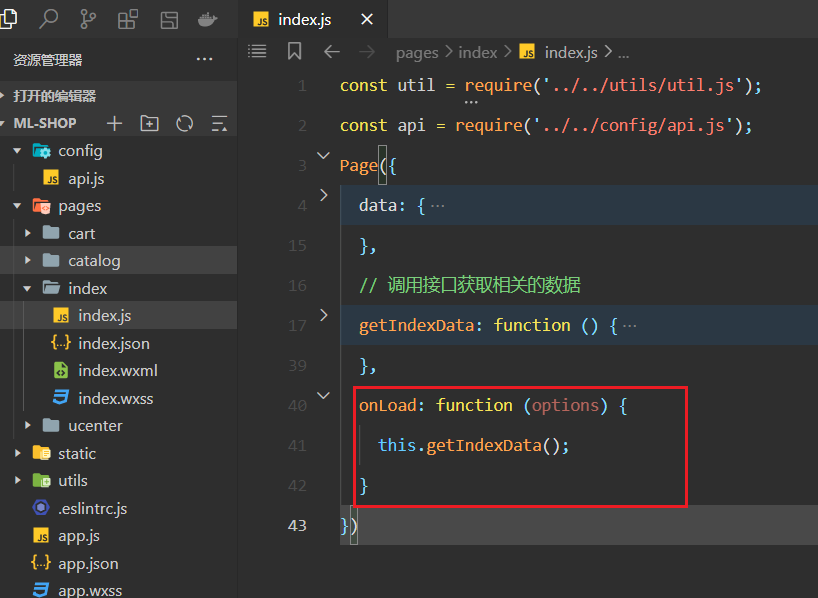
在onLoad钩子中,调用getIndexData,如下:
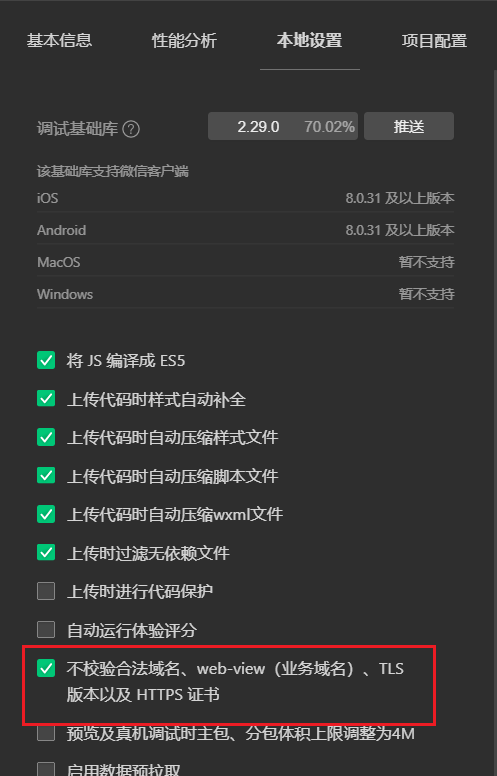
不校验合法域名,如下:
测试如下:
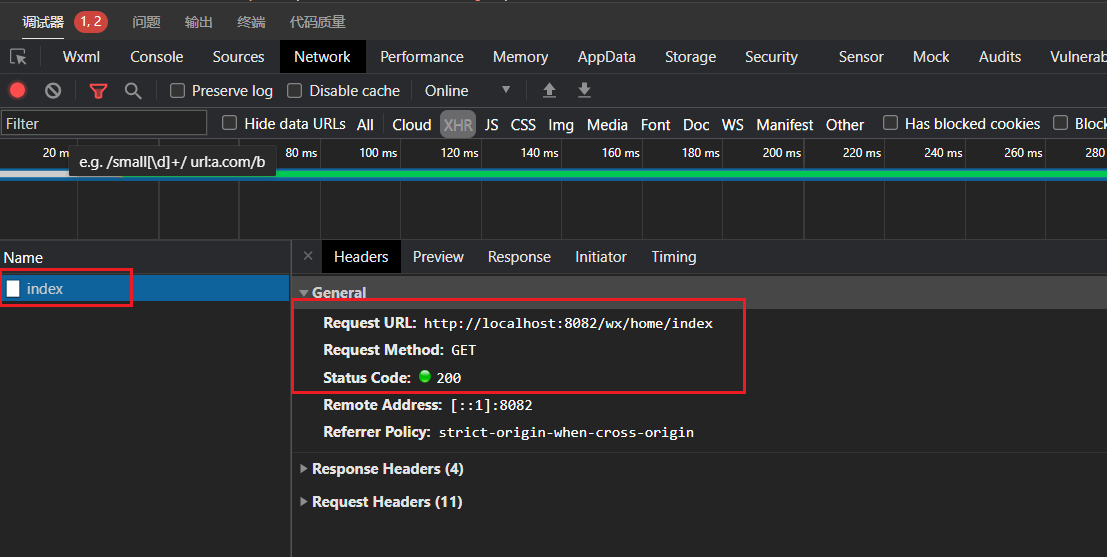

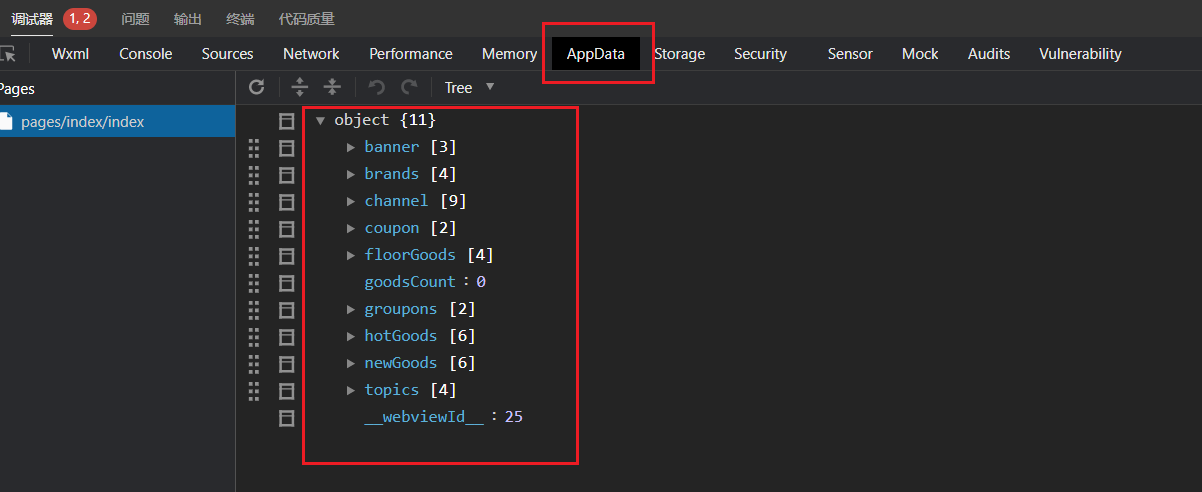
到此首页面数据就获取完毕了。
# 7,渲染搜索框
删除全局的默认样式,如下:
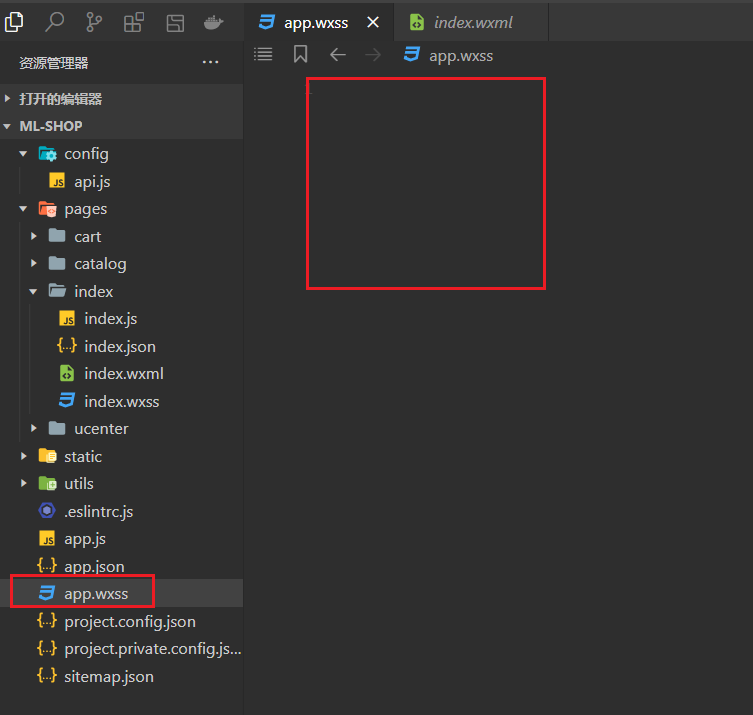
书写一些全局重置样式,如下:
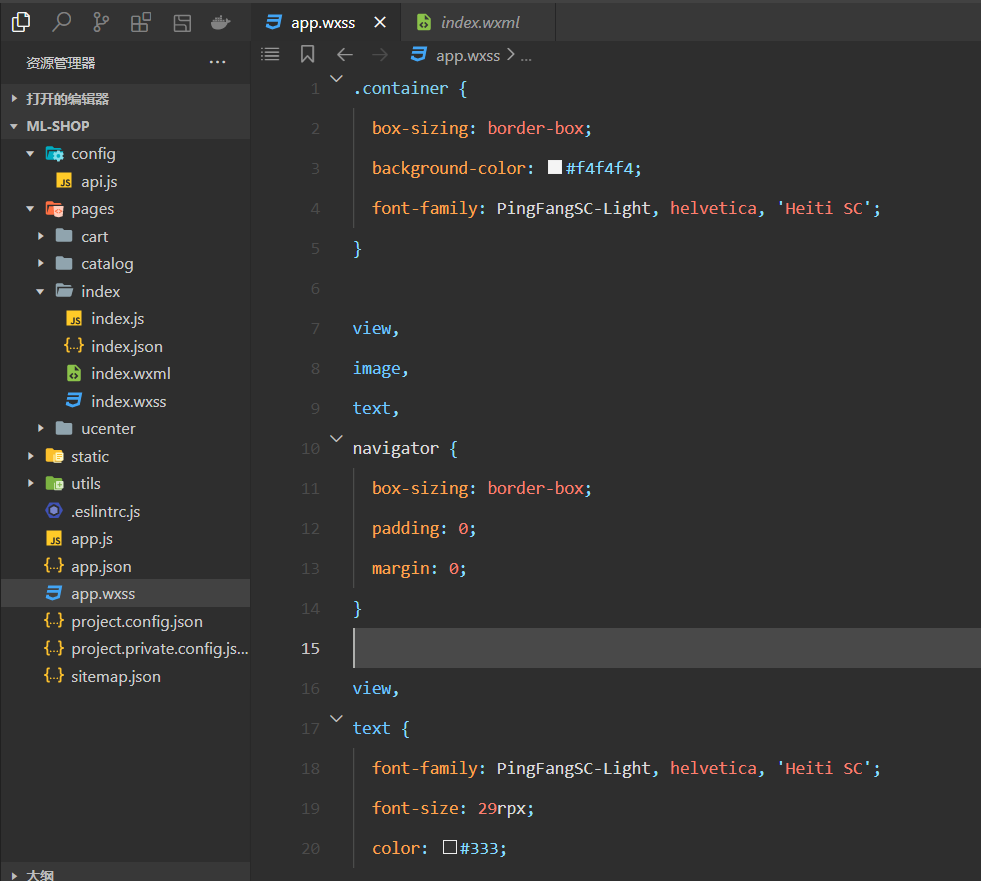
参考代码(大家直接copy之),如下:
/**app.wxss**/

.container {
    box-sizing: border-box;
    background-color: #f4f4f4;
    font-family: PingFangSC-Light, helvetica, 'Heiti SC';
}

view,
image,
text,
navigator {
    box-sizing: border-box;
    padding: 0;
    margin: 0;
}

view,
text {
    font-family: PingFangSC-Light, helvetica, 'Heiti SC';
    font-size: 29rpx;
    color: #333;
}
2
3
4
5
6
7
8
9
10
11
12
13
14
15
16
17
18
19
20
21
22
23
书写搜索框对应的结构如下:
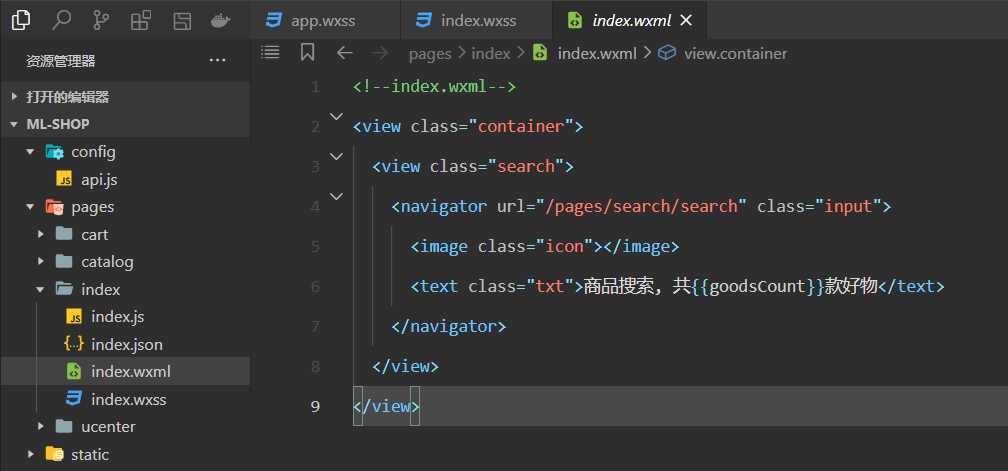
效果如下:
书写对应的样式,如下:
/**index.wxss**/

/* ======================================= 搜索框相关的样式 */
.search {
    height: 88rpx;
    width: 100%;
    padding: 0 30rpx;
    background: #fff;
    display: flex;
    align-items: center;
}

.search .input {
    width: 690rpx;
    height: 56rpx;
    background: #ededed;
    border-radius: 8rpx;
    display: flex;
    align-items: center;
    justify-content: center;
}

.search .icon {
    background: url(http://yanxuan.nosdn.127.net/hxm/yanxuan-wap/p/20161201/style/img/icon-normal/search2-2fb94833aa.png) center no-repeat;
    background-size: 100%;
    width: 28rpx;
    height: 28rpx;
}

.search .txt {
    height: 42rpx;
    line-height: 42rpx;
    color: #666;
    padding-left: 10rpx;
    font-size: 30rpx;
}
2
3
4
5
6
7
8
9
10
11
12
13
14
15
16
17
18
19
20
21
22
23
24
25
26
27
28
29
30
31
32
33
34
35
36
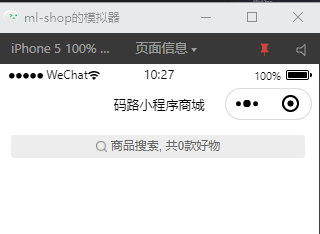
效果如下:
# 8,渲染轮播图
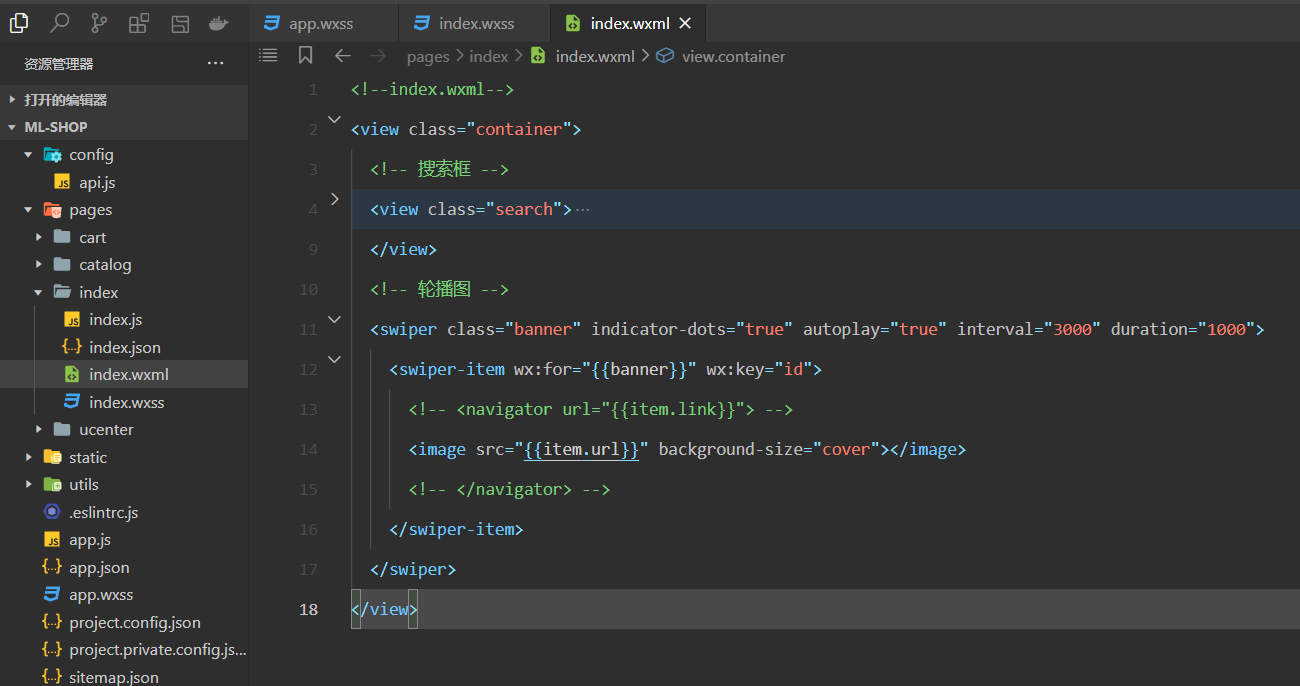
书写对应的结构如下:
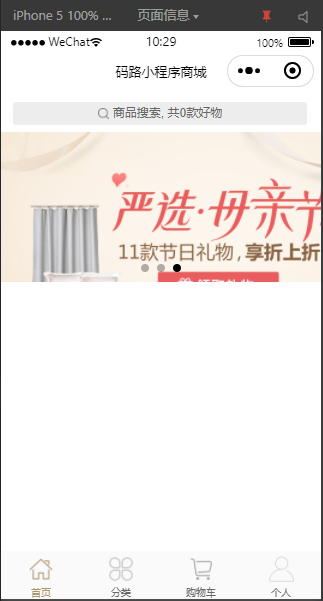
效果如下:
书写对应的样式,如下:
/* ======================================= 轮播图相关的样式 */
.banner {
    width: 750rpx;
    height: 417rpx;
}

.banner image {
    width: 100%;
    height: 417rpx;
}
2
3
4
5
6
7
8
9
10
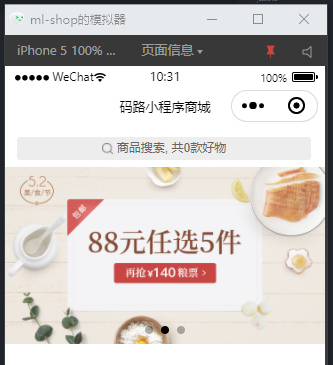
效果如下:
# 9,渲染宫格菜单
书写对应的结构如下:
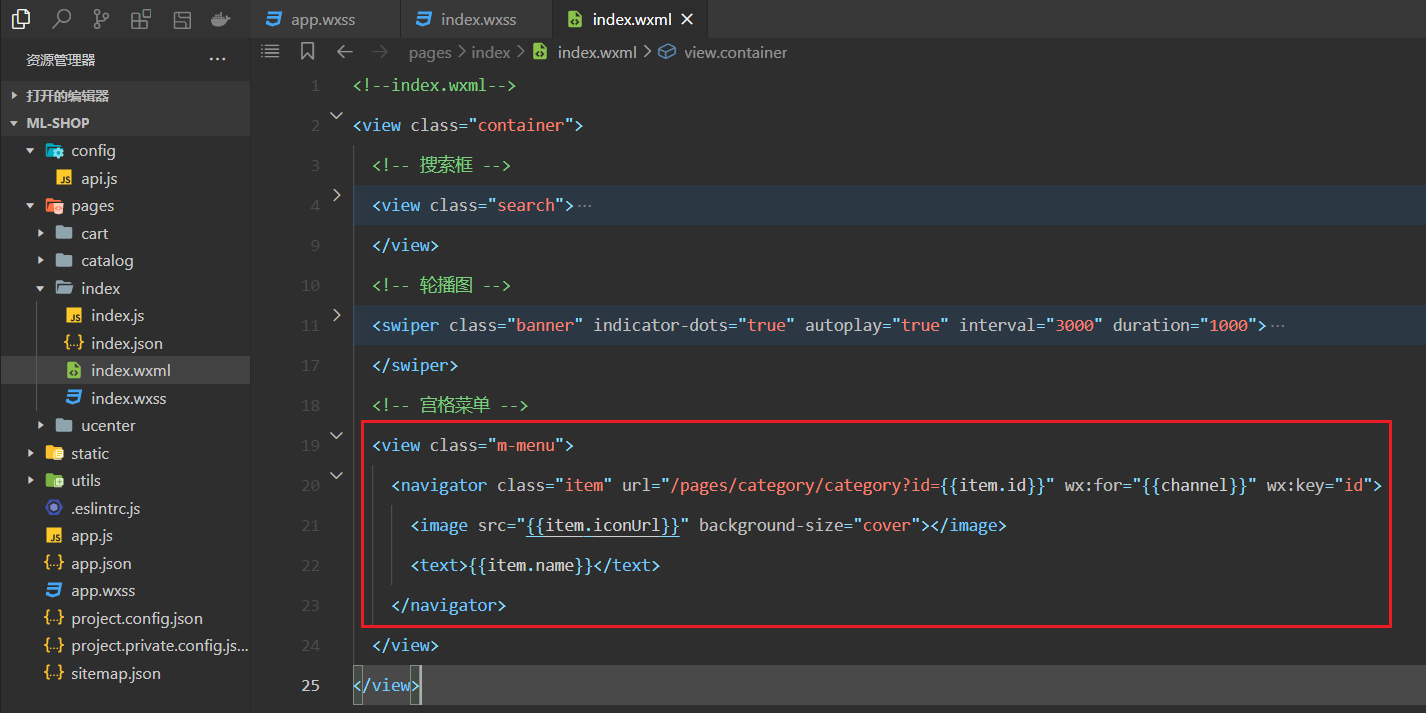
效果如下:
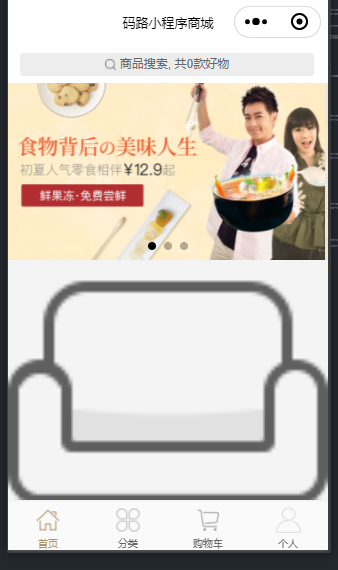
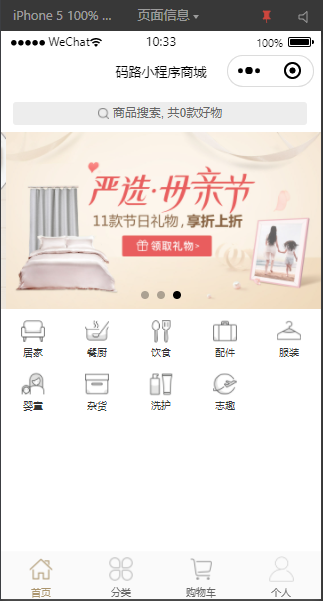
书写对应的样式,如下:
/* ======================================= 宫格菜单相关的样式 */
.m-menu {
    background: #fff;
    display: flex;
    align-items: center;
    flex-wrap: wrap;
    padding-bottom: 0rpx;
    padding-top: 25rpx;
}

.m-menu .item {
    width: 150rpx;
    height: 126rpx;
}

.m-menu image {
    display: block;
    width: 58rpx;
    height: 58rpx;
    margin: 0 auto;
    margin-bottom: 12rpx;
}

.m-menu text {
    display: block;
    font-size: 24rpx;
    text-align: center;
    margin: 0 auto;
    line-height: 1;
    color: #333;
}
2
3
4
5
6
7
8
9
10
11
12
13
14
15
16
17
18
19
20
21
22
23
24
25
26
27
28
29
30
31
效果如下:
# 10,渲染优惠卷
书写对应的结构如下:
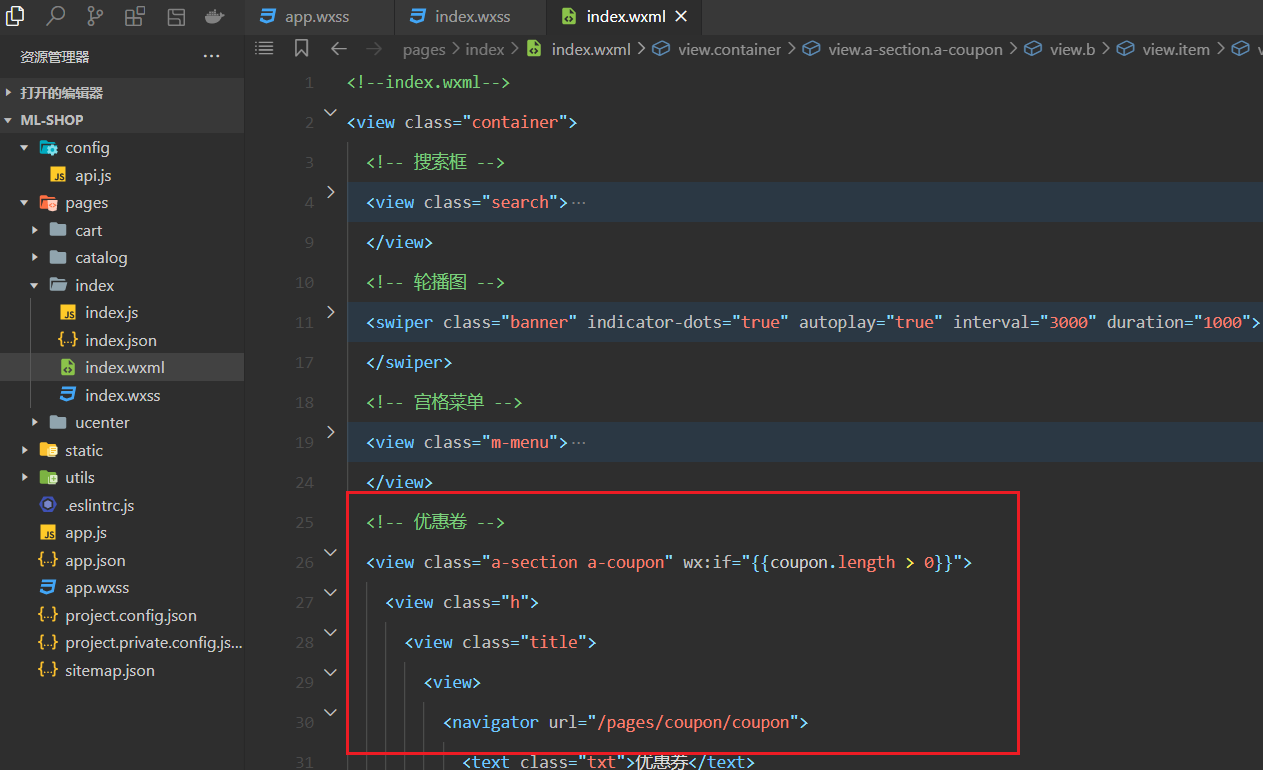
html结构参考代码如下:
 <!-- 优惠卷 -->
 <view class="a-section a-coupon" wx:if="{{coupon.length > 0}}">
     <view class="h">
         <view class="title">
             <view>
                 <navigator url="/pages/coupon/coupon">
                     <text class="txt">优惠券</text>
                 </navigator>
             </view>
         </view>
     </view>
     <view wx:if="{{coupon.length>0}}" class="b">
         <view class="item" wx:for="{{coupon}}" wx:for-index="index" wx:for-item="item" wx:key="id" bindtap="getCoupon" data-index="{{item.id}}">
             <view class="tag">{{item.tag}}</view>
             <view class="content">
                 <view class="left">
                     <view class="discount">{{item.discount}}元</view>
                     <view class="min"> 满{{item.min}}元使用</view>
                 </view>
                 <view class="right">
                     <view class="name">{{item.name}}</view>
                     <view class="desc">{{item.desc}}</view>
                     <view class="time" wx:if="{{item.days != 0}}">有效期:{{item.days}}天</view>
                     <view class="time" wx:else> 有效期:{{item.startTime}} - {{item.endTime}}</view>
                 </view>
             </view>
         </view>
     </view>
 </view>
2
3
4
5
6
7
8
9
10
11
12
13
14
15
16
17
18
19
20
21
22
23
24
25
26
27
28
29
效果如下:
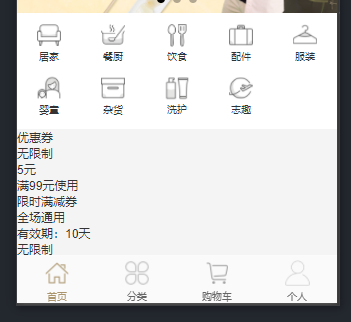
书写公共section的样式,如下:
/* ======================================= section共用相关的样式 */
.a-section {
    width: 750rpx;
    height: auto;
    overflow: hidden;
    background: #fff;
    color: #333;
    margin-top: 20rpx;
}

.a-section .h {
    display: flex;
    flex-flow: row nowrap;
    align-items: center;
    justify-content: center;
    height: 130rpx;
}

.a-section .h .txt {
    padding-right: 30rpx;
    background-size: 16.656rpx 27rpx;
    display: inline-block;
    height: 36rpx;
    font-size: 33rpx;
    line-height: 36rpx;
}
2
3
4
5
6
7
8
9
10
11
12
13
14
15
16
17
18
19
20
21
22
23
24
25
26
效果如下:
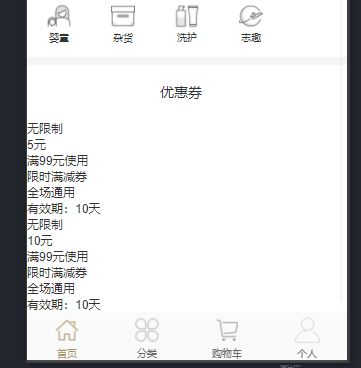
书写coupon相关的样式,如下:
/* ======================================= 优惠卷相关的样式 */
.a-coupon {
    width: 750rpx;
    height: auto;
    overflow: hidden;
}

.a-coupon .b .item {
    position: relative;
    height: 200rpx;
    width: 700rpx;
    background: linear-gradient(to right, #cfa568, #e3bf79);
    margin-bottom: 10rpx;
    margin-left: 30rpx;
    margin-right: 30rpx;
    padding-top: 30rpx;
}

.a-coupon .b .tag {
    height: 32rpx;
    background: #a48143;
    padding-left: 16rpx;
    padding-right: 16rpx;
    position: absolute;
    left: 20rpx;
    color: #fff;
    top: 20rpx;
    font-size: 20rpx;
    text-align: center;
    line-height: 32rpx;
}

.a-coupon .b .content {
    margin-top: 24rpx;
    margin-left: 40rpx;
    display: flex;
    margin-right: 40rpx;
    flex-direction: row;
}

.a-coupon .b .content .left {
    flex: 1;
}

.a-coupon .b .discount {
    font-size: 50rpx;
    color: #b4282d;
}

.a-coupon .b .min {
    color: #fff;
}

.a-coupon .b .content .right {
    width: 400rpx;
}

.a-coupon .b .name {
    font-size: 44rpx;
    color: #fff;
    margin-bottom: 14rpx;
}

.a-coupon .b .desc {
    font-size: 24rpx;
    color: #fff;
}

.a-coupon .b .time {
    font-size: 24rpx;
    color: #fff;
    line-height: 30rpx;
}
2
3
4
5
6
7
8
9
10
11
12
13
14
15
16
17
18
19
20
21
22
23
24
25
26
27
28
29
30
31
32
33
34
35
36
37
38
39
40
41
42
43
44
45
46
47
48
49
50
51
52
53
54
55
56
57
58
59
60
61
62
63
64
65
66
67
68
69
70
71
72
73
效果如下:
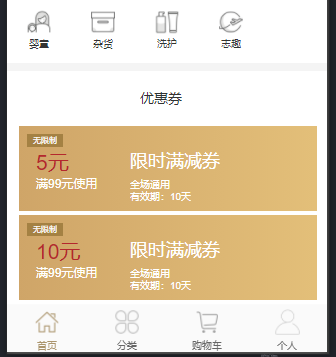
# 11,渲染团购专区
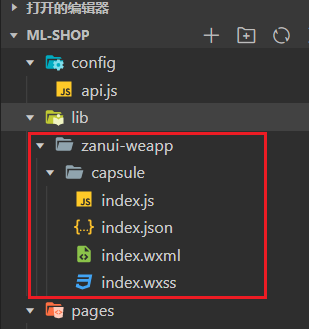
在团购专区用到如下的小组件:
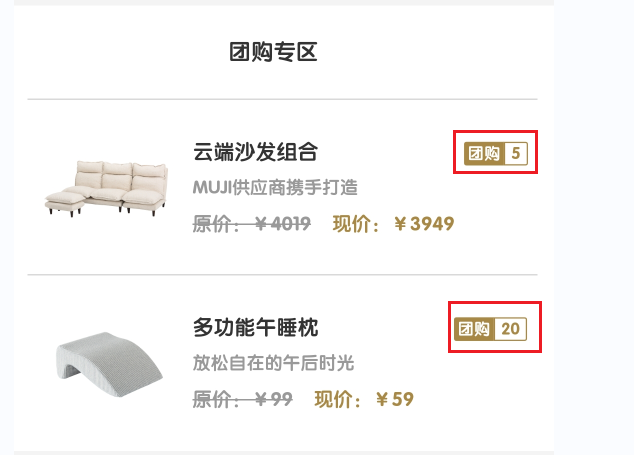
直接引用zan-capsule组件,如下:
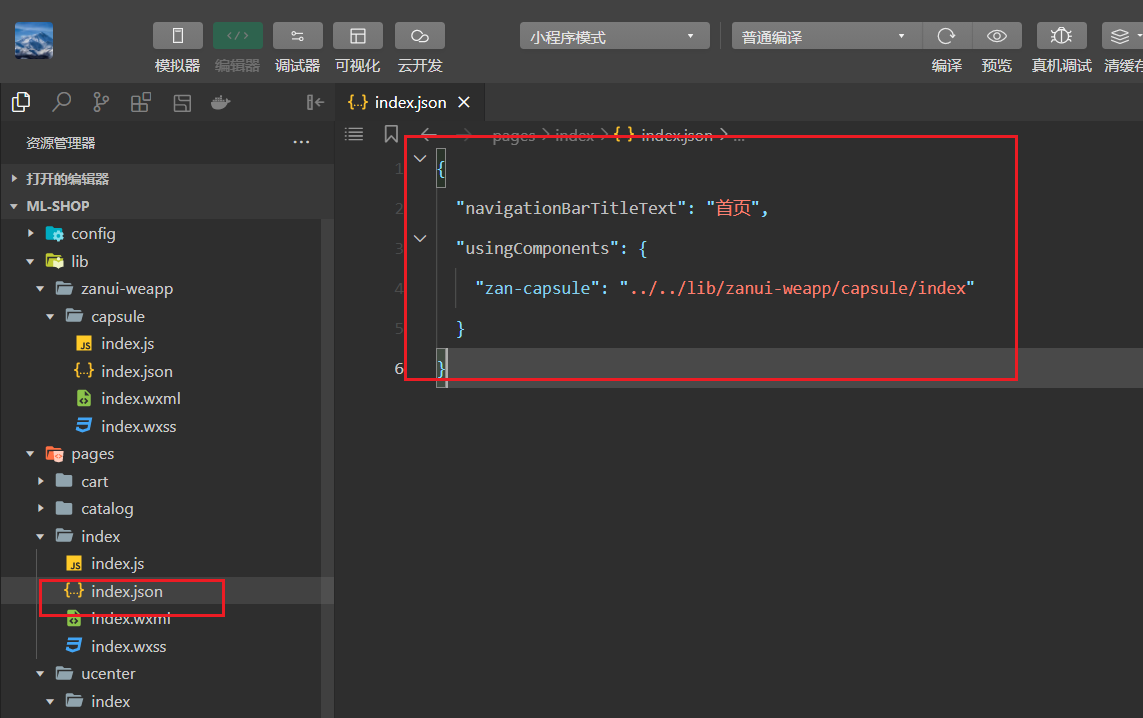
在index.json中注册之,如下:
书写对应的结构,如下:
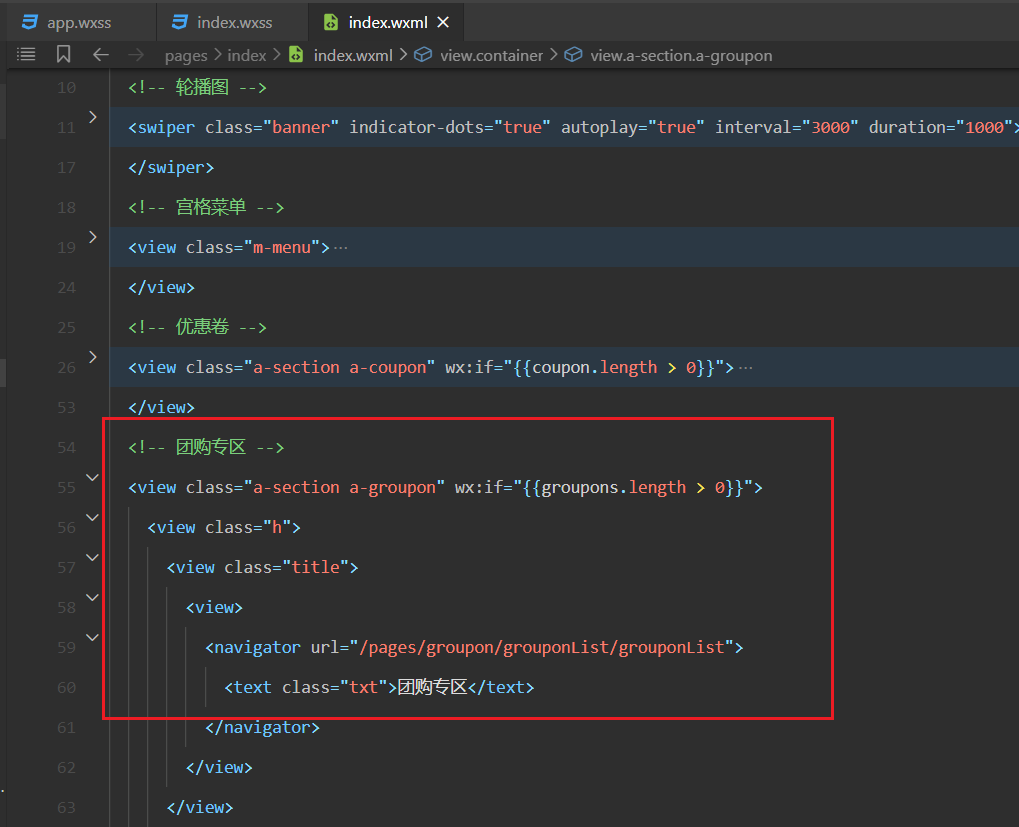
参考结构如下:
 <!-- 团购专区 -->
 <view class="a-section a-groupon" wx:if="{{groupons.length > 0}}">
     <view class="h">
         <view class="title">
             <view>
                 <navigator url="/pages/groupon/grouponList/grouponList">
                     <text class="txt">团购专区</text>
                 </navigator>
             </view>
         </view>
     </view>
     <view class="b">
         <view class="item" wx:for="{{groupons}}" wx:for-index="index" wx:for-item="item" wx:key="id">
             <navigator url="/pages/goods/goods?id={{item.goods.id}}">
                 <image class="img" src="{{item.goods.picUrl}}" background-size="cover"></image>
                 <view class="right">
                     <view class="text">
                         <view class="header">
                             <text class="name">{{item.goods.name}}</text>
                             <view class="capsule-tag">
                                 <zan-capsule color="#a78845" leftText="团购" rightText="{{item.groupon_member}}" />
                             </view>
                         </view>
                         <text class="desc">{{item.goods.brief}}</text>
                         <view class="price">
                             <view class="counterPrice">原价:¥{{item.goods.counterPrice}}</view>
                             <view class="retailPrice">现价:¥{{item.groupon_price}}</view>
                         </view>
                     </view>
                 </view>
             </navigator>
         </view>
     </view>
 </view>
2
3
4
5
6
7
8
9
10
11
12
13
14
15
16
17
18
19
20
21
22
23
24
25
26
27
28
29
30
31
32
33
34
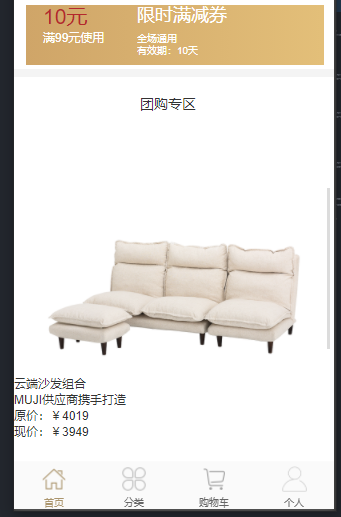
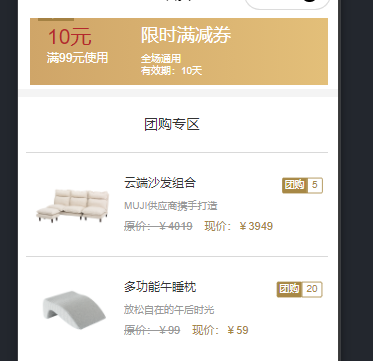
效果如下:
书写对应的样式如下:
/* ======================================= 团购专区相关的样式 */
.a-groupon {
    width: 750rpx;
    height: auto;
    overflow: hidden;
}

.a-groupon .b .item {
    border-top: 1px solid #d9d9d9;
    margin: 0 20rpx;
    height: 244rpx;
    width: 710rpx;
}

.a-groupon .b .img {
    margin-top: 12rpx;
    margin-right: 12rpx;
    float: left;
    width: 220rpx;
    height: 220rpx;
}

.a-groupon .b .right {
    float: left;
    height: 244rpx;
    width: 476rpx;
    display: flex;
    flex-flow: row nowrap;
}

.a-groupon .b .text {
    display: flex;
    flex-wrap: nowrap;
    flex-direction: column;
    justify-content: center;
    overflow: hidden;
    height: 244rpx;
    width: 476rpx;
}

.a-groupon .b .name {
    float: left;
    width: 330rpx;
    display: block;
    color: #333;
    line-height: 50rpx;
    font-size: 30rpx;
}

.a-groupon .capsule-tag {
    float: right;
    padding-right: 0rpx;
    padding-top: 8rpx;
}

.a-groupon .zan-capsule+.zan-capsule {
    margin-left: 10px;
}

.a-groupon .b .desc {
    width: 476rpx;
    display: block;
    color: #999;
    line-height: 50rpx;
    font-size: 25rpx;
}

.a-groupon .b .price {
    width: 476rpx;
    display: flex;
    color: #ab956d;
    line-height: 50rpx;
    font-size: 33rpx;
}

.a-groupon .b .counterPrice {
    text-decoration: line-through;
    font-size: 28rpx;
    color: #999;
}

.a-groupon .b .retailPrice {
    margin-left: 30rpx;
    font-size: 28rpx;
    color: #a78845;
}
2
3
4
5
6
7
8
9
10
11
12
13
14
15
16
17
18
19
20
21
22
23
24
25
26
27
28
29
30
31
32
33
34
35
36
37
38
39
40
41
42
43
44
45
46
47
48
49
50
51
52
53
54
55
56
57
58
59
60
61
62
63
64
65
66
67
68
69
70
71
72
73
74
75
76
77
78
79
80
81
82
83
84
85
86
效果如下 :
# 12,渲染品牌制造商
书写对应的结构如下:
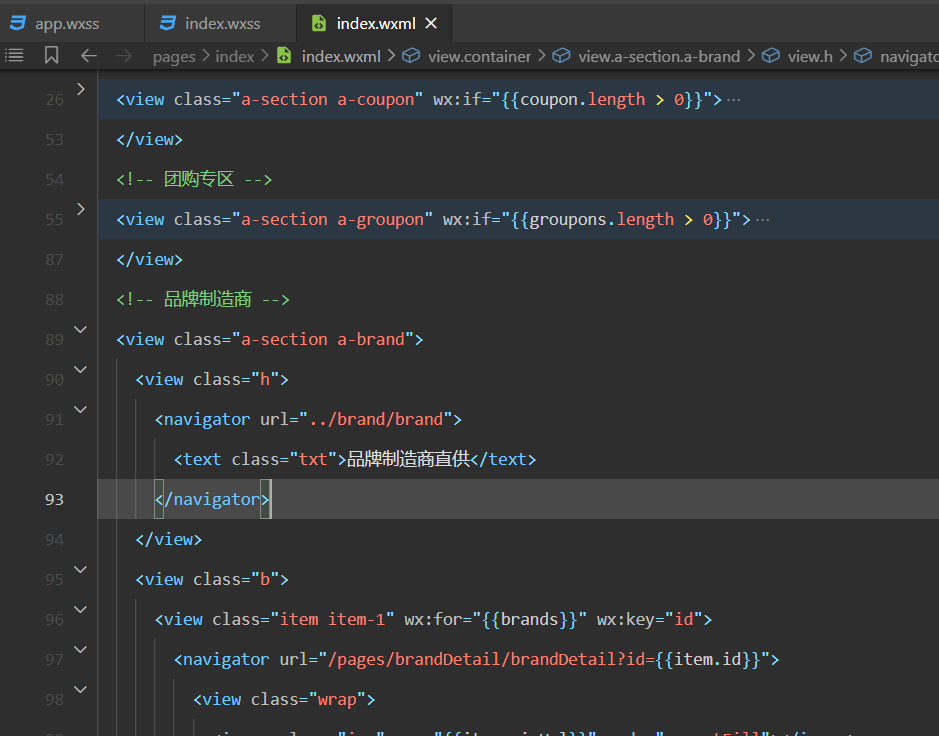
参考对应的代码如下:
  <!-- 品牌制造商 -->
  <view class="a-section a-brand">
      <view class="h">
          <navigator url="../brand/brand">
              <text class="txt">品牌制造商直供</text>
          </navigator>
      </view>
      <view class="b">
          <view class="item item-1" wx:for="{{brands}}" wx:key="id">
              <navigator url="/pages/brandDetail/brandDetail?id={{item.id}}">
                  <view class="wrap">
                      <image class="img" src="{{item.picUrl}}" mode="aspectFill"></image>
                      <view class="mt">
                          <text class="brand">{{item.name}}</text>
                          <text class="price">{{item.floorPrice}}</text>
                          <text class="unit">元起</text>
                      </view>
                  </view>
              </navigator>
          </view>
      </view>
  </view>
2
3
4
5
6
7
8
9
10
11
12
13
14
15
16
17
18
19
20
21
22
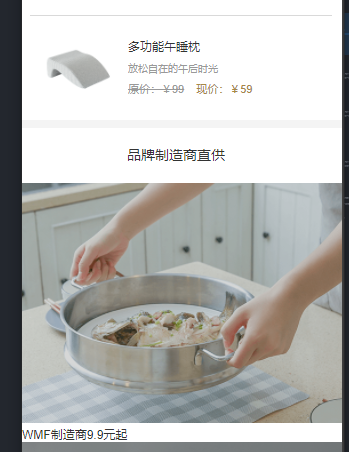
效果如下:
书写对应的样式,如下:
/* ======================================= 品牌制造商相关的样式 */

.a-brand .b {
    width: 750rpx;
    height: auto;
    overflow: hidden;
    position: relative;
}

.a-brand .wrap {
    position: relative;
}

.a-brand .img {
    position: absolute;
    left: 0;
    top: 0;
}

.a-brand .mt {
    position: absolute;
    z-index: 2;
    padding: 27rpx 31rpx;
    left: 0;
    top: 0;
}

.a-brand .mt .brand {
    display: block;
    font-size: 33rpx;
    height: 43rpx;
    color: #fff;
}

.a-brand .mt .price,
.a-brand .mt .unit {
    font-size: 25rpx;
    color: #fff;
}

.a-brand .item-1 {
    float: left;
    width: 375rpx;
    height: 252rpx;
    overflow: hidden;
    border-top: 1rpx solid #fff;
    margin-left: 1rpx;
}

.a-brand .item-1:nth-child(2n+1) {
    margin-left: 0;
    width: 374rpx;
}

.a-brand .item-1 .img {
    width: 375rpx;
    height: 253rpx;
}
2
3
4
5
6
7
8
9
10
11
12
13
14
15
16
17
18
19
20
21
22
23
24
25
26
27
28
29
30
31
32
33
34
35
36
37
38
39
40
41
42
43
44
45
46
47
48
49
50
51
52
53
54
55
56
57
58
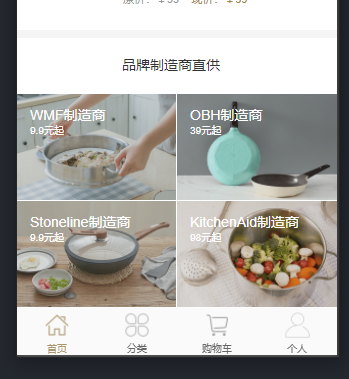
效果如下:
# 13,渲染周一周四新品首发
书写对应结构如下:
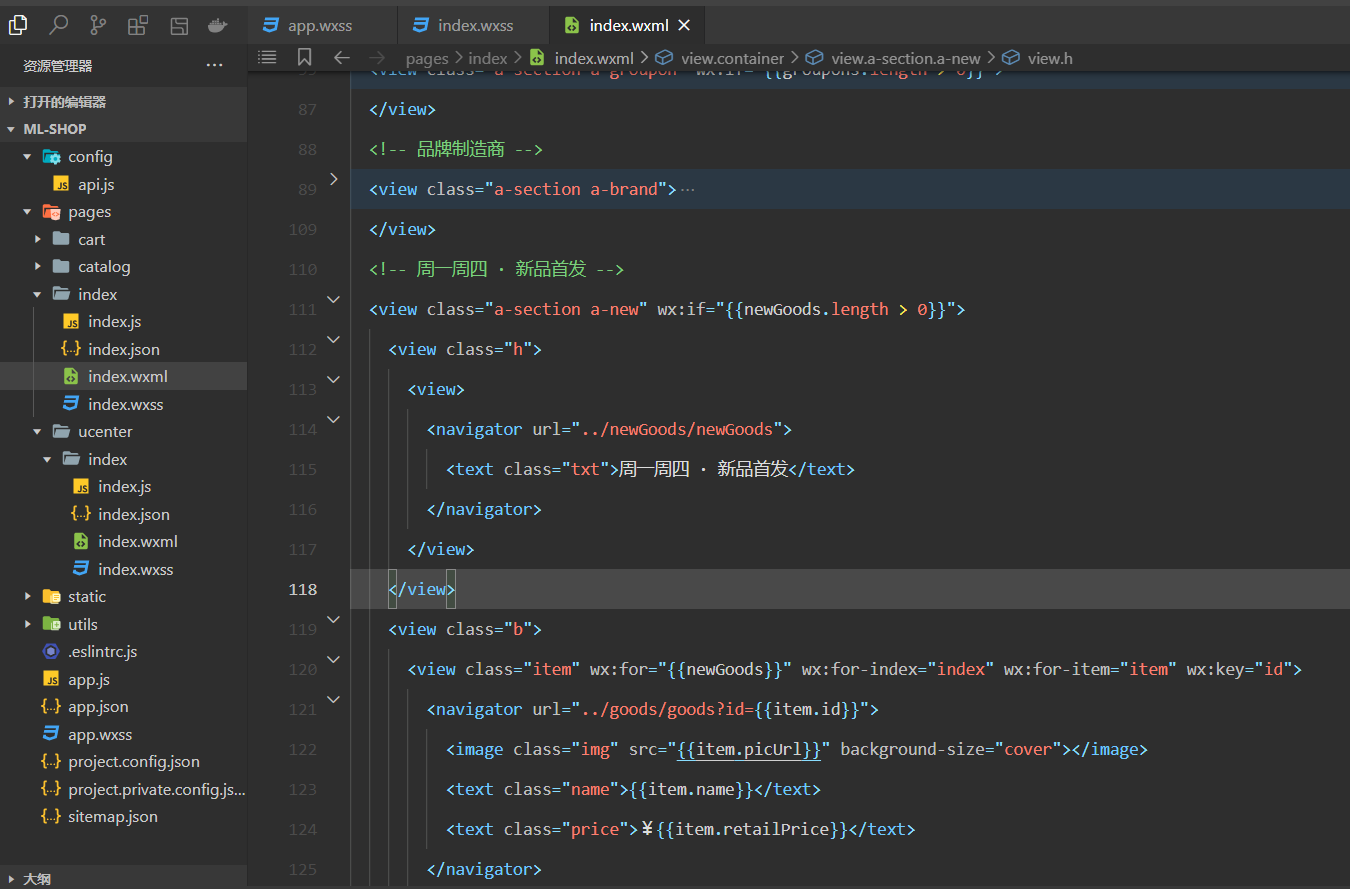
参考代码如下:
 <!-- 周一周四 · 新品首发 -->
 <view class="a-section a-new" wx:if="{{newGoods.length > 0}}">
     <view class="h">
         <view>
             <navigator url="../newGoods/newGoods">
                 <text class="txt">周一周四 · 新品首发</text>
             </navigator>
         </view>
     </view>
     <view class="b">
         <view class="item" wx:for="{{newGoods}}" wx:for-index="index" wx:for-item="item" wx:key="id">
             <navigator url="../goods/goods?id={{item.id}}">
                 <image class="img" src="{{item.picUrl}}" background-size="cover"></image>
                 <text class="name">{{item.name}}</text>
                 <text class="price">¥{{item.retailPrice}}</text>
             </navigator>
         </view>
     </view>
 </view>
2
3
4
5
6
7
8
9
10
11
12
13
14
15
16
17
18
19
效果如下:
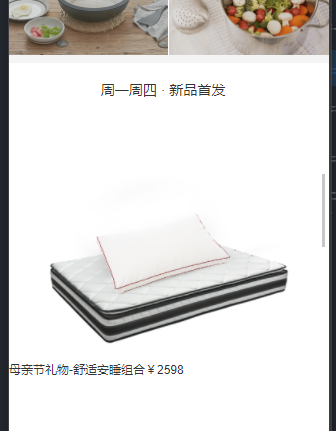
书写对应样式如下:
/* ======================================= 周一周四 · 新品首发相关的样式 */
.a-new .b {
    width: 750rpx;
    height: auto;
    overflow: hidden;
    padding: 0 31rpx 45rpx 31rpx;
}

.a-new .b .item {
    float: left;
    width: 302rpx;
    margin-top: 10rpx;
    margin-left: 21rpx;
    margin-right: 21rpx;
}

.a-new .b .item-b {
    margin-left: 42rpx;
}

.a-new .b .img {
    width: 302rpx;
    height: 302rpx;
}

.a-new .b .name {
    text-align: center;
    display: block;
    width: 302rpx;
    height: 35rpx;
    margin-bottom: 14rpx;
    overflow: hidden;
    font-size: 30rpx;
    color: #333;
}

.a-new .b .price {
    display: block;
    text-align: center;
    line-height: 30rpx;
    font-size: 30rpx;
    color: #ab956d;
}
2
3
4
5
6
7
8
9
10
11
12
13
14
15
16
17
18
19
20
21
22
23
24
25
26
27
28
29
30
31
32
33
34
35
36
37
38
39
40
41
42
43
效果如下:
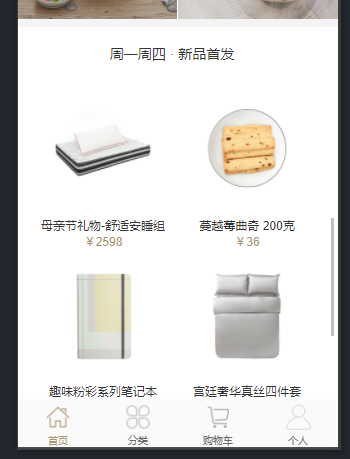
# 14,渲染人气推荐
书写对应的html代码,如下:
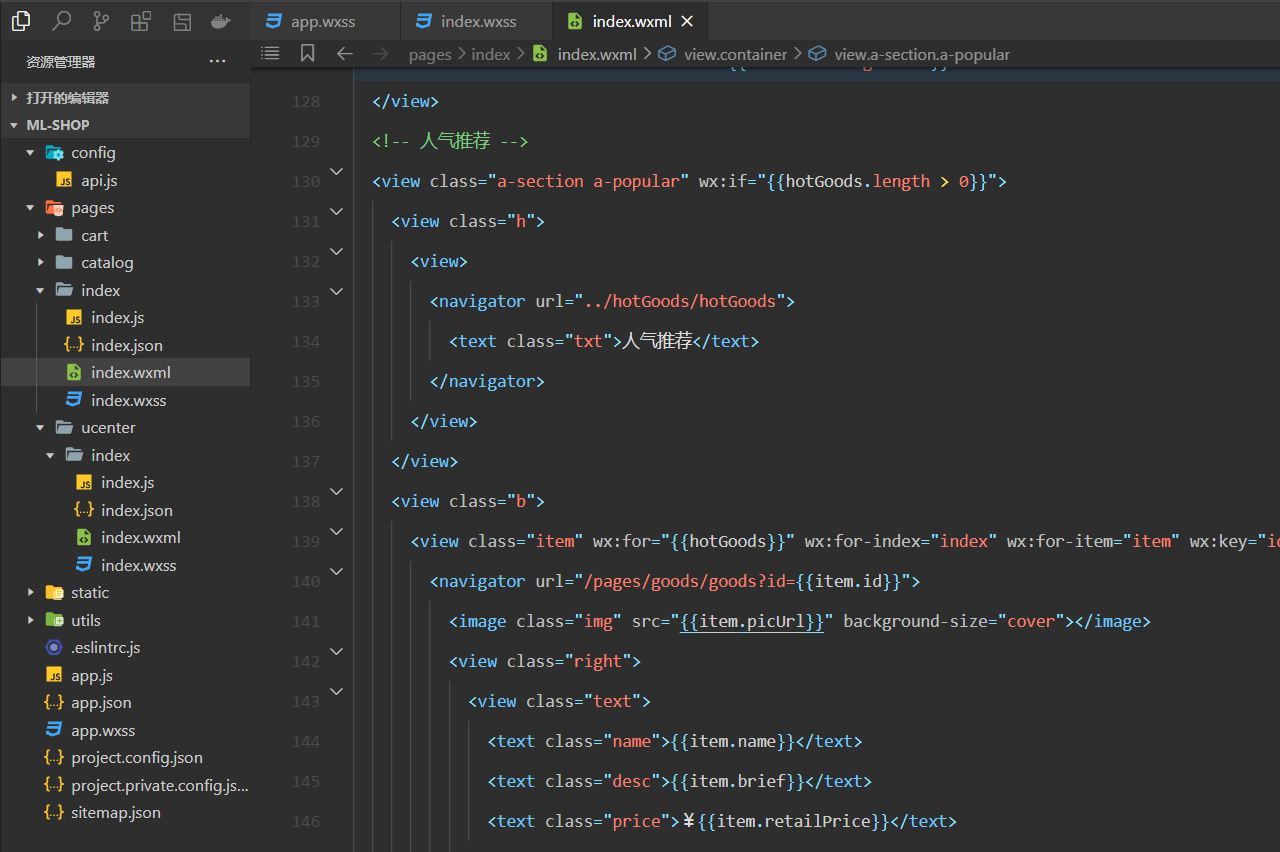
参考代码如下:
 <!-- 人气推荐 -->
 <view class="a-section a-popular" wx:if="{{hotGoods.length > 0}}">
     <view class="h">
         <view>
             <navigator url="../hotGoods/hotGoods">
                 <text class="txt">人气推荐</text>
             </navigator>
         </view>
     </view>
     <view class="b">
         <view class="item" wx:for="{{hotGoods}}" wx:for-index="index" wx:for-item="item" wx:key="id">
             <navigator url="/pages/goods/goods?id={{item.id}}">
                 <image class="img" src="{{item.picUrl}}" background-size="cover"></image>
                 <view class="right">
                     <view class="text">
                         <text class="name">{{item.name}}</text>
                         <text class="desc">{{item.brief}}</text>
                         <text class="price">¥{{item.retailPrice}}</text>
                     </view>
                 </view>
             </navigator>
         </view>
     </view>
 </view>
2
3
4
5
6
7
8
9
10
11
12
13
14
15
16
17
18
19
20
21
22
23
24
效果如下:
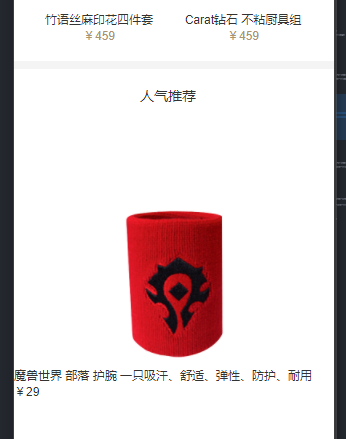
书写对应的样式如下:
/* ======================================= 人气推荐相关的样式 */
.a-popular {
    width: 750rpx;
    height: auto;
    overflow: hidden;
}

.a-popular .b .item {
    border-top: 1px solid #d9d9d9;
    margin: 0 20rpx;
    height: 264rpx;
    width: 710rpx;
}

.a-popular .b .img {
    margin-top: 12rpx;
    margin-right: 12rpx;
    float: left;
    width: 240rpx;
    height: 240rpx;
}

.a-popular .b .right {
    float: left;
    height: 264rpx;
    width: 456rpx;
    display: flex;
    flex-flow: row nowrap;
}

.a-popular .b .text {
    display: flex;
    flex-wrap: nowrap;
    flex-direction: column;
    justify-content: center;
    overflow: hidden;
    height: 264rpx;
    width: 456rpx;
}

.a-popular .b .name {
    width: 456rpx;
    display: block;
    color: #333;
    line-height: 50rpx;
    font-size: 30rpx;
}

.a-popular .b .desc {
    width: 456rpx;
    display: block;
    color: #999;
    line-height: 50rpx;
    font-size: 25rpx;
}

.a-popular .b .price {
    width: 456rpx;
    display: block;
    color: #ab956d;
    line-height: 50rpx;
    font-size: 33rpx;
}
2
3
4
5
6
7
8
9
10
11
12
13
14
15
16
17
18
19
20
21
22
23
24
25
26
27
28
29
30
31
32
33
34
35
36
37
38
39
40
41
42
43
44
45
46
47
48
49
50
51
52
53
54
55
56
57
58
59
60
61
62
63
效果如下:
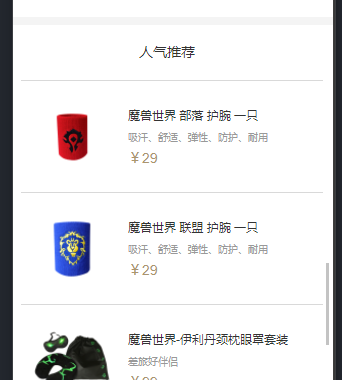
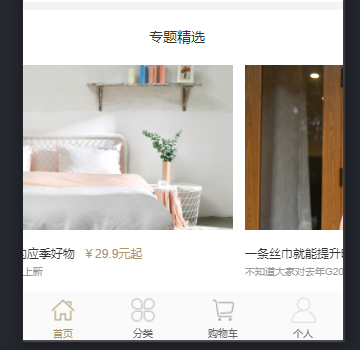
# 15,渲染专题精选
书写对应的html代码,如下:
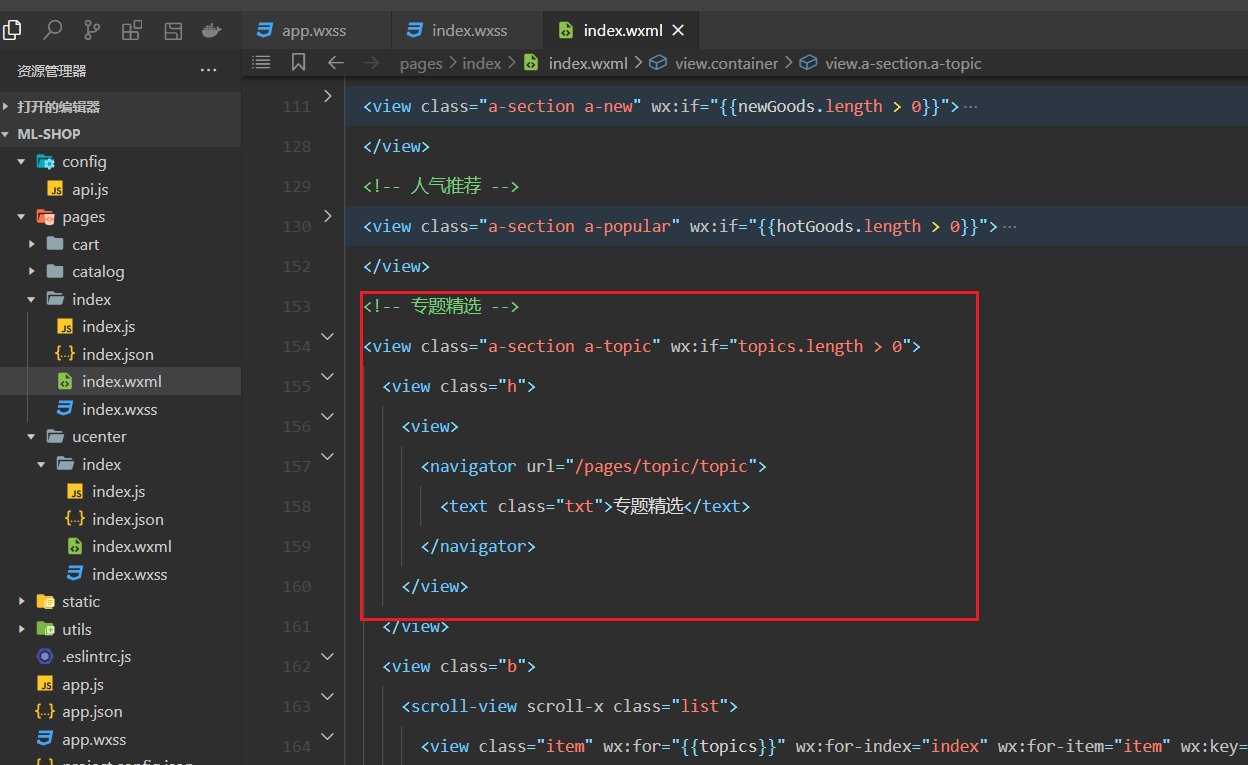
参考代码如下:
<!-- 专题精选 -->
<view class="a-section a-topic" wx:if="topics.length > 0">
    <view class="h">
        <view>
            <navigator url="/pages/topic/topic">
                <text class="txt">专题精选</text>
            </navigator>
        </view>
    </view>
    <view class="b">
        <scroll-view scroll-x class="list">
            <view class="item" wx:for="{{topics}}" wx:for-index="index" wx:for-item="item" wx:key="id">
                <navigator url="../topicDetail/topicDetail?id={{item.id}}">
                    <image class="img" src="{{item.picUrl}}" background-size="cover"></image>
                    <view class="np">
                        <text class="name">{{item.title}}</text>
                        <text class="price">¥{{item.price}}元起</text>
                    </view>
                    <text class="desc">{{item.subtitle}}</text>
                </navigator>
            </view>
        </scroll-view>
    </view>
</view>
2
3
4
5
6
7
8
9
10
11
12
13
14
15
16
17
18
19
20
21
22
23
24
效果如下:
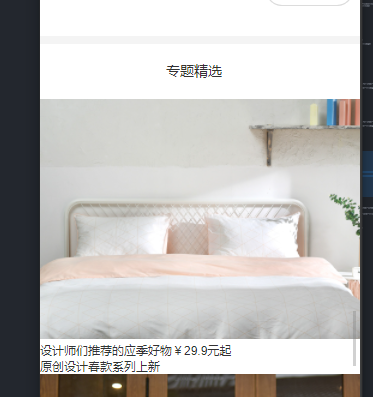
书写对应的样式如下:
/* ======================================= 专题精选相关的样式 */

.a-topic .b {
    height: 533rpx;
    width: 750rpx;
    padding: 0 0 48rpx 0;
}

.a-topic .b .list {
    height: 533rpx;
    width: 750rpx;
    white-space: nowrap;
}

.a-topic .b .item {
    display: inline-block;
    height: 533rpx;
    width: 680.5rpx;
    margin-left: 30rpx;
    overflow: hidden;
}

.a-topic .b .item:last-child {
    margin-right: 30rpx;
}

.a-topic .b .img {
    height: 387.5rpx;
    width: 680.5rpx;
    margin-bottom: 30rpx;
}

.a-topic .b .np {
    height: 35rpx;
    margin-bottom: 13.5rpx;
    color: #333;
    font-size: 30rpx;
}

.a-topic .b .np .price {
    margin-left: 20.8rpx;
    color: #ab956d;
}

.a-topic .b .desc {
    display: block;
    height: 30rpx;
    color: #999;
    font-size: 24rpx;
    white-space: nowrap;
    overflow: hidden;
    text-overflow: ellipsis;
}
2
3
4
5
6
7
8
9
10
11
12
13
14
15
16
17
18
19
20
21
22
23
24
25
26
27
28
29
30
31
32
33
34
35
36
37
38
39
40
41
42
43
44
45
46
47
48
49
50
51
52
53
效果如下:
# 16,渲染其它数据(二维数组)
书写对应的html代码,如下:
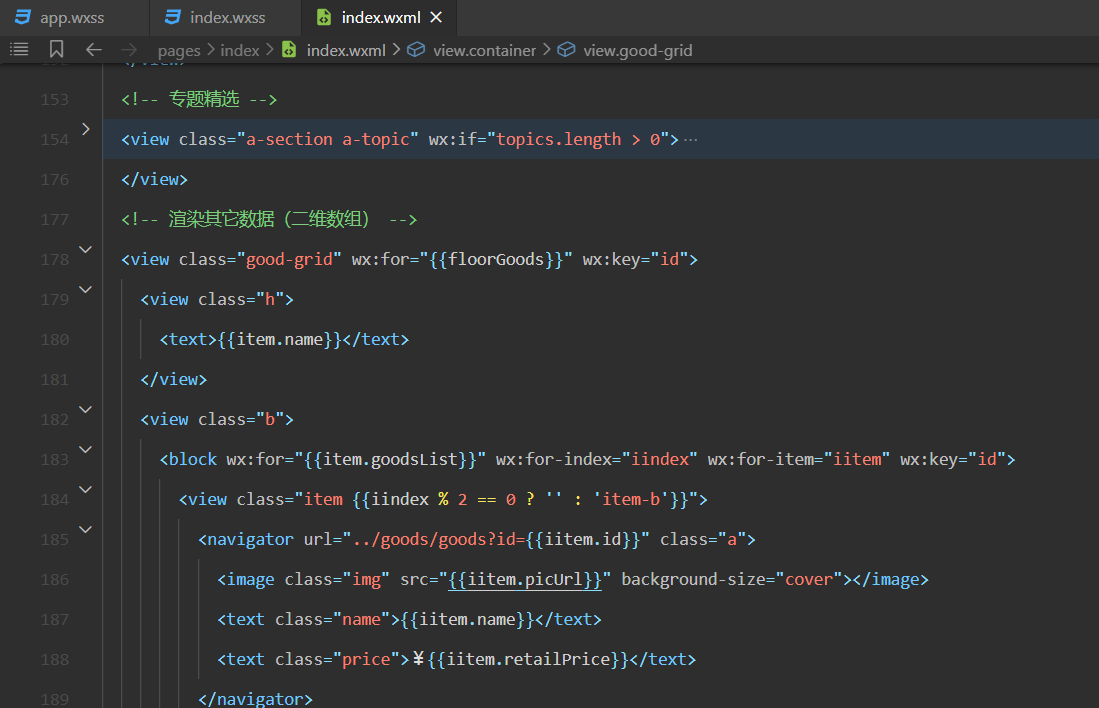
参考代码如下:
<!-- 渲染其它数据(二维数组) -->
<view class="good-grid" wx:for="{{floorGoods}}" wx:key="id">
    <view class="h">
        <text>{{item.name}}</text>
    </view>
    <view class="b">
        <block wx:for="{{item.goodsList}}" wx:for-index="iindex" wx:for-item="iitem" wx:key="id">
            <view class="item {{iindex % 2 == 0 ? '' : 'item-b'}}">
                <navigator url="../goods/goods?id={{iitem.id}}" class="a">
                    <image class="img" src="{{iitem.picUrl}}" background-size="cover"></image>
                    <text class="name">{{iitem.name}}</text>
                    <text class="price">¥{{iitem.retailPrice}}</text>
                </navigator>
            </view>
        </block>
    </view>
    <navigator url="/pages/category/category?id={{item.id}}" class="t">
        <view class="txt">{{'更多'+item.name+'好物 >'}}</view>
    </navigator>
</view>
2
3
4
5
6
7
8
9
10
11
12
13
14
15
16
17
18
19
20
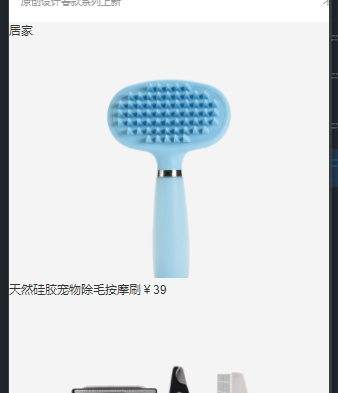
效果如下:
书写对应的样式如下:
/* ======================================= 其它数据(二维数组)相关的样式 */
.good-grid {
    width: 750rpx;
    height: auto;
    overflow: hidden;
}

.good-grid .h {
    display: flex;
    flex-flow: row nowrap;
    align-items: center;
    justify-content: center;
    height: 130rpx;
    font-size: 33rpx;
    color: #333;
}

.good-grid .b {
    width: 750rpx;
    padding: 0 6.25rpx;
    height: auto;
    overflow: hidden;
}

.good-grid .b .item {
    float: left;
    background: #fff;
    width: 365rpx;
    margin-bottom: 6.25rpx;
    height: 452rpx;
    overflow: hidden;
    text-align: center;
}

.good-grid .b .item .a {
    height: 452rpx;
    width: 100%;
}

.good-grid .b .item-b {
    margin-left: 6.25rpx;
}

.good-grid .item .img {
    margin-top: 20rpx;
    width: 302rpx;
    height: 302rpx;
}

.good-grid .item .name {
    display: block;
    width: 365.625rpx;
    padding: 0 20rpx;
    overflow: hidden;
    height: 35rpx;
    margin: 11.5rpx 0 22rpx 0;
    text-align: center;
    font-size: 30rpx;
    color: #333;
}

.good-grid .item .price {
    display: block;
    width: 365.625rpx;
    height: 30rpx;
    text-align: center;
    font-size: 30rpx;
    color: #ab956d;
}

.good-grid .t {
    height: 100rpx;
    background: #fff;
    display: flex;
    align-items: center;
    justify-content: center;
}
2
3
4
5
6
7
8
9
10
11
12
13
14
15
16
17
18
19
20
21
22
23
24
25
26
27
28
29
30
31
32
33
34
35
36
37
38
39
40
41
42
43
44
45
46
47
48
49
50
51
52
53
54
55
56
57
58
59
60
61
62
63
64
65
66
67
68
69
70
71
72
73
74
75
76
77
效果如下:
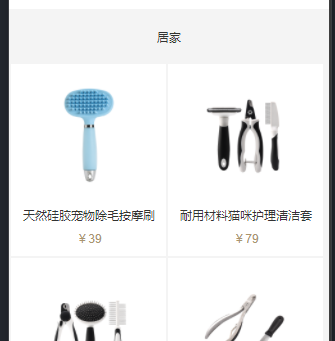
到此,首页面数据就渲染完毕了。
# 三,渲染分类页面
# 1,整理对应接口
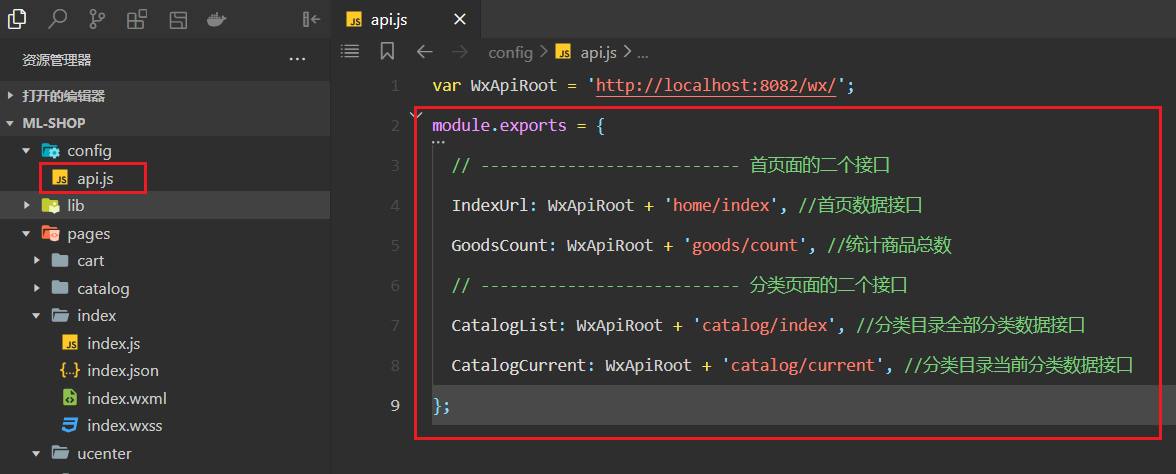
对应的API接口地址如下:
# 2,定义状态,获取数据
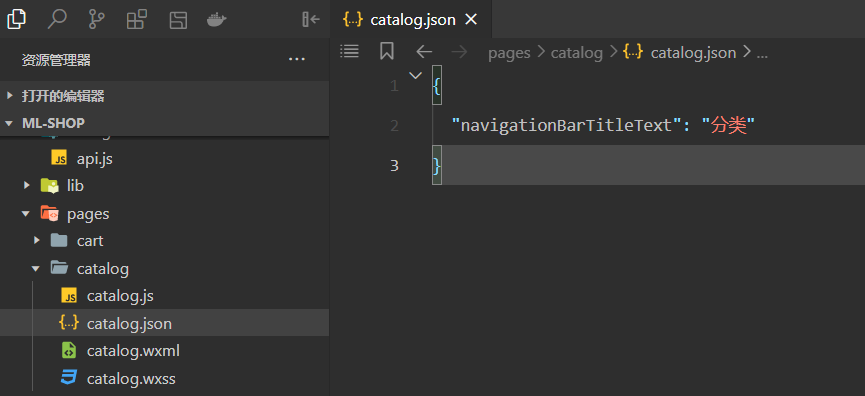
配置导航头,如下:
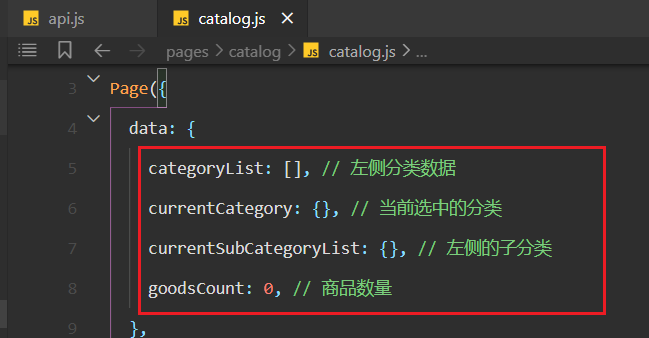
定义相关的状态,如下:
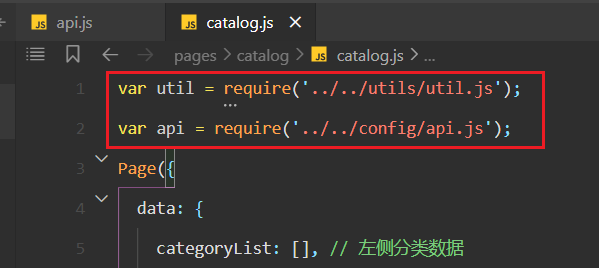
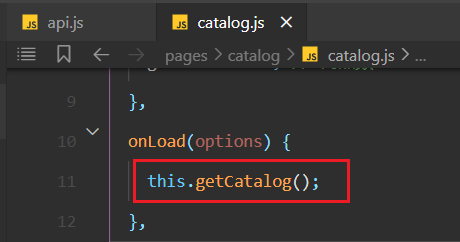
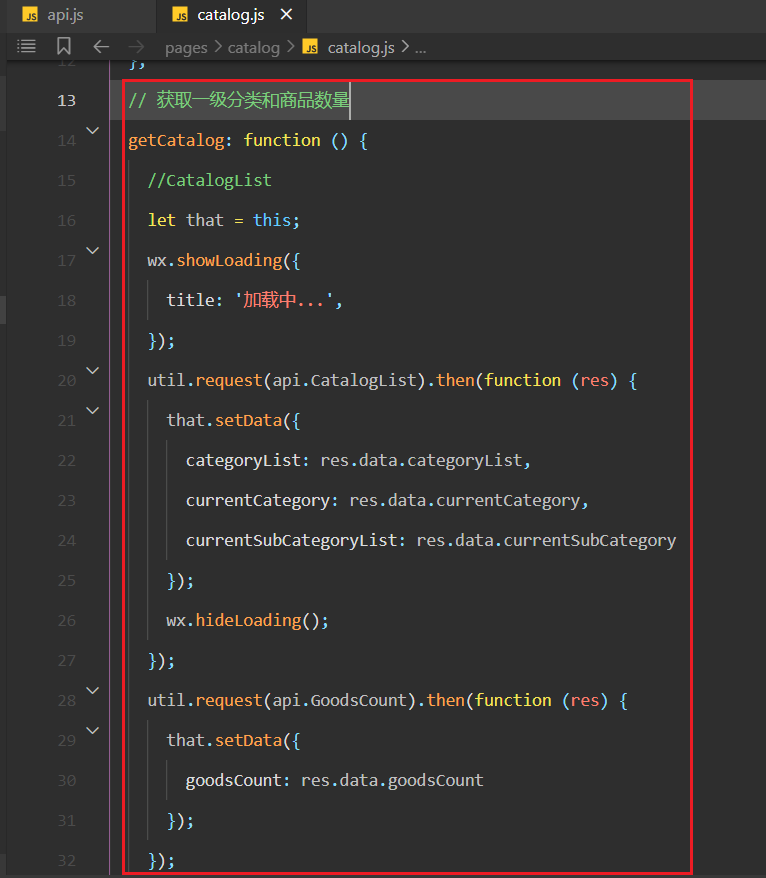
在onLoad中调用方法,发请求获取左侧分类数据和商品数量,如下:
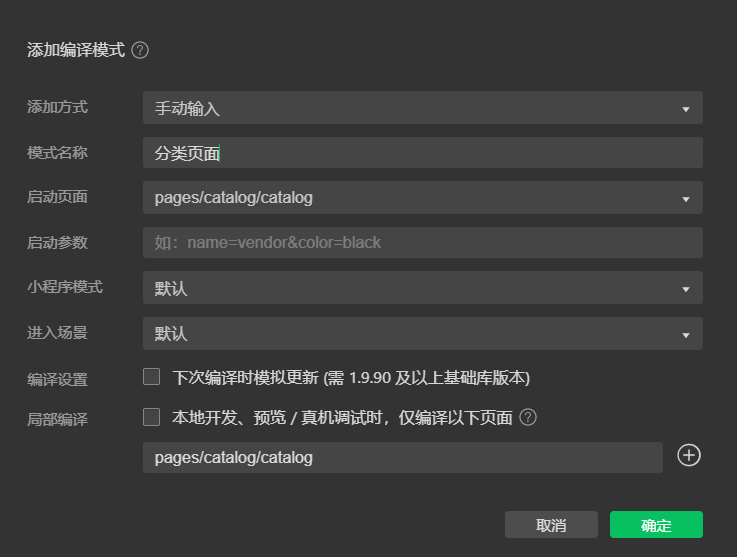
添加编译模式,如下:
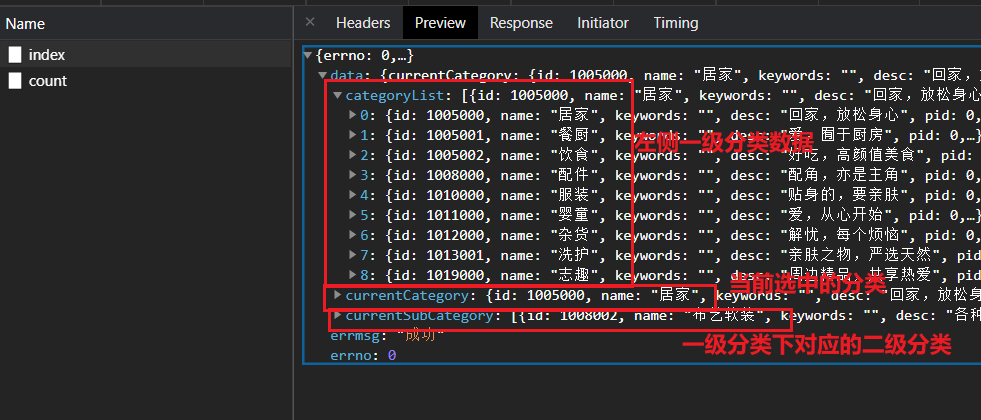
测试如下:
# 3,渲染左侧一级分类数据
实现对应的HTML结构,如下:
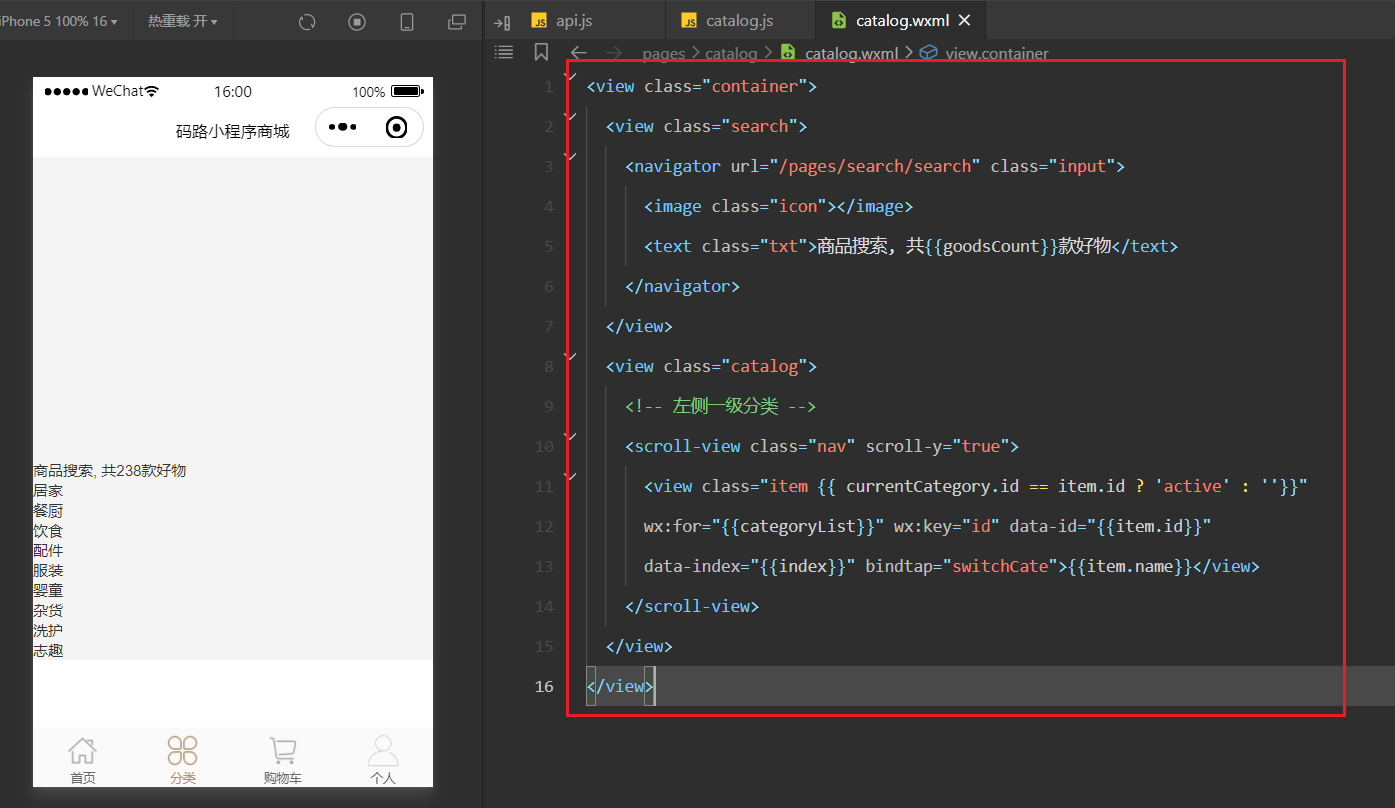
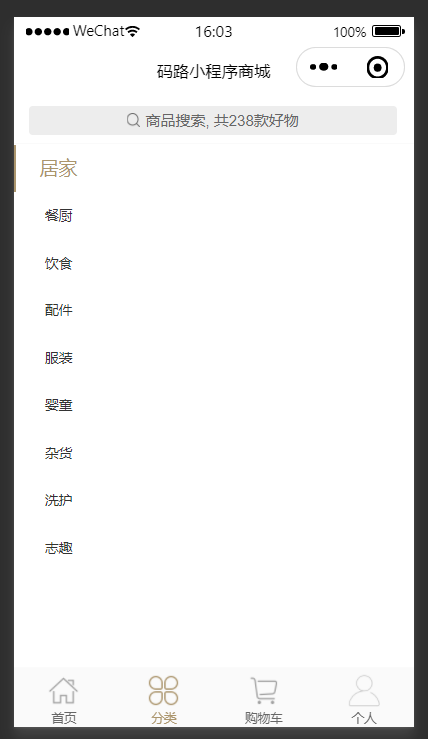
书写对应的样式如下:
/* ======================================= 搜索框相关的样式 */
page {
    height: 100%;
}

.container {
    background: #f9f9f9;
    height: 100%;
    width: 100%;
    display: flex;
    flex-direction: column;
}

.search {
    height: 88rpx;
    width: 100%;
    padding: 0 30rpx;
    background: #fff;
    display: flex;
    align-items: center;
}

.search .input {
    width: 690rpx;
    height: 56rpx;
    background: #ededed;
    border-radius: 8rpx;
    display: flex;
    align-items: center;
    justify-content: center;
}

.search .icon {
    background: url(http://yanxuan.nosdn.127.net/hxm/yanxuan-wap/p/20161201/style/img/icon-normal/search2-2fb94833aa.png) center no-repeat;
    background-size: 100%;
    width: 28rpx;
    height: 28rpx;
}

.search .txt {
    height: 42rpx;
    line-height: 42rpx;
    color: #666;
    padding-left: 10rpx;
    font-size: 30rpx;
}

/* ======================================= 左侧一级菜单相关的样式 */

.catalog {
    flex: 1;
    width: 100%;
    background: #fff;
    display: flex;
    border-top: 1px solid #fafafa;
}

.catalog .nav {
    width: 162rpx;
    height: 100%;
}

.catalog .nav .item {
    text-align: center;
    line-height: 90rpx;
    width: 162rpx;
    height: 90rpx;
    color: #333;
    font-size: 28rpx;
    border-left: 6rpx solid #fff;
}

.catalog .nav .item.active {
    color: #ab956d;
    font-size: 36rpx;
    border-left: 6rpx solid #ab956d;
}
2
3
4
5
6
7
8
9
10
11
12
13
14
15
16
17
18
19
20
21
22
23
24
25
26
27
28
29
30
31
32
33
34
35
36
37
38
39
40
41
42
43
44
45
46
47
48
49
50
51
52
53
54
55
56
57
58
59
60
61
62
63
64
65
66
67
68
69
70
71
72
73
74
75
76
77
效果如下:
# 4,渲染二级分类数据
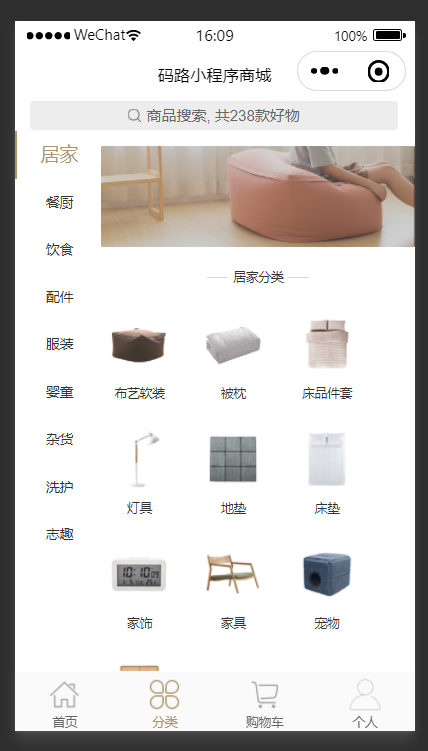
渲染当前分类数据,如下:
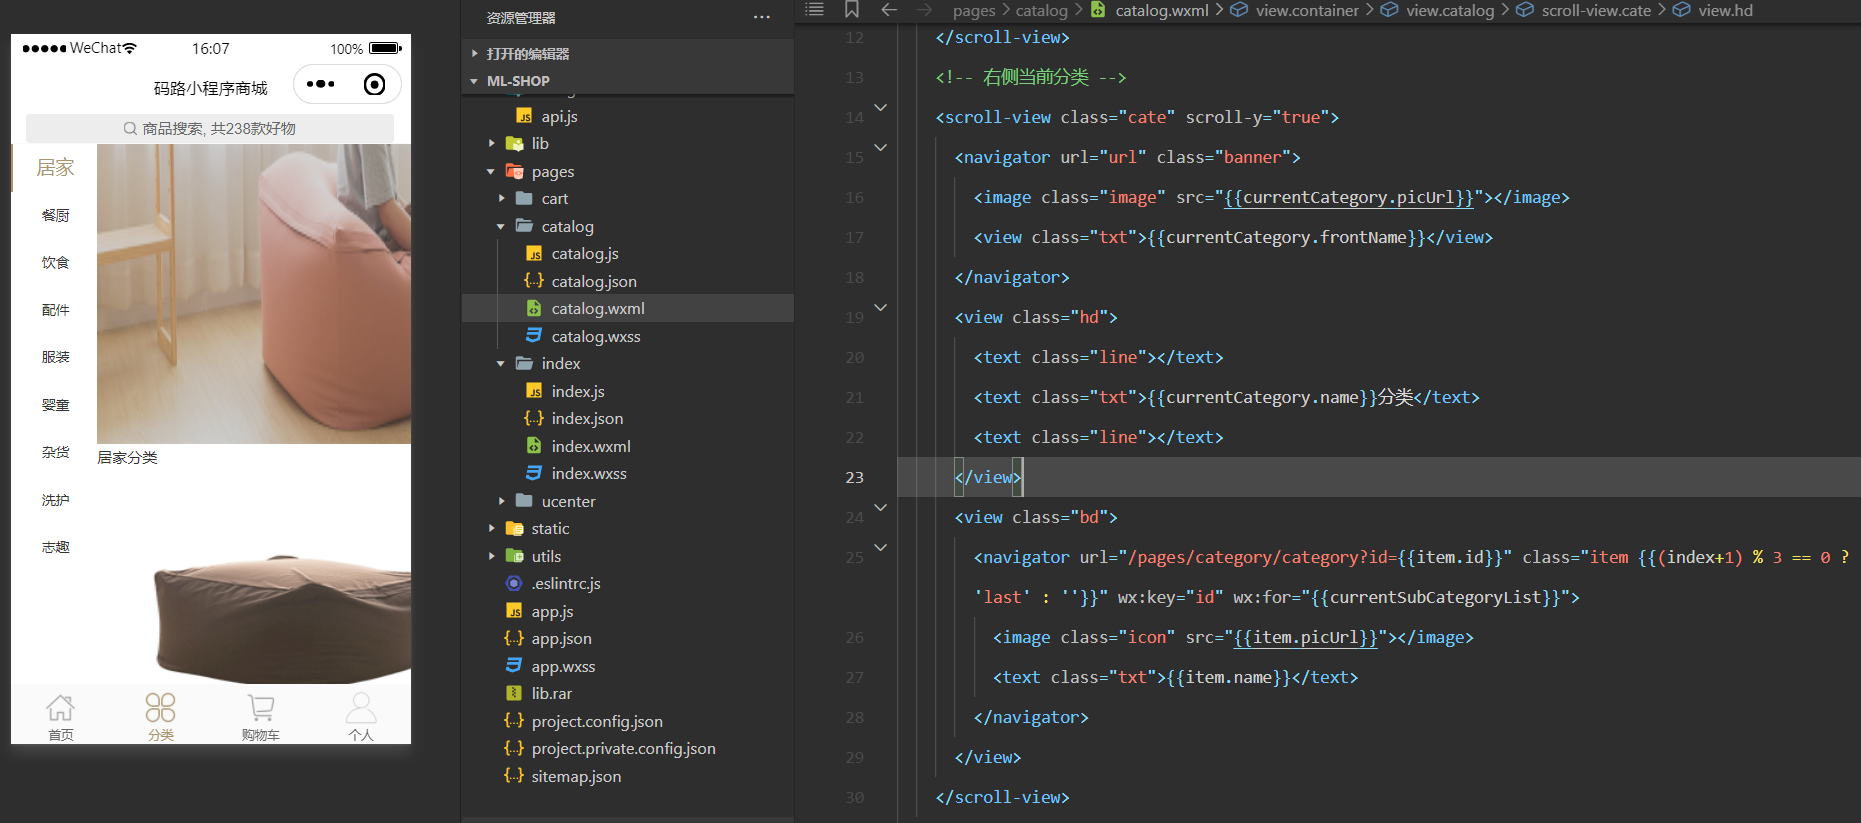
参考代码(完整),如下:
<view class="container">
    <view class="search">
        <navigator url="/pages/search/search" class="input">
            <image class="icon"></image>
            <text class="txt">商品搜索, 共{{goodsCount}}款好物</text>
        </navigator>
    </view>
    <view class="catalog">
        <!-- 左侧一级分类 -->
        <scroll-view class="nav" scroll-y="true">
            <view class="item {{ currentCategory.id == item.id ? 'active' : ''}}" wx:for="{{categoryList}}" wx:key="id" data-id="{{item.id}}" data-index="{{index}}" bindtap="switchCate">{{item.name}}</view>
        </scroll-view>
        <!-- 右侧当前分类 -->
        <scroll-view class="cate" scroll-y="true">
            <navigator url="url" class="banner">
                <image class="image" src="{{currentCategory.picUrl}}"></image>
                <view class="txt">{{currentCategory.frontName}}</view>
            </navigator>
            <view class="hd">
                <text class="line"></text>
                <text class="txt">{{currentCategory.name}}分类</text>
                <text class="line"></text>
            </view>
            <view class="bd">
                <navigator url="/pages/category/category?id={{item.id}}" class="item {{(index+1) % 3 == 0 ? 'last' : ''}}" wx:key="id" wx:for="{{currentSubCategoryList}}">
                    <image class="icon" src="{{item.picUrl}}"></image>
                    <text class="txt">{{item.name}}</text>
                </navigator>
            </view>
        </scroll-view>
    </view>
</view>
2
3
4
5
6
7
8
9
10
11
12
13
14
15
16
17
18
19
20
21
22
23
24
25
26
27
28
29
30
31
32
右侧的样式,如下:
/* ======================================= 右侧二级菜单相关的样式 */
catalog .cate {
    border-left: 1px solid #fafafa;
    flex: 1;
    height: 100%;
    padding: 0 30rpx 0 30rpx;
}

.banner {
    display: block;
    height: 222rpx;
    width: 100%;
    position: relative;
}

.banner .image {
    position: absolute;
    top: 30rpx;
    left: 0;
    border-radius: 4rpx;
    height: 192rpx;
    width: 100%;
}

.banner .txt {
    position: absolute;
    top: 30rpx;
    text-align: center;
    color: #fff;
    font-size: 28rpx;
    left: 0;
    height: 192rpx;
    line-height: 192rpx;
    width: 100%;
}

.catalog .hd {
    height: 108rpx;
    width: 100%;
    display: flex;
    justify-content: center;
    align-items: center;
}

.catalog .hd .txt {
    font-size: 24rpx;
    text-align: center;
    color: #333;
    padding: 0 10rpx;
    width: auto;
}

.catalog .hd .line {
    width: 40rpx;
    height: 1px;
    background: #d9d9d9;
}

.catalog .bd {
    height: auto;
    width: 100%;
    overflow: hidden;
}

.catalog .bd .item {
    display: block;
    float: left;
    height: 216rpx;
    width: 144rpx;
    margin-right: 34rpx;
}

.catalog .bd .item.last {
    margin-right: 0;
}

.catalog .bd .item .icon {
    height: 144rpx;
    width: 144rpx;
}

.catalog .bd .item .txt {
    display: block;
    text-align: center;
    font-size: 24rpx;
    color: #333;
    height: 72rpx;
    width: 144rpx;
}
2
3
4
5
6
7
8
9
10
11
12
13
14
15
16
17
18
19
20
21
22
23
24
25
26
27
28
29
30
31
32
33
34
35
36
37
38
39
40
41
42
43
44
45
46
47
48
49
50
51
52
53
54
55
56
57
58
59
60
61
62
63
64
65
66
67
68
69
70
71
72
73
74
75
76
77
78
79
80
81
82
83
84
85
86
87
88
89
效果如下:
# 5,一级分类绑定事件,实现切换
已经对一级分类绑定了对应的事件,并传参,如下:
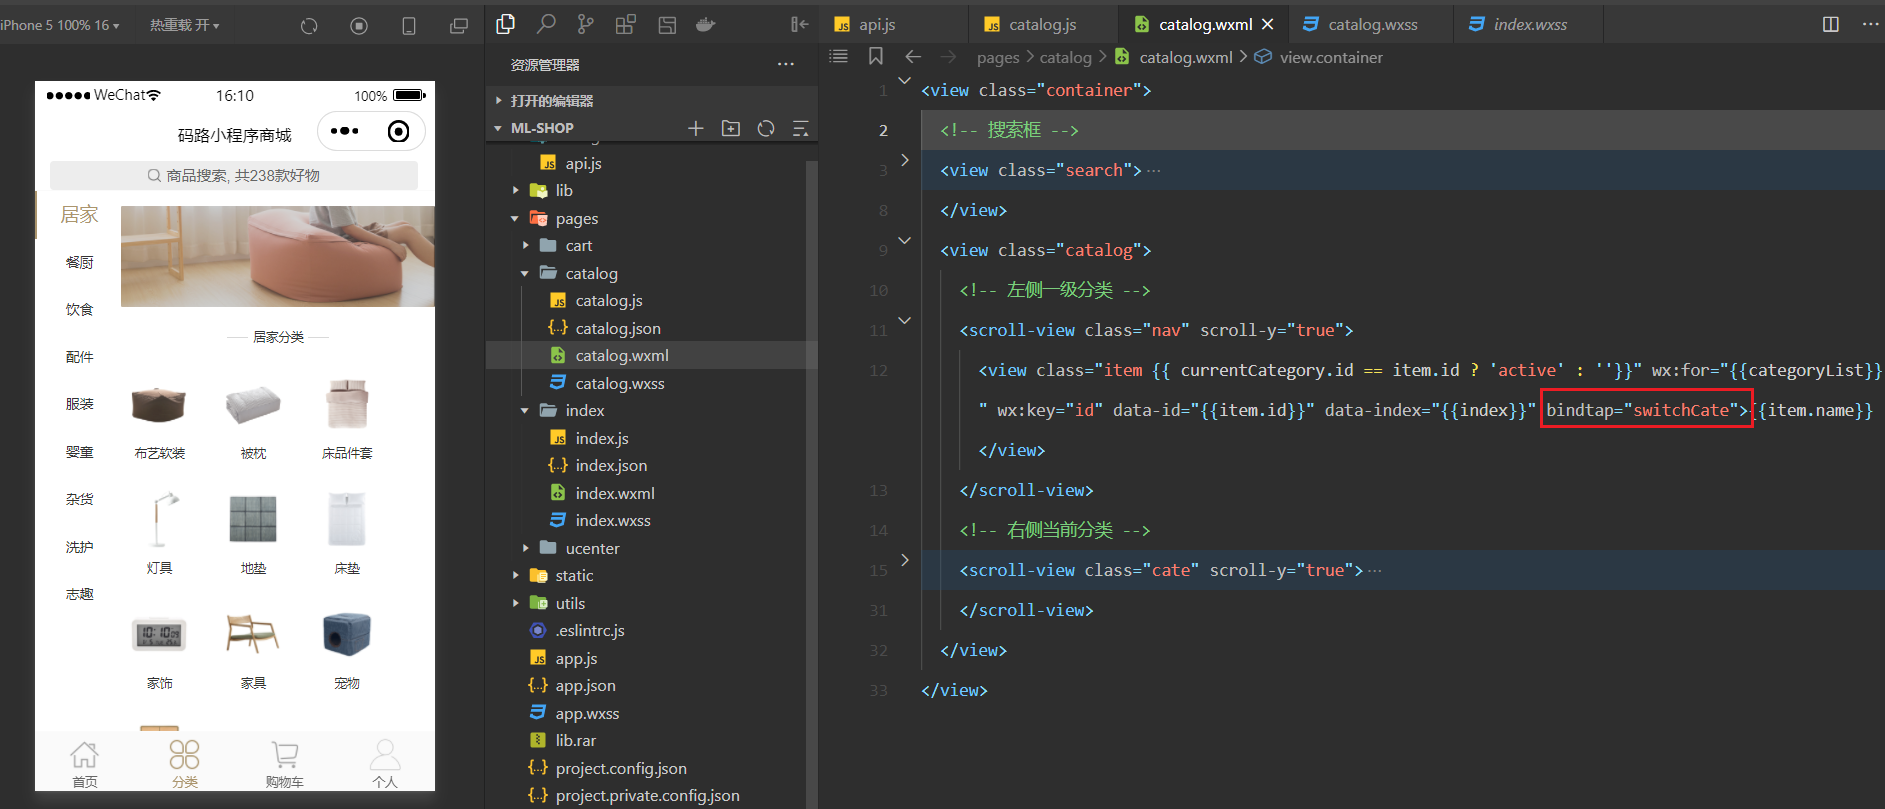
实现对应的方法,如下:
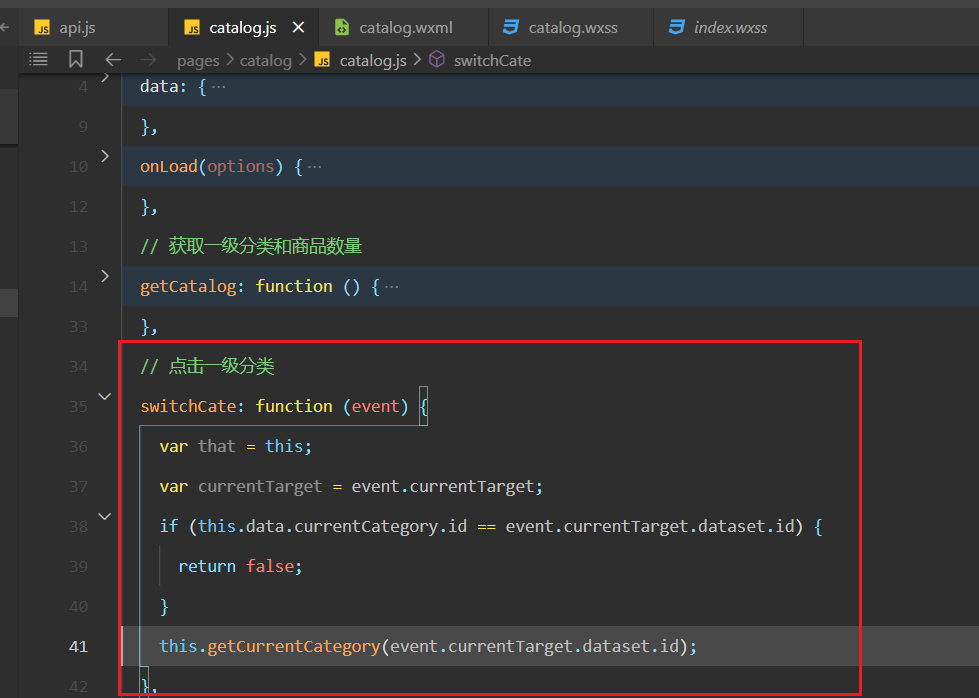
实现获取其它二级分类方法,如下:
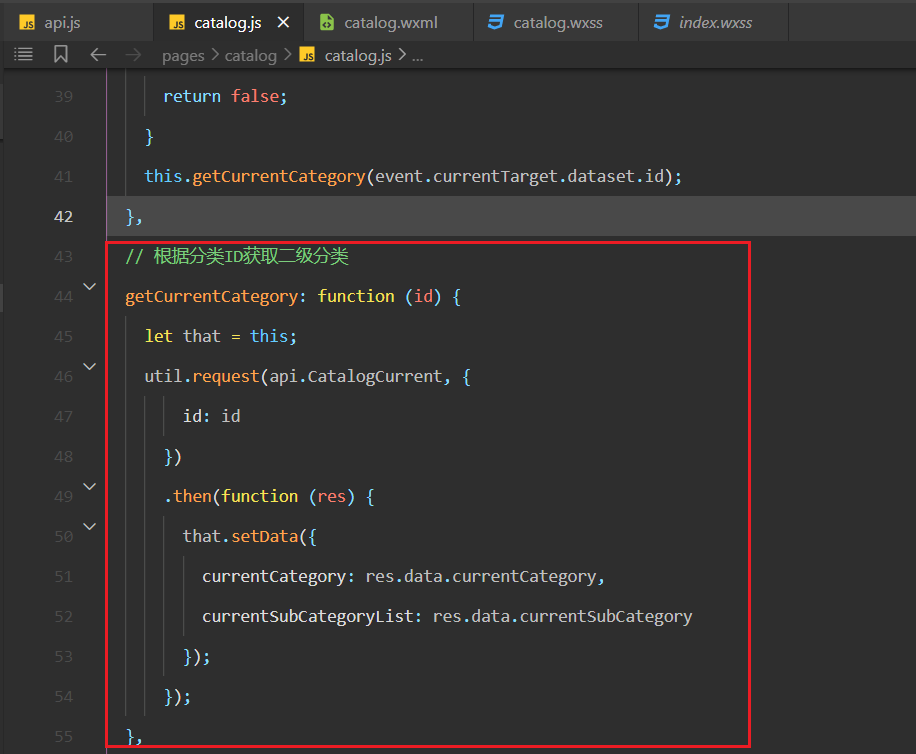
测试OK,如下:
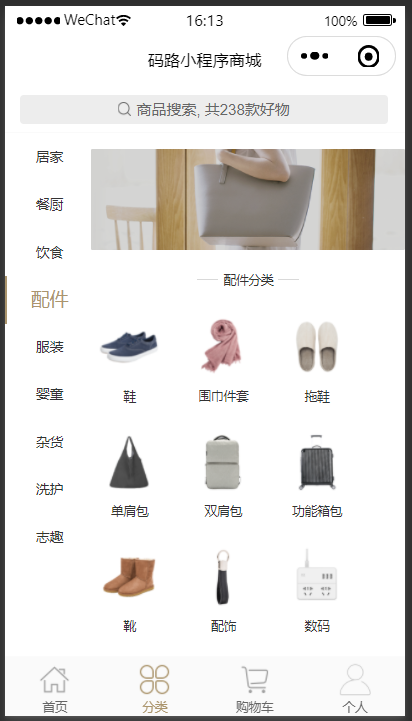
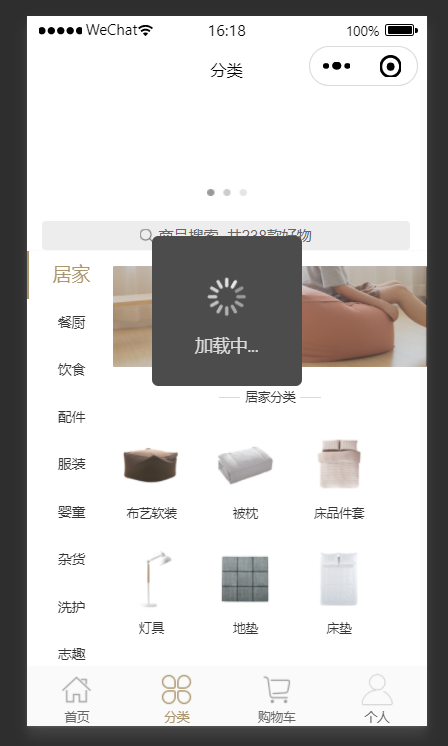
# 6,pullDownRefresh中完成下拉刷新
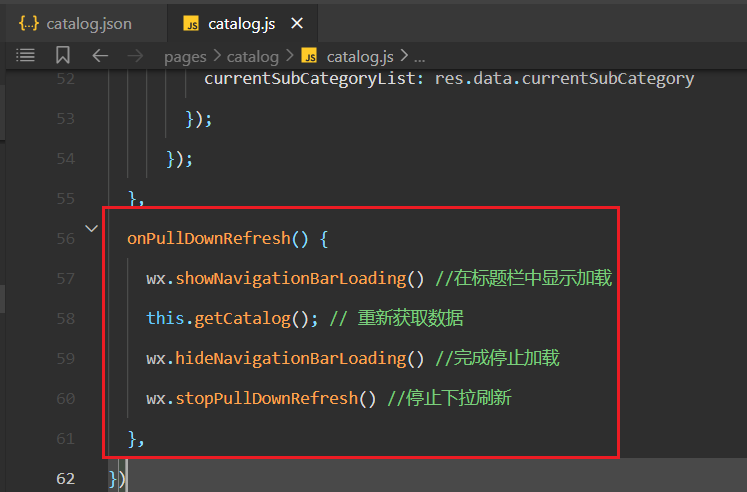
测试OK,如下:
# 四,注册,登录(微信登录/账号登录),退出登录
# 1,整理相关的接口
整理相关的接口,如下:
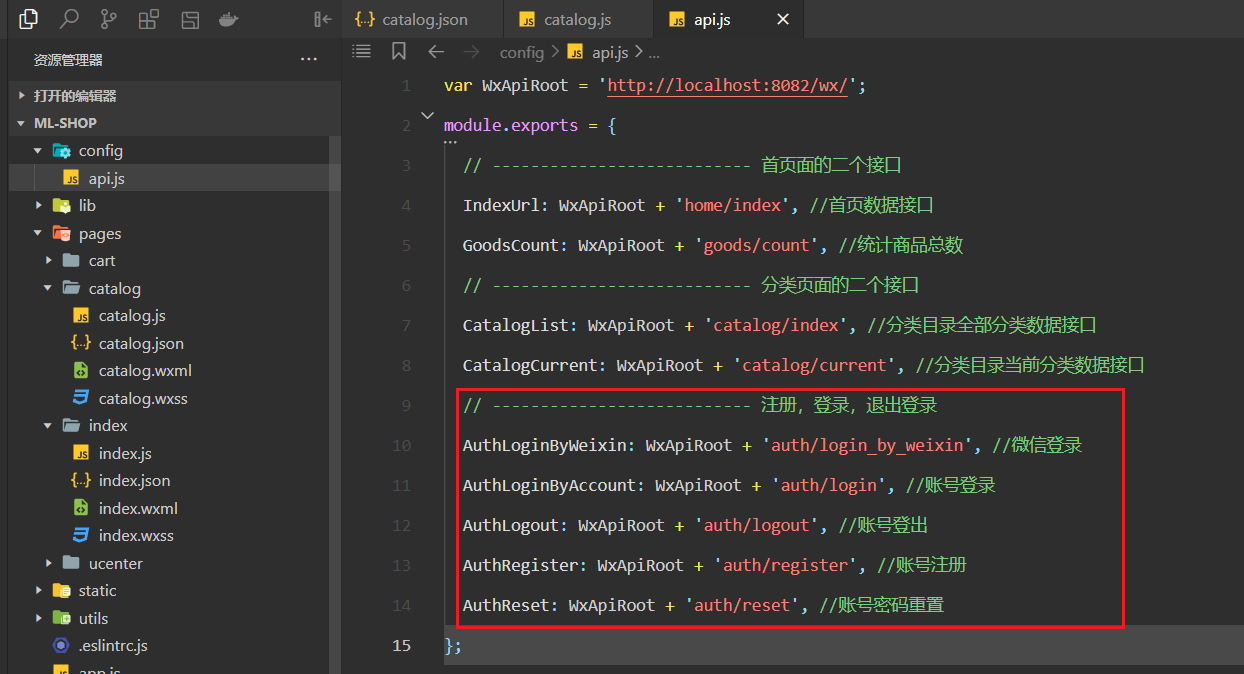
参考代码如下:
var WxApiRoot = 'http://localhost:8082/wx/';
module.exports = {
    // --------------------------- 首页面的二个接口
    IndexUrl: WxApiRoot + 'home/index', //首页数据接口
    GoodsCount: WxApiRoot + 'goods/count', //统计商品总数
    // --------------------------- 分类页面的二个接口
    CatalogList: WxApiRoot + 'catalog/index', //分类目录全部分类数据接口
    CatalogCurrent: WxApiRoot + 'catalog/current', //分类目录当前分类数据接口
    // --------------------------- 注册,登录,退出登录
    AuthLoginByWeixin: WxApiRoot + 'auth/login_by_weixin', //微信登录
    AuthLoginByAccount: WxApiRoot + 'auth/login', //账号登录
    AuthLogout: WxApiRoot + 'auth/logout', //账号登出
    AuthRegister: WxApiRoot + 'auth/register', //账号注册
    AuthReset: WxApiRoot + 'auth/reset', //账号密码重置
};
2
3
4
5
6
7
8
9
10
11
12
13
14
15
# 2,实现个人中心头部
需求:
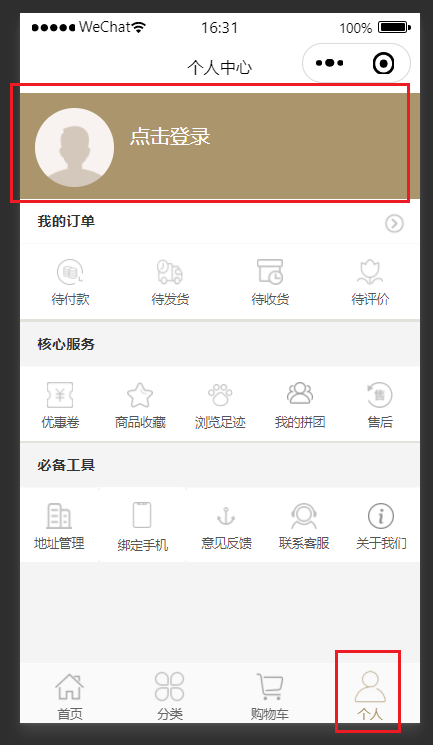
由于个人中心模块中,还要包含其它很多的页面,所以在ucenter文件夹下有一个index文件夹,如下:
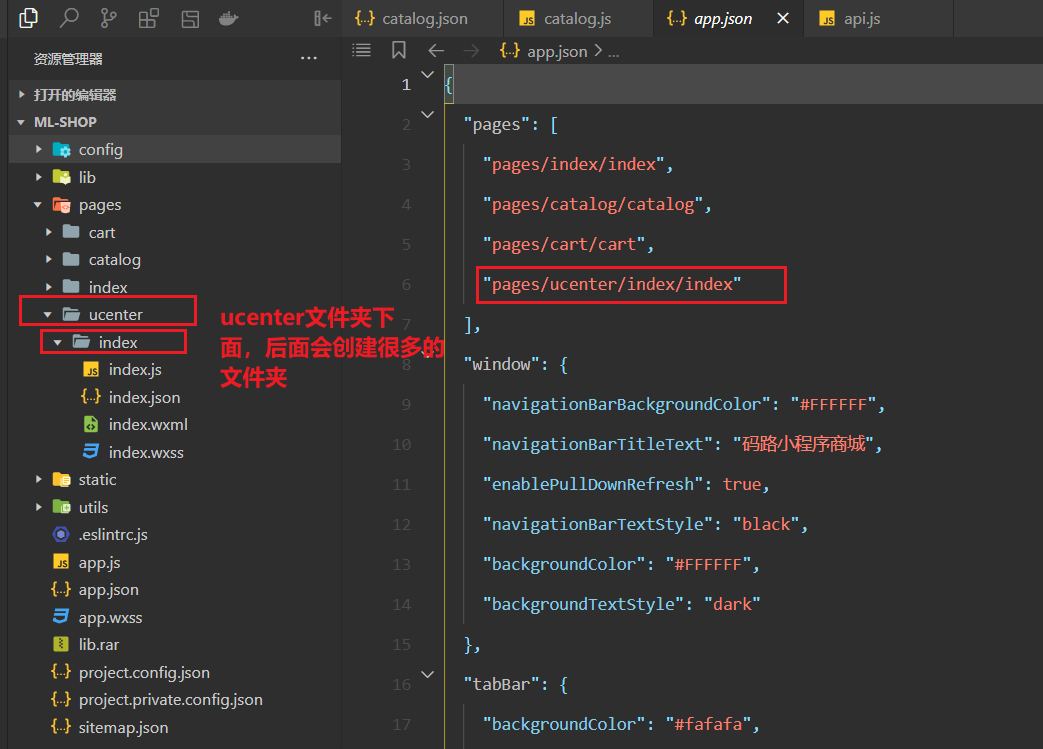
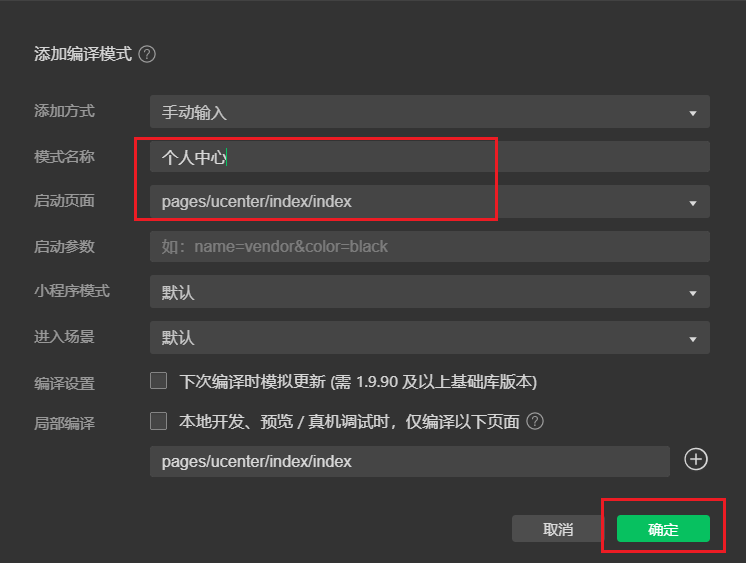
添加编译模式,如下:
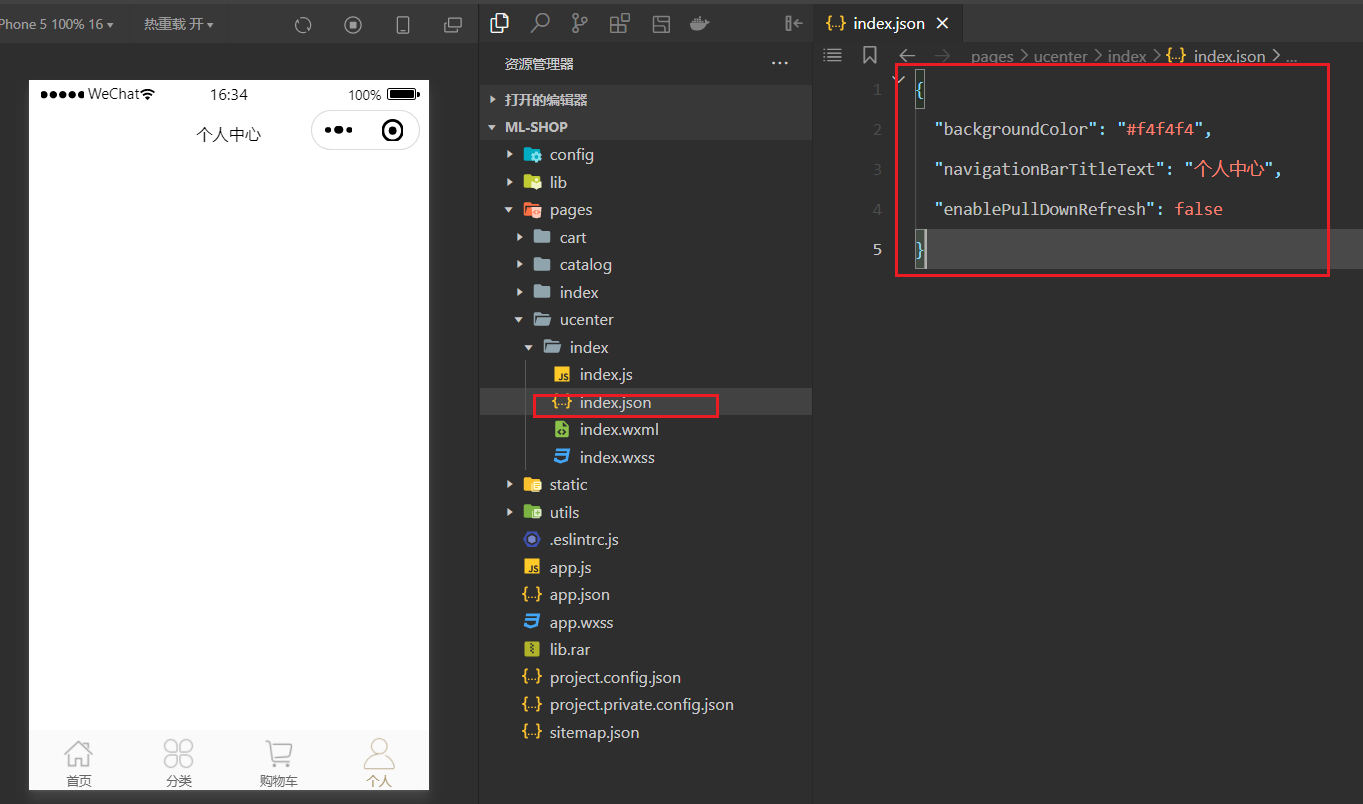
在uenter/index/index.json中配置如下:
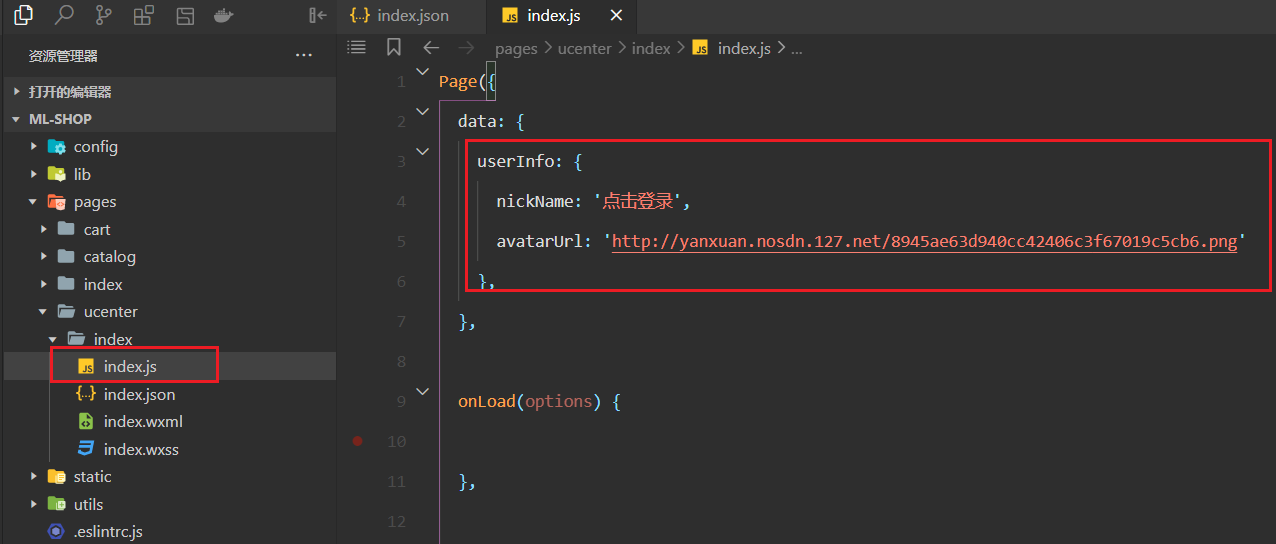
定义状态,如下:
书写对应的结构,如下:
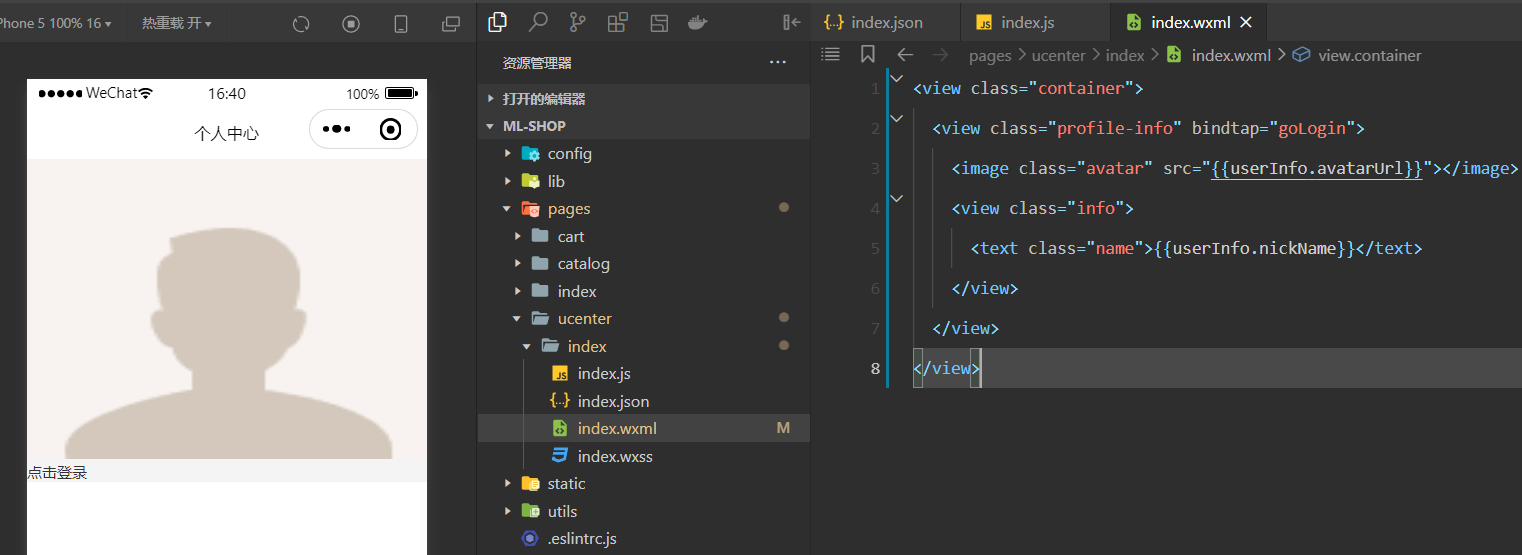
参考代码如下:
<view class="container">
    <view class="profile-info" bindtap="goLogin">
        <image class="avatar" src="{{userInfo.avatarUrl}}"></image>
        <view class="info">
            <text class="name">{{userInfo.nickName}}</text>
        </view>
    </view>
</view>
2
3
4
5
6
7
8
对应的样式如下:
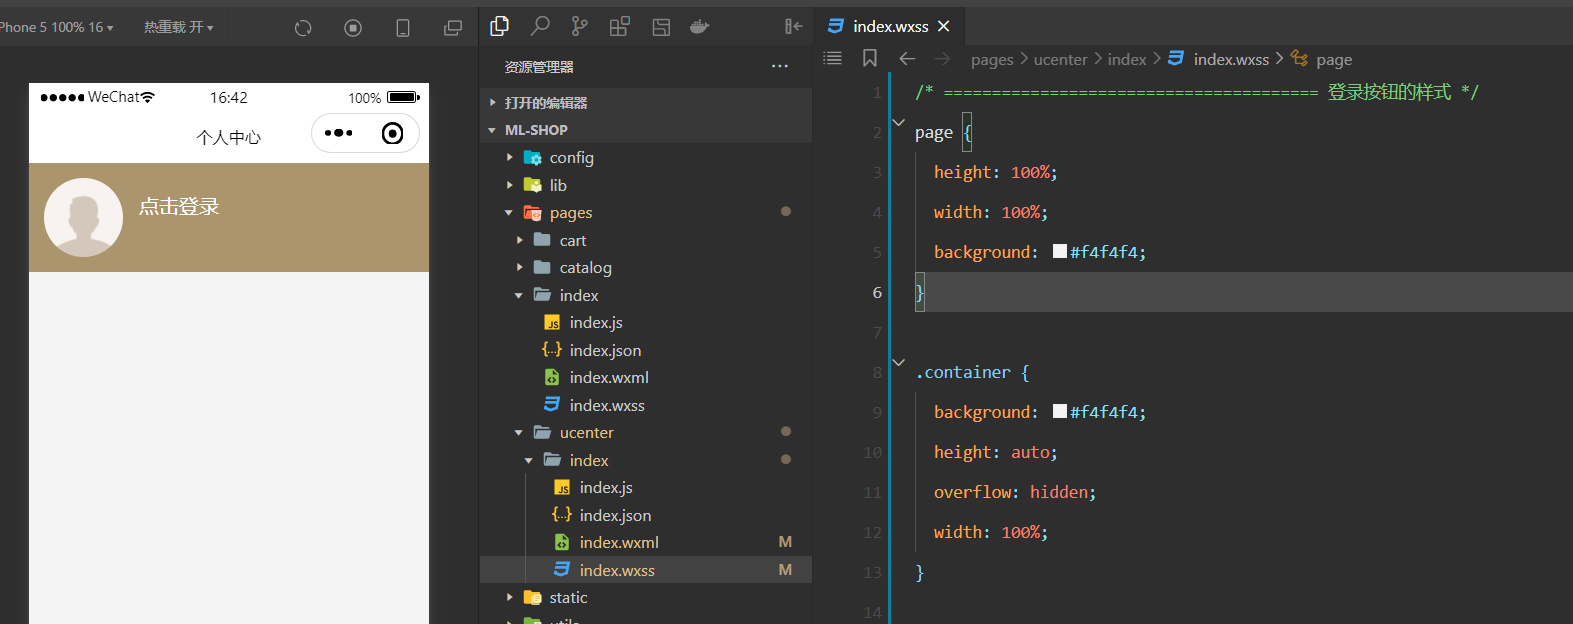
参考样式,如下:
/* ======================================= 登录按钮的样式 */
page {
    height: 100%;
    width: 100%;
    background: #f4f4f4;
}

.container {
    background: #f4f4f4;
    height: auto;
    overflow: hidden;
    width: 100%;
}

.profile-info {
    background-color: #ab956d;
    color: #f4f4f4;
    display: flex;
    align-items: center;
    padding: 30rpx;
    font-size: 28rpx;
}

.profile-info .avatar {
    height: 148rpx;
    width: 148rpx;
    border-radius: 50%;
}

.profile-info .info {
    flex: 1;
    height: 85rpx;
    padding-left: 31.25rpx;
}

.profile-info .name {
    display: block;
    height: 45rpx;
    line-height: 45rpx;
    color: #fff;
    font-size: 37.5rpx;
    margin-bottom: 10rpx;
}

.profile-info .level {
    display: block;
    height: 30rpx;
    line-height: 30rpx;
    margin-bottom: 10rpx;
    color: #7f7f7f;
    font-size: 30rpx;
}
2
3
4
5
6
7
8
9
10
11
12
13
14
15
16
17
18
19
20
21
22
23
24
25
26
27
28
29
30
31
32
33
34
35
36
37
38
39
40
41
42
43
44
45
46
47
48
49
50
51
52
# 3,点击登录去登录页面
和身份认证相关的的页面,我们都放在auth文件夹下面,创建auth文件夹,在auth文件夹下面创建login页面,如下:
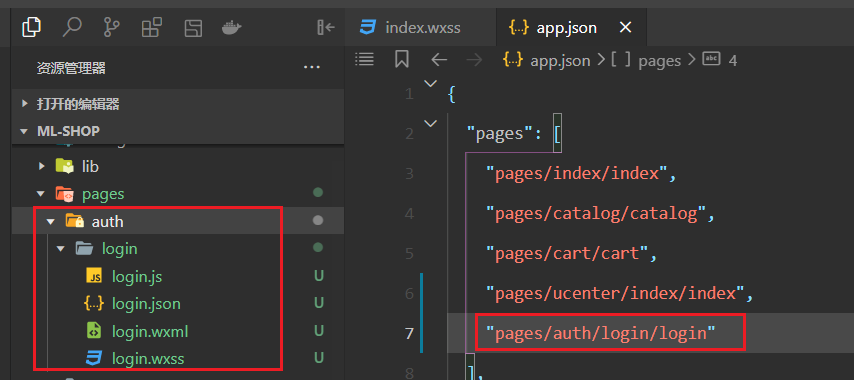
点击个人中心的登录按钮后,就要去登录页面,如下:
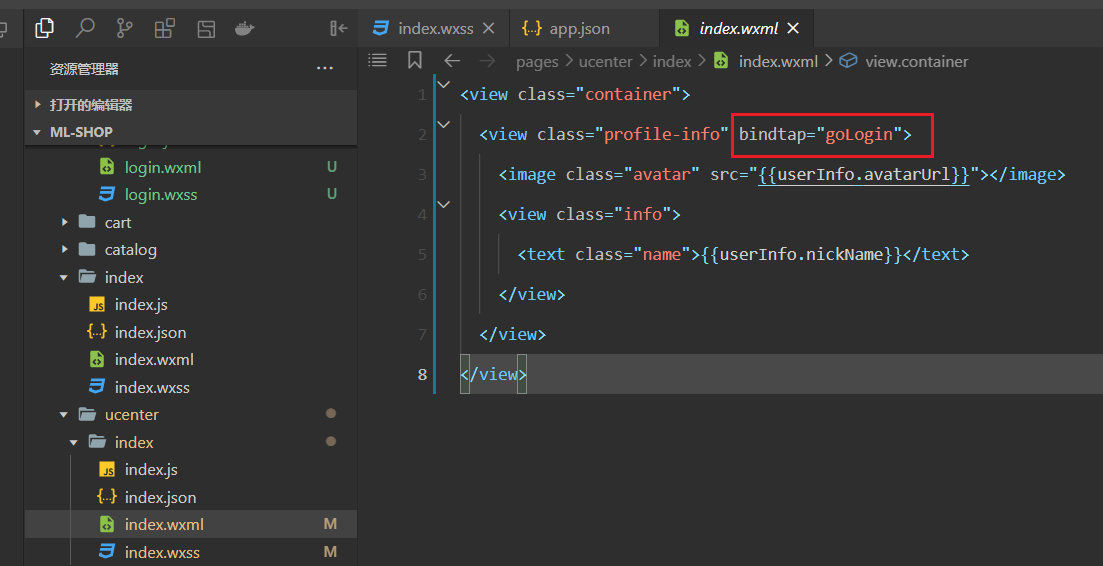
实现对应的方法,如下:
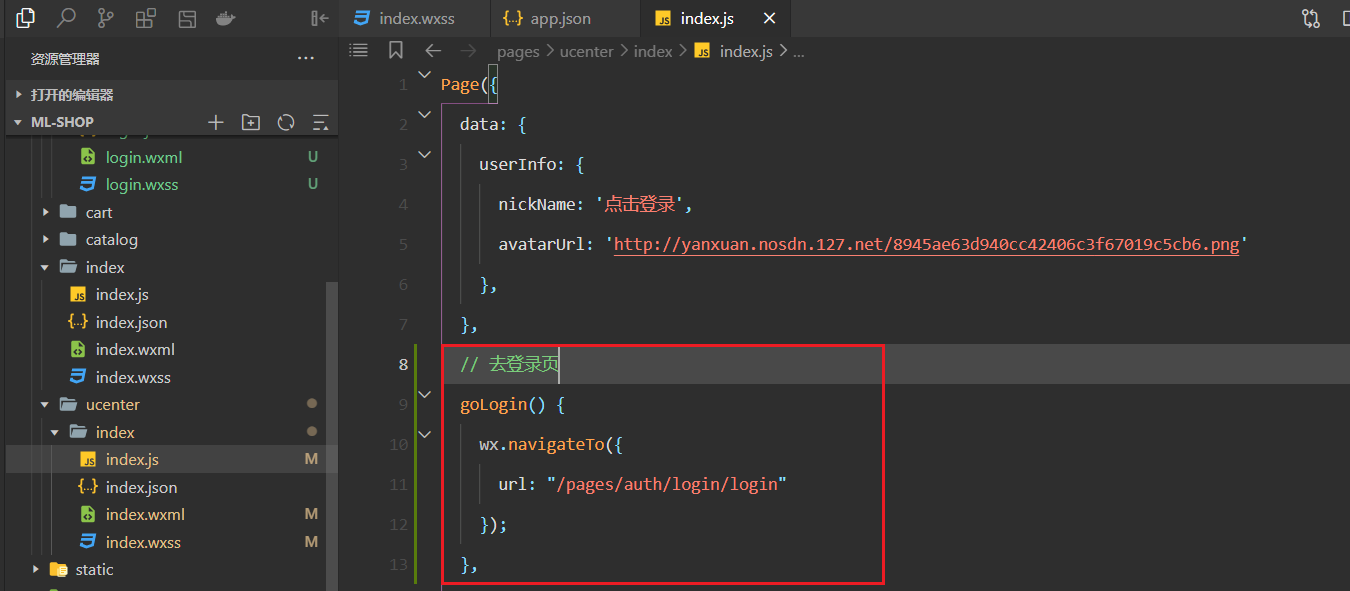
点击测试如下:
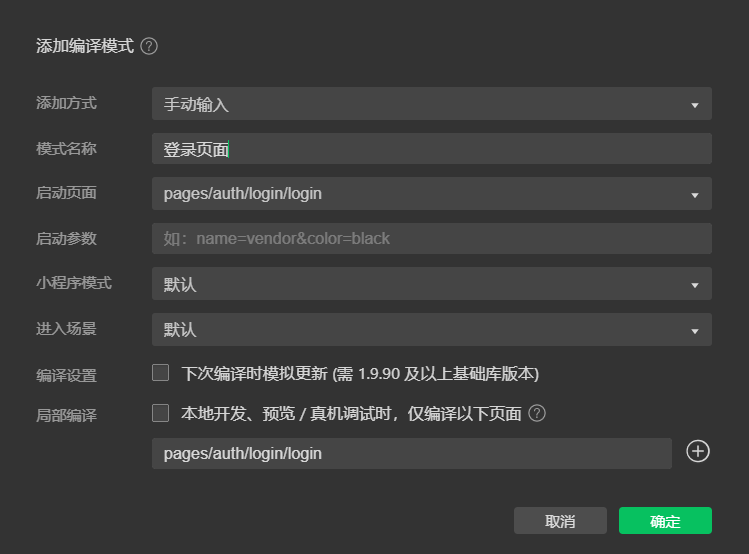
添加编译模式,如下:
# 4,绘制登录页面
需求如下 :
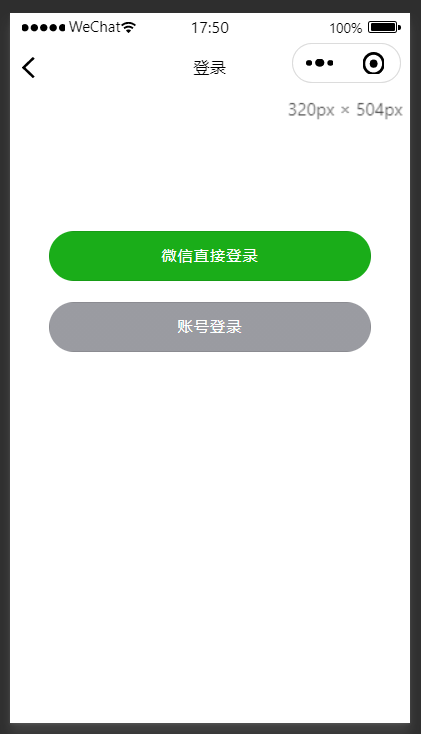
绘制HTML结构,如下:

书写对应的样式,如下:
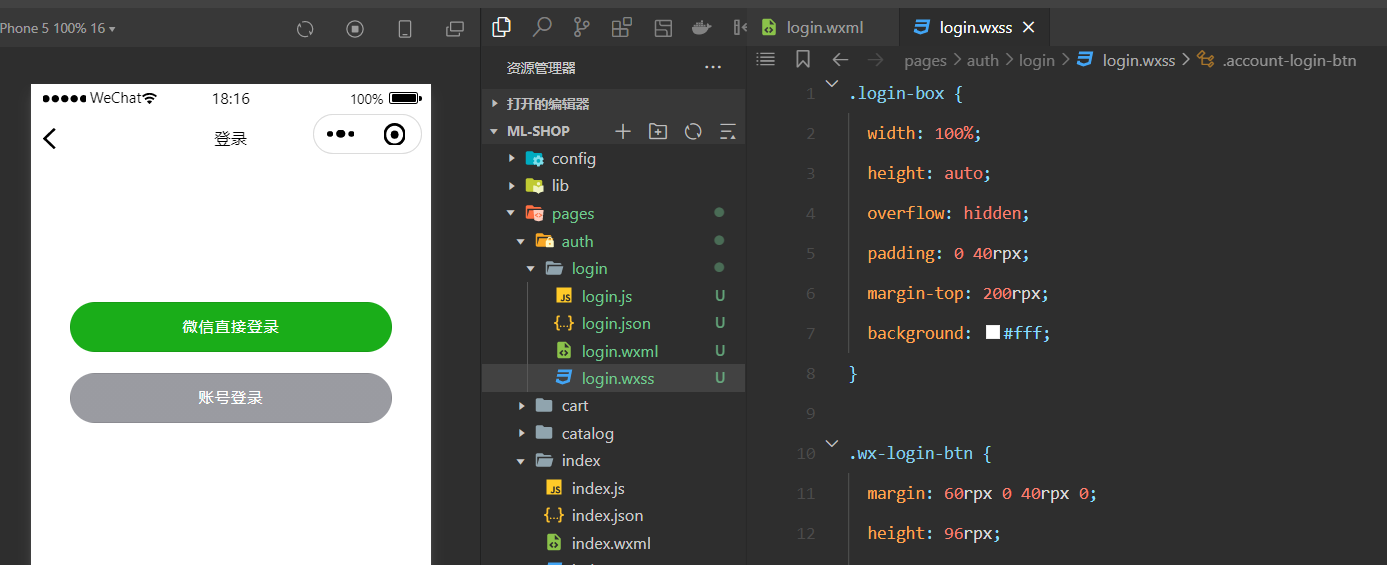
参考样式,如下:
.login-box {
    width: 100%;
    height: auto;
    overflow: hidden;
    padding: 0 40rpx;
    margin-top: 200rpx;
    background: #fff;
}

.wx-login-btn {
    margin: 60rpx 0 40rpx 0;
    height: 96rpx;
    line-height: 96rpx;
    font-size: 30rpx;
    border-radius: 6rpx;
    width: 90%;
    color: #fff;
    right: 0;
    display: flex;
    justify-content: center;
    align-items: center;
    position: flex;
    bottom: 0;
    left: 0;
    padding: 0;
    margin-left: 5%;
    text-align: center;
    /* padding-left: -5rpx; */
    border-top-left-radius: 50rpx;
    border-bottom-left-radius: 50rpx;
    border-top-right-radius: 50rpx;
    border-bottom-right-radius: 50rpx;
    letter-spacing: 3rpx;
}

.account-login-btn {
    width: 90%;
    margin: 0 auto;
    color: #fff;
    font-size: 30rpx;
    height: 96rpx;
    line-height: 96rpx;
    right: 0;
    display: flex;
    justify-content: center;
    align-items: center;
    position: flex;
    bottom: 0;
    left: 0;
    border-radius: 0;
    padding: 0;
    margin-left: 5%;
    text-align: center;
    /* padding-left: -5rpx; */
    border-top-left-radius: 50rpx;
    border-bottom-left-radius: 50rpx;
    border-top-right-radius: 50rpx;
    border-bottom-right-radius: 50rpx;
    letter-spacing: 3rpx;
    background-image: linear-gradient(to right, #9a9ba1 0%, #9a9ba1 100%);
}
2
3
4
5
6
7
8
9
10
11
12
13
14
15
16
17
18
19
20
21
22
23
24
25
26
27
28
29
30
31
32
33
34
35
36
37
38
39
40
41
42
43
44
45
46
47
48
49
50
51
52
53
54
55
56
57
58
59
60
61
# 5,实现微信登录(重难点)
强调一下,我们使用的小程序版本是:
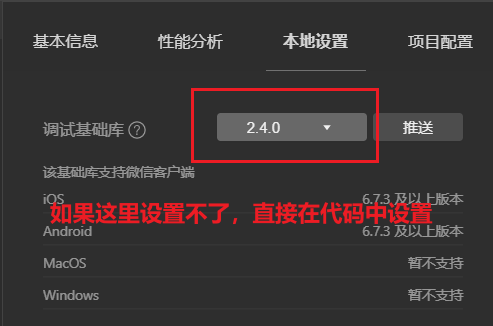
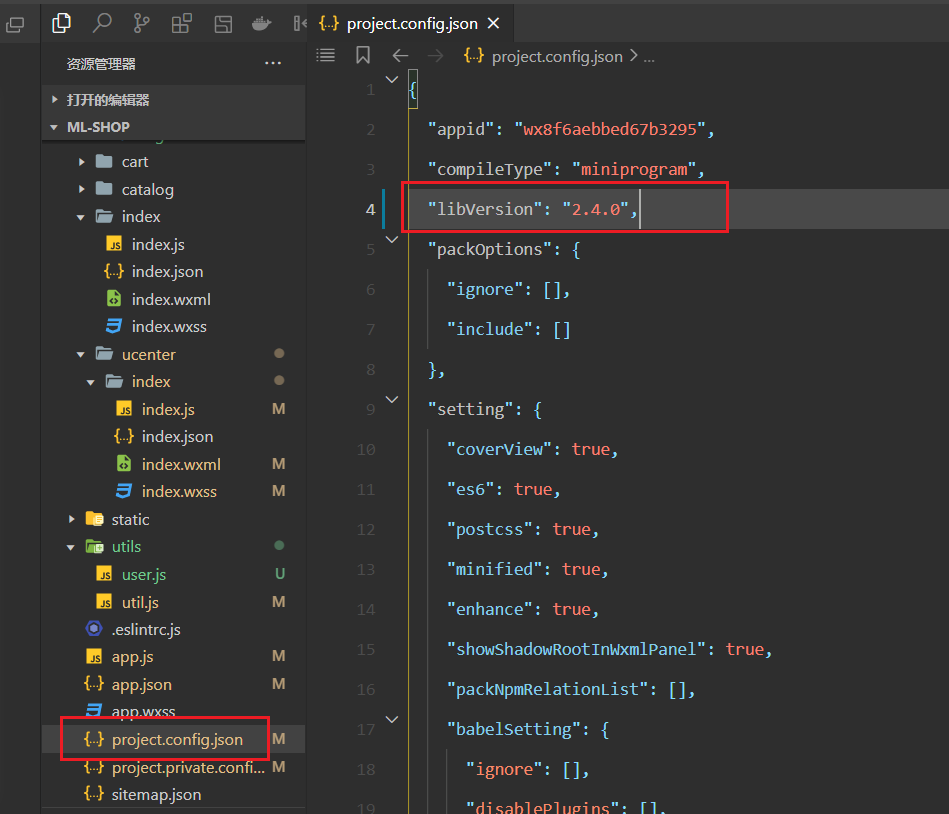
在代码中设置,如下:
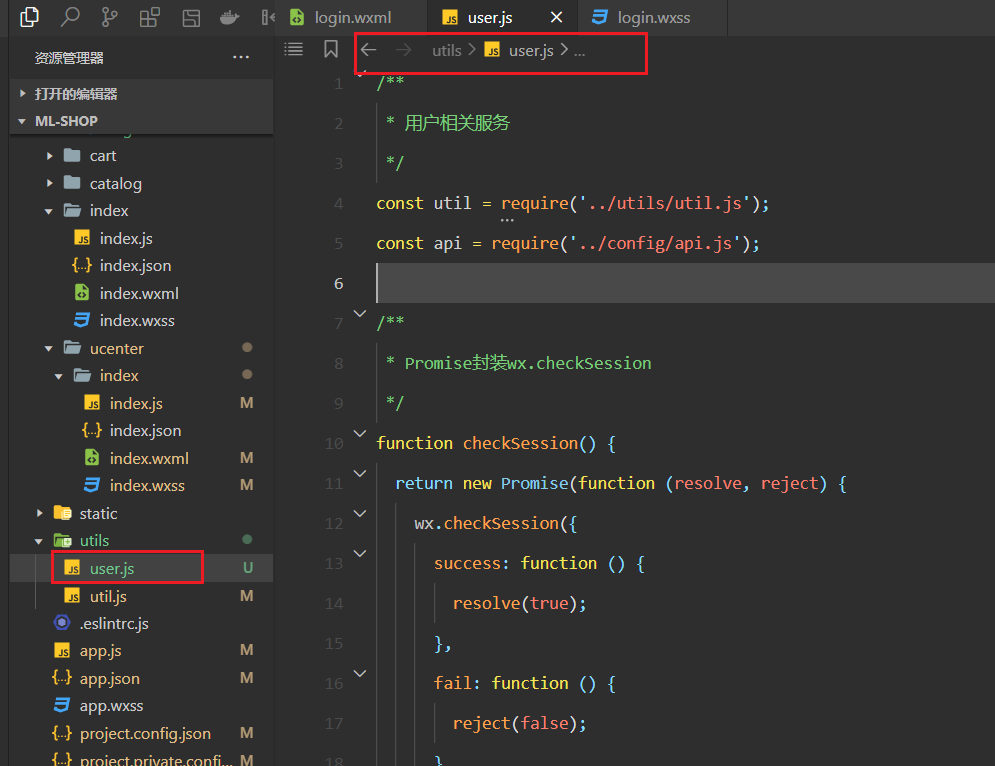
微信登录,重点就看官方的图,主要逻辑都在后端,把图中要主逻辑都封装在utils下面的user.js模块中,创建user.js模块,如下:
user.js模块中的代码如下:
参考代码如下,下面的逻辑主要来自于官方的图:
// user.js

/**
 * 用户相关服务
 */
const util = require('../utils/util.js');
const api = require('../config/api.js');

/**
 * Promise封装wx.checkSession
 */
function checkSession() {
    return new Promise(function(resolve, reject) {
        wx.checkSession({
            success: function() {
                resolve(true);
            },
            fail: function() {
                reject(false);
            }
        })
    });
}

/**
 * Promise封装wx.login
 */
function login() {
    return new Promise(function(resolve, reject) {
        wx.login({
            success: function(res) {
                if (res.code) {
                    resolve(res);
                } else {
                    reject(res);
                }
            },
            fail: function(err) {
                reject(err);
            }
        });
    });
}

/**
 * 调用微信登录
 */
function loginByWeixin(userInfo) {

    return new Promise(function(resolve, reject) {
        return login().then((res) => {
            //登录远程服务器
            util.request(api.AuthLoginByWeixin, {
                code: res.code,
                userInfo: userInfo
            }, 'POST').then(res => {
                if (res.errno === 0) {
                    //存储用户信息
                    wx.setStorageSync('userInfo', res.data.userInfo);
                    wx.setStorageSync('token', res.data.token);

                    resolve(res);
                } else {
                    reject(res);
                }
            }).catch((err) => {
                reject(err);
            });
        }).catch((err) => {
            reject(err);
        })
    });
}

/**
 * 判断用户是否登录
 */
function checkLogin() {
    return new Promise(function(resolve, reject) {
        if (wx.getStorageSync('userInfo') && wx.getStorageSync('token')) {
            checkSession().then(() => {
                resolve(true);
            }).catch(() => {
                reject(false);
            });
        } else {
            reject(false);
        }
    });
}

module.exports = {
    loginByWeixin,
    checkLogin,
};
2
3
4
5
6
7
8
9
10
11
12
13
14
15
16
17
18
19
20
21
22
23
24
25
26
27
28
29
30
31
32
33
34
35
36
37
38
39
40
41
42
43
44
45
46
47
48
49
50
51
52
53
54
55
56
57
58
59
60
61
62
63
64
65
66
67
68
69
70
71
72
73
74
75
76
77
78
79
80
81
82
83
84
85
86
87
88
89
90
91
92
93
94
95
面试题: 说一下微信小程序中的登录你是如何实现的?
在util.js中,封闭一个提示功能,如下:
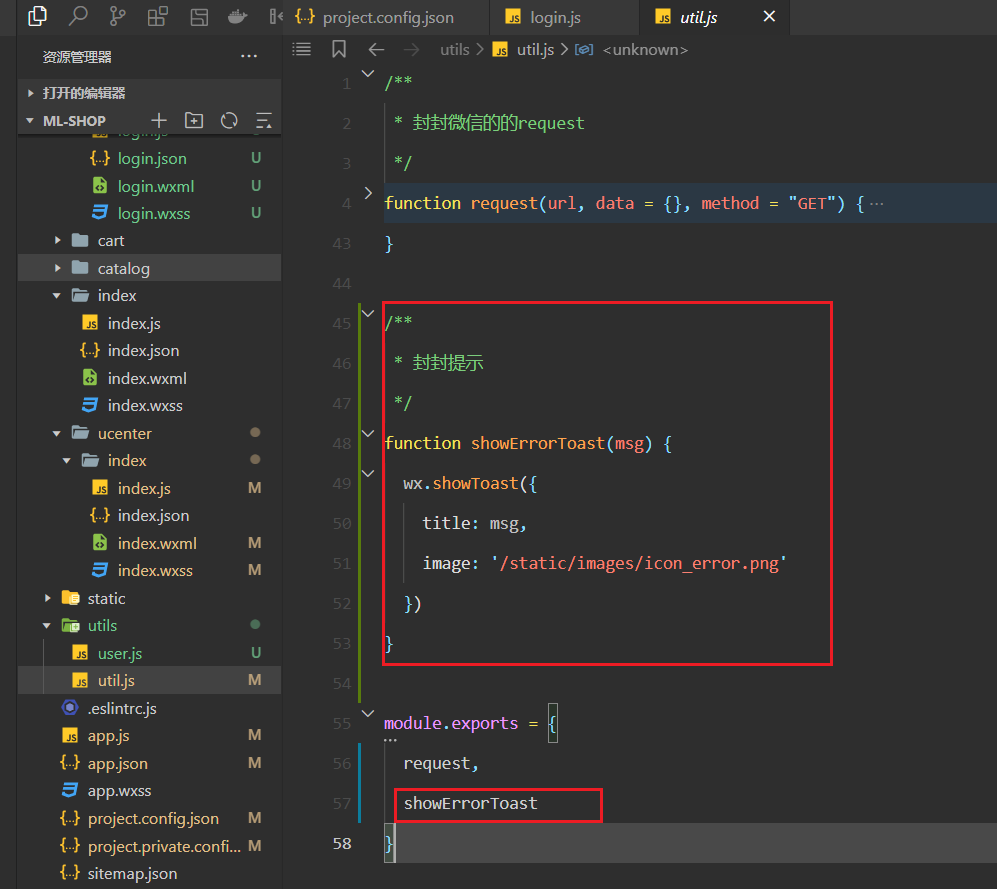
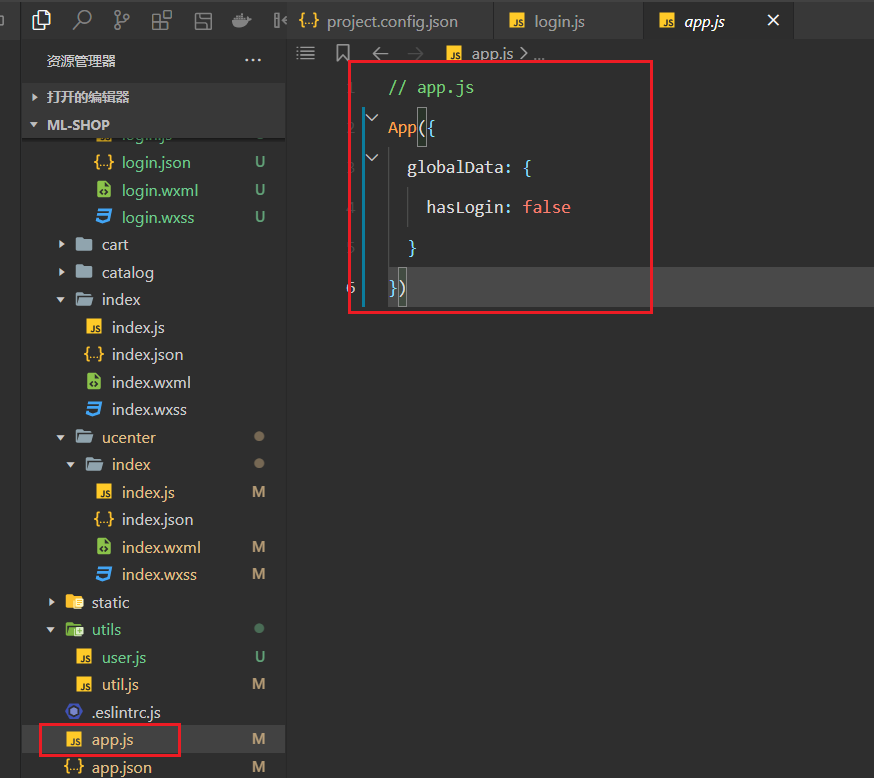
在app.js中设置一个全局数据,表示是否登录,如果登录了,设置为true,如下:
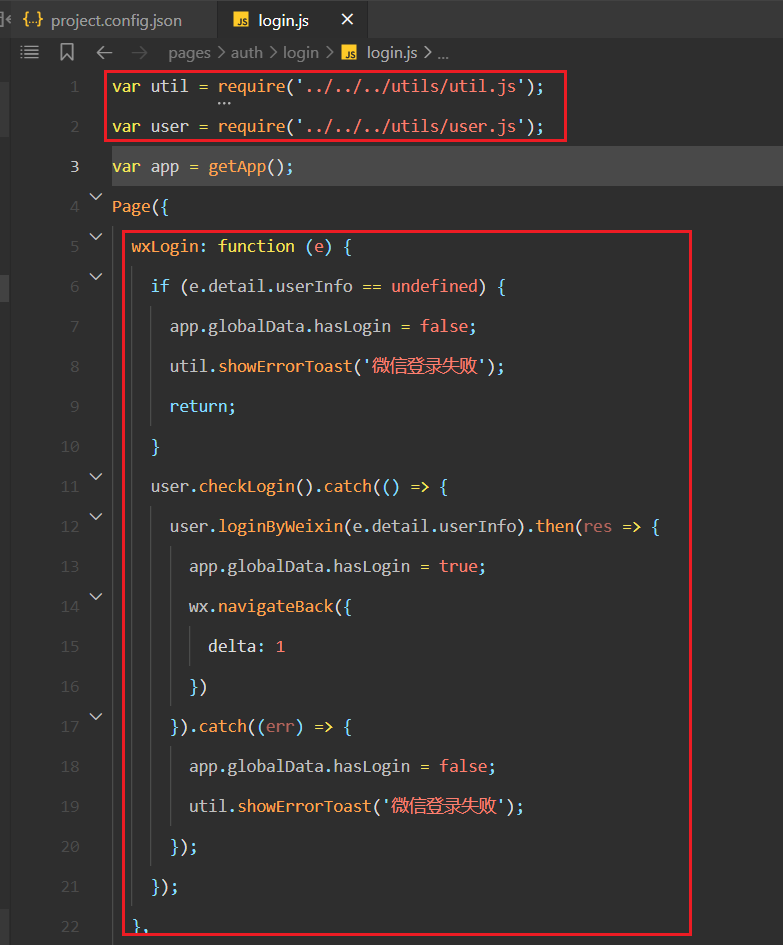
当点击微信登录时,如下:

实现对对应的方法,如下:
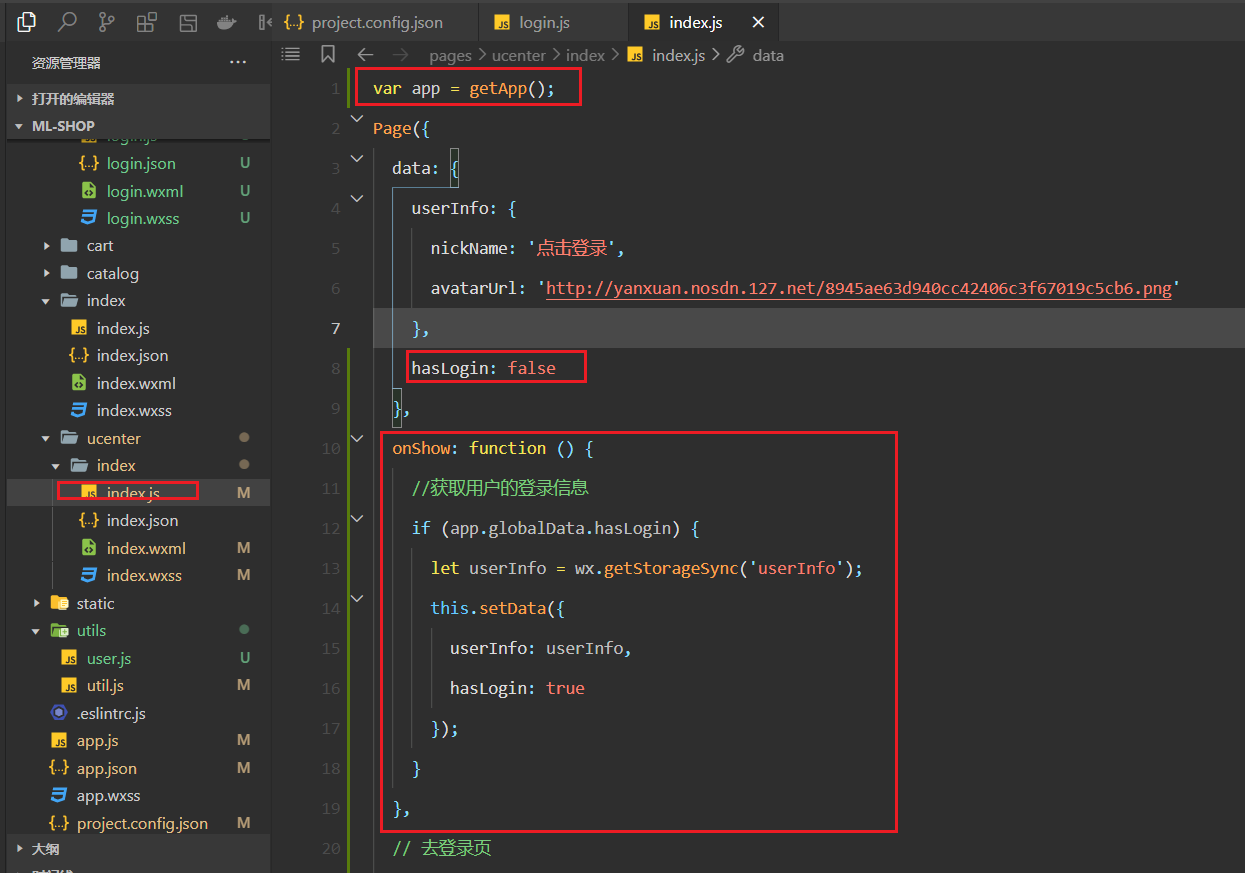
登录成功后,返回到个人中心页面,就需要从本地获取用户昵称和头像,实现如下:
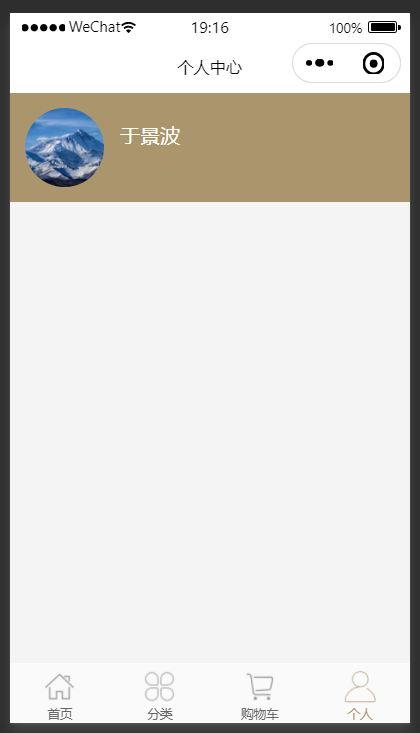
测试登录成功后,如下:
# 6,实现账号注册的前置工作
需求:
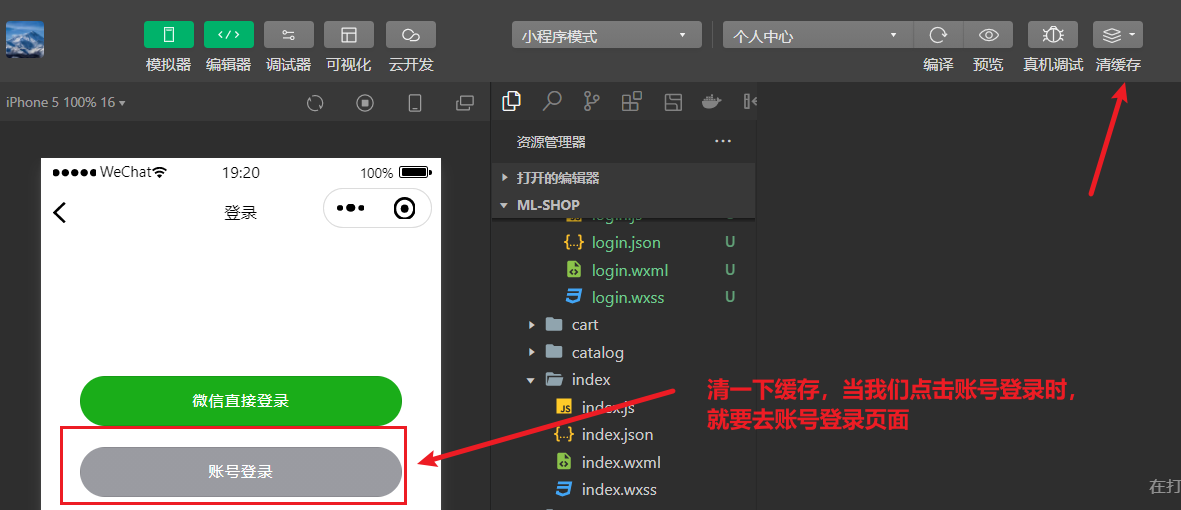
当点击账号登录时,调用accontLogin方法,如下:

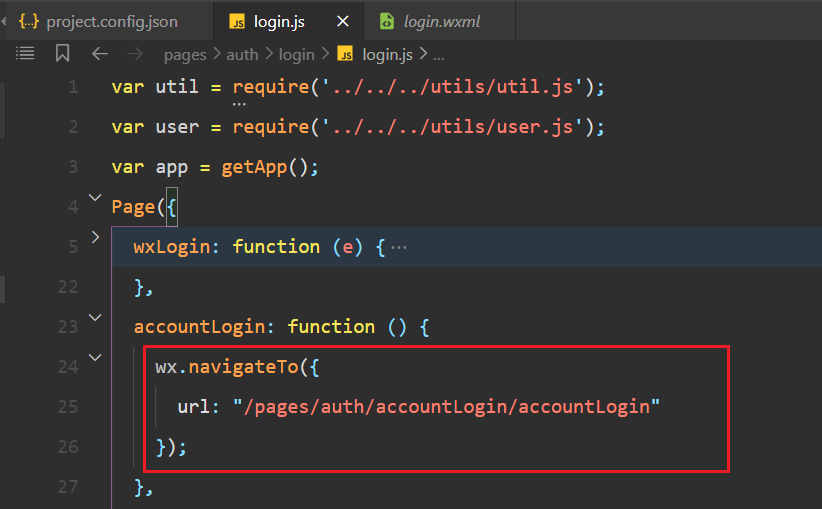
实现对应的方法,如下:
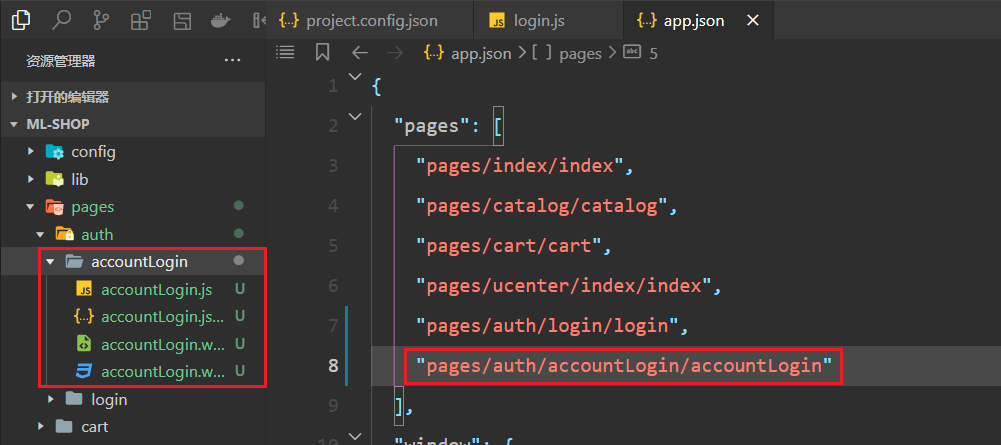
此时,我们还没有accountLogin页面,需要创建accoutLogin页面,如下:
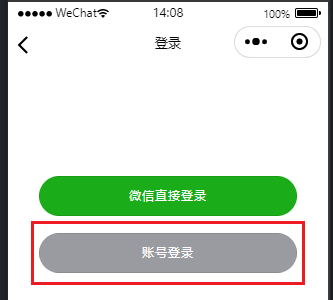
点击账号登录,就会跳到账号登录的页面,如下:
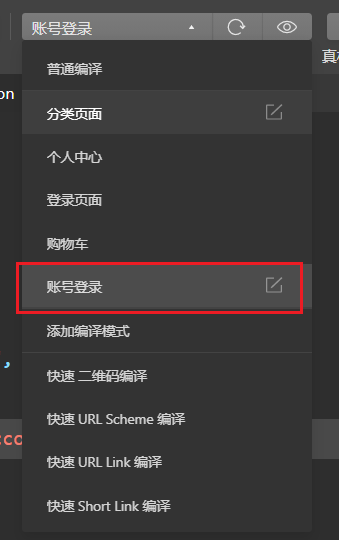
添加编译模式,如下:
开始绘制账号登录页面,如下:
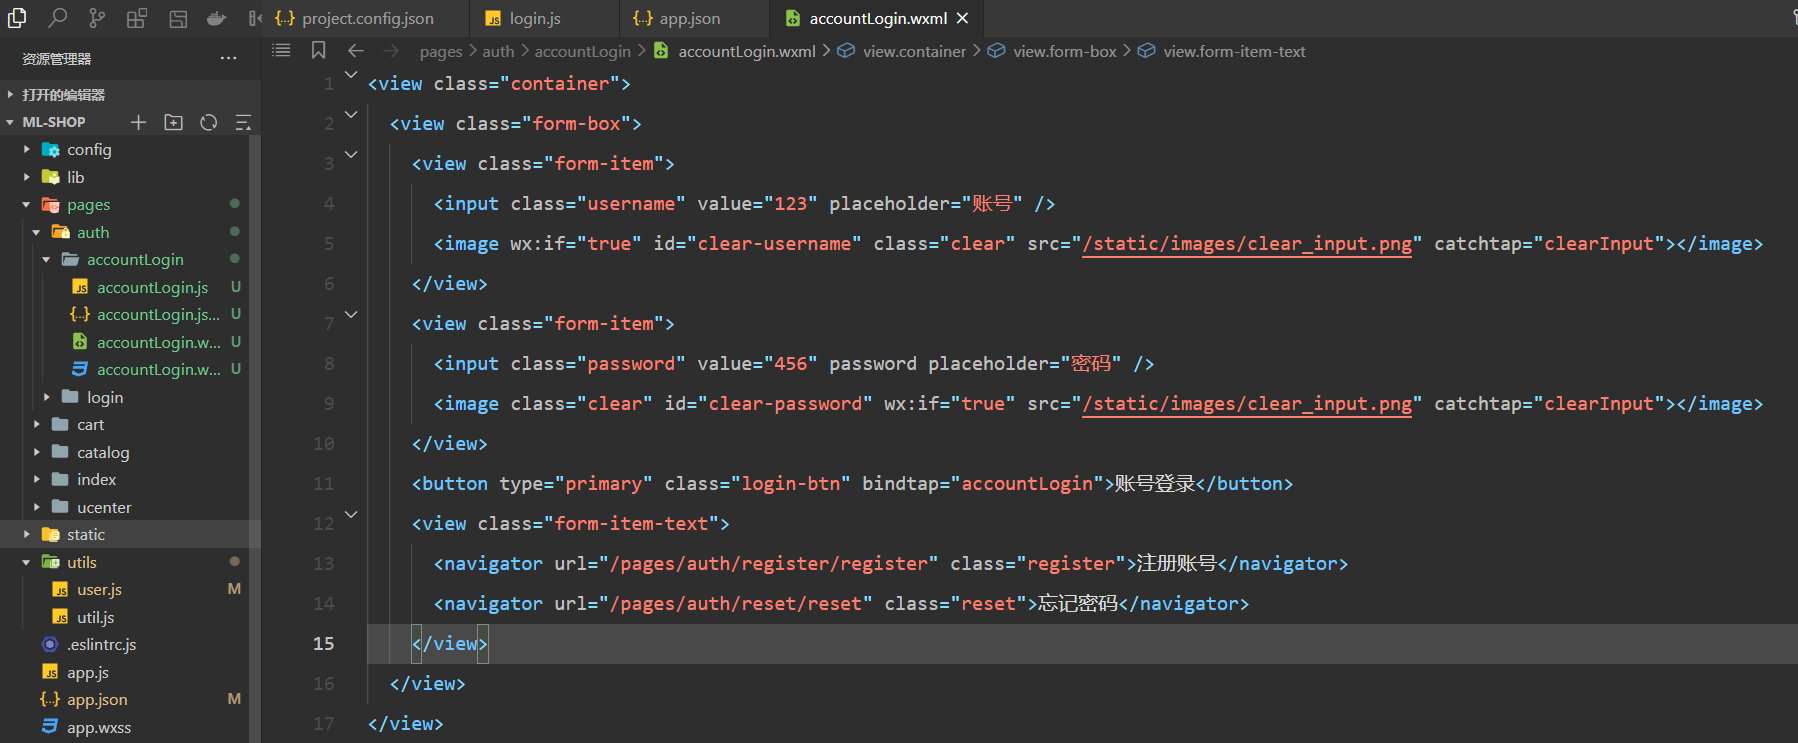
参考代码如下:
<view class="container">
    <view class="form-box">
        <view class="form-item">
            <input class="username" value="123" placeholder="账号" />
            <image wx:if="true" id="clear-username" class="clear" src="/static/images/clear_input.png" catchtap="clearInput"></image>
        </view>
        <view class="form-item">
            <input class="password" value="456" password placeholder="密码" />
            <image class="clear" id="clear-password" wx:if="true" src="/static/images/clear_input.png" catchtap="clearInput"></image>
        </view>
        <button type="primary" class="login-btn" bindtap="accountLogin">账号登录</button>
        <view class="form-item-text">
            <navigator url="/pages/auth/register/register" class="register">注册账号</navigator>
            <navigator url="/pages/auth/reset/reset" class="reset">忘记密码</navigator>
        </view>
    </view>
</view>
2
3
4
5
6
7
8
9
10
11
12
13
14
15
16
17
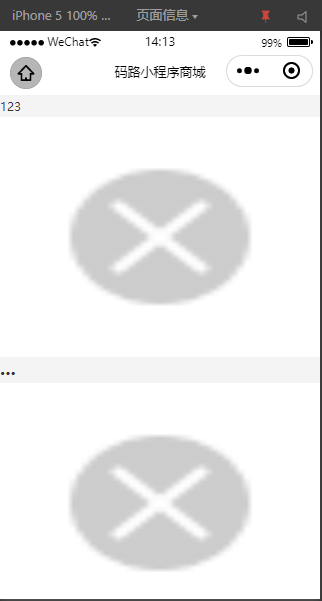
效果如下:
书写对应的样式,如下:
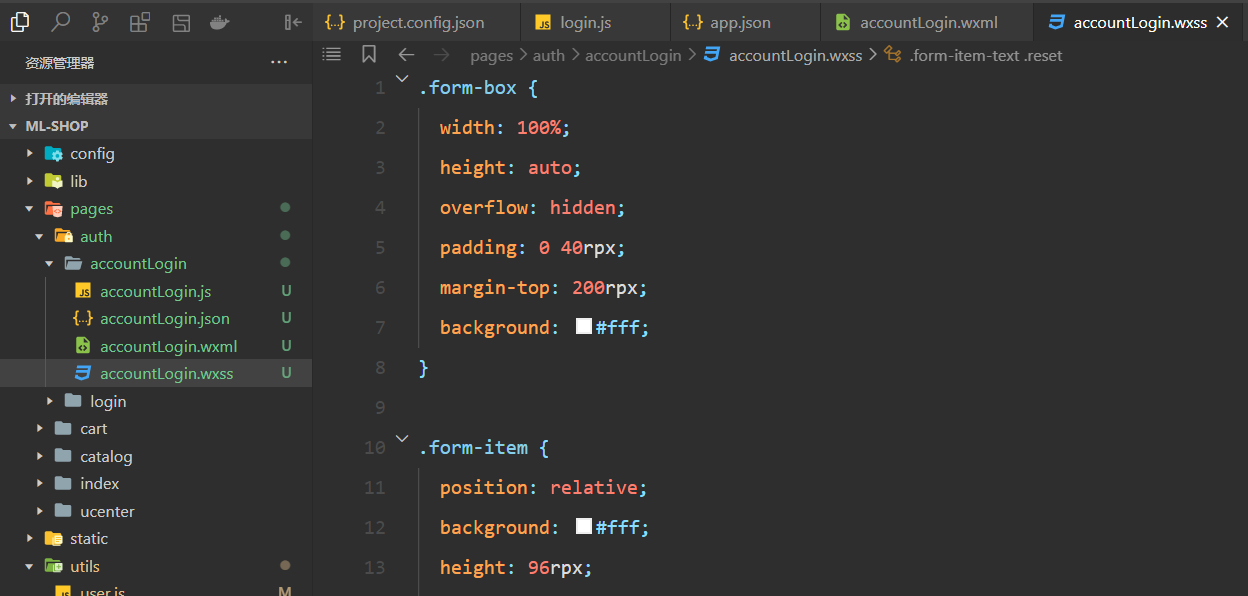
参考代码如下:
.form-box {
    width: 100%;
    height: auto;
    overflow: hidden;
    padding: 0 40rpx;
    margin-top: 200rpx;
    background: #fff;
}

.form-item {
    position: relative;
    background: #fff;
    height: 96rpx;
    border-bottom: 1px solid #d9d9d9;
}

.form-item .username,
.form-item .password,
.form-item .code {
    position: absolute;
    top: 26rpx;
    left: 0;
    display: block;
    width: 100%;
    height: 44rpx;
    background: #fff;
    color: #333;
    font-size: 30rpx;
}

.form-item-code {
    margin-top: 32rpx;
    height: auto;
    overflow: hidden;
    width: 100%;
}

.form-item-code .form-item {
    float: left;
    width: 350rpx;
}

.form-item-code .code-img {
    float: right;
    margin-top: 4rpx;
    height: 88rpx;
    width: 236rpx;
}

.form-item .clear {
    position: absolute;
    top: 26rpx;
    right: 18rpx;
    z-index: 2;
    display: block;
    background: #fff;
    height: 44rpx;
    width: 44rpx;
}

.login-btn {
    margin: 60rpx 0 40rpx 0;
    height: 96rpx;
    line-height: 96rpx;
    font-size: 30rpx;
    border-radius: 6rpx;
    width: 90%;
    color: #fff;
    right: 0;
    display: flex;
    justify-content: center;
    align-items: center;
    position: flex;
    bottom: 0;
    left: 0;
    padding: 0;
    margin-left: 5%;
    text-align: center;
    /* padding-left: -5rpx; */
    border-top-left-radius: 50rpx;
    border-bottom-left-radius: 50rpx;
    border-top-right-radius: 50rpx;
    border-bottom-right-radius: 50rpx;
    letter-spacing: 3rpx;
    background-image: linear-gradient(to right, #9a9ba1 0%, #9a9ba1 100%);
}

.form-item-text {
    height: 35rpx;
    width: 100%;
}

.form-item-text .register {
    display: block;
    height: 34rpx;
    float: left;
    font-size: 28rpx;
}

.form-item-text .reset {
    display: block;
    height: 34rpx;
    float: right;
    font-size: 28rpx;
}
2
3
4
5
6
7
8
9
10
11
12
13
14
15
16
17
18
19
20
21
22
23
24
25
26
27
28
29
30
31
32
33
34
35
36
37
38
39
40
41
42
43
44
45
46
47
48
49
50
51
52
53
54
55
56
57
58
59
60
61
62
63
64
65
66
67
68
69
70
71
72
73
74
75
76
77
78
79
80
81
82
83
84
85
86
87
88
89
90
91
92
93
94
95
96
97
98
99
100
101
102
103
104
105
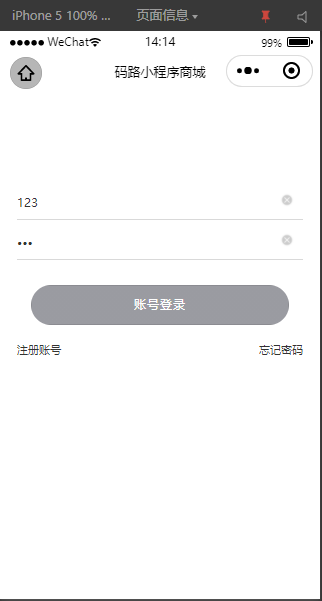
效果如下:
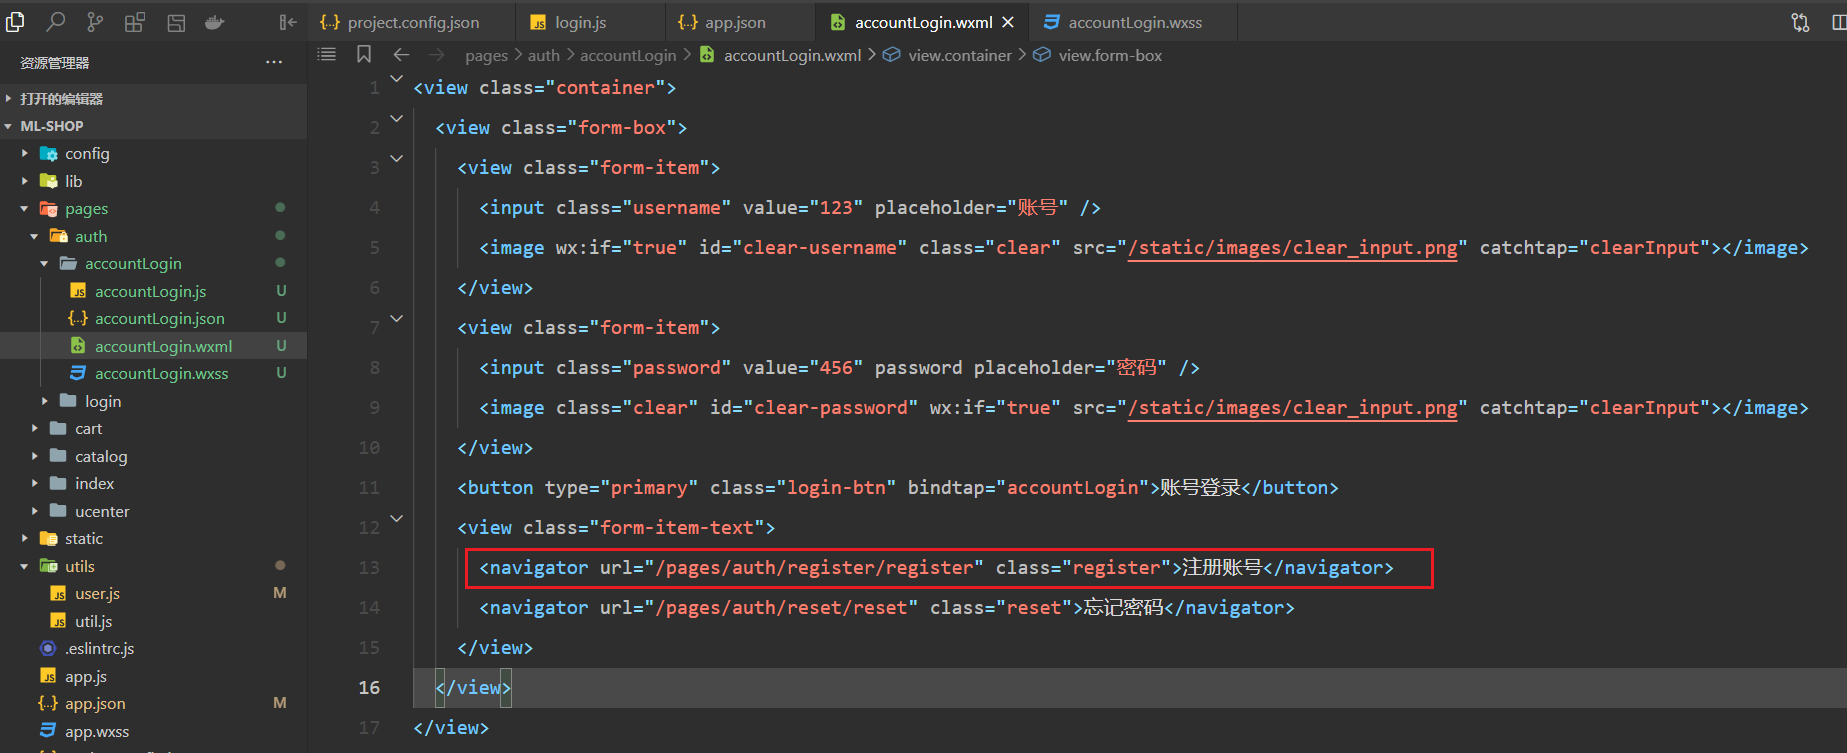
当点击注册账号时,就需要先注册一个账号,当点击注册账号,调用如下方法:
此时,我们就需要创建register页面,如下:
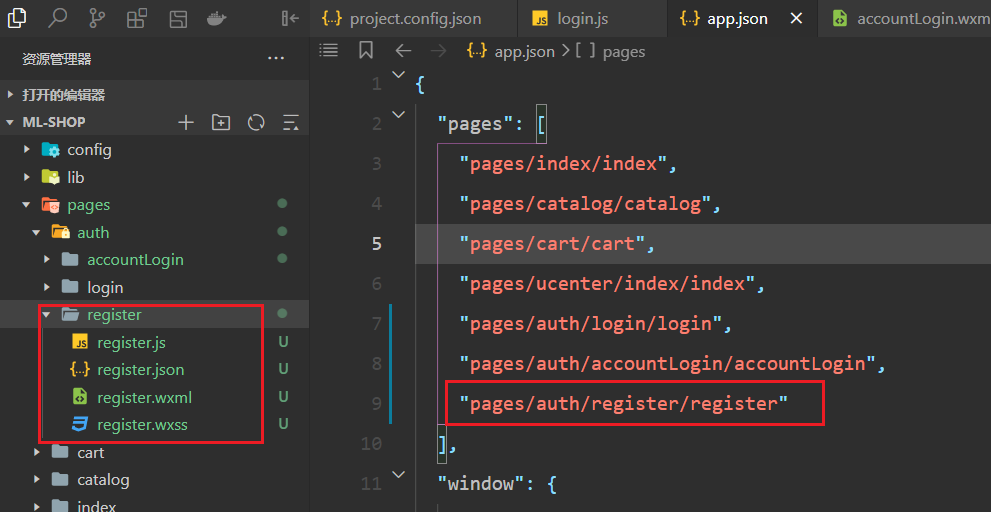
点击测试,如下:
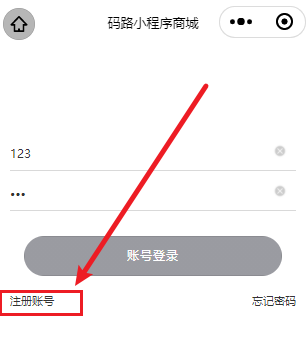
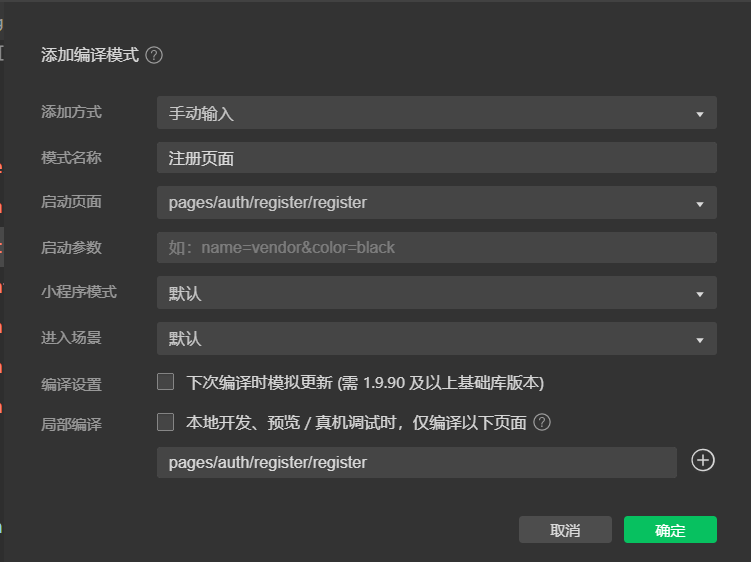
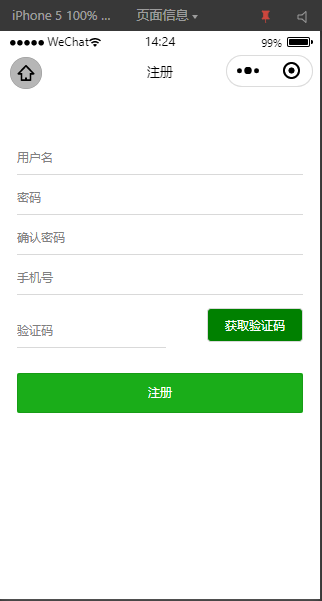
添加编译模式,开始绘制注册页面,如下:
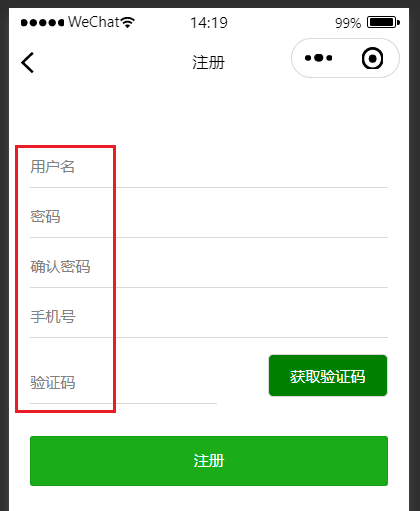
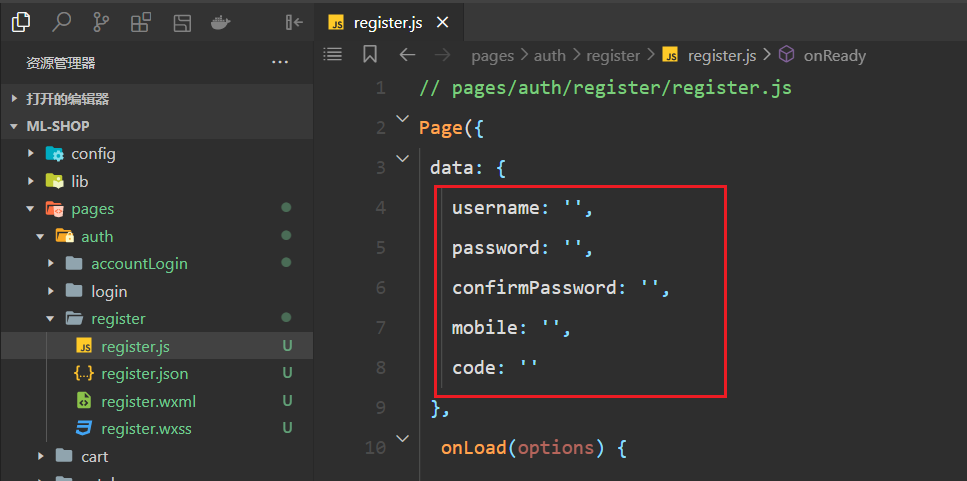
注册页面,需要用到的状态分析如下:
定义状态如下:
开始绘制注册页面,如下:
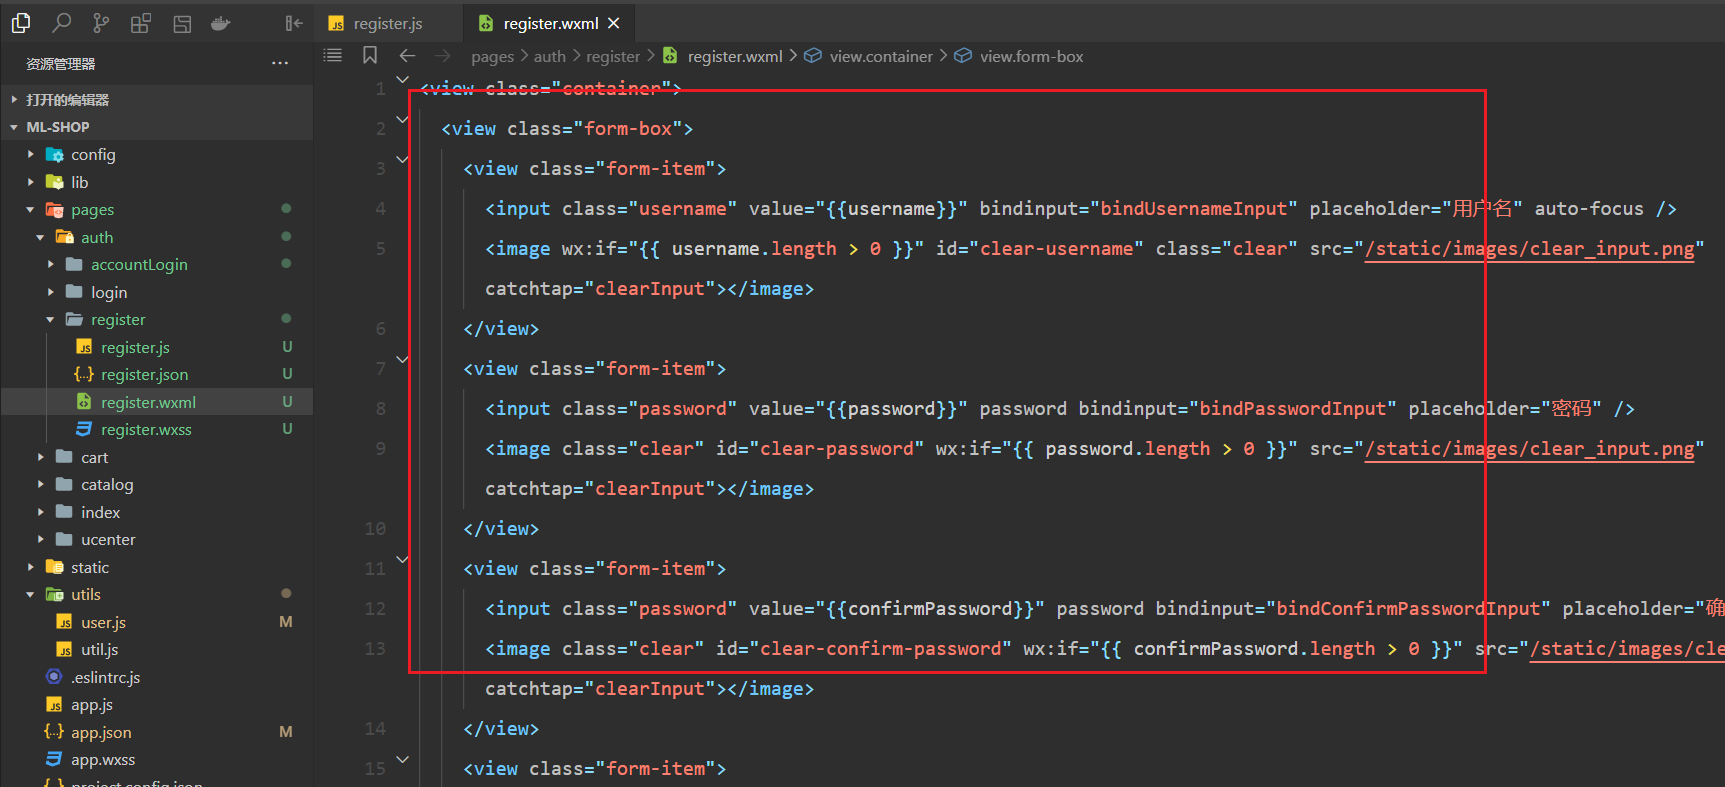
参考代码如下:
<view class="container">
    <view class="form-box">
        <view class="form-item">
            <input class="username" value="{{username}}" bindinput="bindUsernameInput" placeholder="用户名" auto-focus />
            <image wx:if="{{ username.length > 0 }}" id="clear-username" class="clear" src="/static/images/clear_input.png" catchtap="clearInput"></image>
        </view>
        <view class="form-item">
            <input class="password" value="{{password}}" password bindinput="bindPasswordInput" placeholder="密码" />
            <image class="clear" id="clear-password" wx:if="{{ password.length > 0 }}" src="/static/images/clear_input.png" catchtap="clearInput"></image>
        </view>
        <view class="form-item">
            <input class="password" value="{{confirmPassword}}" password bindinput="bindConfirmPasswordInput" placeholder="确认密码" />
            <image class="clear" id="clear-confirm-password" wx:if="{{ confirmPassword.length > 0 }}" src="/static/images/clear_input.png" catchtap="clearInput"></image>
        </view>
        <view class="form-item">
            <input class="mobile" value="{{mobile}}" bindinput="bindMobileInput" placeholder="手机号" />
            <image wx:if="{{ mobile.length > 0 }}" id="clear-mobile" class="clear" src="/static/images/clear_input.png" catchtap="clearInput"></image>
        </view>
        <view class="form-item-code">
            <view class="form-item code-item">
                <input class="code" value="{{code}}" bindinput="bindCodeInput" placeholder="验证码" />
                <image class="clear" id="clear-code" wx:if="{{ code.length > 0 }}" src="/static/images/clear_input.png" catchtap="clearInput"></image>
            </view>
            <view class="code-btn" bindtap="sendCode">获取验证码</view>
        </view>
        <button type="primary" class="register-btn" bindtap="startRegister">注册</button>
    </view>
</view>
2
3
4
5
6
7
8
9
10
11
12
13
14
15
16
17
18
19
20
21
22
23
24
25
26
27
28
效果如下:
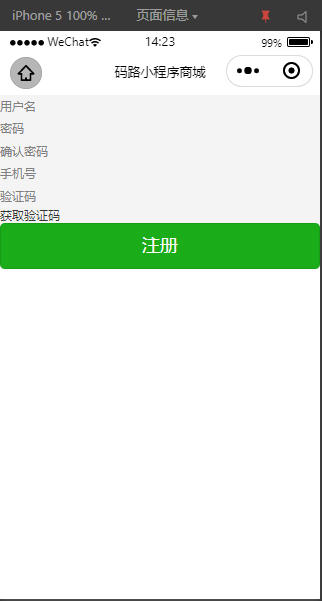
书写对应的样式,如下:
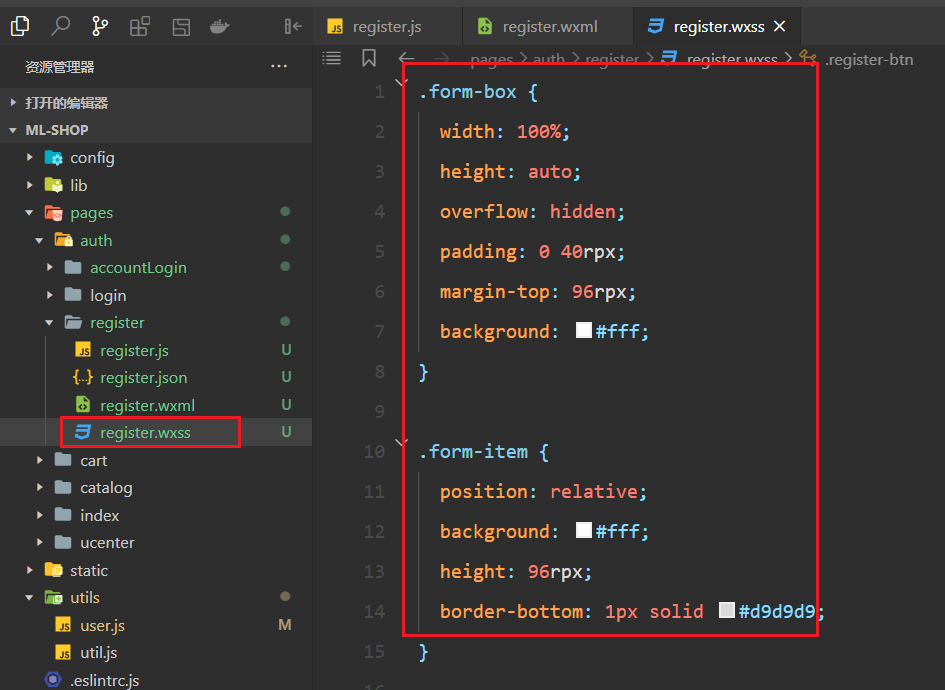
参考代码如下:
.form-box {
    width: 100%;
    height: auto;
    overflow: hidden;
    padding: 0 40rpx;
    margin-top: 96rpx;
    background: #fff;
}

.form-item {
    position: relative;
    background: #fff;
    height: 96rpx;
    border-bottom: 1px solid #d9d9d9;
}

.form-item .username,
.form-item .password,
.form-item .mobile,
.form-item .code {
    position: absolute;
    top: 26rpx;
    left: 0;
    display: block;
    width: 100%;
    height: 44rpx;
    background: #fff;
    color: #333;
    font-size: 30rpx;
}

.form-item-code {
    margin-top: 32rpx;
    height: auto;
    overflow: hidden;
    width: 100%;
}

.form-item-code .form-item {
    float: left;
    width: 350rpx;
}

.form-item-code .code-btn {
    float: right;
    padding: 20rpx 40rpx;
    border: 1px solid #d9d9d9;
    border-radius: 10rpx;
    color: #fff;
    background: green;
}

.form-item .clear {
    position: absolute;
    top: 26rpx;
    right: 18rpx;
    z-index: 2;
    display: block;
    background: #fff;
    height: 44rpx;
    width: 44rpx;
}

.register-btn {
    margin: 60rpx 0 40rpx 0;
    height: 96rpx;
    line-height: 96rpx;
    color: #fff;
    font-size: 30rpx;
    width: 100%;
    border-radius: 6rpx;
}
2
3
4
5
6
7
8
9
10
11
12
13
14
15
16
17
18
19
20
21
22
23
24
25
26
27
28
29
30
31
32
33
34
35
36
37
38
39
40
41
42
43
44
45
46
47
48
49
50
51
52
53
54
55
56
57
58
59
60
61
62
63
64
65
66
67
68
69
70
71
72
json配置如下:
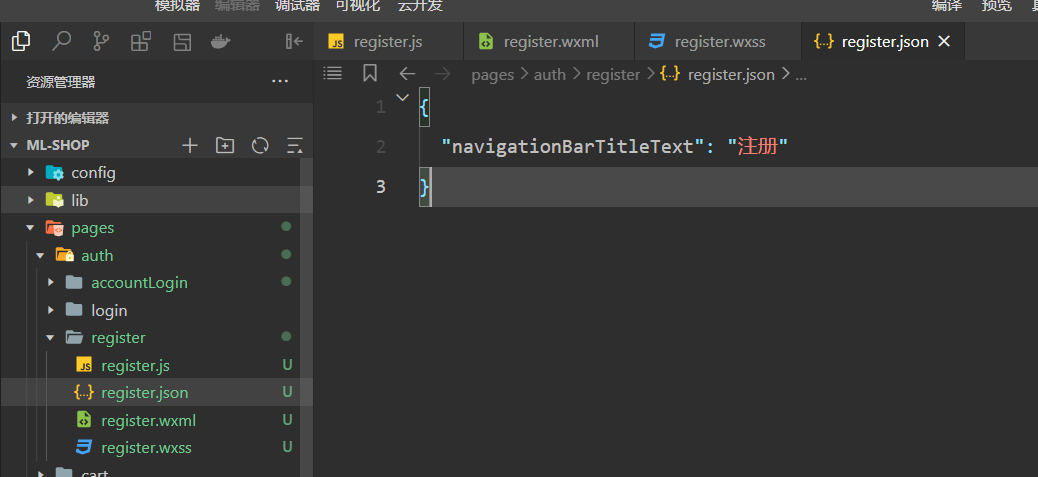
效果如下:
当用户在输入框中输入数据时,需要给状态赋值,如下:
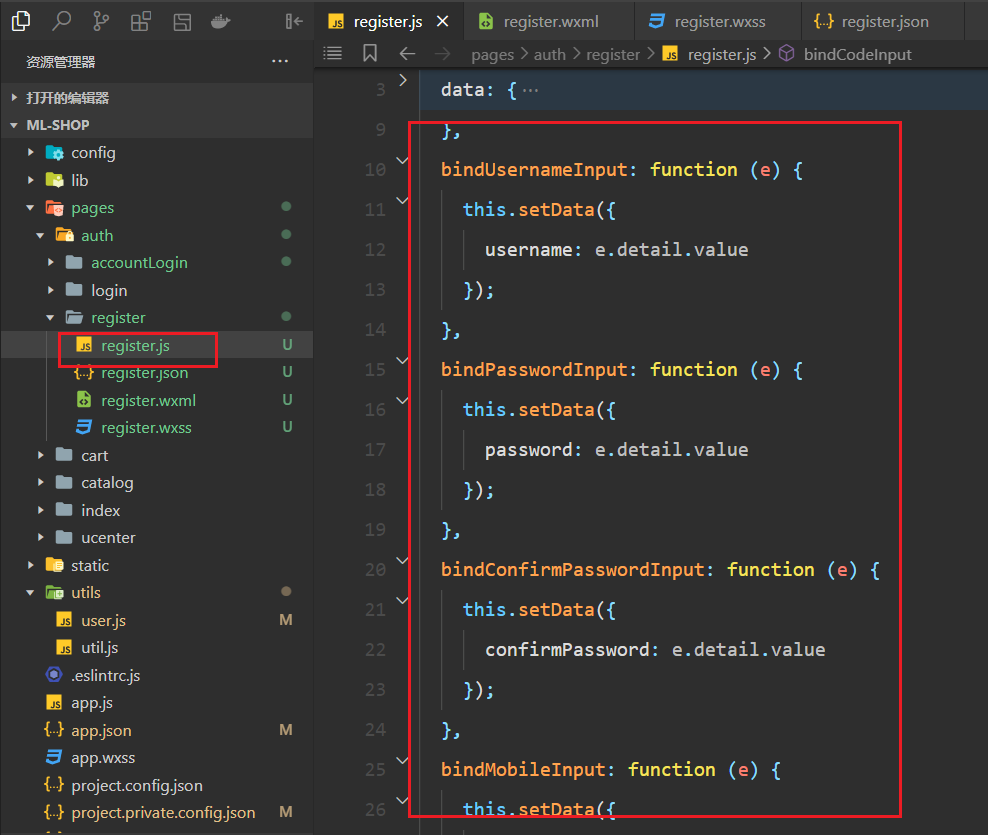
参考代码如下:
bindUsernameInput: function(e) {
        this.setData({
            username: e.detail.value
        });
    },
    bindPasswordInput: function(e) {
        this.setData({
            password: e.detail.value
        });
    },
    bindConfirmPasswordInput: function(e) {
        this.setData({
            confirmPassword: e.detail.value
        });
    },
    bindMobileInput: function(e) {
        this.setData({
            mobile: e.detail.value
        });
    },
    bindCodeInput: function(e) {
        this.setData({
            code: e.detail.value
        });
    },
2
3
4
5
6
7
8
9
10
11
12
13
14
15
16
17
18
19
20
21
22
23
24
25
测试是否可以收集到用户填写的数据,如下:
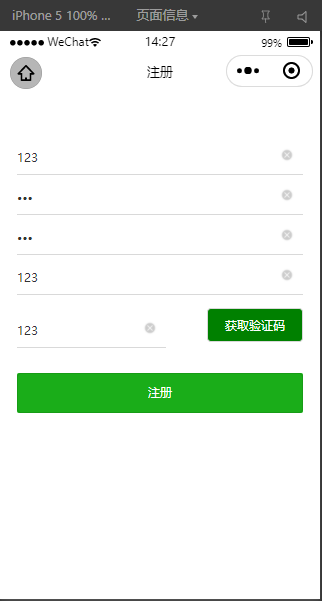
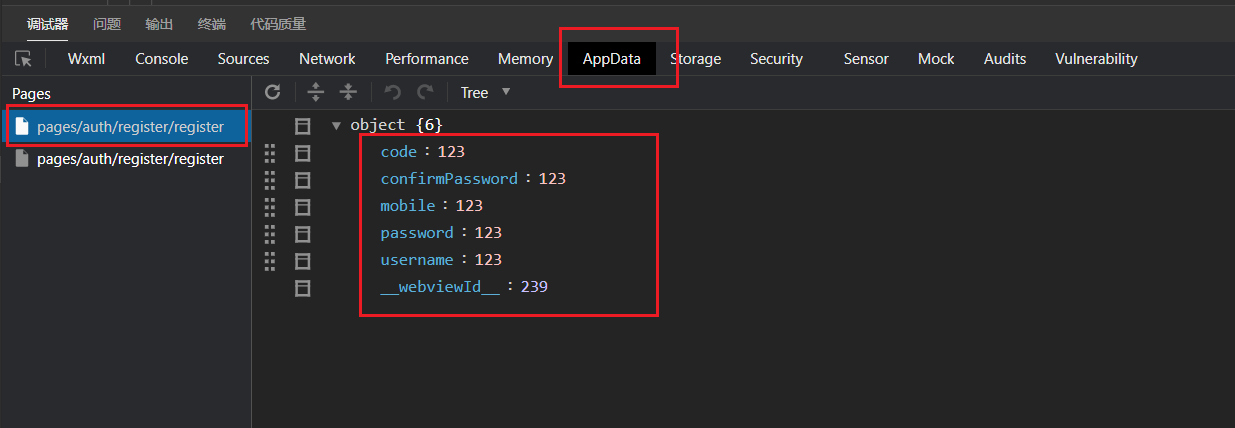
到此,数据收集OK。
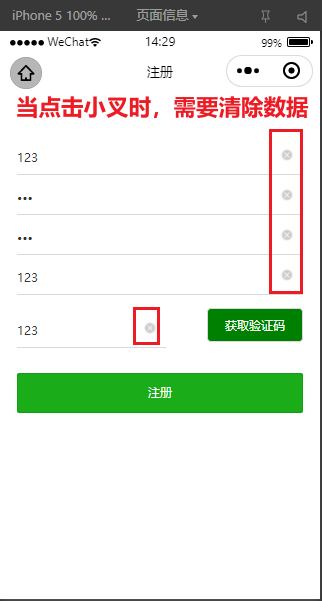
当点击小叉时,需要清除数据,如下:
对应的方法如下:
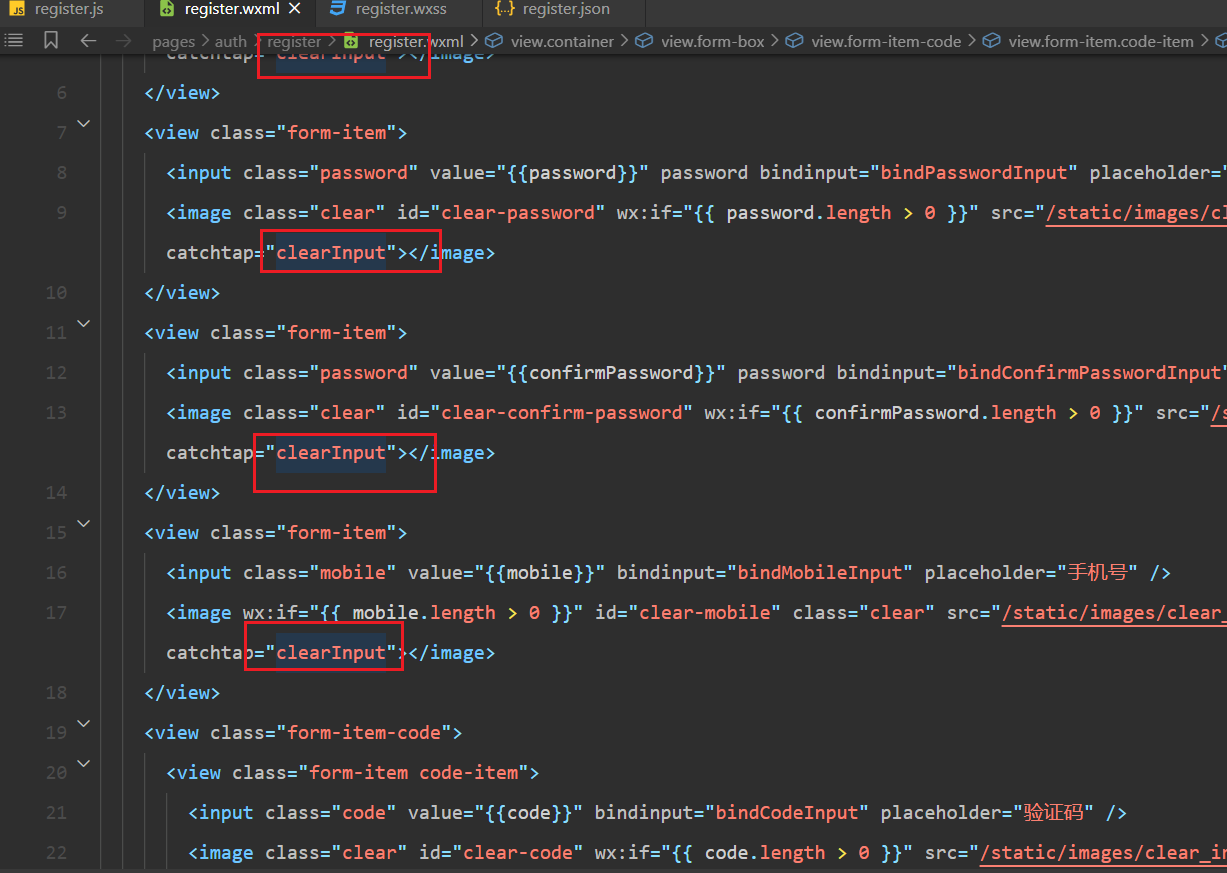
实现对应的方法,如下:
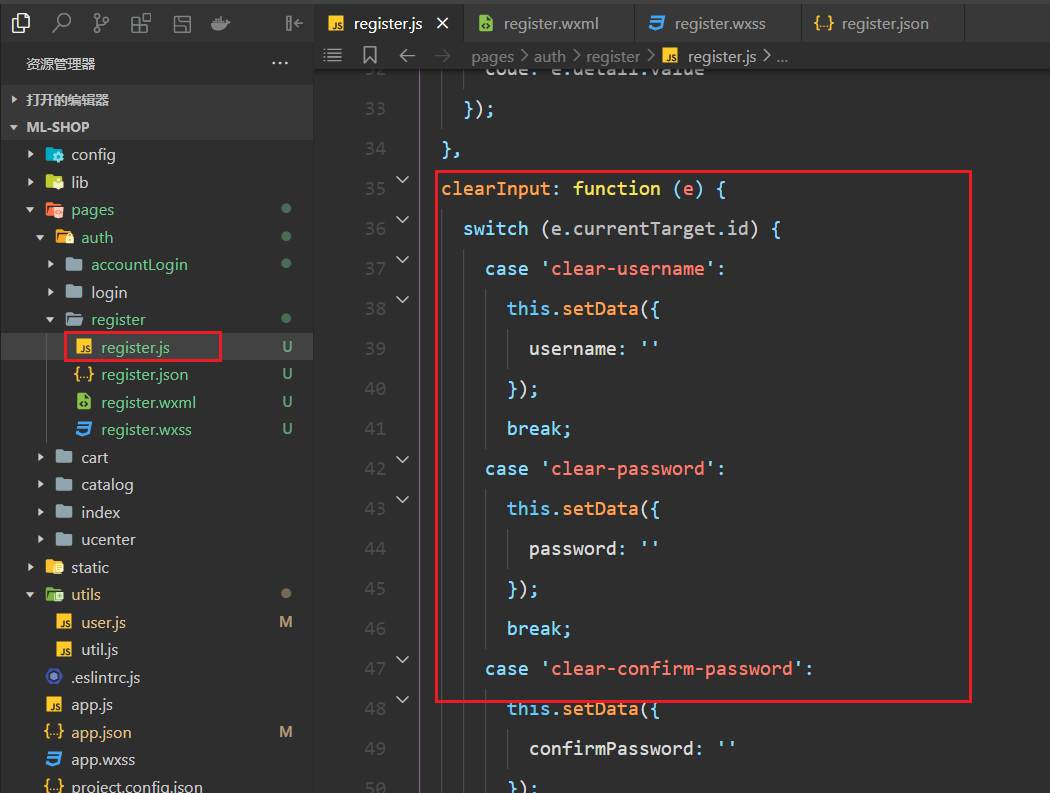
参考代码如下:
clearInput: function(e) {
    switch (e.currentTarget.id) {
        case 'clear-username':
            this.setData({
                username: ''
            });
            break;
        case 'clear-password':
            this.setData({
                password: ''
            });
            break;
        case 'clear-confirm-password':
            this.setData({
                confirmPassword: ''
            });
            break;
        case 'clear-mobile':
            this.setData({
                mobile: ''
            });
            break;
        case 'clear-code':
            this.setData({
                code: ''
            });
            break;
    }
},
2
3
4
5
6
7
8
9
10
11
12
13
14
15
16
17
18
19
20
21
22
23
24
25
26
27
28
29
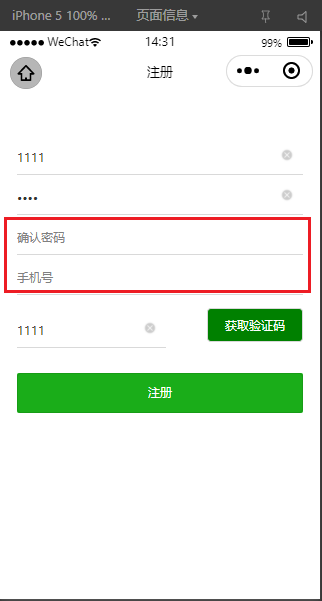
测试之如下:
验证码接口由于没有购买对应的服务器,此功能并不需要我们实现。
# 7,实现注册
先封装一个校验手机号的正则,如下:
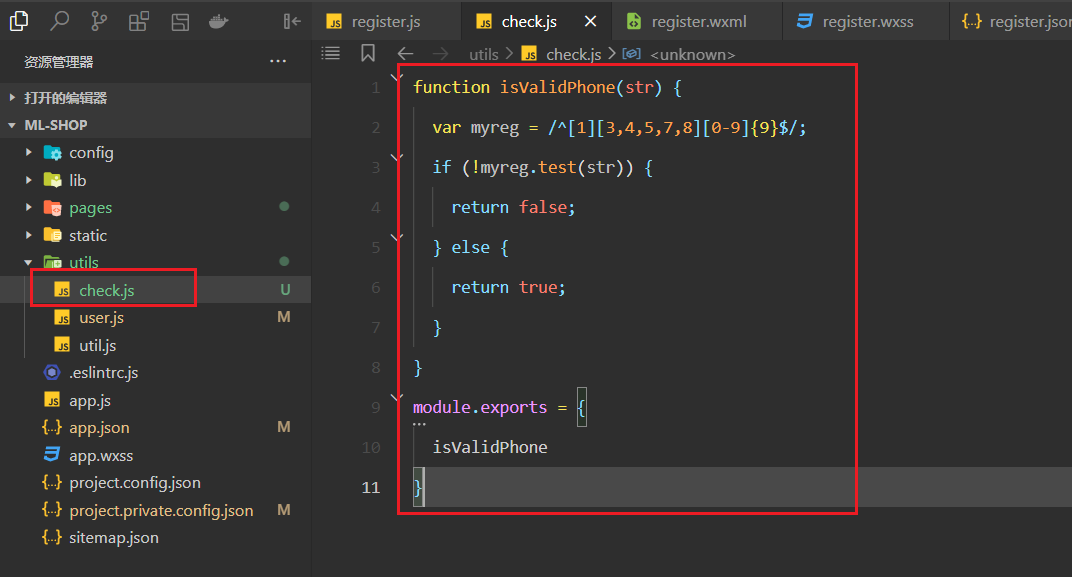
当点击注册时调用如下方法,如下:

实现startRegister方法,在真正注册之前,先校验数据的合法性,如下:

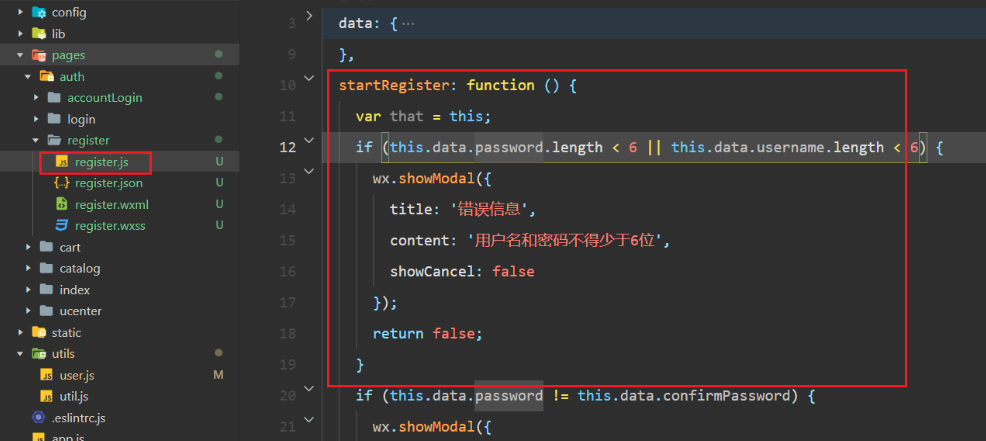
参考代码如下:
 startRegister: function() {
     var that = this;
     if (this.data.password.length < 6 || this.data.username.length < 6) {
         wx.showModal({
             title: '错误信息',
             content: '用户名和密码不得少于6位',
             showCancel: false
         });
         return false;
     }
     if (this.data.password != this.data.confirmPassword) {
         wx.showModal({
             title: '错误信息',
             content: '确认密码不一致',
             showCancel: false
         });
         return false;
     }
     if (this.data.mobile.length == 0 || this.data.code.length == 0) {
         wx.showModal({
             title: '错误信息',
             content: '手机号和验证码不能为空',
             showCancel: false
         });
         return false;
     }
     if (!check.isValidPhone(this.data.mobile)) {
         wx.showModal({
             title: '错误信息',
             content: '手机号输入不正确',
             showCancel: false
         });
         return false;
     }
 },
2
3
4
5
6
7
8
9
10
11
12
13
14
15
16
17
18
19
20
21
22
23
24
25
26
27
28
29
30
31
32
33
34
35
如果校验通过,就需要实现注册了,注册也是小程序真正的注册,需要调用wx.login,如下:
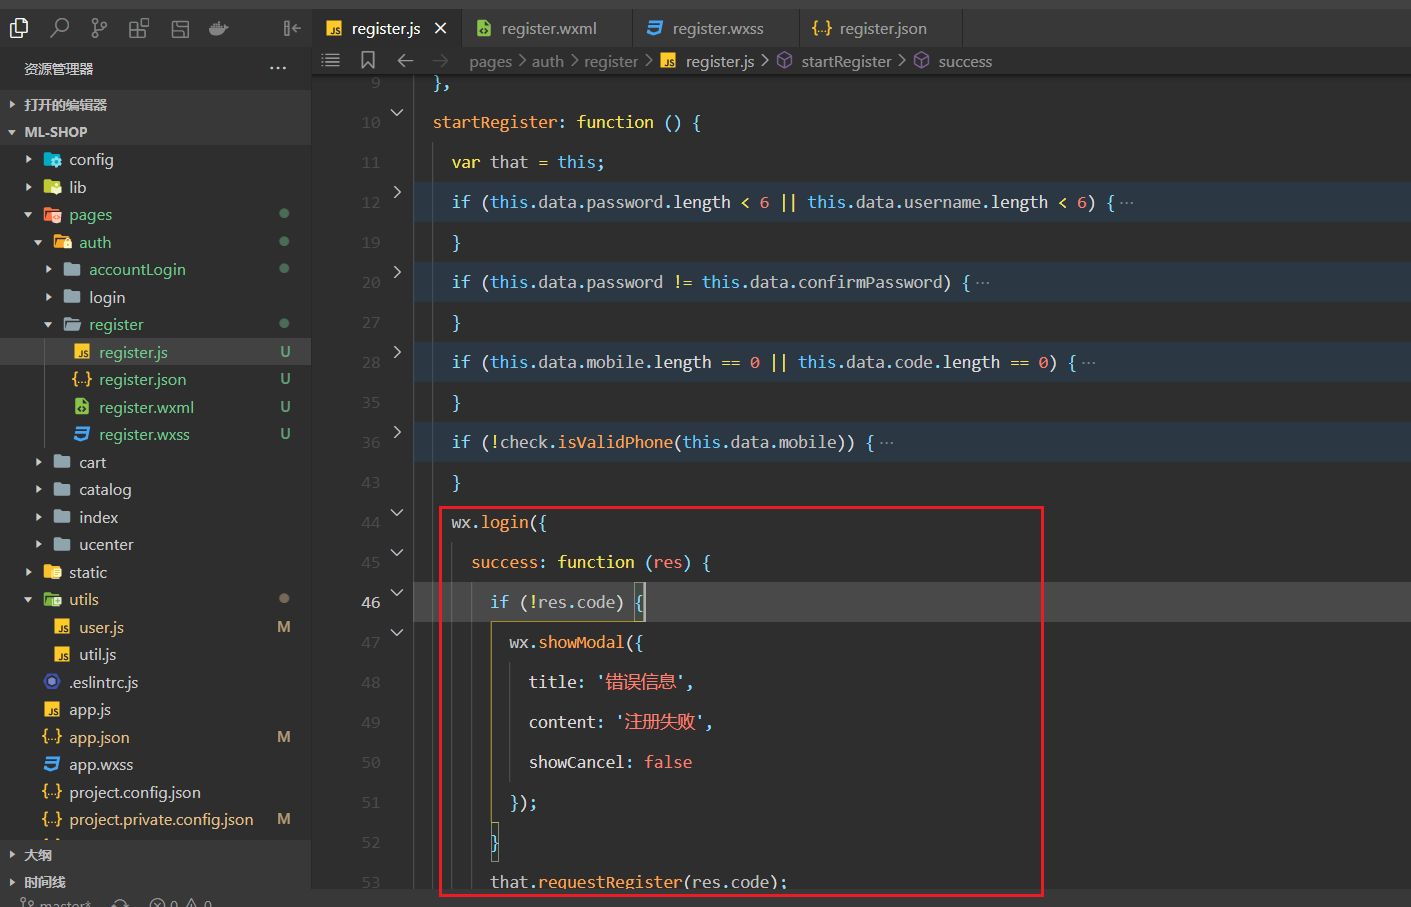
实现requestRegister方法,如下:
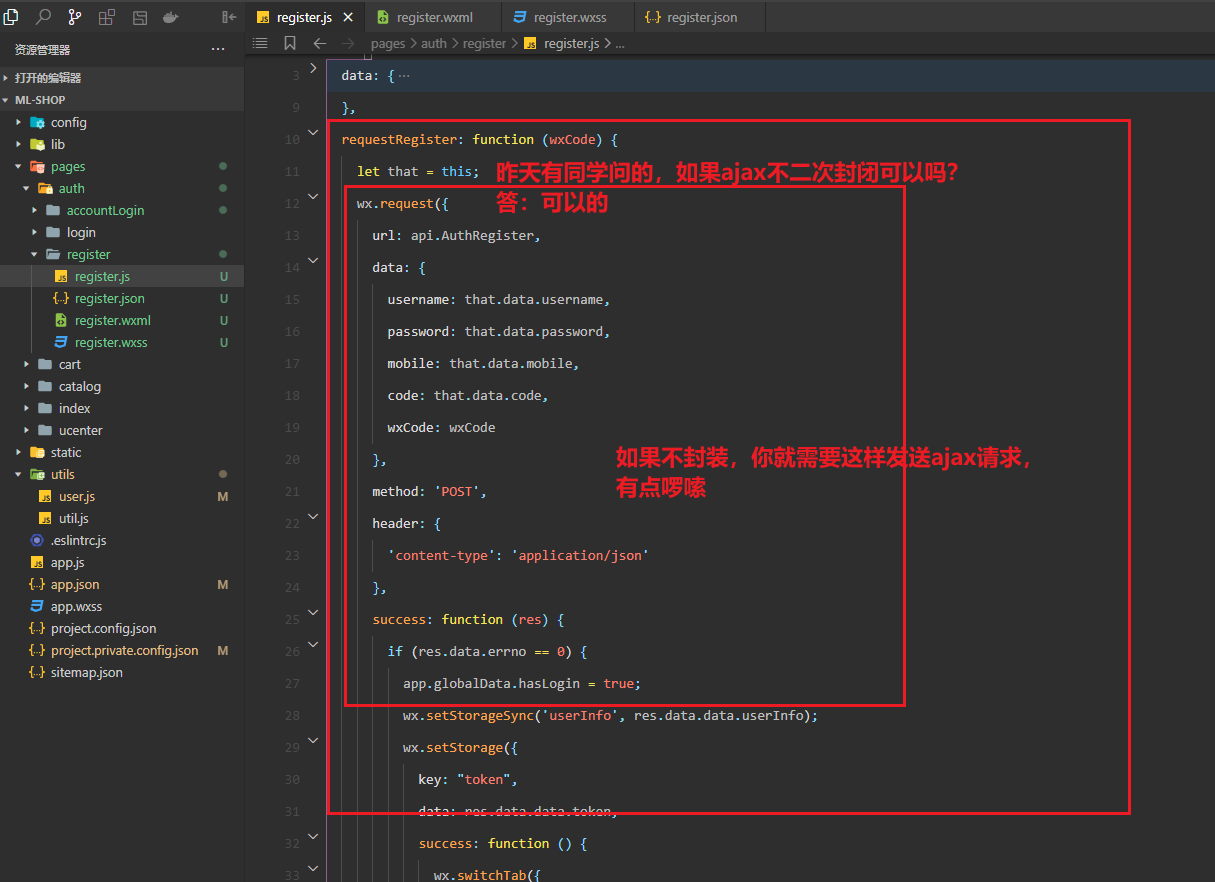
完整代码如下:
var api = require('../../../config/api.js');
var check = require('../../../utils/check.js');
var app = getApp();
Page({
    data: {
        username: '',
        password: '',
        confirmPassword: '',
        mobile: '',
        code: ''
    },
    requestRegister: function(wxCode) {
        let that = this;
        wx.request({
            url: api.AuthRegister,
            data: {
                username: that.data.username,
                password: that.data.password,
                mobile: that.data.mobile,
                code: that.data.code,
                wxCode: wxCode
            },
            method: 'POST',
            header: {
                'content-type': 'application/json'
            },
            success: function(res) {
                if (res.data.errno == 0) {
                    app.globalData.hasLogin = true;
                    wx.setStorageSync('userInfo', res.data.data.userInfo);
                    wx.setStorage({
                        key: "token",
                        data: res.data.data.token,
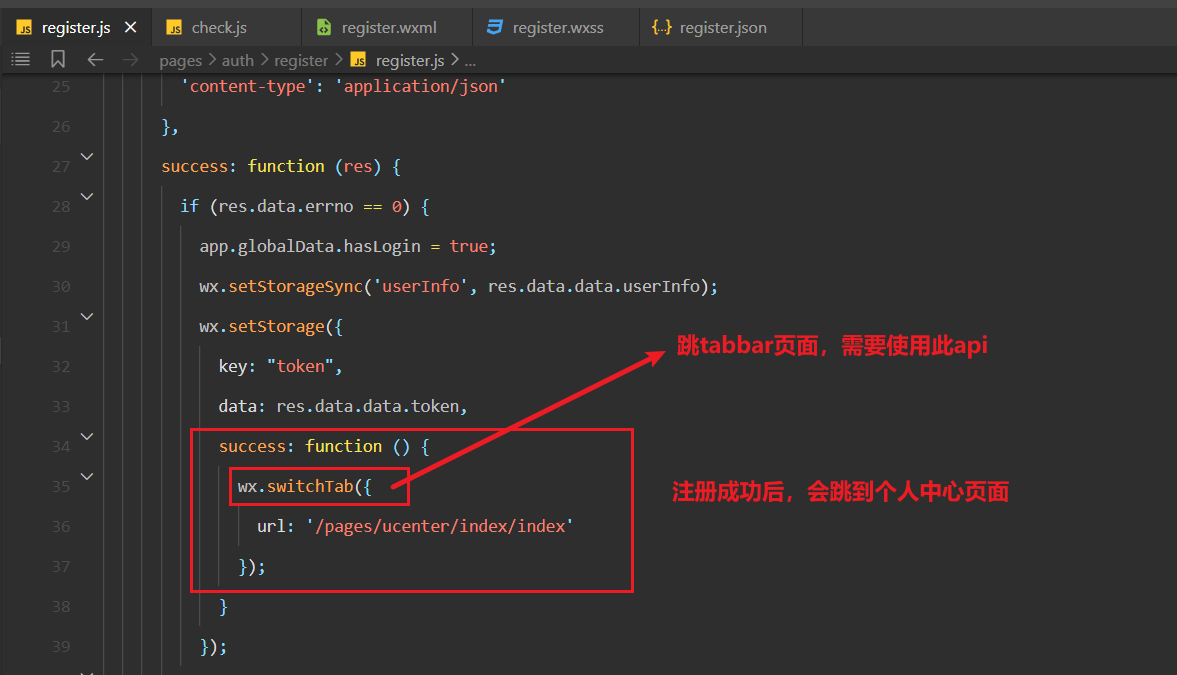
                        success: function() {
                            wx.switchTab({
                                url: '/pages/ucenter/index/index'
                            });
                        }
                    });
                } else {
                    wx.showModal({
                        title: '错误信息',
                        content: res.data.errmsg,
                        showCancel: false
                    });
                }
            }
        });
    },
    startRegister: function() {
        var that = this;
        if (this.data.password.length < 6 || this.data.username.length < 6) {
            wx.showModal({
                title: '错误信息',
                content: '用户名和密码不得少于6位',
                showCancel: false
            });
            return false;
        }
        if (this.data.password != this.data.confirmPassword) {
            wx.showModal({
                title: '错误信息',
                content: '确认密码不一致',
                showCancel: false
            });
            return false;
        }
        if (this.data.mobile.length == 0 || this.data.code.length == 0) {
            wx.showModal({
                title: '错误信息',
                content: '手机号和验证码不能为空',
                showCancel: false
            });
            return false;
        }
        if (!check.isValidPhone(this.data.mobile)) {
            wx.showModal({
                title: '错误信息',
                content: '手机号输入不正确',
                showCancel: false
            });
            return false;
        }
        wx.login({
            success: function(res) {
                if (!res.code) {
                    wx.showModal({
                        title: '错误信息',
                        content: '注册失败',
                        showCancel: false
                    });
                }
                that.requestRegister(res.code);
            }
        });
    },

    bindUsernameInput: function(e) {
        this.setData({
            username: e.detail.value
        });
    },
    bindPasswordInput: function(e) {
        this.setData({
            password: e.detail.value
        });
    },
    bindConfirmPasswordInput: function(e) {
        this.setData({
            confirmPassword: e.detail.value
        });
    },
    bindMobileInput: function(e) {
        this.setData({
            mobile: e.detail.value
        });
    },
    bindCodeInput: function(e) {
        this.setData({
            code: e.detail.value
        });
    },
    clearInput: function(e) {
        switch (e.currentTarget.id) {
            case 'clear-username':
                this.setData({
                    username: ''
                });
                break;
            case 'clear-password':
                this.setData({
                    password: ''
                });
                break;
            case 'clear-confirm-password':
                this.setData({
                    confirmPassword: ''
                });
                break;
            case 'clear-mobile':
                this.setData({
                    mobile: ''
                });
                break;
            case 'clear-code':
                this.setData({
                    code: ''
                });
                break;
        }
    }
})
2
3
4
5
6
7
8
9
10
11
12
13
14
15
16
17
18
19
20
21
22
23
24
25
26
27
28
29
30
31
32
33
34
35
36
37
38
39
40
41
42
43
44
45
46
47
48
49
50
51
52
53
54
55
56
57
58
59
60
61
62
63
64
65
66
67
68
69
70
71
72
73
74
75
76
77
78
79
80
81
82
83
84
85
86
87
88
89
90
91
92
93
94
95
96
97
98
99
100
101
102
103
104
105
106
107
108
109
110
111
112
113
114
115
116
117
118
119
120
121
122
123
124
125
126
127
128
129
130
131
132
133
134
135
136
137
138
139
140
141
142
143
144
145
146
147
148
149
150
151
152
由于一个用户只能注册一次,也就是说注册接口只能调用一次,在调用注册接口之前,需要把数据库中数据删除掉,如下:
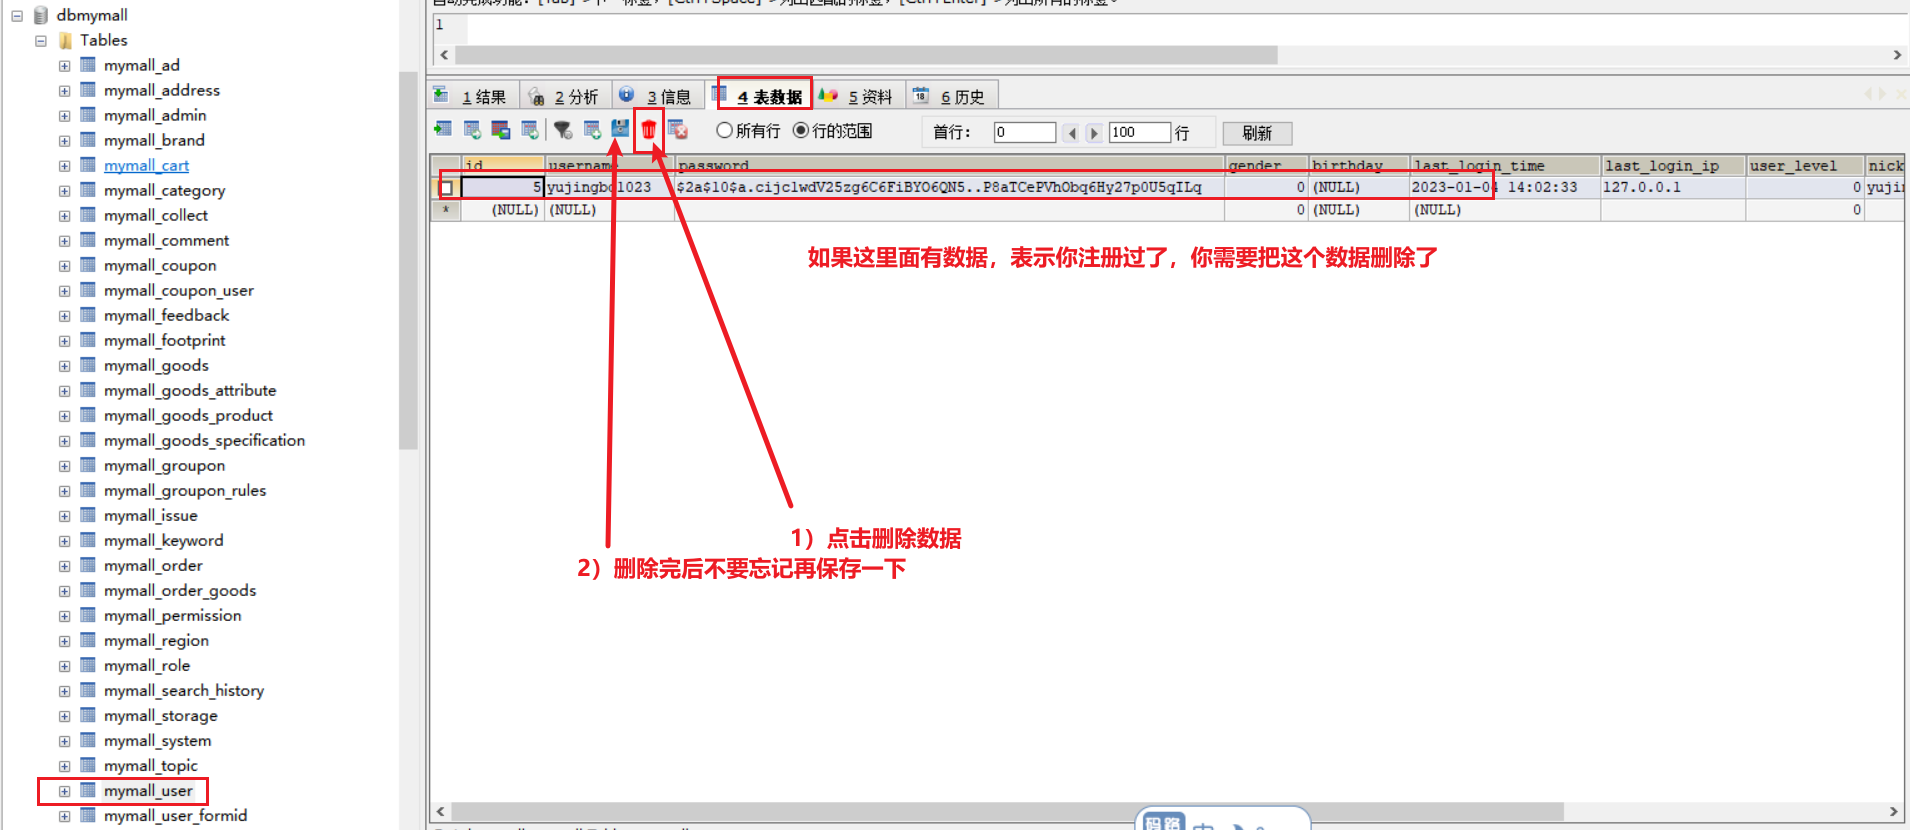
删除后是这样的,如下:

然后开始测试注册接口,如下:
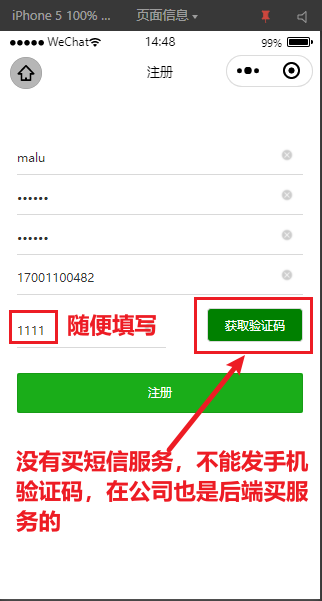
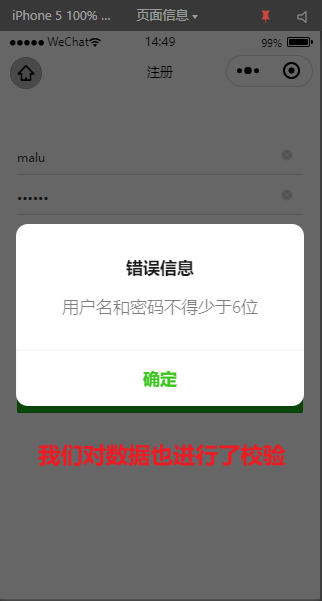
重新填写,如下:
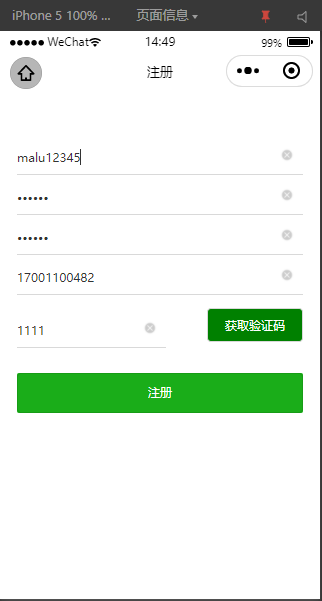

注册完后,看数据库中有没有数据,如下:
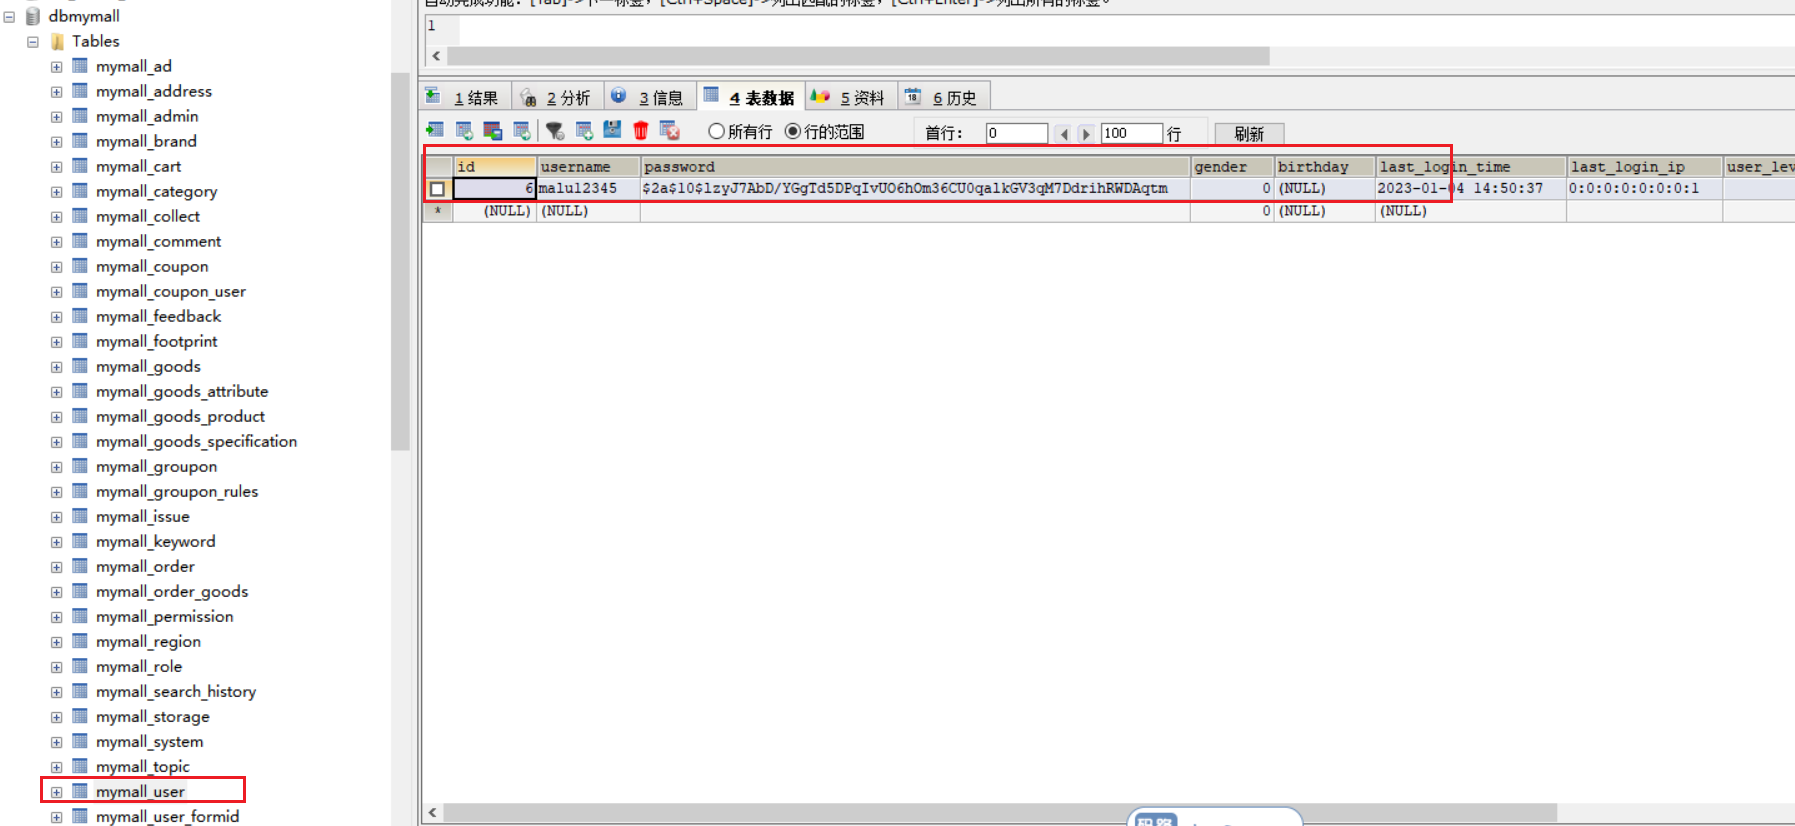
到此,注册就实现了。
# 8,实现账号登录前置工作
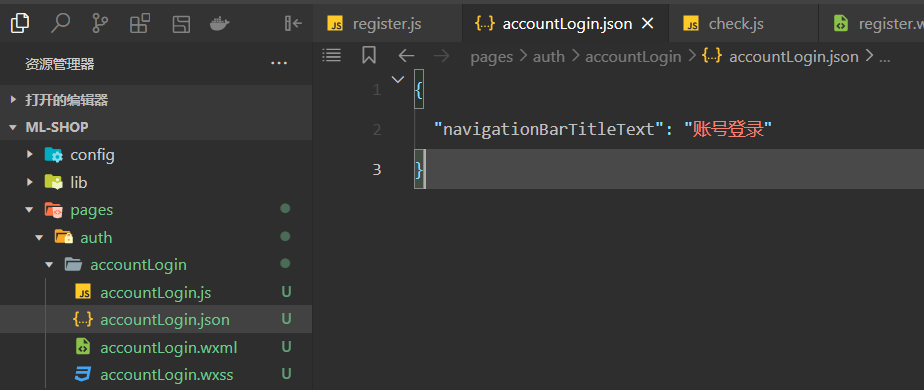
修改登录页面的json,如下:
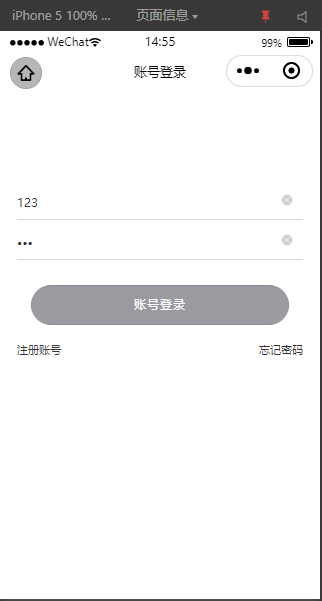
效果如下 :
引入相关模块,定义相关的状态如下:
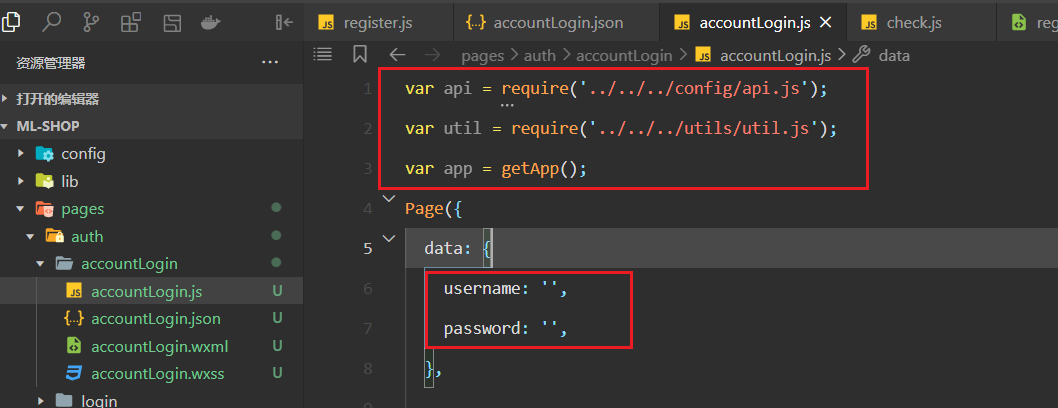
使用状态,如下:
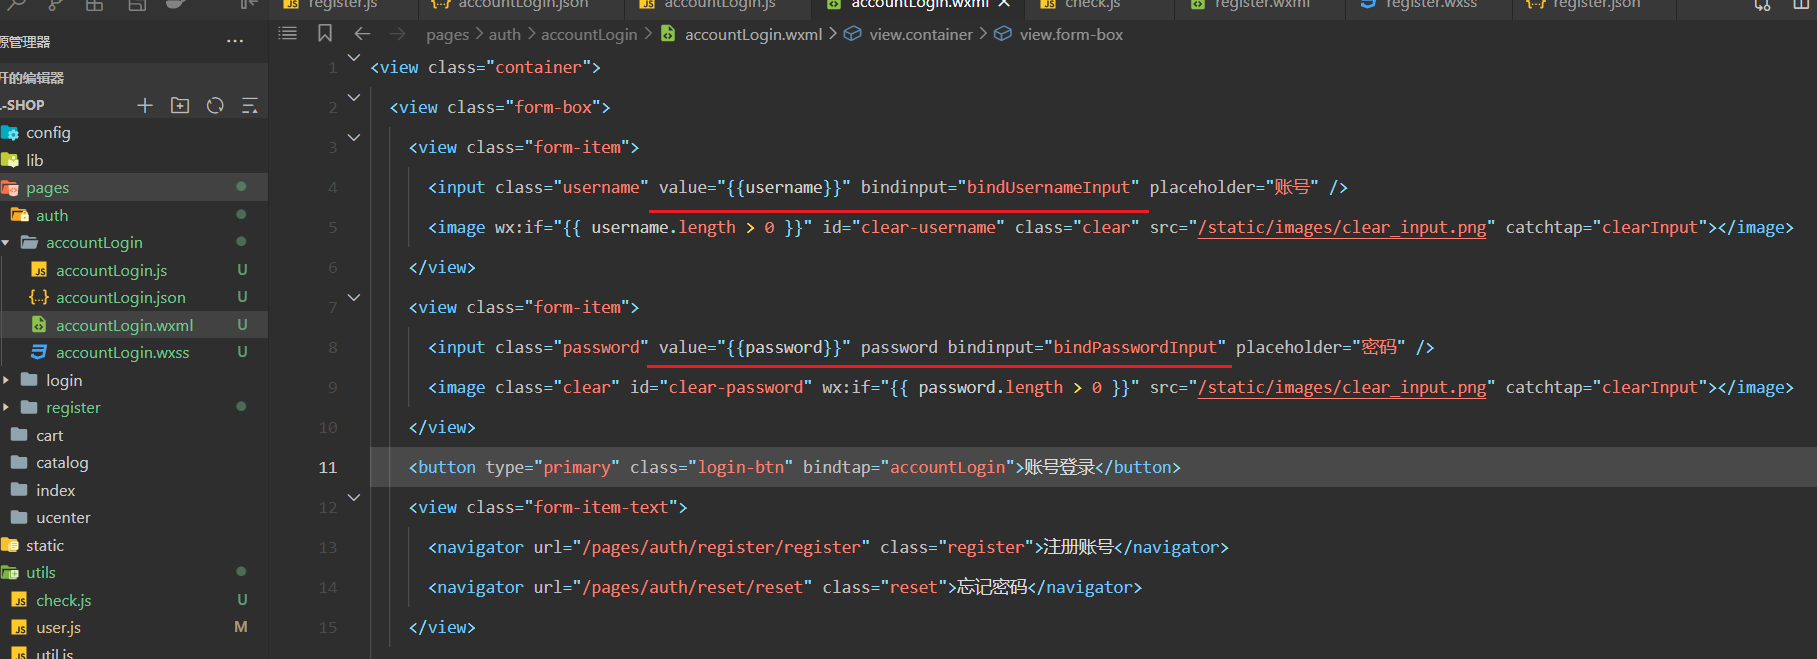
定义方法,收集数据,如下:
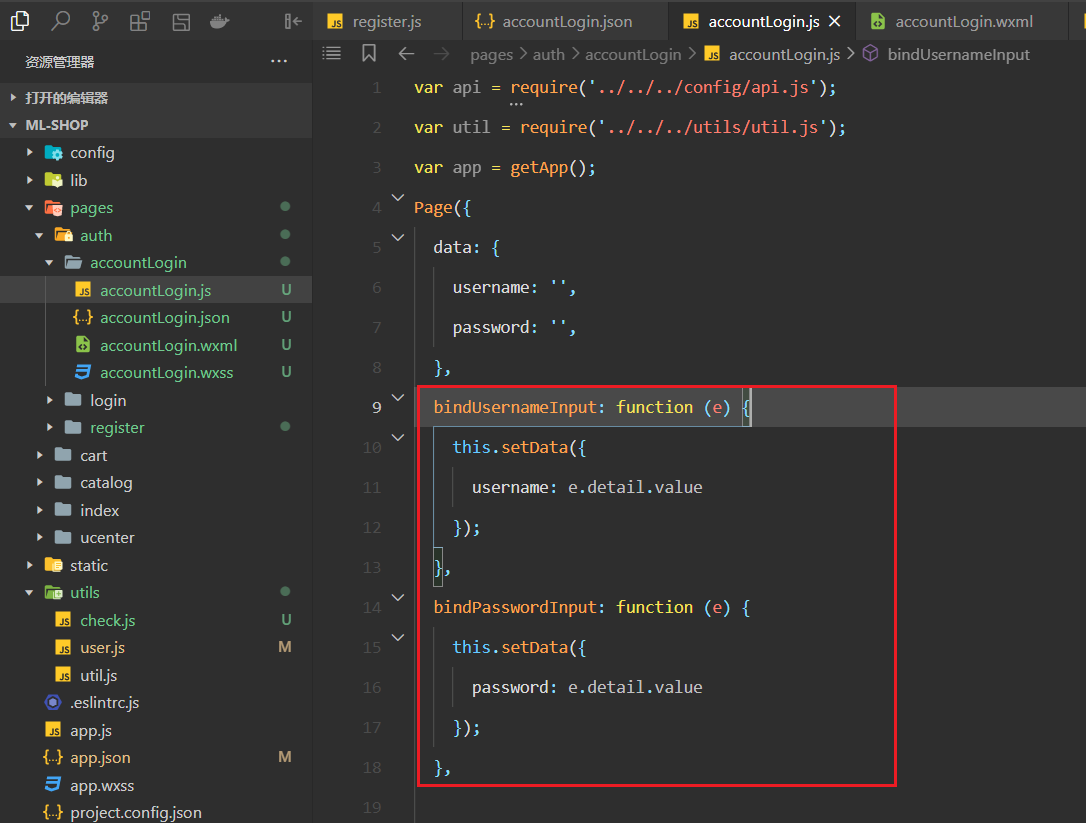
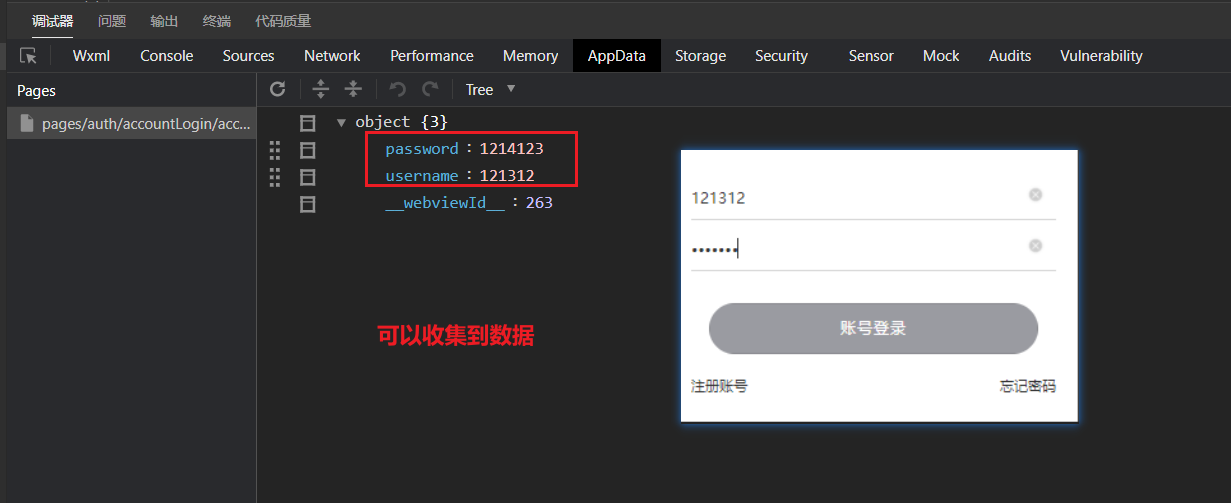
测试是否可以收集到数据,如下:
当点击小叉时,需要清空数据,如下:
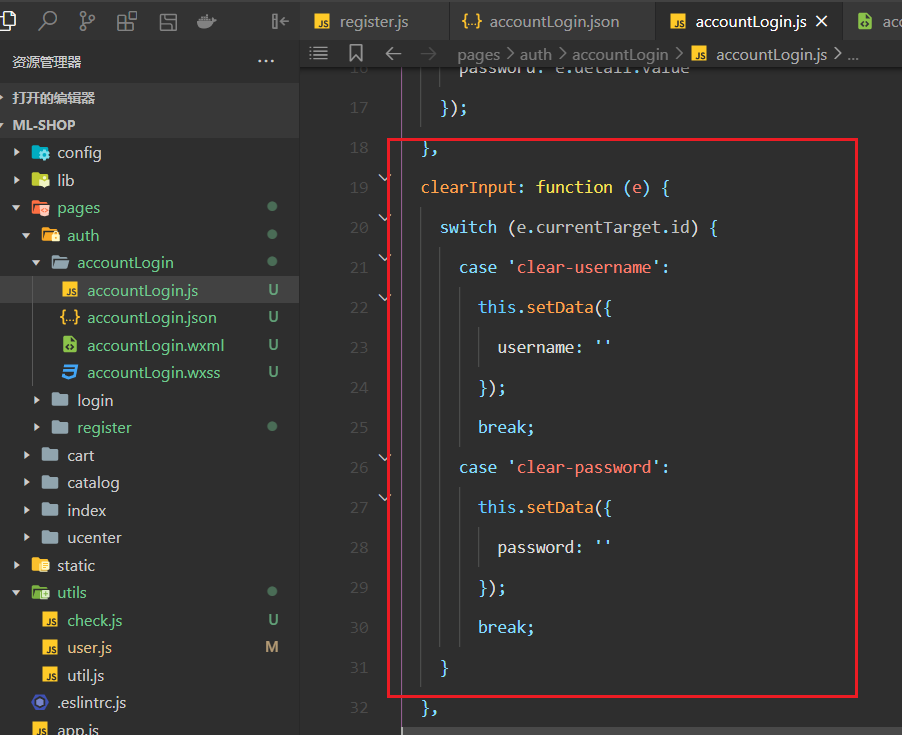
测试OK如下:
# 9,实现登录
当我们点击登录按钮时,调用如下方法:
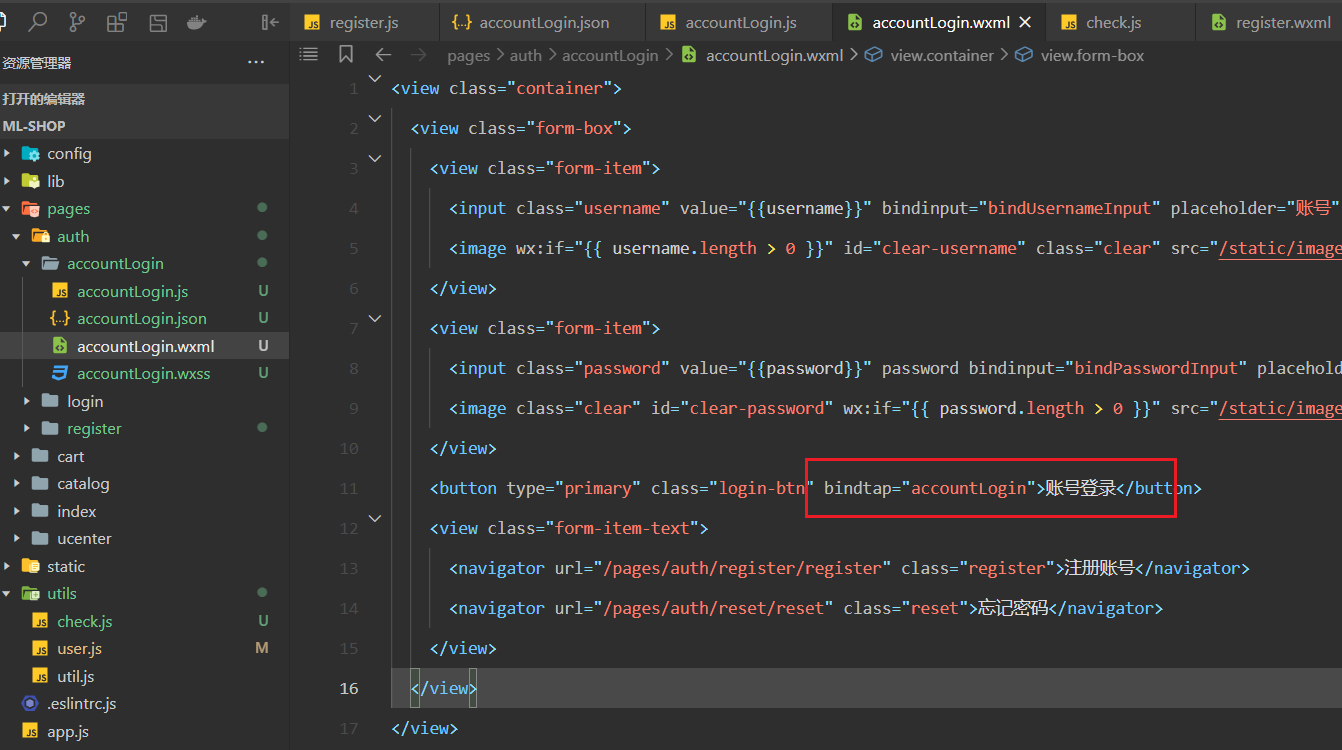
实现对应方法,如下:
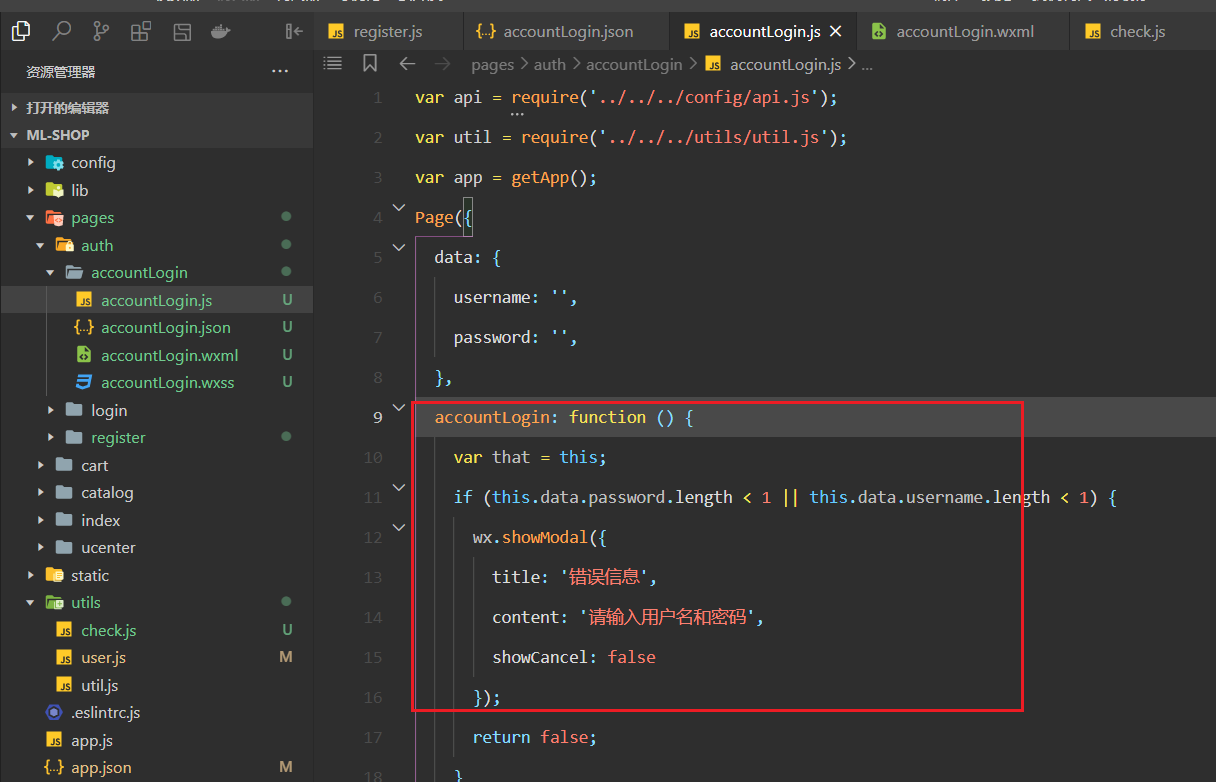
代码如下:
 accountLogin: function() {
     var that = this;
     if (this.data.password.length < 1 || this.data.username.length < 1) {
         wx.showModal({
             title: '错误信息',
             content: '请输入用户名和密码',
             showCancel: false
         });
         return false;
     }
     wx.request({
         url: api.AuthLoginByAccount,
         data: {
             username: that.data.username,
             password: that.data.password
         },
         method: 'POST',
         header: {
             'content-type': 'application/json'
         },
         success: function(res) {
             if (res.data.errno == 0) {
                 app.globalData.hasLogin = true;
                 wx.setStorageSync('userInfo', res.data.data.userInfo);
                 wx.setStorage({
                     key: "token",
                     data: res.data.data.token,
                     success: function() {
                         wx.switchTab({
                             url: '/pages/ucenter/index/index'
                         });
                     }
                 });
             } else {
                 app.globalData.hasLogin = false;
                 util.showErrorToast('账户登录失败');
             }
         }
     });
 },
2
3
4
5
6
7
8
9
10
11
12
13
14
15
16
17
18
19
20
21
22
23
24
25
26
27
28
29
30
31
32
33
34
35
36
37
38
39
40
测试如下(不要忘了你注册的用户名和密码):


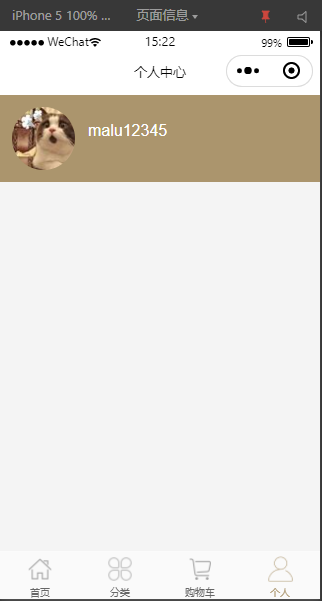
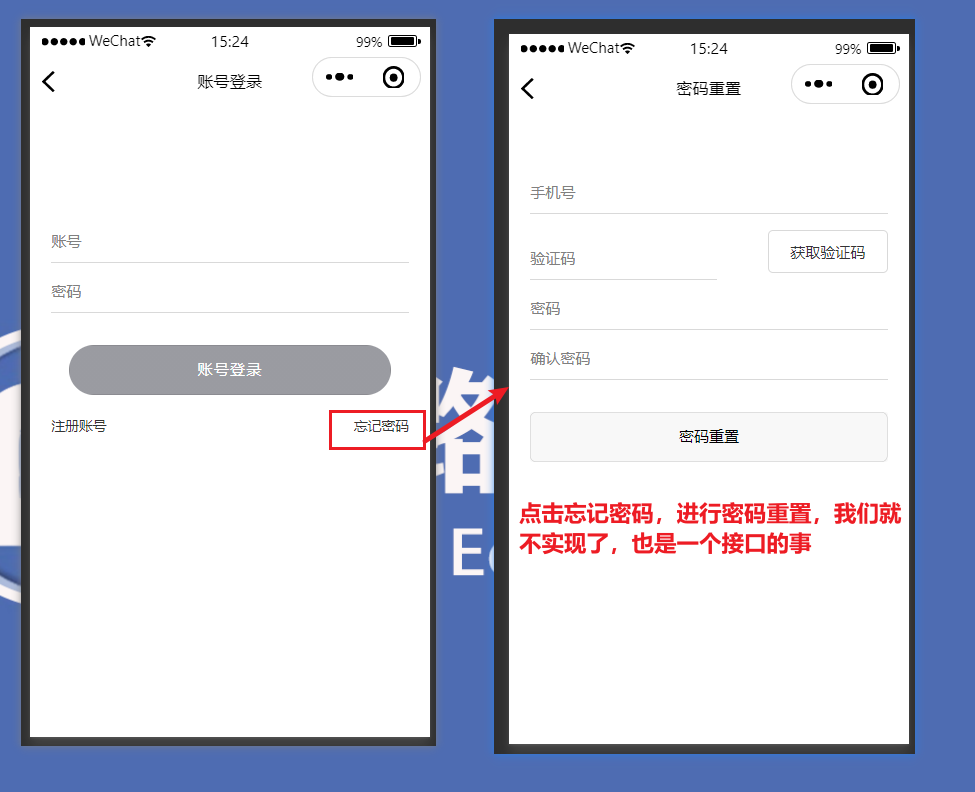
到此,使用账号实现登录就实现了。忘记密码,重置密码我们就不做了:
# 10,实现退出登录
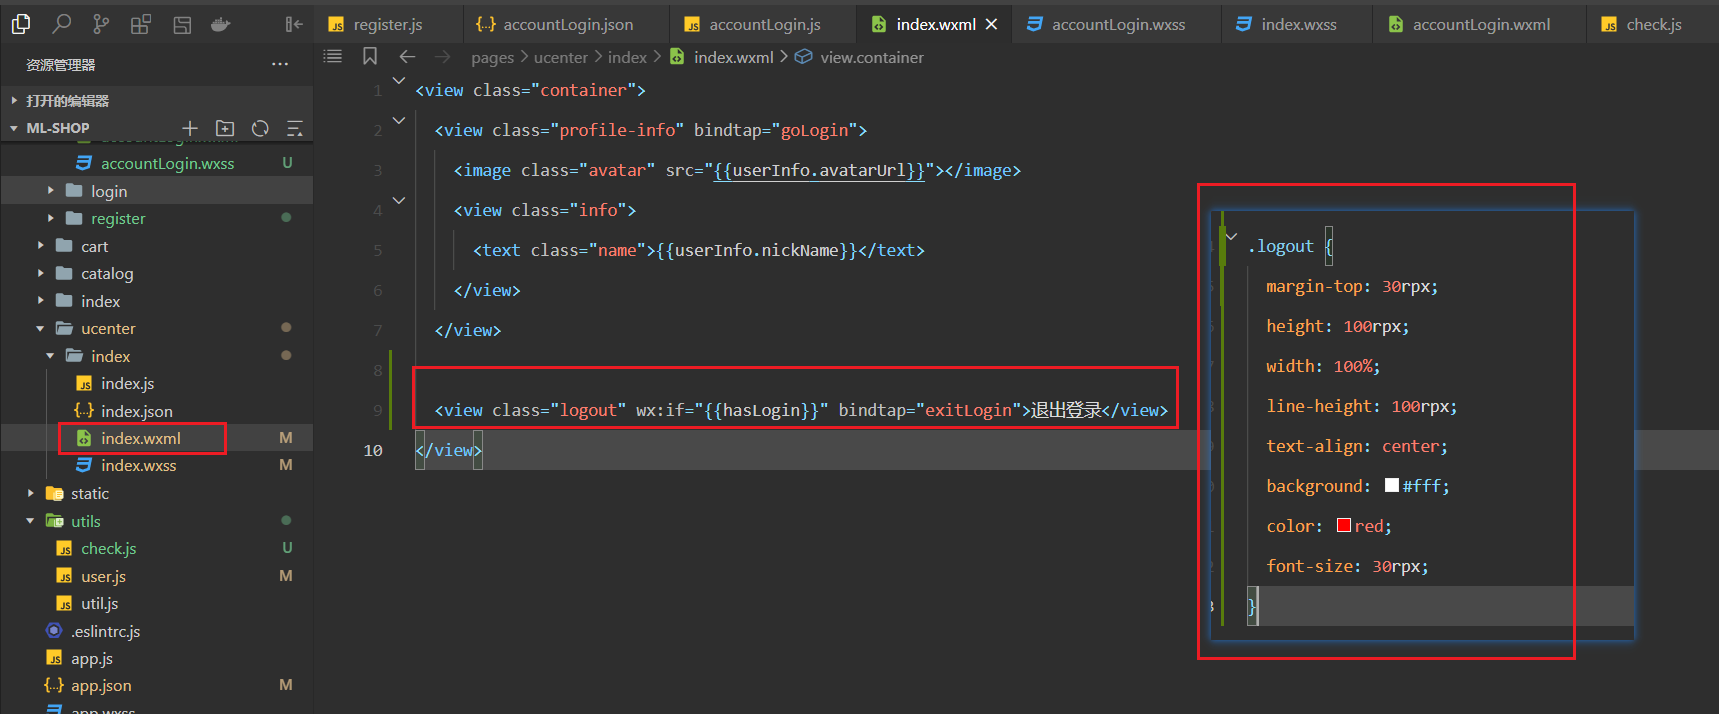
在个人中心页面中添加一个退出登录按钮,如下:
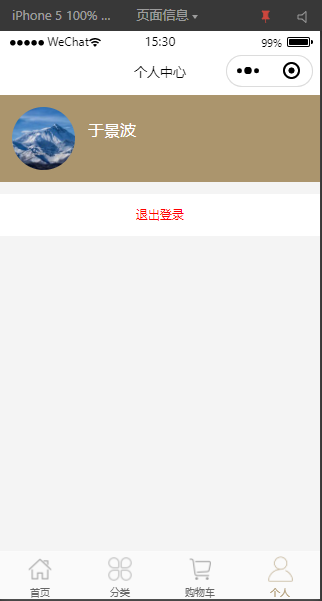
清除缓存,使用任意一种方式,登录成功后,看效果,如下:
现在有一个问题,当我们重新编译时,数据就丢失了,如下:
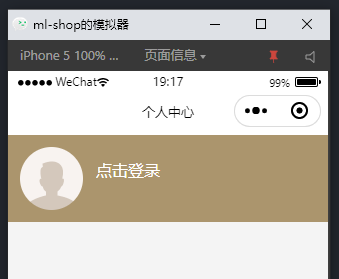
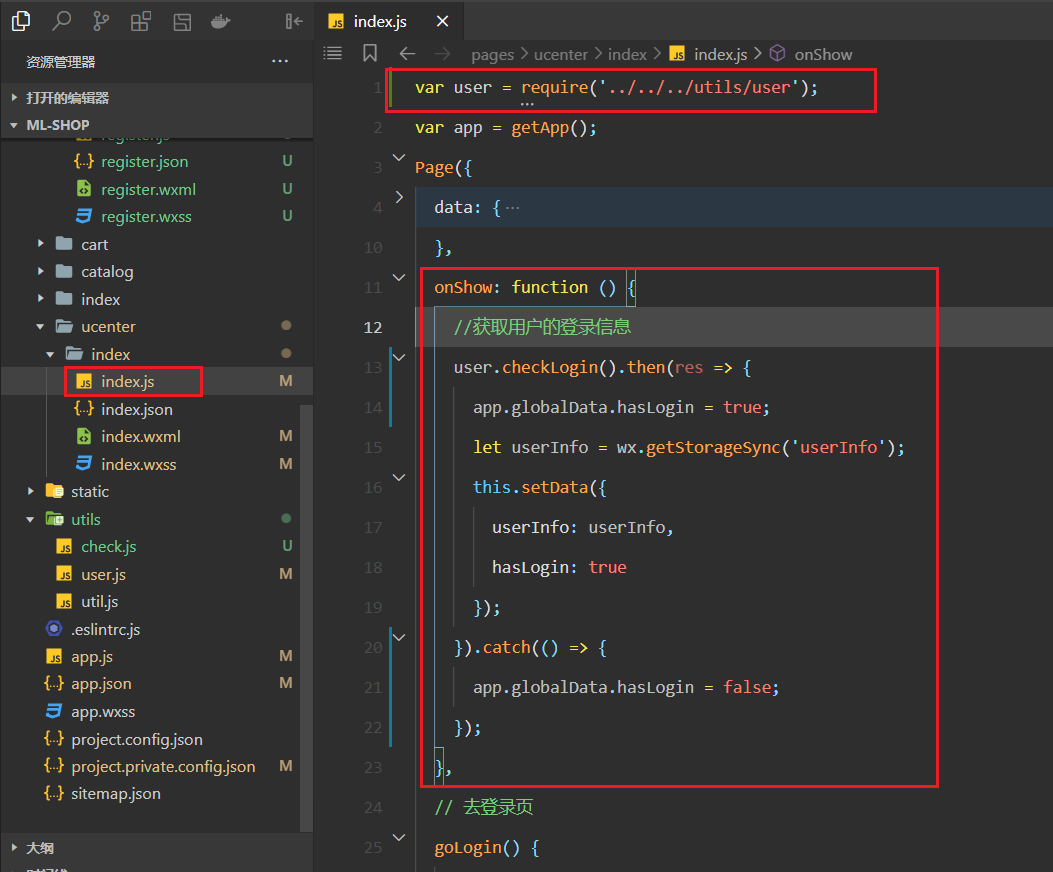
之所以会丢失,原因是当重新编译时,会重新加载整个小程序应用,我们需要在加载个人中心页面时,判断用户是否已登录,如果登录了,就需要从缓存中取出数据,设置数据,如下:
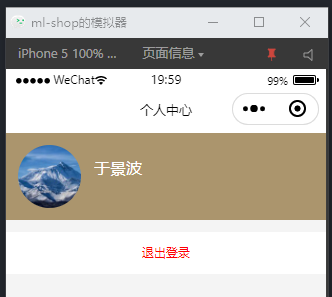
再次清理缓存,重新登录,登录完成后,再次进行编译,发现数据还在,如下:
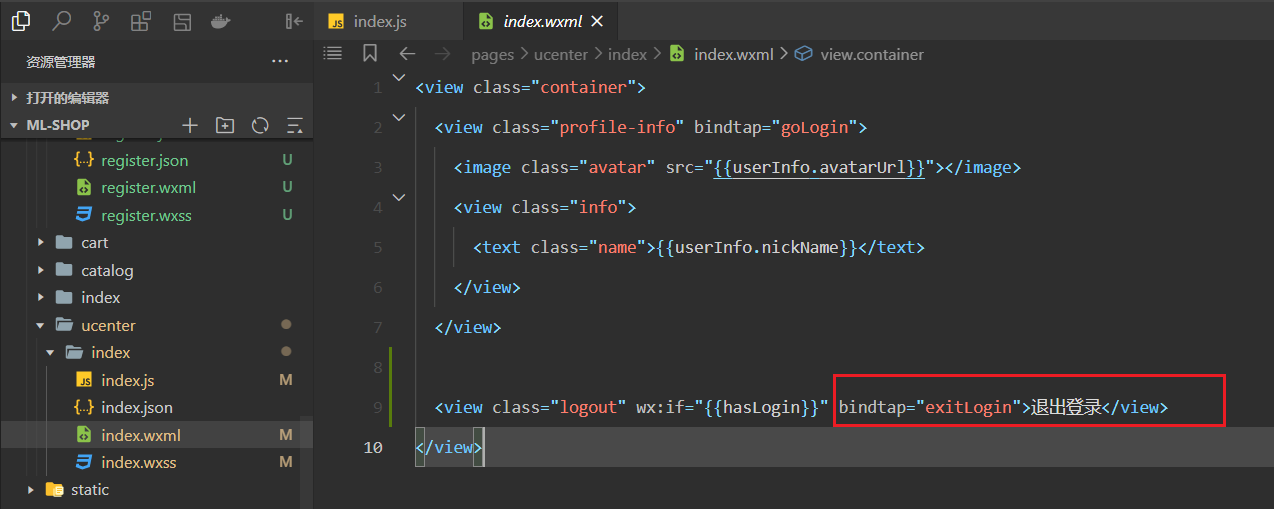
当点击退出登录时,就要实现退出登录了,绑定的事件如下:
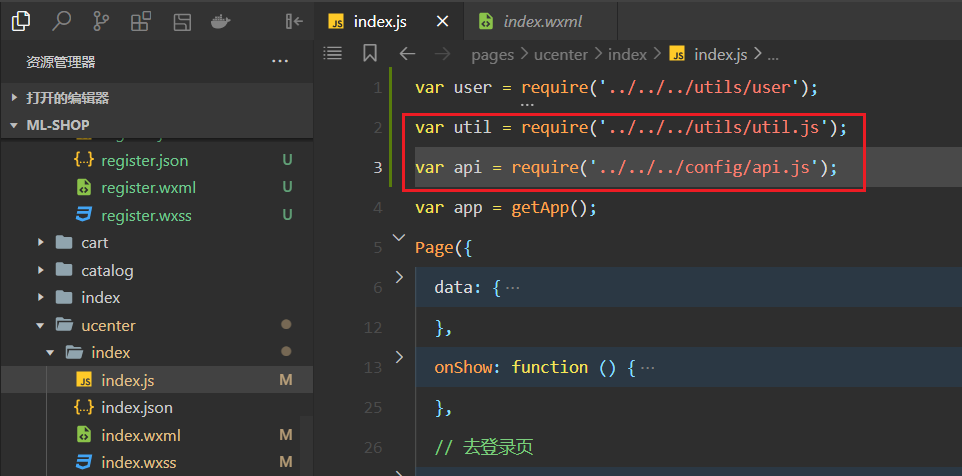
实现对应的方法,如下:
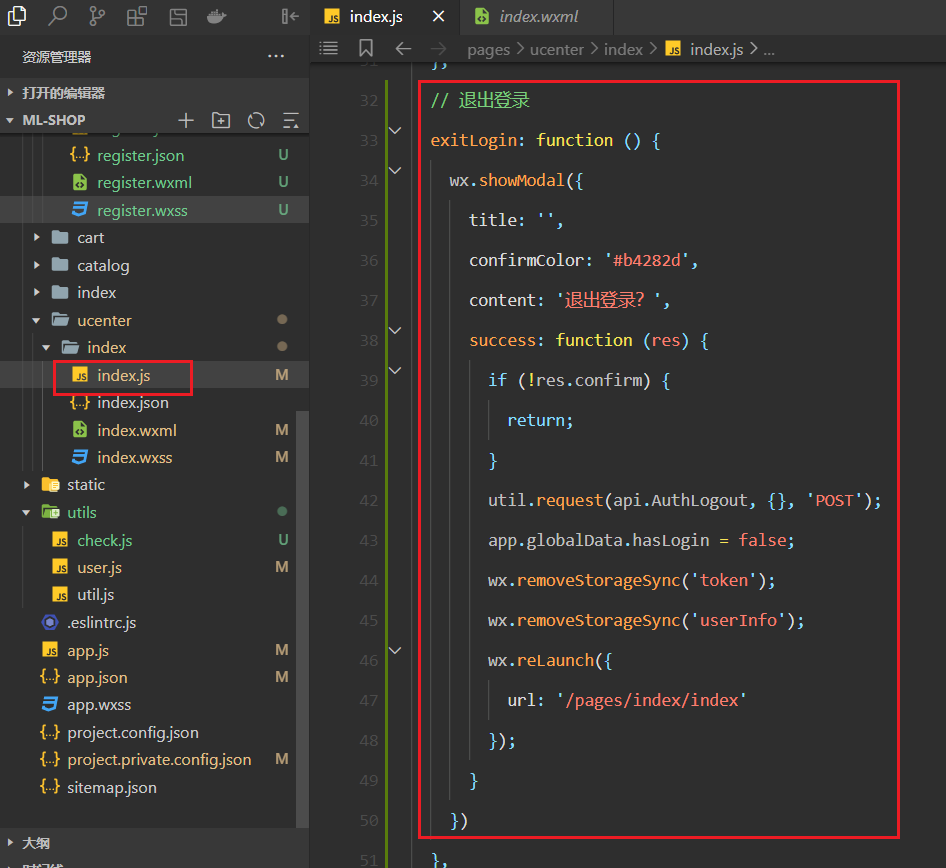
测试如下:
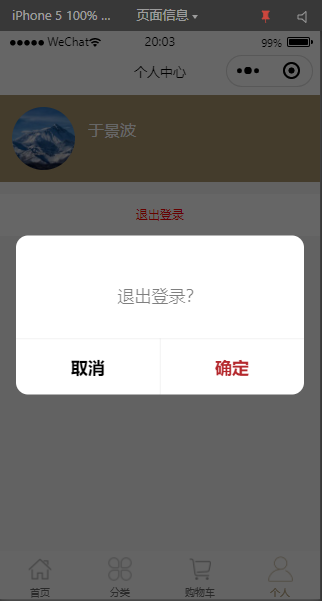
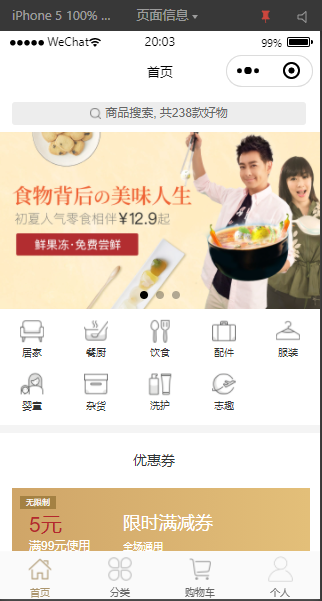
点击确定,就退出登录,回到了首页面,如下 :
# 五,详情页面渲染
需要先进行登录,如下不登录,获取的数据可能不完整。.
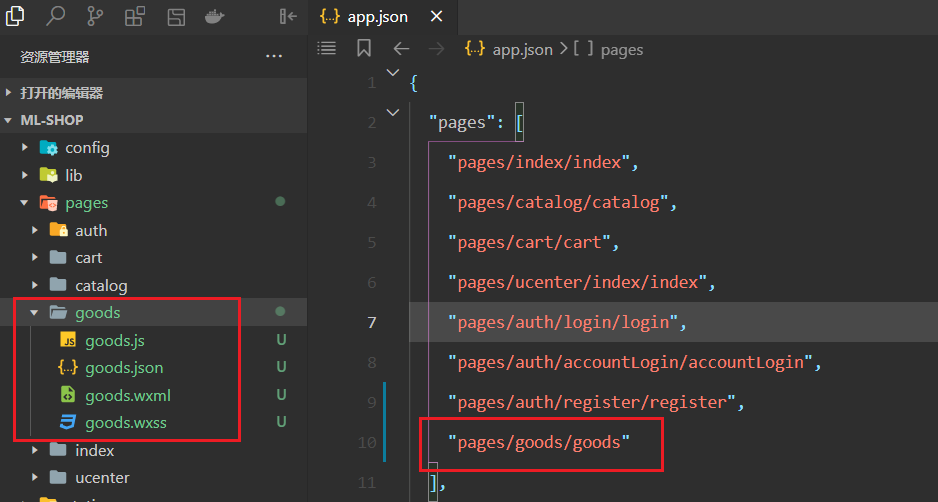
# 1,详情页面轮播图渲染
创建详情页面,如下:
当点击首页面的商品时,就会跳到详情页面,如下:
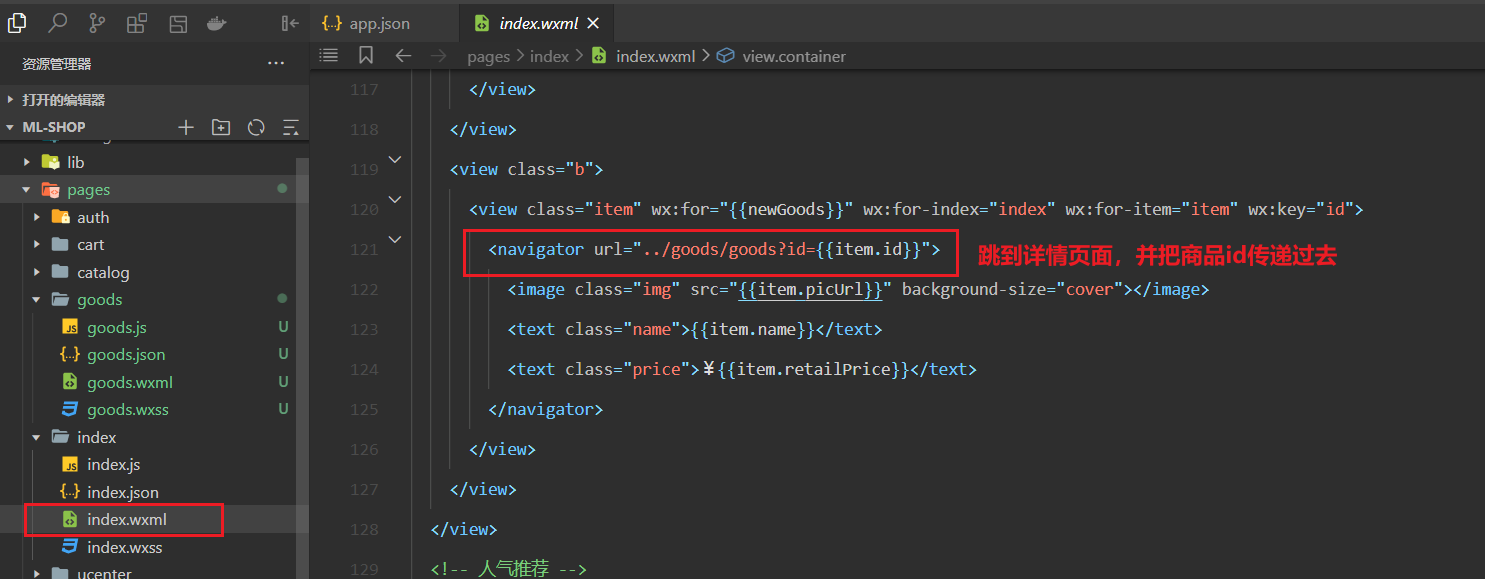
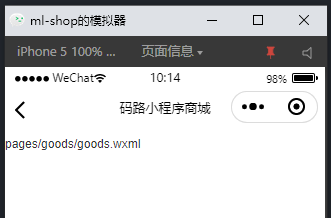
点击跳转,如下:
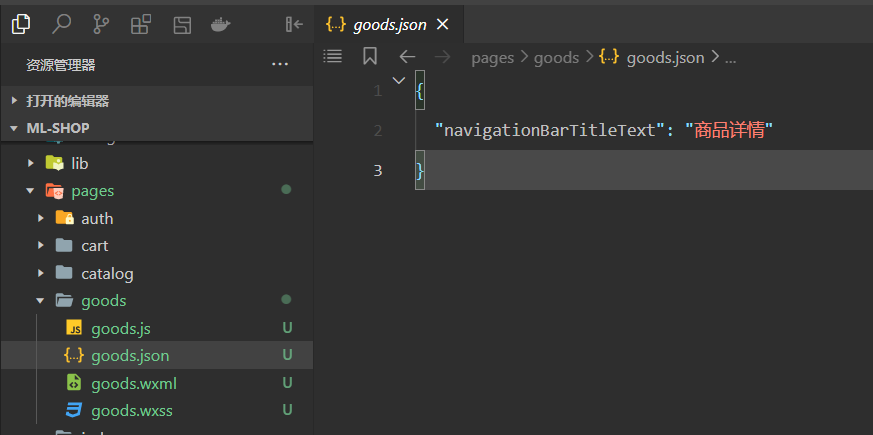
json配置如下:
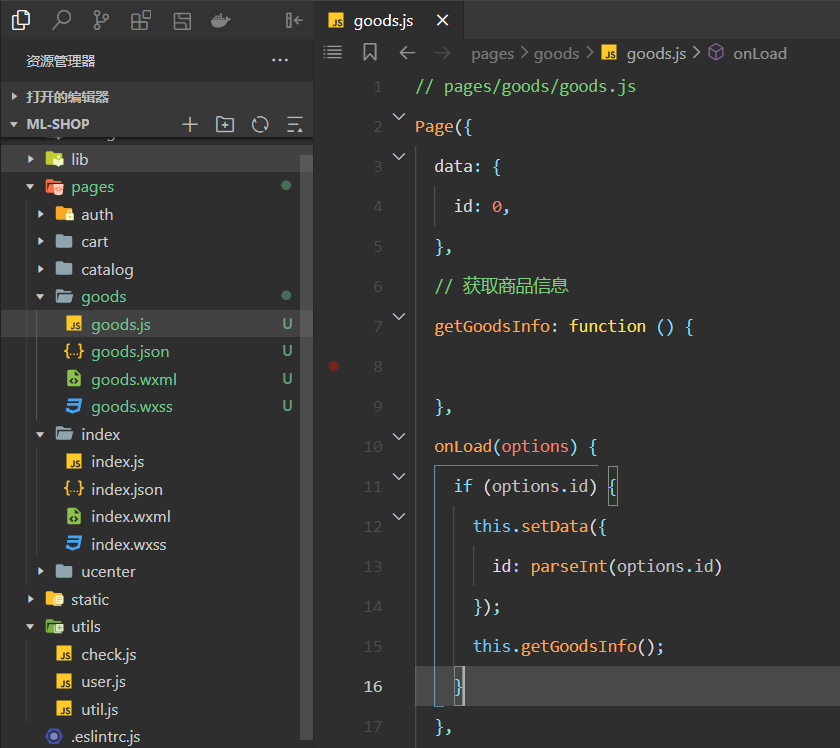
在详情页面,获取商品id,并根据id获取商品详情,如下:
查看id是否获取到,如下:

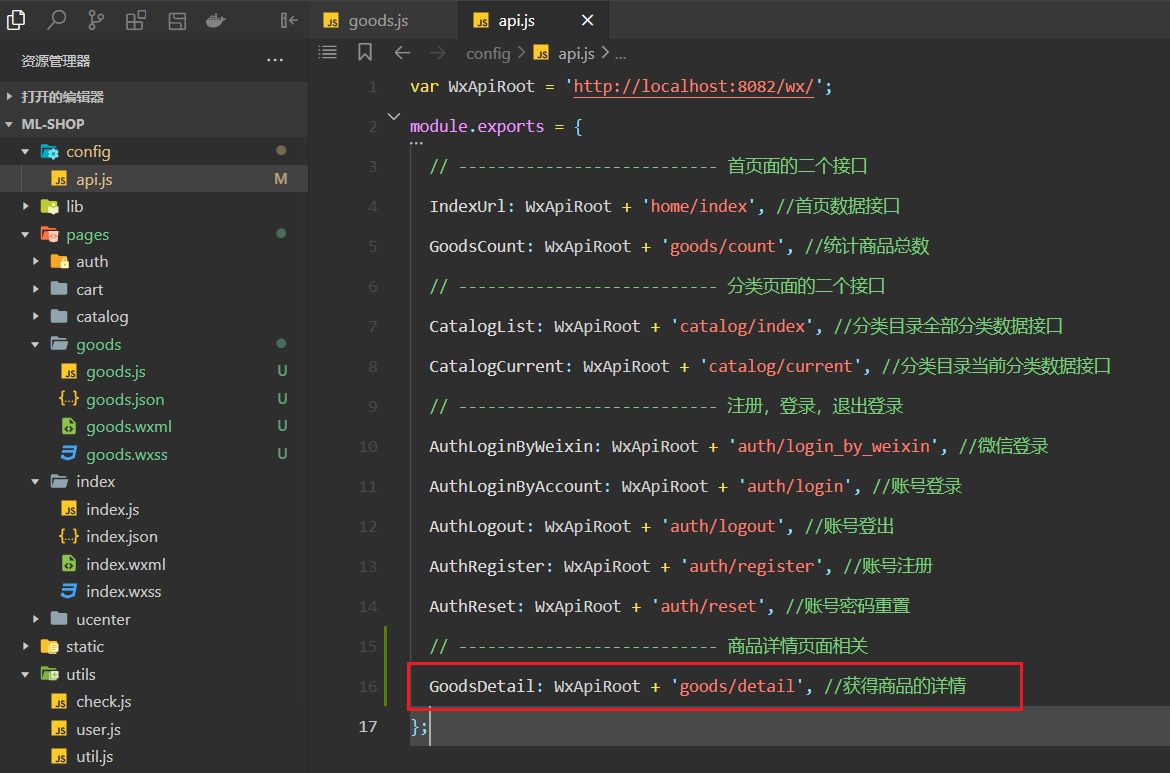
整理获取详情的API接口,如下:
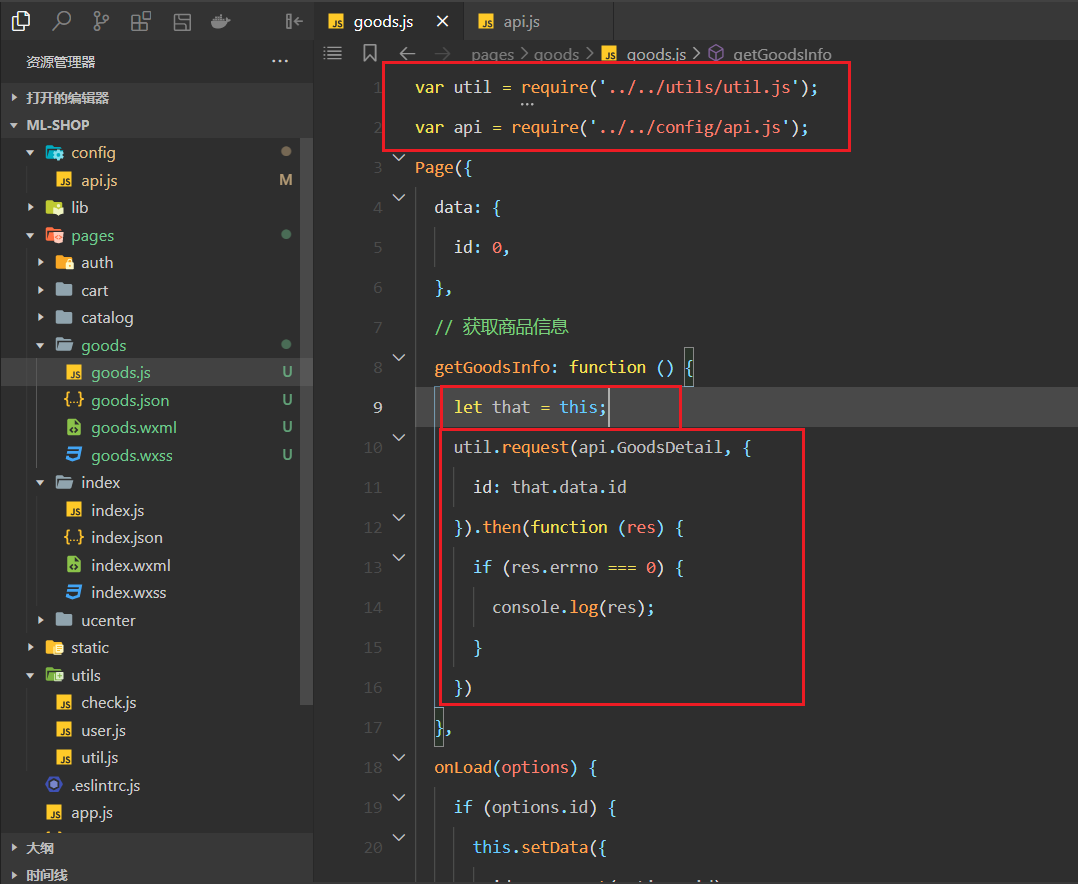
调用接口,如下 :
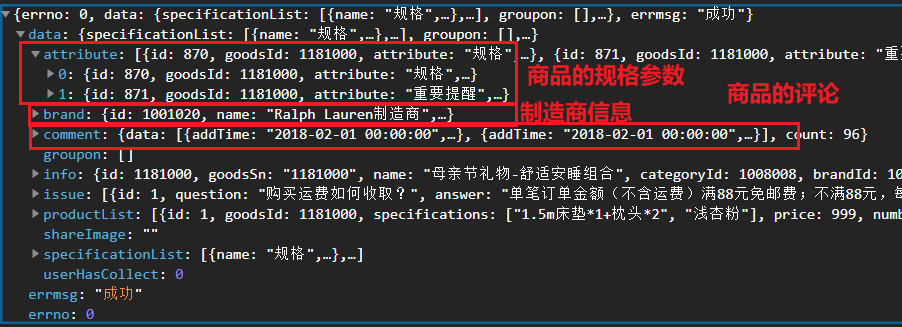
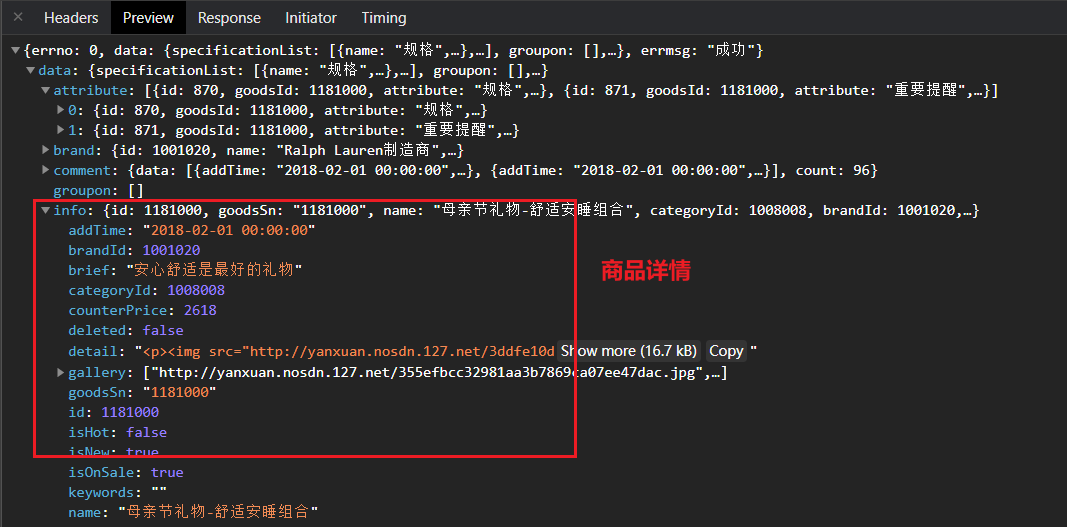
看一下,响应的数据如下:

分析响应回来的重要数据,如下:
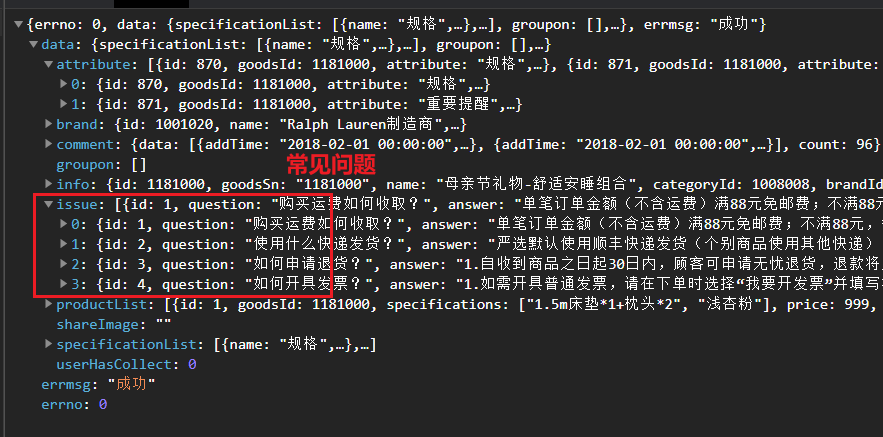
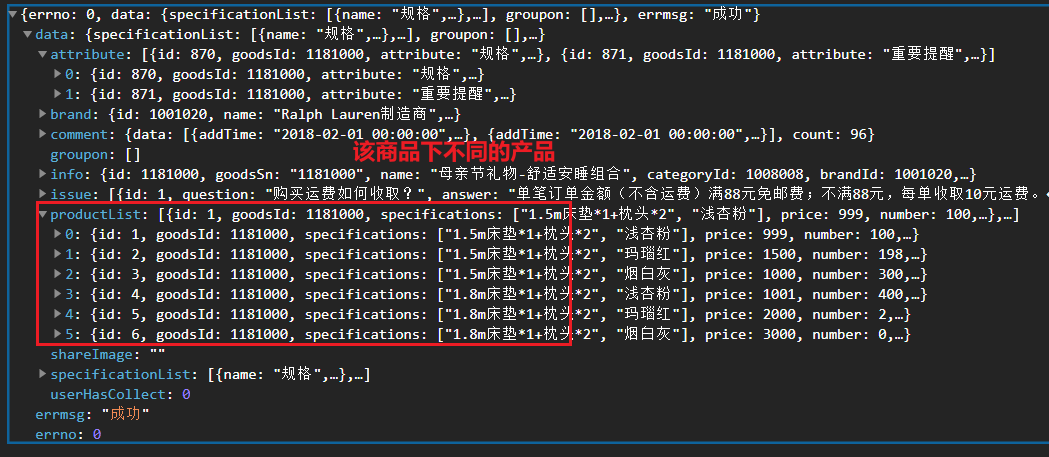
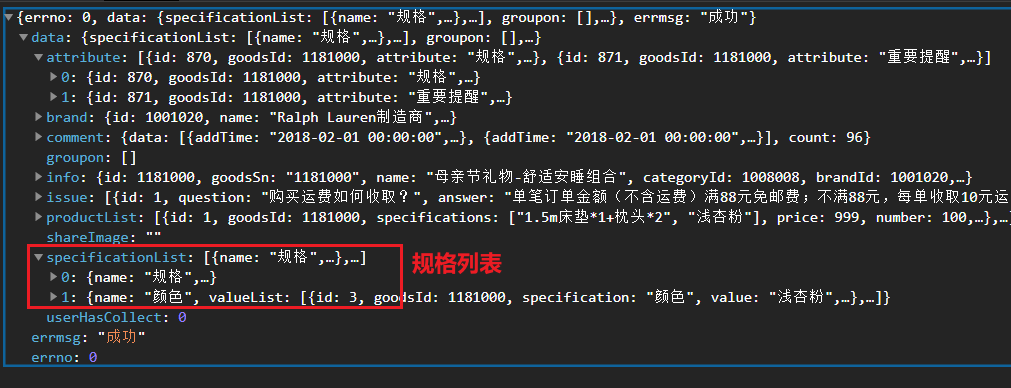
定义相关的状态,并赋值,如下:
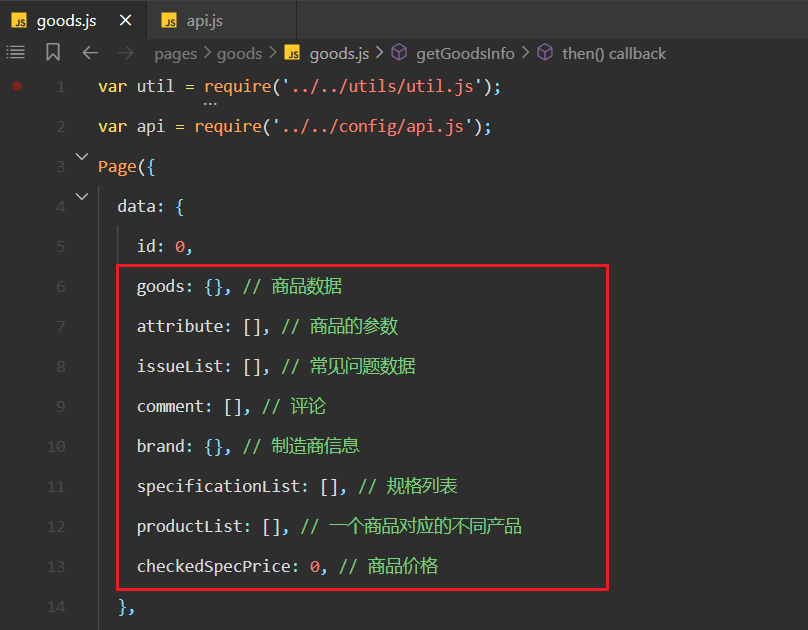
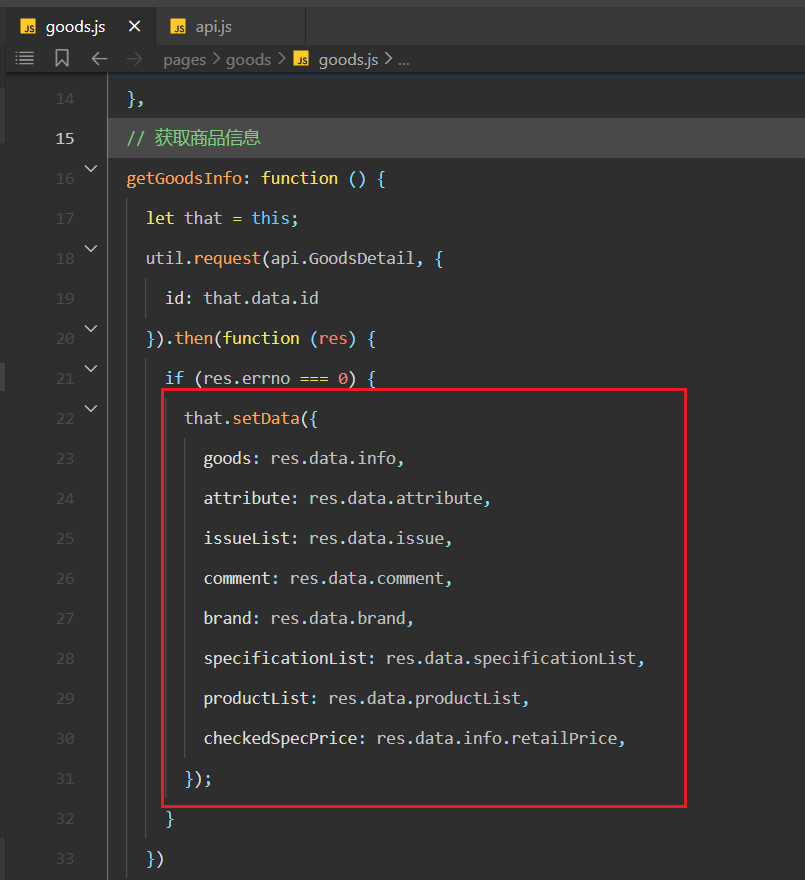
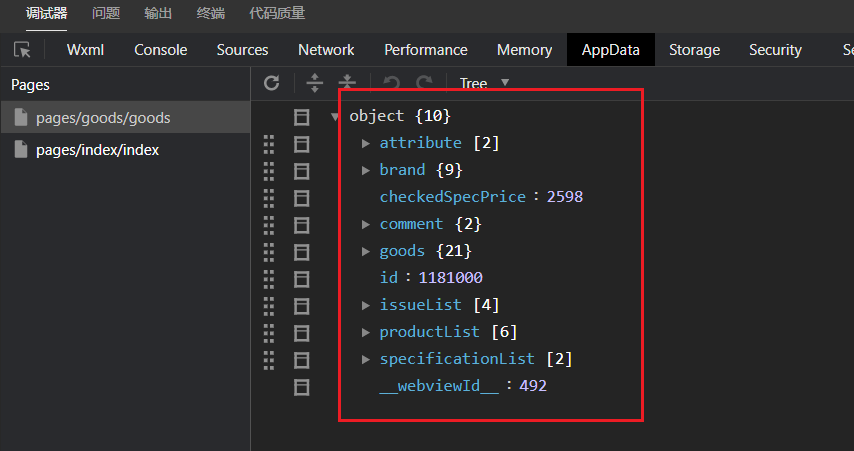
查看状态,如下:
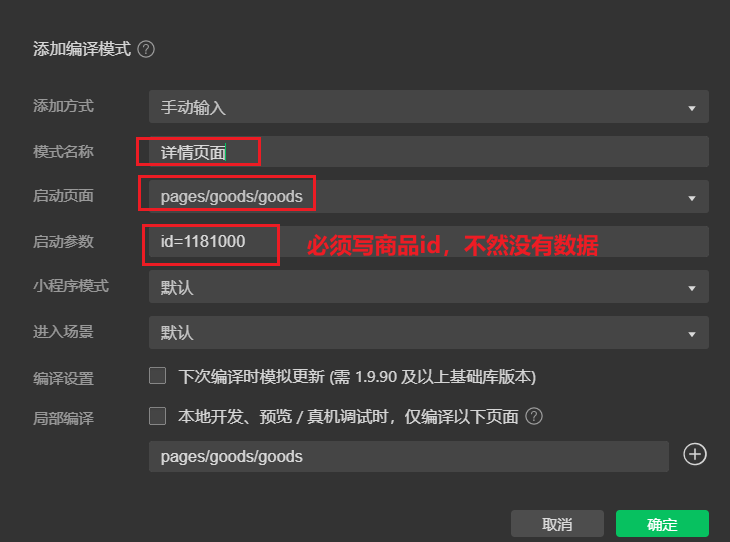
有了数据,就开始渲染轮播图,先添加一个编译模式,如下:
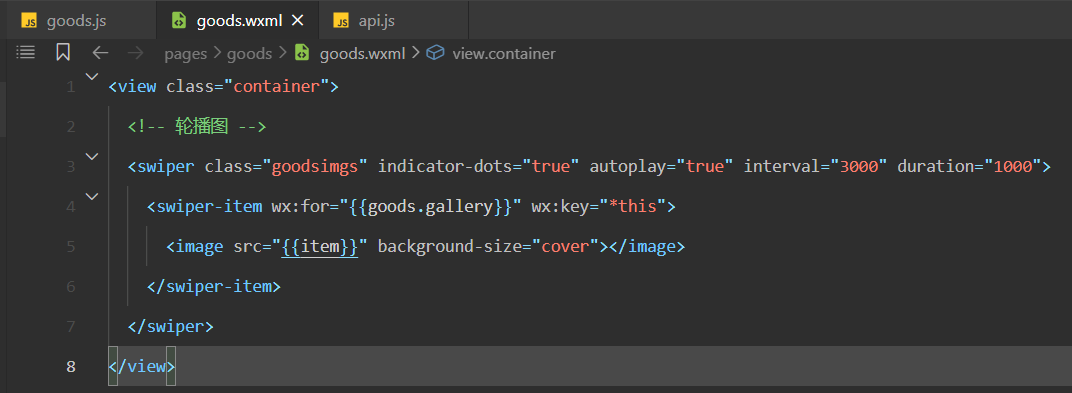
书写轮播图结构,如下:
效果如下:
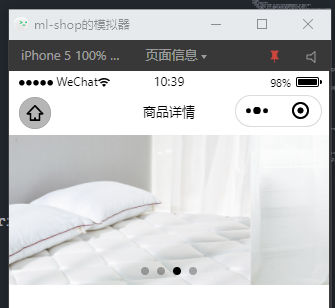
书写对应的样式,如下:
/* ---------------------- 轮播图样式 */
.container {
    margin-bottom: 100rpx;
}

.goodsimgs {
    width: 750rpx;
    height: 750rpx;
}

.goodsimgs image {
    width: 750rpx;
    height: 750rpx;
}
2
3
4
5
6
7
8
9
10
11
12
13
14
效果如下 :
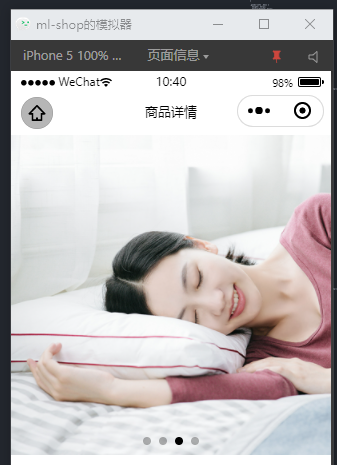
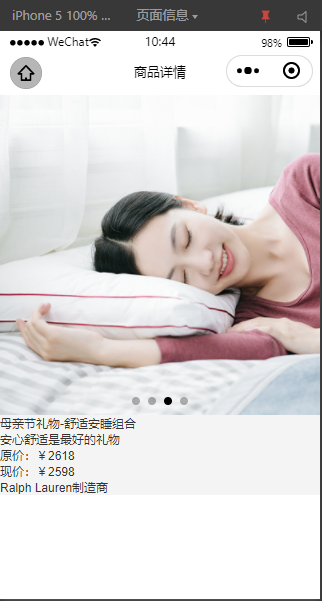
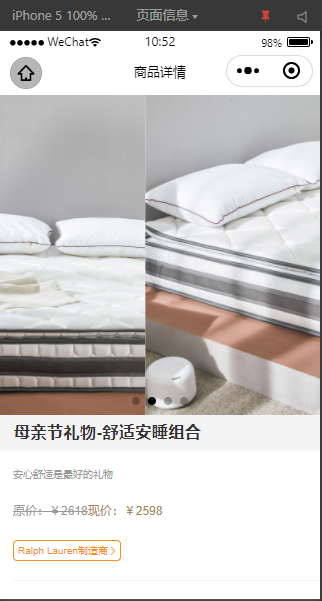
# 2,渲染商品基本信息
需求如下:
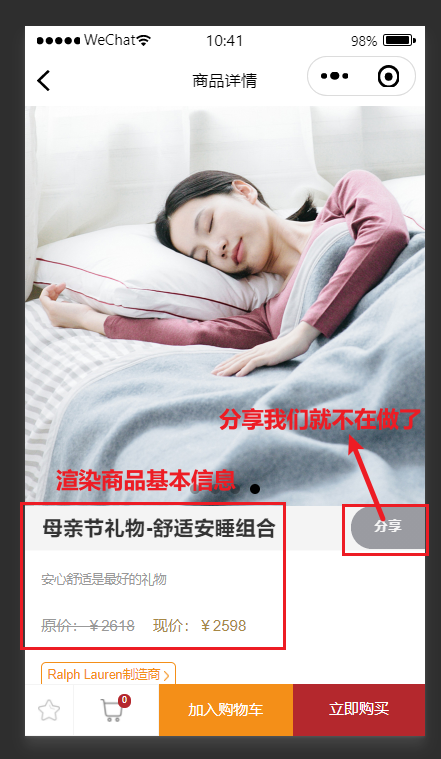
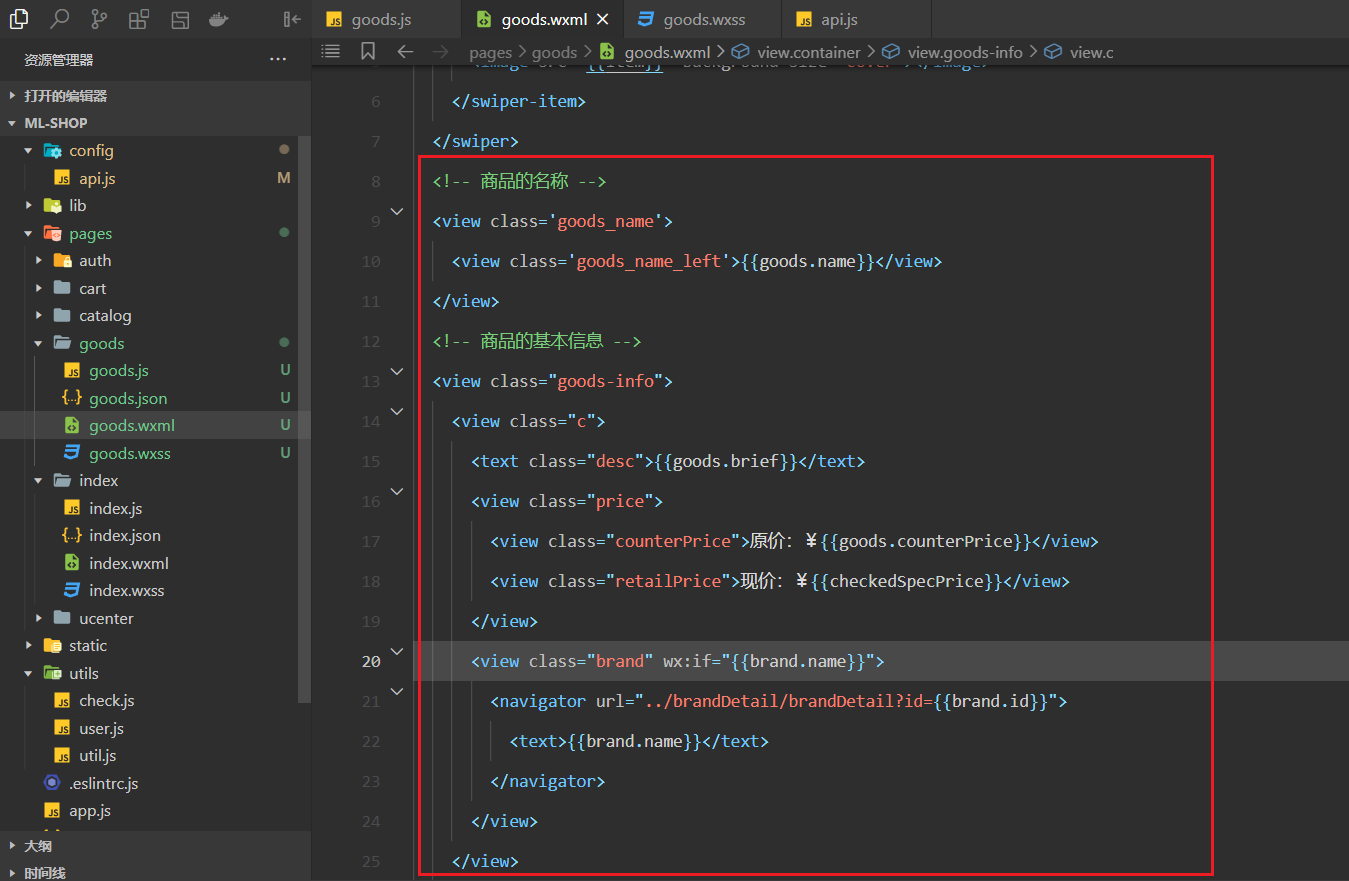
书写对应的结构如下:
效果如下 :
对应的样式如下:
/* ---------------------- 商品名称 */
.goods_name {
    /* border: 1px solid black; */
    height: 86rpx;
    line-height: 86rpx;
    border-bottom: 1px solid #fafafa;
}

.goods_name_left {
    /* border: 1px solid #757575; */
    float: left;
    height: 86rpx;
    font-weight: 550;
    line-height: 86rpx;
    margin-left: 35rpx;
    font-size: 38rpx;
    letter-spacing: 1rpx;
}

/* ---------------------- 商品基本信息 */
.goods-info {
    width: 750rpx;
    height: 306rpx;
    overflow: hidden;
    background: #fff;
}

.goods-info .c {
    display: block;
    width: 718.75rpx;
    height: 100%;
    margin-left: 31.25rpx;
    padding: 38rpx 31.25rpx 38rpx 0;
    border-bottom: 1px solid #f4f4f4;
}

.goods-info .c text {
    display: block;
    width: 687.5rpx;
    text-align: left;
}

.goods-info .desc {
    height: 43rpx;
    margin-bottom: 41rpx;
    font-size: 24rpx;
    line-height: 36rpx;
    color: #999;
}

.goods-info .price {
    height: 70rpx;
    align-content: center;
}

.goods-info .counterPrice {
    float: left;
    padding-left: 0rpx;
    text-decoration: line-through;
    font-size: 30rpx;
    color: #999;
}

.goods-info .retailPrice {
    padding-left: 5%;
    font-size: 30rpx;
    color: #a78845;
}

.goods-info .brand {
    margin-top: 23rpx;
    min-height: 40rpx;
    text-align: left;
}

.goods-info .brand text {
    display: inline-block;
    width: auto;
    padding: 2px 30rpx 2px 10.5rpx;
    line-height: 35.5rpx;
    border: 1px solid #f48f18;
    font-size: 25rpx;
    color: #f48f18;
    border-radius: 4px;
    background: url(http://nos.netease.com/mailpub/hxm/yanxuan-wap/p/20150730/style/img/icon-normal/detailTagArrow-18bee52dab.png) 95% center no-repeat;
    background-size: 10.75rpx 18.75rpx;
}
2
3
4
5
6
7
8
9
10
11
12
13
14
15
16
17
18
19
20
21
22
23
24
25
26
27
28
29
30
31
32
33
34
35
36
37
38
39
40
41
42
43
44
45
46
47
48
49
50
51
52
53
54
55
56
57
58
59
60
61
62
63
64
65
66
67
68
69
70
71
72
73
74
75
76
77
78
79
80
81
82
83
84
85
86
87
效果如下 :
完成的结构如下:
<view class="container">
    <!-- 轮播图 -->
    <swiper class="goodsimgs" indicator-dots="true" autoplay="true" interval="3000" duration="1000">
        <swiper-item wx:for="{{goods.gallery}}" wx:key="*this">
            <image src="{{item}}" background-size="cover"></image>
        </swiper-item>
    </swiper>
    <!-- 商品的名称 -->
    <view class='goods_name'>
        <view class='goods_name_left'>{{goods.name}}</view>
    </view>
    <!-- 商品的基本信息 -->
    <view class="goods-info">
        <view class="c">
            <text class="desc">{{goods.brief}}</text>
            <view class="price">
                <view class="counterPrice">原价:¥{{goods.counterPrice}}</view>
                <view class="retailPrice">现价:¥{{checkedSpecPrice}}</view>
            </view>
            <view class="brand" wx:if="{{brand.name}}">
                <navigator url="../brandDetail/brandDetail?id={{brand.id}}">
                    <text>{{brand.name}}</text>
                </navigator>
            </view>
        </view>
    </view>
</view>
2
3
4
5
6
7
8
9
10
11
12
13
14
15
16
17
18
19
20
21
22
23
24
25
26
27
# 3,渲染选择标准
分析:
在基本信息下面是选择标准,如下:
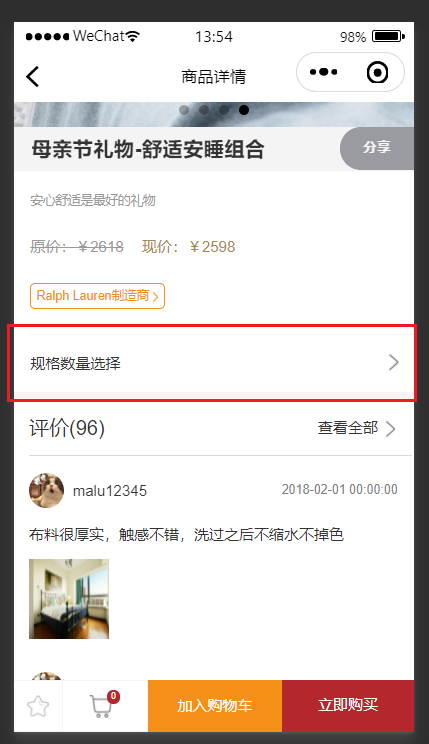
当我们点击规格数据选择时,就会弹出如下的框:
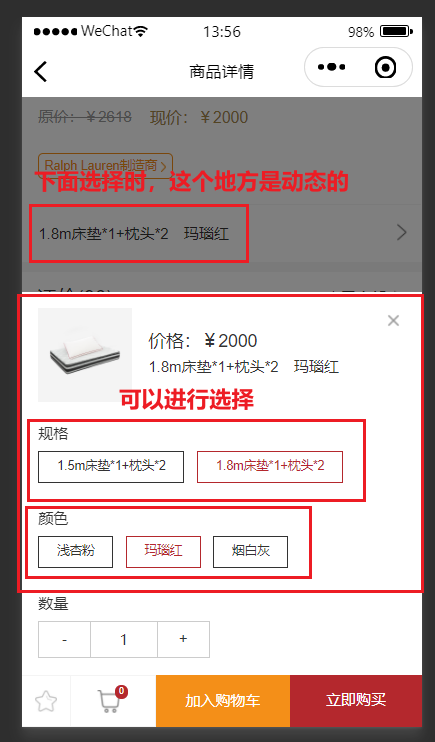
所以我们需要把它定义成一个状态,如下:
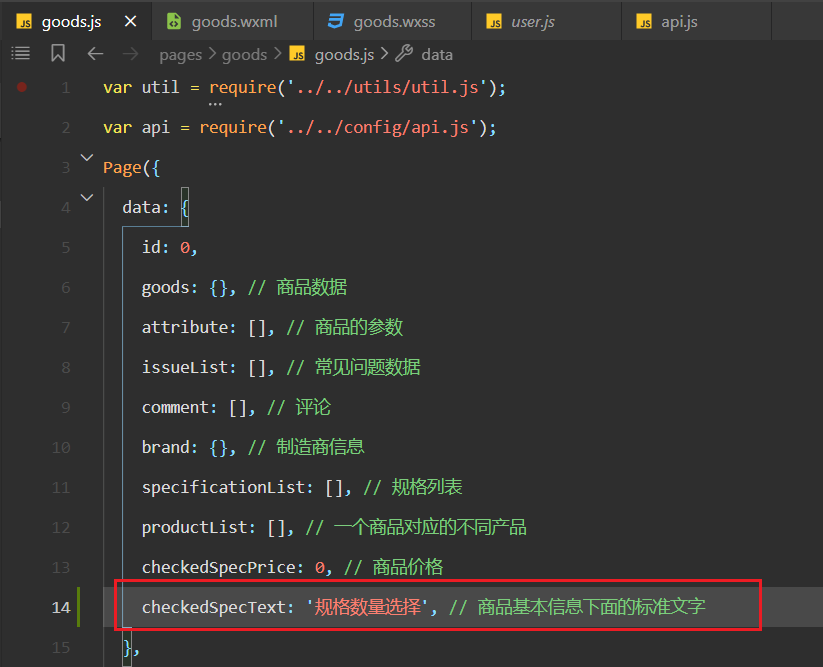
实现对应的结构如下:
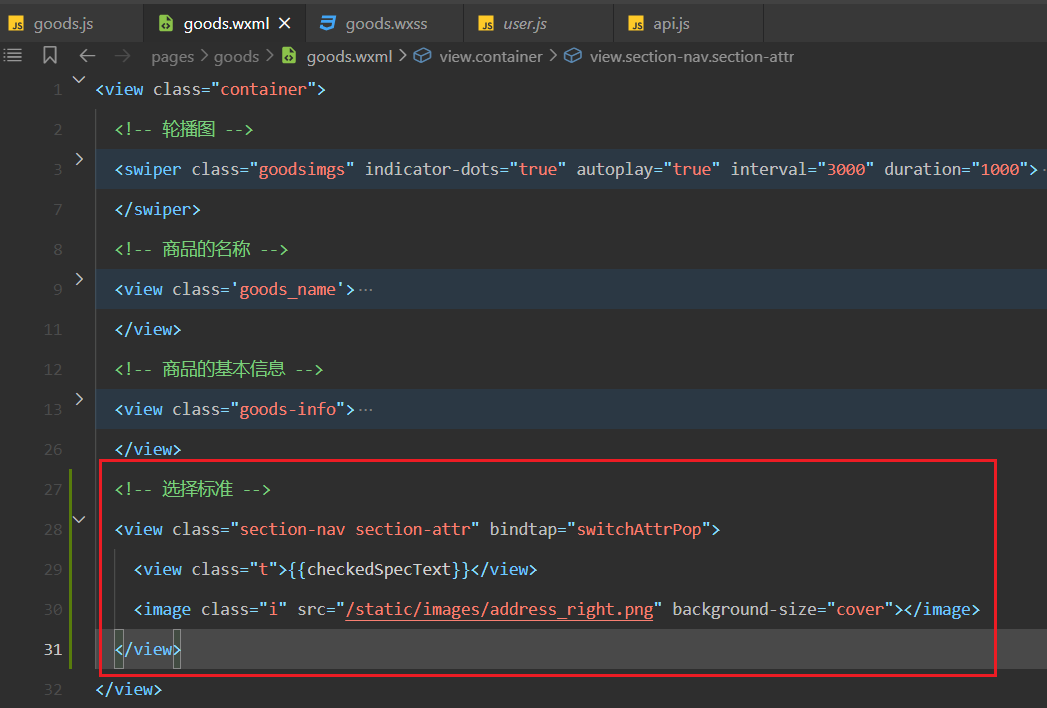
效果如下:
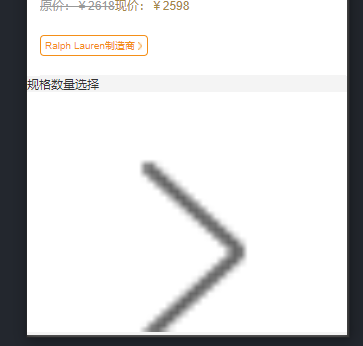
书写对应的样式,如下:
/* ---------------------- 规格数量选择样式 */
.section-nav {
    width: 750rpx;
    height: 108rpx;
    background: #fff;
    margin-bottom: 20rpx;
}

.section-nav .t {
    float: left;
    width: 600rpx;
    height: 108rpx;
    line-height: 108rpx;
    font-size: 29rpx;
    color: #333;
    margin-left: 31.25rpx;
}

.section-nav .i {
    float: right;
    width: 52rpx;
    height: 52rpx;
    margin-right: 16rpx;
    margin-top: 28rpx;
}
2
3
4
5
6
7
8
9
10
11
12
13
14
15
16
17
18
19
20
21
22
23
24
25
效果如下:
# 4,渲染商品评论
大家点击如下商品,会有商品的评论:
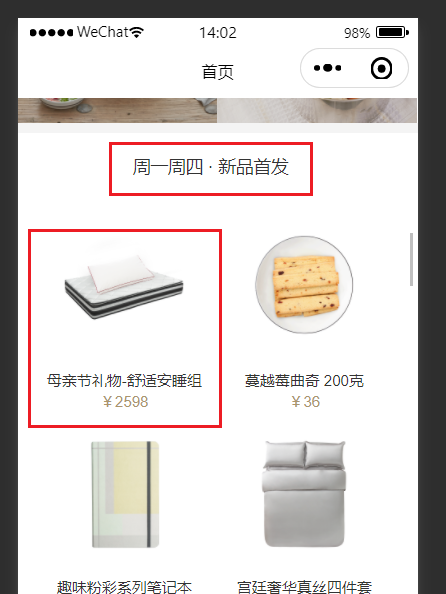
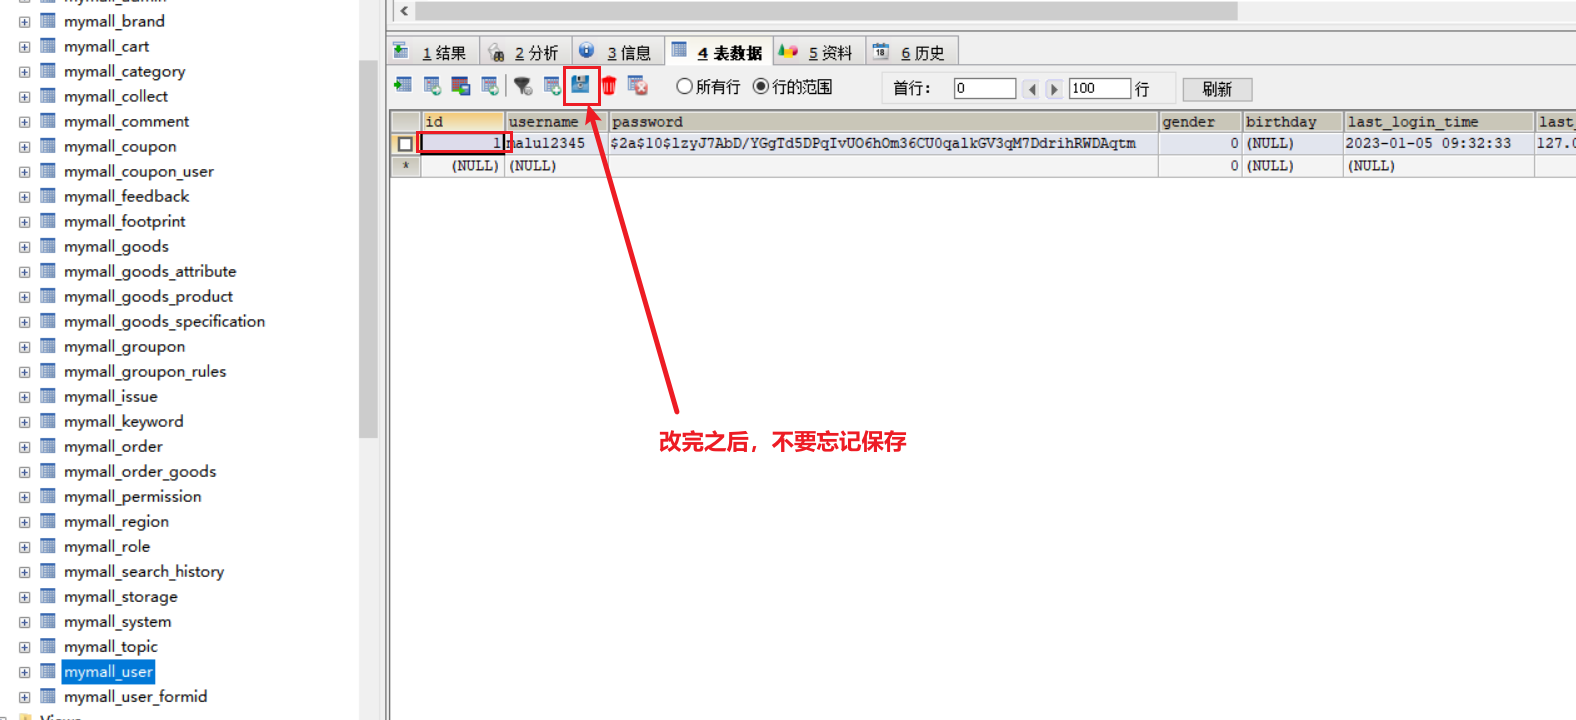
需要把数据库中用户id改一下,如下:
书写对应的结构如下:
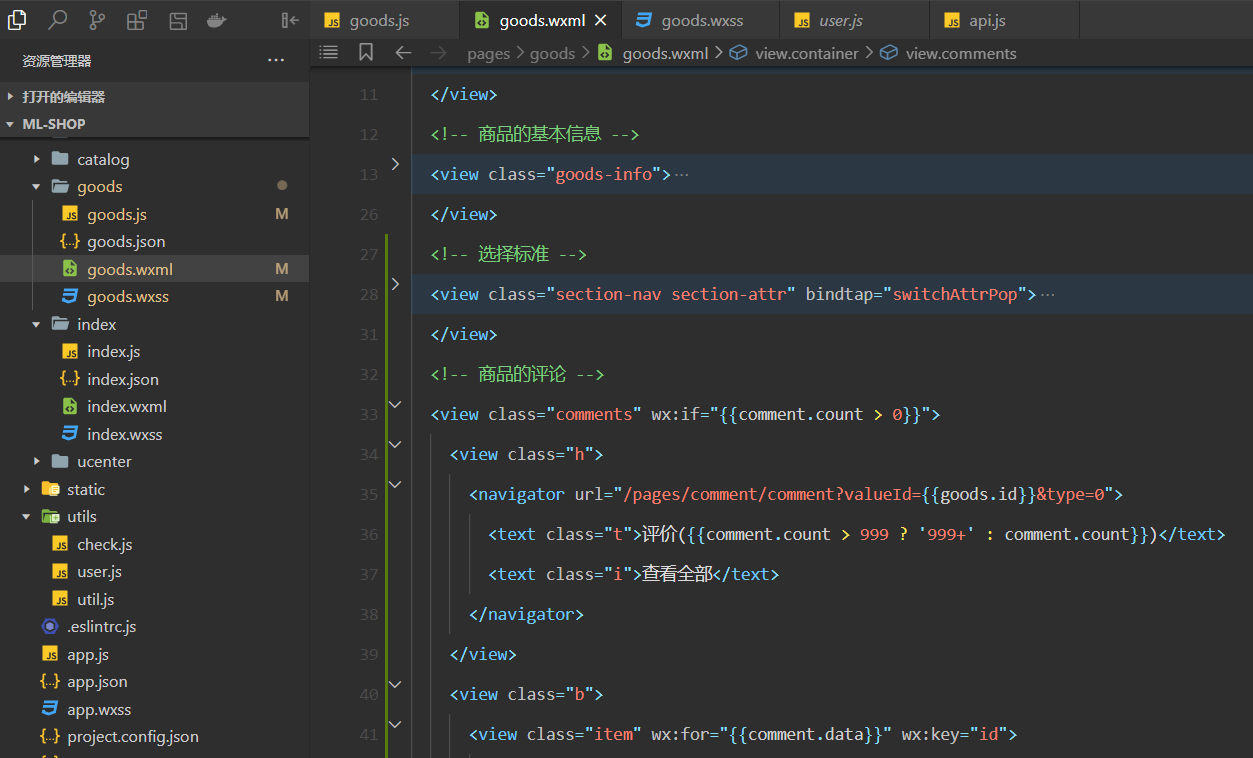
参考代码如下:
<!-- 商品的评论 -->
<view class="comments" wx:if="{{comment.count > 0}}">
    <view class="h">
        <navigator url="/pages/comment/comment?valueId={{goods.id}}&type=0"><text class="t">评价( {
                {
                comment.count > 999 ? '999+' : comment.count
                }
                }

                )</text><text class="i">查看全部</text></navigator>
    </view>
    <view class="b">
        <view class="item" wx:for="{{comment.data}}" wx:key="id">
            <view class="info">
                <view class="user">
                    <image src="{{item.avatar}}"></image><text> {
                        {item.nickname
                        }
                        }

                    </text>
                </view>
                <view class="time"> {
                    {
                    item.addTime
                    }
                    }

                </view>
            </view>
            <view class="content"> {
                {
                item.content
                }
                }

            </view>
            <view class="imgs" wx:if="{{item.picList.length > 0}}">
                <image class="img" wx:for="{{item.picList}}" wx:key="*this" wx:for-item="iitem" src="{{iitem}} "></image>
            </view>
        </view>
    </view>
</view>
2
3
4
5
6
7
8
9
10
11
12
13
14
15
16
17
18
19
20
21
22
23
24
25
26
27
28
29
30
31
32
33
34
35
36
37
38
39
40
41
42
43
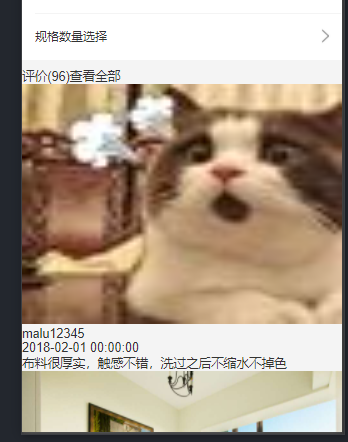
效果如下:
书写对应的样式如下:
/* ---------------------- 商品的评论 */
.comments {
    width: 100%;
    height: auto;
    padding-left: 30rpx;
    background: #fff;
    margin: 20rpx 0;
}

.comments .h {
    height: 102.5rpx;
    line-height: 100.5rpx;
    width: 718.75rpx;
    padding-right: 16rpx;
    border-bottom: 1px solid #d9d9d9;
}

.comments .h .t {
    display: block;
    float: left;
    width: 50%;
    font-size: 38.5rpx;
    color: #333;
}

.comments .h .i {
    display: block;
    float: right;
    width: 164rpx;
    height: 100.5rpx;
    line-height: 100.5rpx;
    background: url(http://nos.netease.com/mailpub/hxm/yanxuan-wap/p/20150730/style/img/icon-normal/address-right-990628faa7.png) right center no-repeat;
    background-size: 52rpx;
}

.comments .b {
    height: auto;
    width: 720rpx;
}

.comments .item {
    height: auto;
    width: 720rpx;
    overflow: hidden;
}

.comments .info {
    height: 127rpx;
    width: 100%;
    padding: 33rpx 0 27rpx 0;
}

.comments .user {
    float: left;
    width: auto;
    height: 67rpx;
    line-height: 67rpx;
    font-size: 0;
}

.comments .user image {
    float: left;
    width: 67rpx;
    height: 67rpx;
    margin-right: 17rpx;
    border-radius: 50%;
}

.comments .user text {
    display: inline-block;
    width: auto;
    height: 66rpx;
    overflow: hidden;
    font-size: 29rpx;
    line-height: 66rpx;
}

.comments .time {
    display: block;
    float: right;
    width: auto;
    height: 67rpx;
    line-height: 67rpx;
    color: #7f7f7f;
    font-size: 25rpx;
    margin-right: 30rpx;
}

.comments .content {
    width: 720rpx;
    padding-right: 30rpx;
    line-height: 45.8rpx;
    font-size: 29rpx;
    margin-bottom: 24rpx;
}

.comments .imgs {
    width: 720rpx;
    height: auto;
    margin-bottom: 25rpx;
}

.comments .imgs .img {
    height: 150rpx;
    width: 150rpx;
    margin-right: 28rpx;
}

.comments .spec {
    width: 720rpx;
    padding-right: 30rpx;
    line-height: 30rpx;
    font-size: 24rpx;
    color: #999;
    margin-bottom: 30rpx;
}
2
3
4
5
6
7
8
9
10
11
12
13
14
15
16
17
18
19
20
21
22
23
24
25
26
27
28
29
30
31
32
33
34
35
36
37
38
39
40
41
42
43
44
45
46
47
48
49
50
51
52
53
54
55
56
57
58
59
60
61
62
63
64
65
66
67
68
69
70
71
72
73
74
75
76
77
78
79
80
81
82
83
84
85
86
87
88
89
90
91
92
93
94
95
96
97
98
99
100
101
102
103
104
105
106
107
108
109
110
111
112
113
114
115
116
效果如下 :
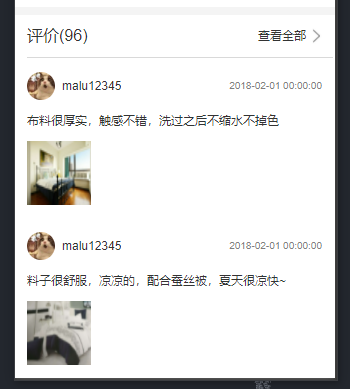
# 5,渲染商品参数
需求如下:
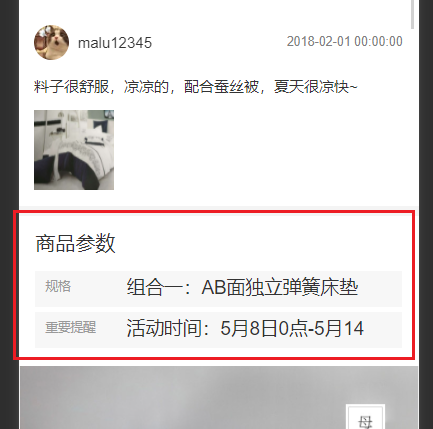
书写对应的结构如下:
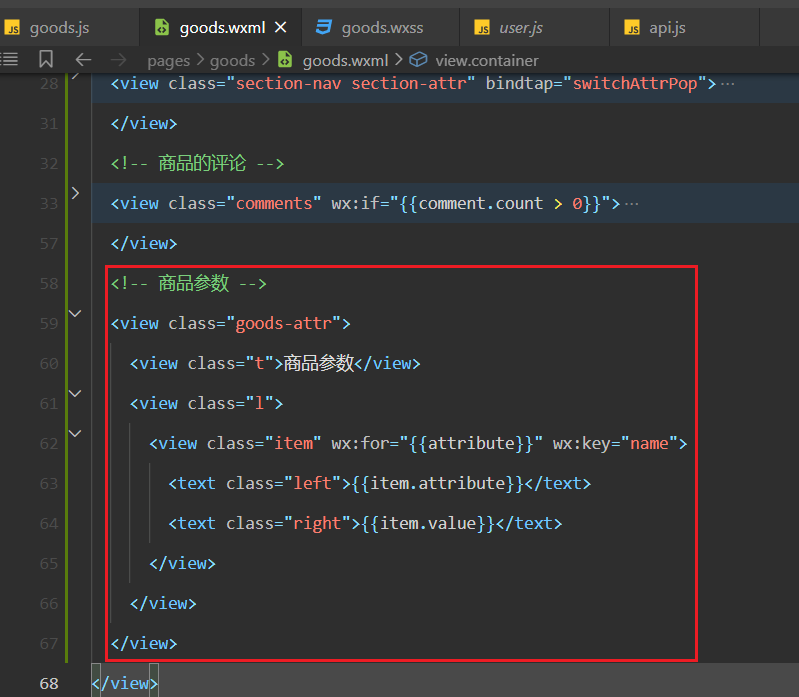
效果如下:
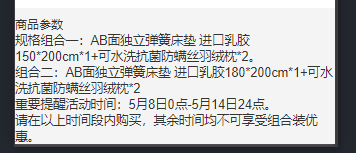
书写对应的样式如下:
/* ---------------------- 商品的参数 */
.goods-attr {
    width: 750rpx;
    height: auto;
    overflow: hidden;
    padding: 0 31.25rpx 25rpx 31.25rpx;
    background: #fff;
}

.goods-attr .t {
    width: 687.5rpx;
    height: 104rpx;
    line-height: 104rpx;
    font-size: 38.5rpx;
}

.goods-attr .item {
    width: 687.5rpx;
    height: 68rpx;
    padding: 11rpx 20rpx;
    margin-bottom: 11rpx;
    background: #f7f7f7;
    font-size: 38.5rpx;
}

.goods-attr .left {
    float: left;
    font-size: 25rpx;
    width: 134rpx;
    height: 45rpx;
    line-height: 45rpx;
    overflow: hidden;
    color: #999;
}

.goods-attr .right {
    float: left;
    font-size: 36.5rpx;
    margin-left: 20rpx;
    width: 480rpx;
    height: 45rpx;
    line-height: 45rpx;
    overflow: hidden;
    color: #333;
}
2
3
4
5
6
7
8
9
10
11
12
13
14
15
16
17
18
19
20
21
22
23
24
25
26
27
28
29
30
31
32
33
34
35
36
37
38
39
40
41
42
43
44
45
效果如下:
# 6,渲染商品的富文本
需求:
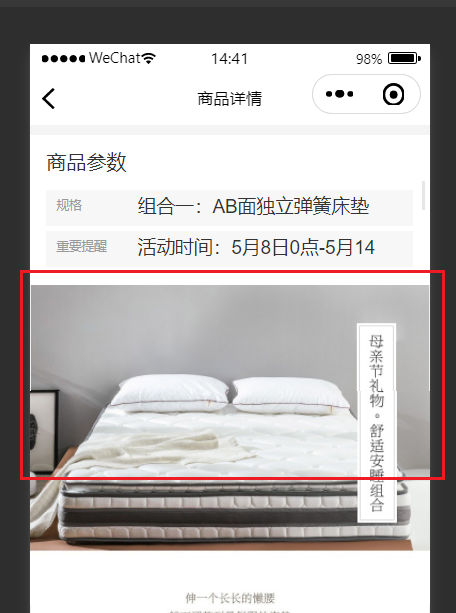
定义状态,如下:
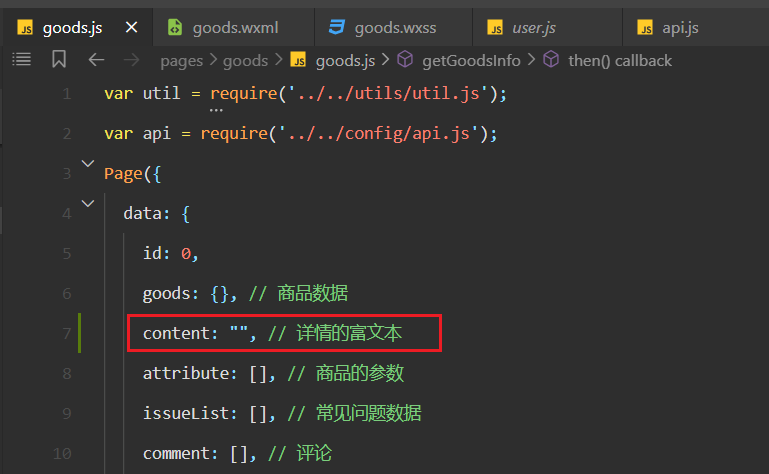
处理数据,如下:
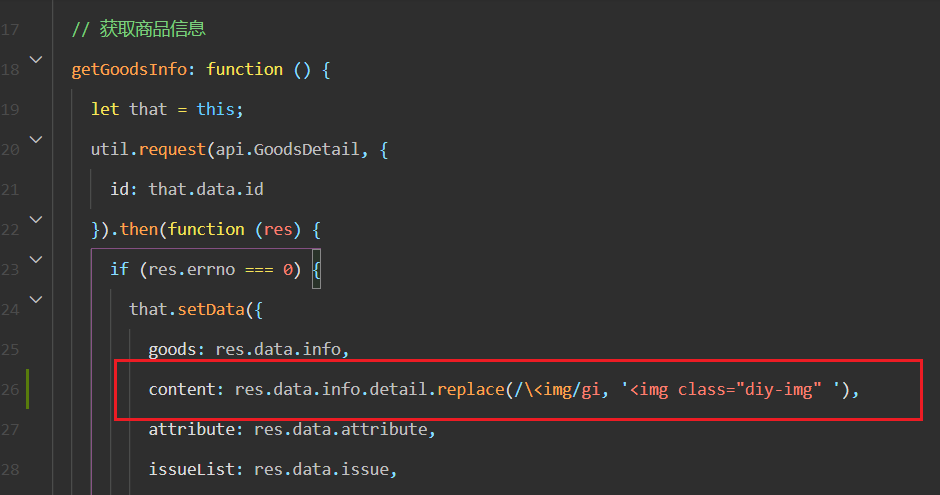
定义类名,如下:
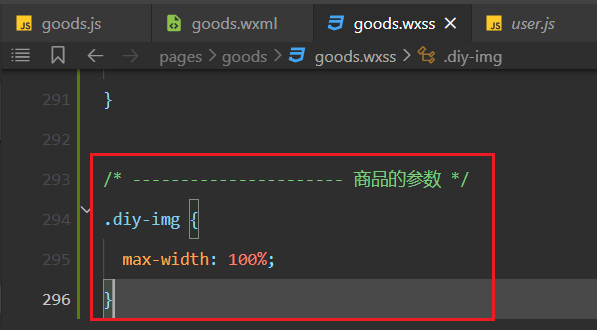
使用状态如下:
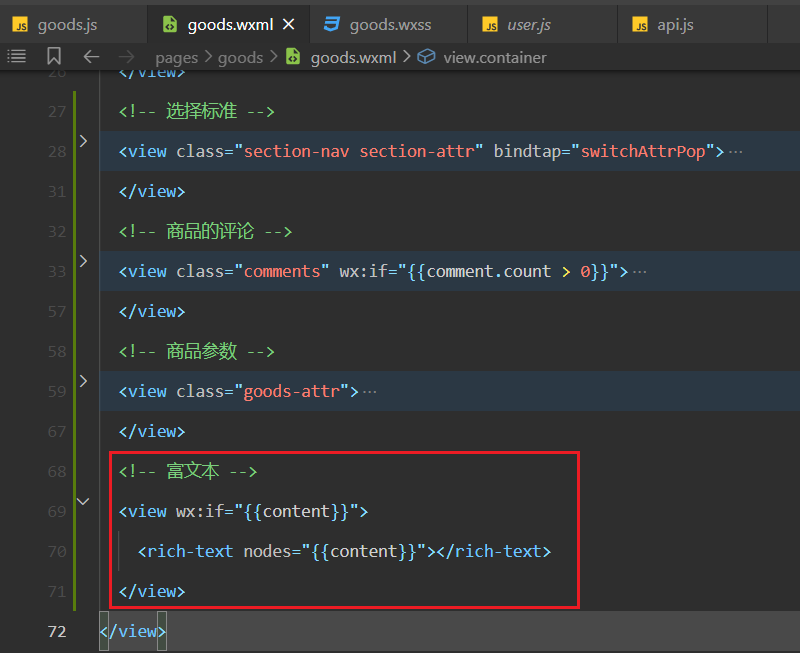
效果如下:
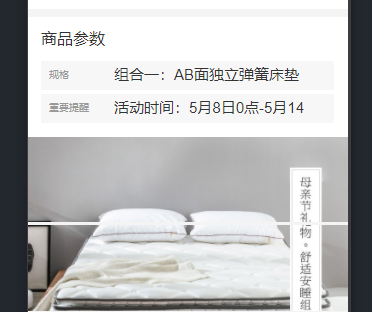
# 7,渲染常见问题
需求:
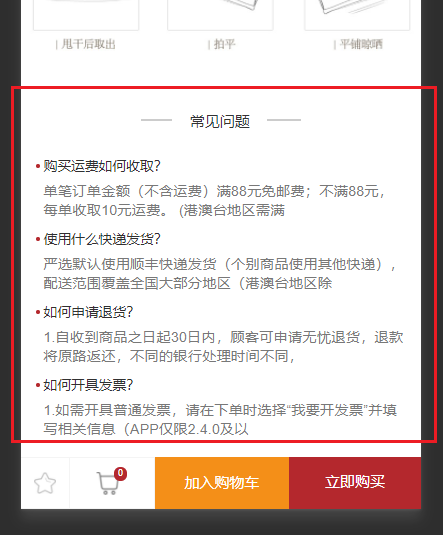
书写对应的结构如下:
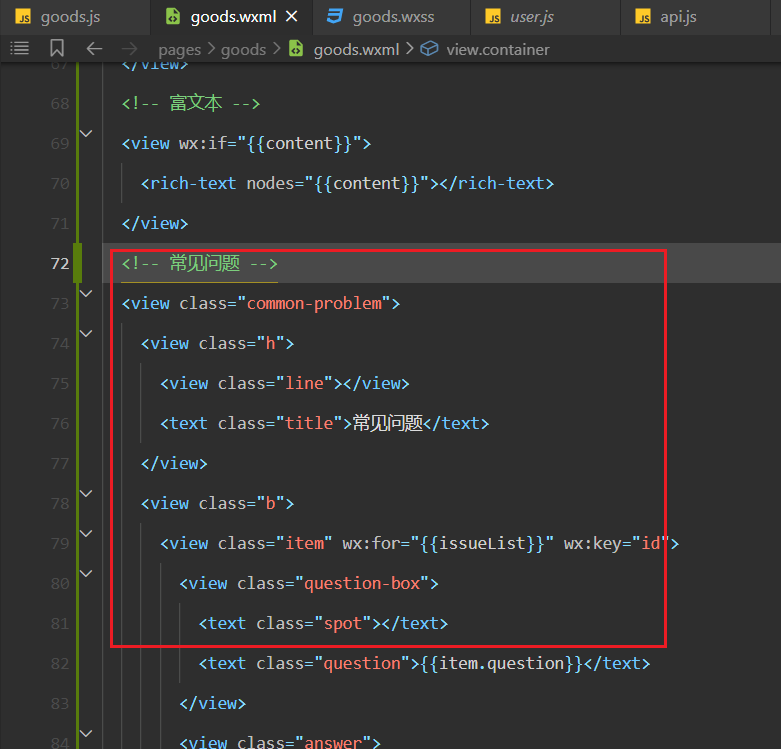
参考代码如下:
 <!-- 常见问题 -->
 <view class="common-problem">
     <view class="h">
         <view class="line"></view>
         <text class="title">常见问题</text>
     </view>
     <view class="b">
         <view class="item" wx:for="{{issueList}}" wx:key="id">
             <view class="question-box">
                 <text class="spot"></text>
                 <text class="question">{{item.question}}</text>
             </view>
             <view class="answer">
                 {{item.answer}}
             </view>
         </view>
     </view>
 </view>
2
3
4
5
6
7
8
9
10
11
12
13
14
15
16
17
18
效果如下:
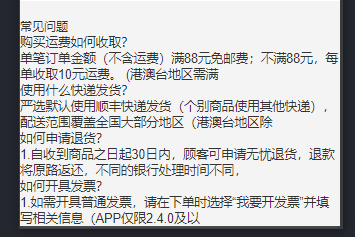
参考样式如下:
/* ---------------------- 常见问题 */
.common-problem {
    width: 750rpx;
    height: auto;
    overflow: hidden;
}

.common-problem .h {
    position: relative;
    height: 145.5rpx;
    width: 750rpx;
    padding: 56.25rpx 0;
    background: #fff;
    text-align: center;
}

.common-problem .h .line {
    display: inline-block;
    position: absolute;
    top: 72rpx;
    left: 0;
    z-index: 2;
    height: 1px;
    margin-left: 225rpx;
    width: 300rpx;
    background: #ccc;
}

.common-problem .h .title {
    display: inline-block;
    position: absolute;
    top: 56.125rpx;
    left: 0;
    z-index: 3;
    height: 33rpx;
    margin-left: 285rpx;
    width: 180rpx;
    background: #fff;
}

.common-problem .b {
    width: 750rpx;
    height: auto;
    overflow: hidden;
    padding: 0rpx 30rpx;
    background: #fff;
}

.common-problem .item {
    height: auto;
    overflow: hidden;
    padding-bottom: 25rpx;
}

.common-problem .question-box {
    overflow: hidden;
}

.common-problem .question-box .spot {
    float: left;
    display: block;
    height: 8rpx;
    width: 8rpx;
    background: #b4282d;
    border-radius: 50%;
    margin-top: 11rpx;
}

.common-problem .question-box .question {
    float: left;
    line-height: 30rpx;
    padding-left: 8rpx;
    display: block;
    font-size: 26rpx;
    padding-bottom: 15rpx;
    color: #303030;
}

.common-problem .answer {
    line-height: 36rpx;
    padding-left: 16rpx;
    font-size: 24rpx;
    color: #787878;
}
2
3
4
5
6
7
8
9
10
11
12
13
14
15
16
17
18
19
20
21
22
23
24
25
26
27
28
29
30
31
32
33
34
35
36
37
38
39
40
41
42
43
44
45
46
47
48
49
50
51
52
53
54
55
56
57
58
59
60
61
62
63
64
65
66
67
68
69
70
71
72
73
74
75
76
77
78
79
80
81
82
83
84
效果如下:
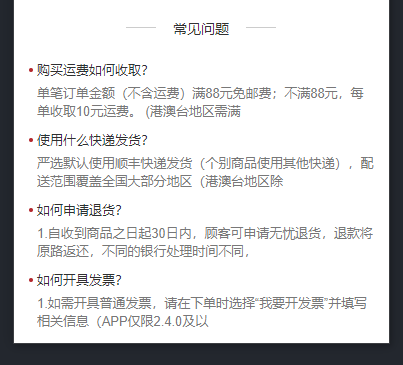
# 8,渲染相关商品
需求:
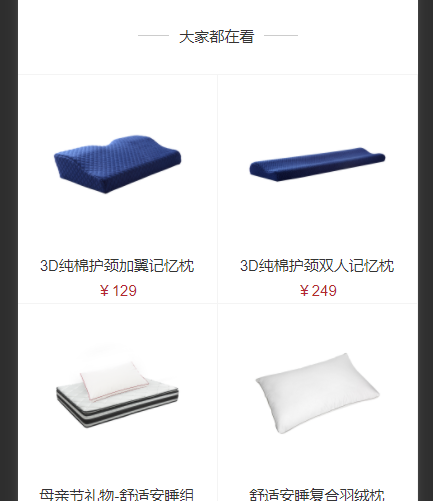
大家都在看模块,还需要调用一个接口,整理对应的接口如下:
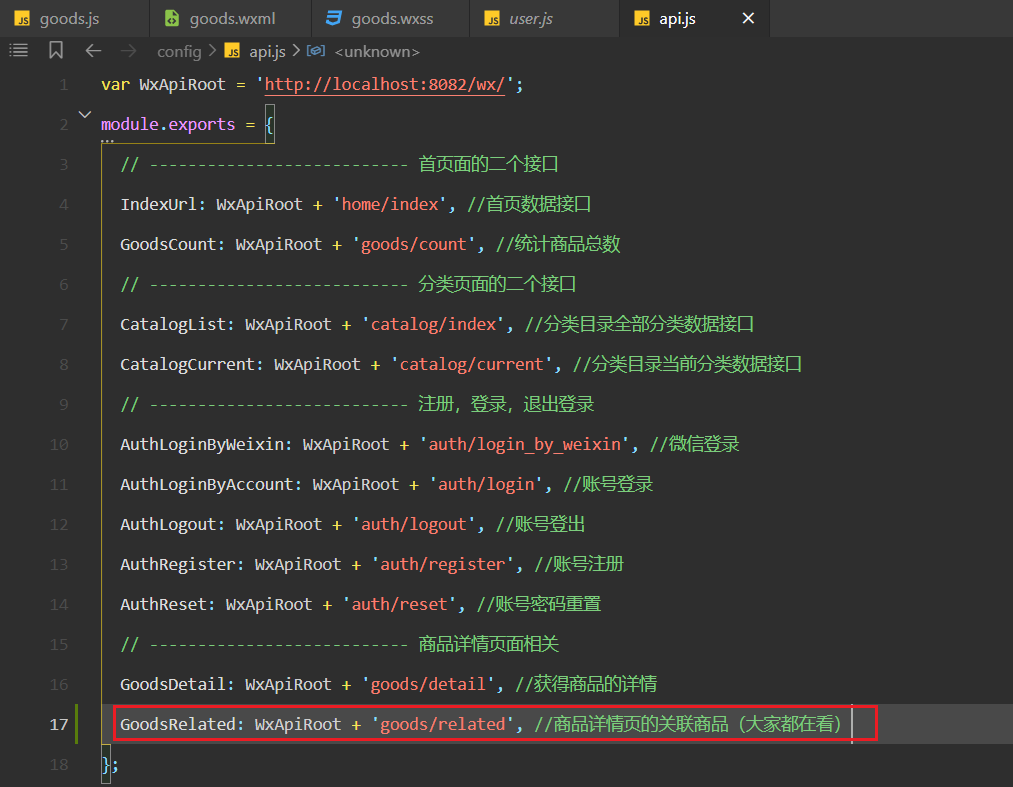
定义状态,如下 :
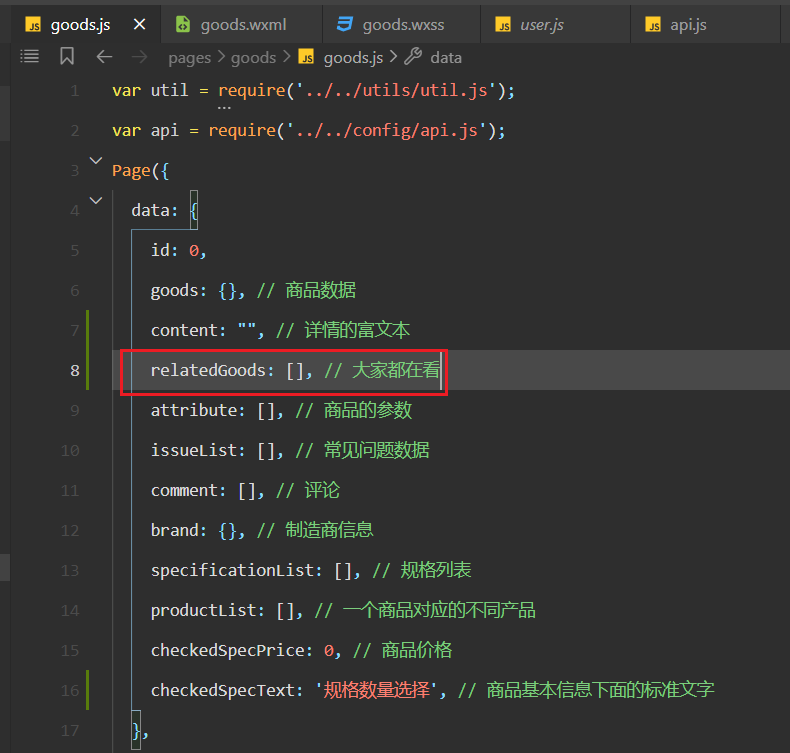
在获取完商品详情后,调用接口,获取大家都在看的相关商品,如下:
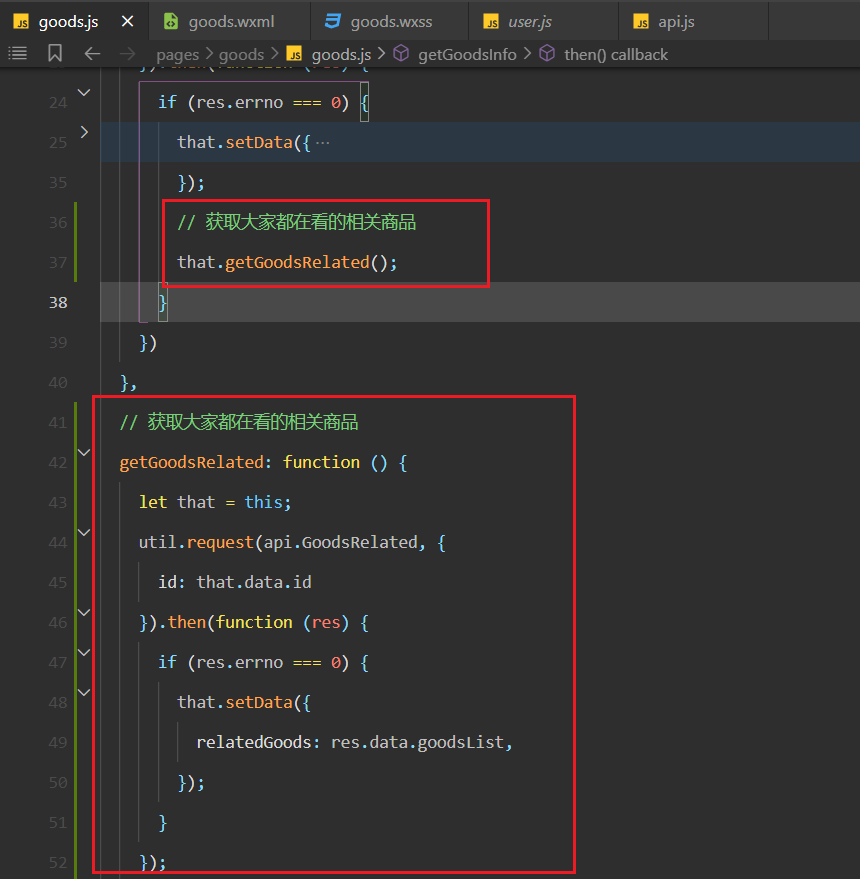
效果状态如下:
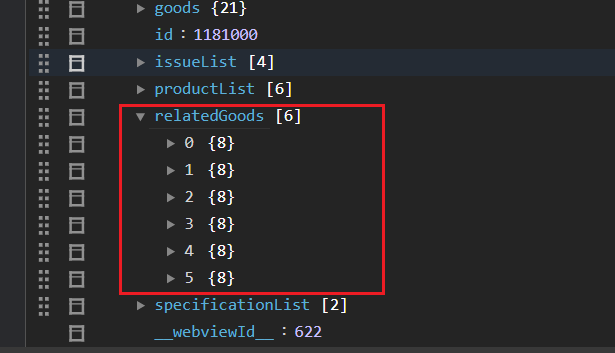
书写对应的结构如下:
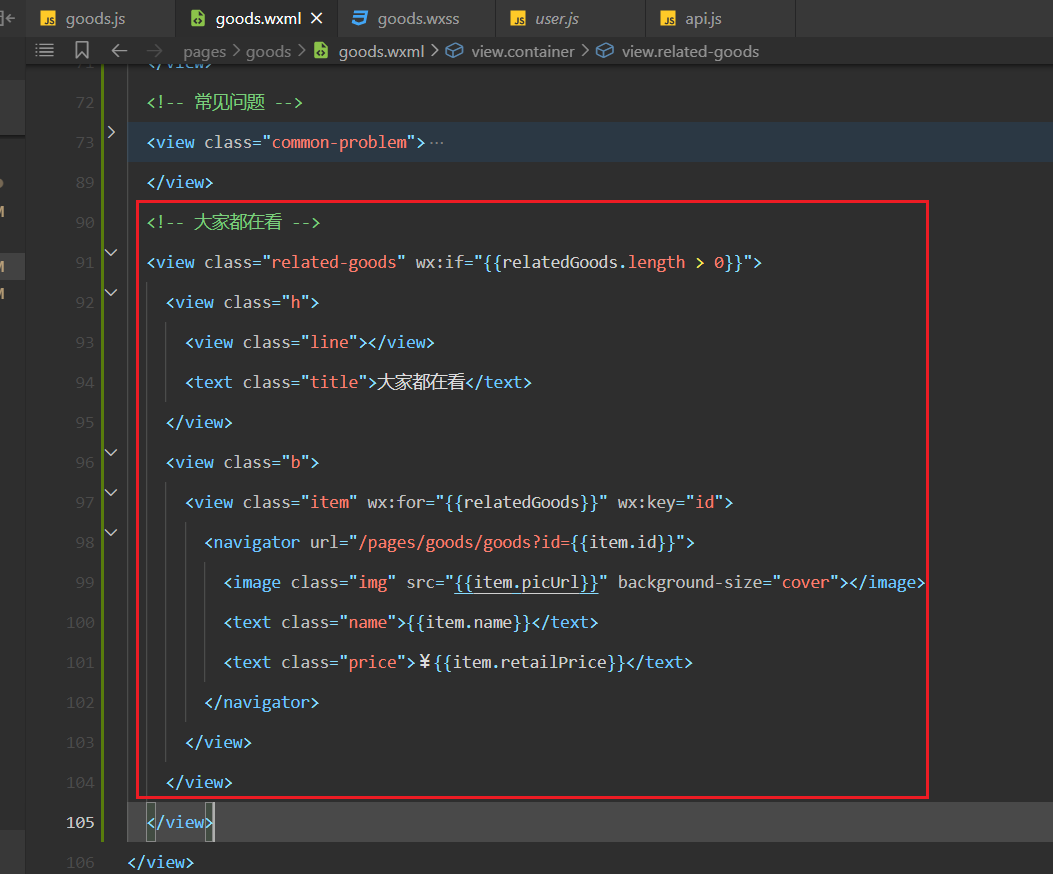
效果如下:
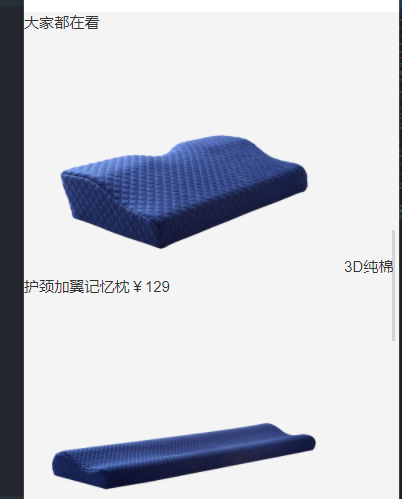
书写对应的样式,如下 :
/* ---------------------- 大家都在看 */
.related-goods {
    width: 750rpx;
    height: auto;
    overflow: hidden;
    padding-bottom: 80rpx;
}

.related-goods .h {
    position: relative;
    height: 145.5rpx;
    width: 750rpx;
    padding: 56.25rpx 0;
    background: #fff;
    text-align: center;
    border-bottom: 1px solid #f4f4f4;
}

.related-goods .h .line {
    display: inline-block;
    position: absolute;
    top: 72rpx;
    left: 0;
    z-index: 2;
    height: 1px;
    margin-left: 225rpx;
    width: 300rpx;
    background: #ccc;
}

.related-goods .h .title {
    display: inline-block;
    position: absolute;
    top: 56.125rpx;
    left: 0;
    z-index: 3;
    height: 33rpx;
    margin-left: 285rpx;
    width: 180rpx;
    background: #fff;
}

.related-goods .b {
    width: 750rpx;
    height: auto;
    overflow: hidden;
}

.related-goods .b .item {
    float: left;
    background: #fff;
    width: 375rpx;
    height: auto;
    overflow: hidden;
    text-align: center;
    padding: 15rpx 31.25rpx;
    border-right: 1px solid #f4f4f4;
    border-bottom: 1px solid #f4f4f4;
}

.related-goods .item .img {
    width: 311.45rpx;
    height: 311.45rpx;
}

.related-goods .item .name {
    display: block;
    width: 311.45rpx;
    height: 35rpx;
    margin: 11.5rpx 0 15rpx 0;
    text-align: center;
    overflow: hidden;
    font-size: 30rpx;
    color: #333;
}

.related-goods .item .price {
    display: block;
    width: 311.45rpx;
    height: 30rpx;
    text-align: center;
    font-size: 30rpx;
    color: #b4282d;
}
2
3
4
5
6
7
8
9
10
11
12
13
14
15
16
17
18
19
20
21
22
23
24
25
26
27
28
29
30
31
32
33
34
35
36
37
38
39
40
41
42
43
44
45
46
47
48
49
50
51
52
53
54
55
56
57
58
59
60
61
62
63
64
65
66
67
68
69
70
71
72
73
74
75
76
77
78
79
80
81
82
83
84
效果如下:
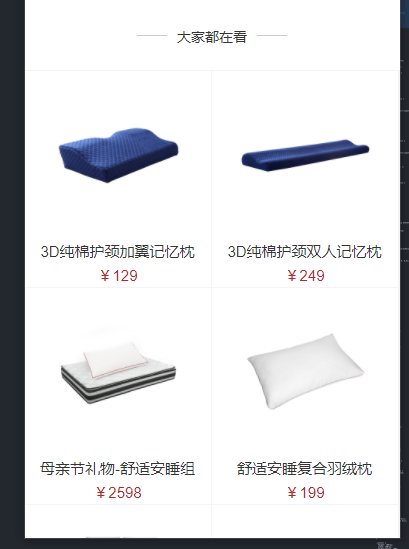
# 9,渲染规格选择界面
需求:
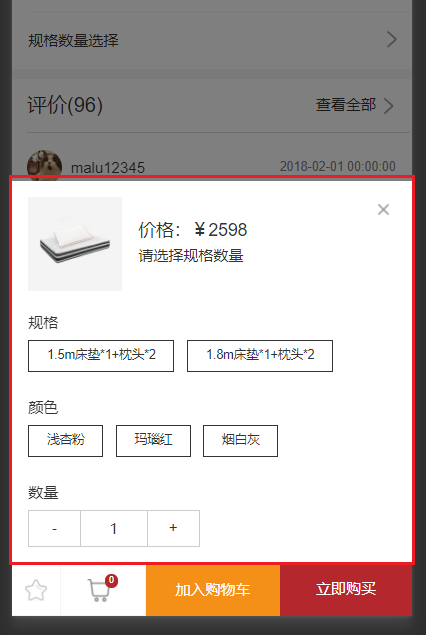
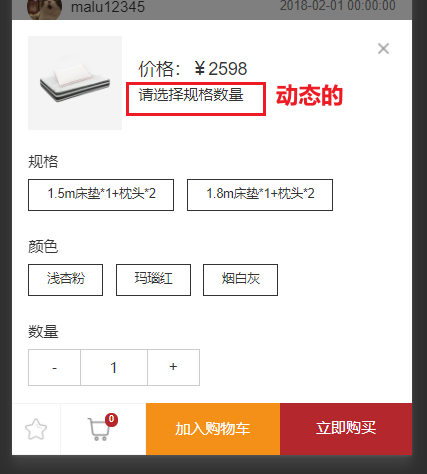
开始绘制规格选择弹窗,如下:
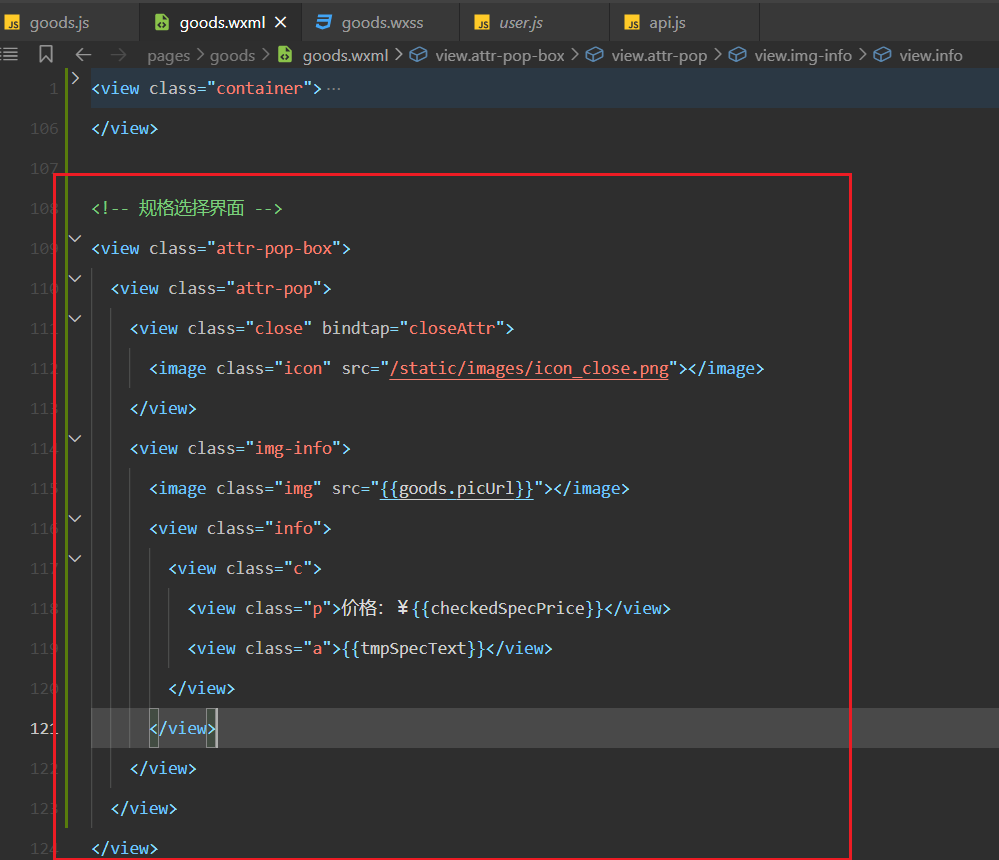
效果如下:
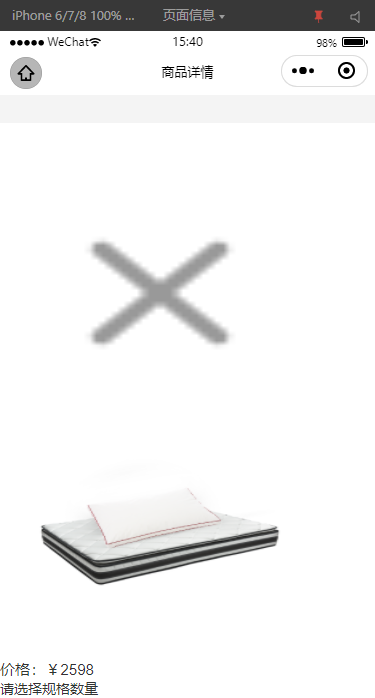
书写样式如下:
/* ---------------------- 选择规则的弹窗 */
.attr-pop-box {
    width: 100%;
    height: 100%;
    position: fixed;
    background: rgba(0, 0, 0, 0.5);
    z-index: 8;
    bottom: 0;
    /* display: none; */
}

.attr-pop {
    width: 100%;
    height: auto;
    max-height: 780rpx;
    padding: 31.25rpx;
    background: #fff;
    position: fixed;
    z-index: 9;
    bottom: 100rpx;
}

.attr-pop .close {
    position: absolute;
    width: 48rpx;
    height: 48rpx;
    right: 31.25rpx;
    overflow: hidden;
    top: 31.25rpx;
}

.attr-pop .close .icon {
    width: 48rpx;
    height: 48rpx;
}

.attr-pop .img-info {
    width: 687.5rpx;
    height: 177rpx;
    overflow: hidden;
    margin-bottom: 41.5rpx;
}

.attr-pop .img {
    float: left;
    height: 177rpx;
    width: 177rpx;
    background: #f4f4f4;
    margin-right: 31.25rpx;
}

.attr-pop .info {
    float: left;
    height: 177rpx;
    display: flex;
    align-items: center;
}

.attr-pop .p {
    font-size: 33rpx;
    color: #333;
    height: 33rpx;
    line-height: 33rpx;
    margin-bottom: 10rpx;
}

.attr-pop .a {
    font-size: 29rpx;
    color: #333;
    height: 40rpx;
    line-height: 40rpx;
}
2
3
4
5
6
7
8
9
10
11
12
13
14
15
16
17
18
19
20
21
22
23
24
25
26
27
28
29
30
31
32
33
34
35
36
37
38
39
40
41
42
43
44
45
46
47
48
49
50
51
52
53
54
55
56
57
58
59
60
61
62
63
64
65
66
67
68
69
70
71
72
效果如下:
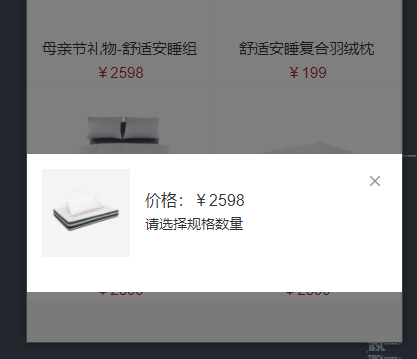
继续渲染规则列表,如下:
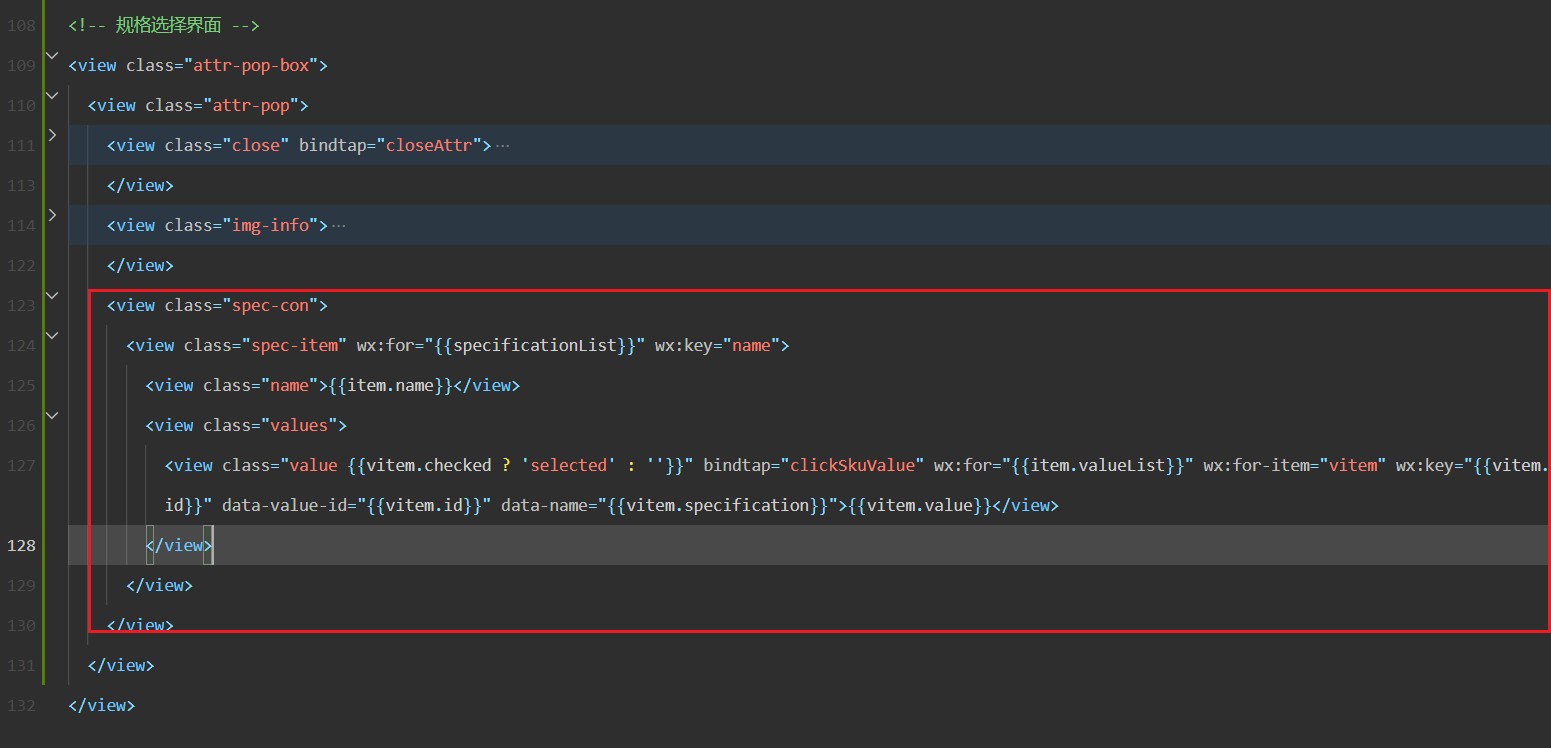
参考代码如下:
<!-- 规格选择界面 -->
<view class="attr-pop-box">
    <view class="attr-pop">
        <view class="close" bindtap="closeAttr">
            <image class="icon" src="/static/images/icon_close.png"></image>
        </view>
        <view class="img-info">
            <image class="img" src="{{goods.picUrl}}"></image>
            <view class="info">
                <view class="c">
                    <view class="p">价格:¥{{checkedSpecPrice}}</view>
                    <view class="a">{{tmpSpecText}}</view>
                </view>
            </view>
        </view>
        <view class="spec-con">
            <view class="spec-item" wx:for="{{specificationList}}" wx:key="name">
                <view class="name">{{item.name}}</view>
                <view class="values">
                    <view class="value {{vitem.checked ? 'selected' : ''}}" bindtap="clickSkuValue" wx:for="{{item.valueList}}" wx:for-item="vitem" wx:key="{{vitem.id}}" data-value-id="{{vitem.id}}" data-name="{{vitem.specification}}">{{vitem.value}}</view>
                </view>
            </view>
        </view>
    </view>
</view>
2
3
4
5
6
7
8
9
10
11
12
13
14
15
16
17
18
19
20
21
22
23
24
25
效果如下:
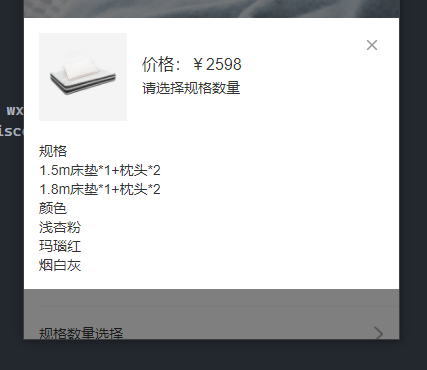
对应的样式如下:
.spec-con {
    width: 100%;
    height: auto;
    overflow: hidden;
}

.spec-con .name {
    height: 32rpx;
    margin-bottom: 22rpx;
    font-size: 29rpx;
    color: #333;
}

.spec-con .values {
    height: auto;
    margin-bottom: 31.25rpx;
    font-size: 0;
}

.spec-con .value {
    display: inline-block;
    height: 62rpx;
    padding: 0 35rpx;
    line-height: 56rpx;
    text-align: center;
    margin-right: 25rpx;
    margin-bottom: 16.5rpx;
    border: 1px solid #333;
    font-size: 25rpx;
    color: #333;
}

.spec-con .value.disable {
    border: 1px solid #ccc;
    color: #ccc;
}

.spec-con .value.selected {
    border: 1px solid #b4282d;
    color: #b4282d;
}
2
3
4
5
6
7
8
9
10
11
12
13
14
15
16
17
18
19
20
21
22
23
24
25
26
27
28
29
30
31
32
33
34
35
36
37
38
39
40
41
效果如下:
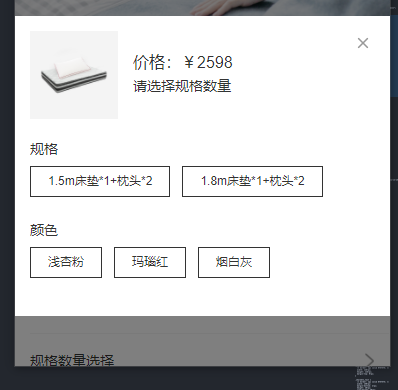
继续渲染数量,定义状态,如下:
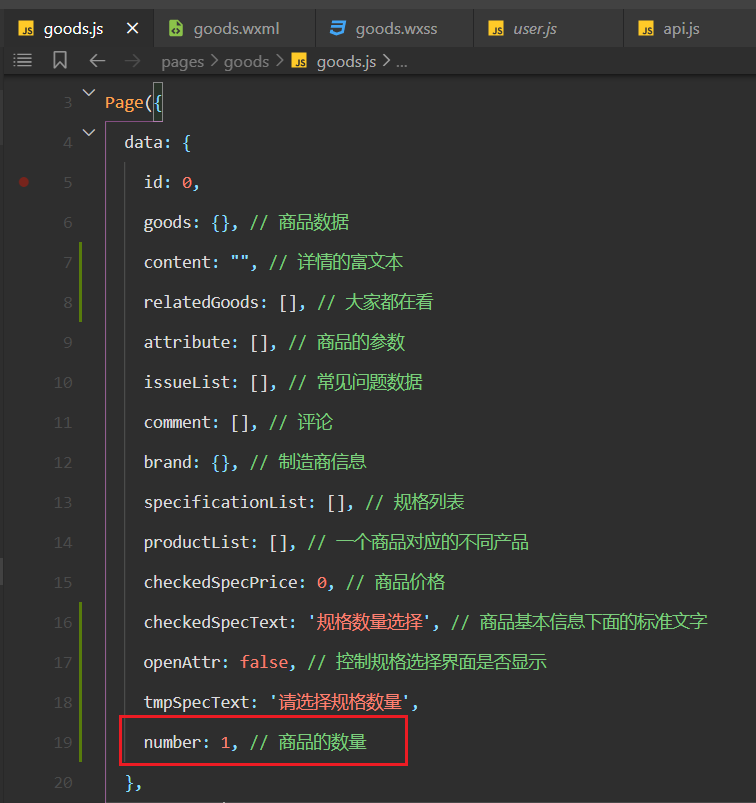
书写对应的结构如下:
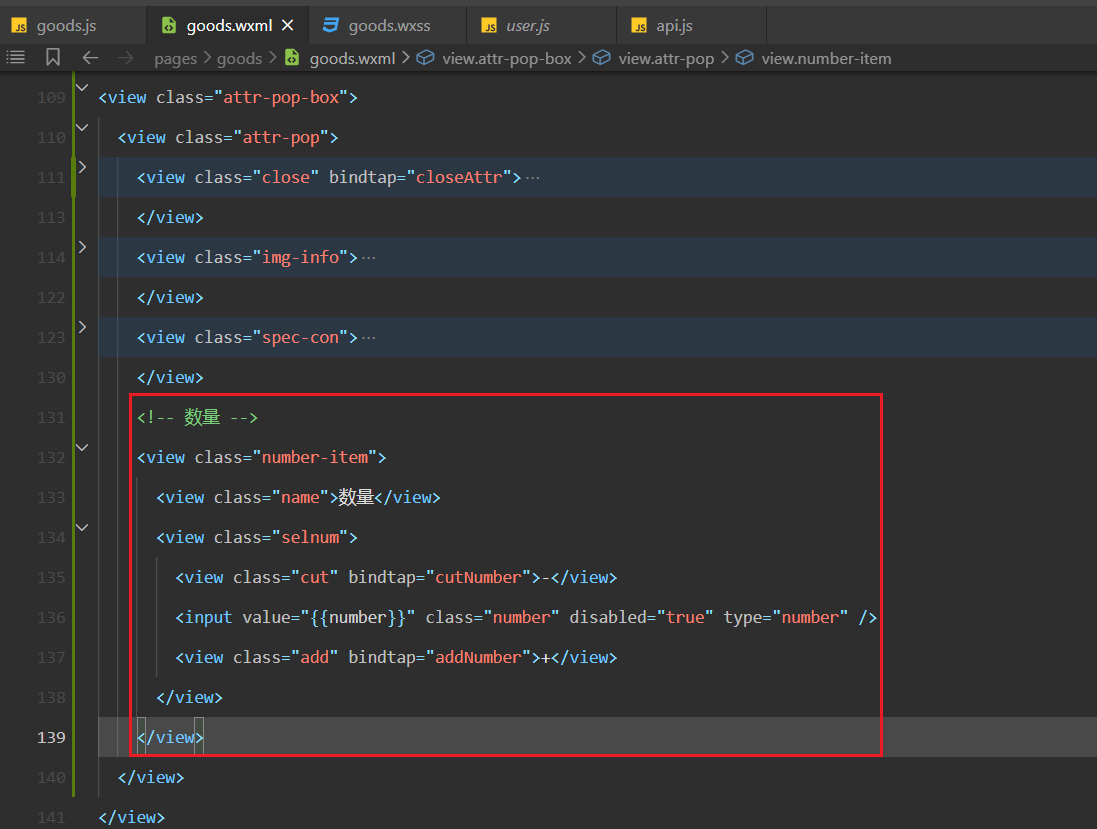
效果如下:
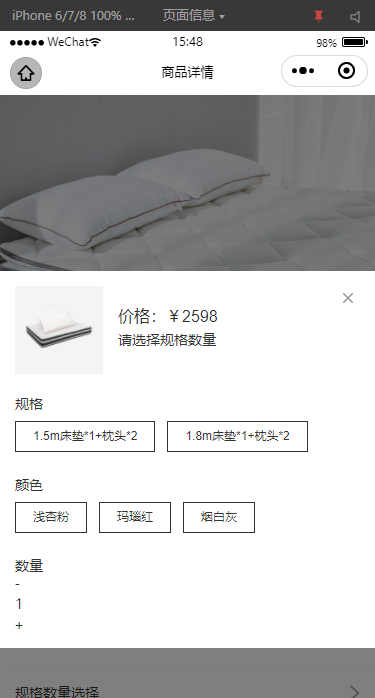
书写对应的样式如下 :
.number-item .selnum {
    width: 322rpx;
    height: 71rpx;
    border: 1px solid #ccc;
    display: flex;
}

.number-item .cut {
    width: 93.75rpx;
    height: 100%;
    text-align: center;
    line-height: 65rpx;
}

.number-item .number {
    flex: 1;
    height: 100%;
    text-align: center;
    line-height: 68.75rpx;
    border-left: 1px solid #ccc;
    border-right: 1px solid #ccc;
    float: left;
}

.number-item .add {
    width: 93.75rpx;
    height: 100%;
    text-align: center;
    line-height: 65rpx;
}
2
3
4
5
6
7
8
9
10
11
12
13
14
15
16
17
18
19
20
21
22
23
24
25
26
27
28
29
30
效果如下:
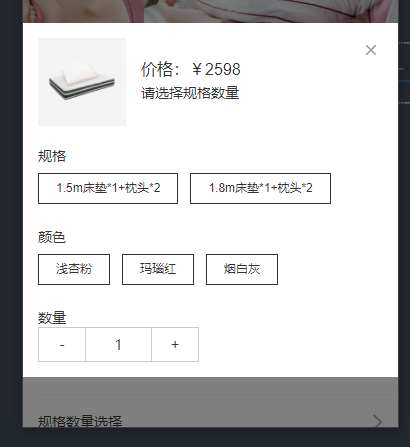
定义一个状态,控制规格选择界面是否弹出,如下:
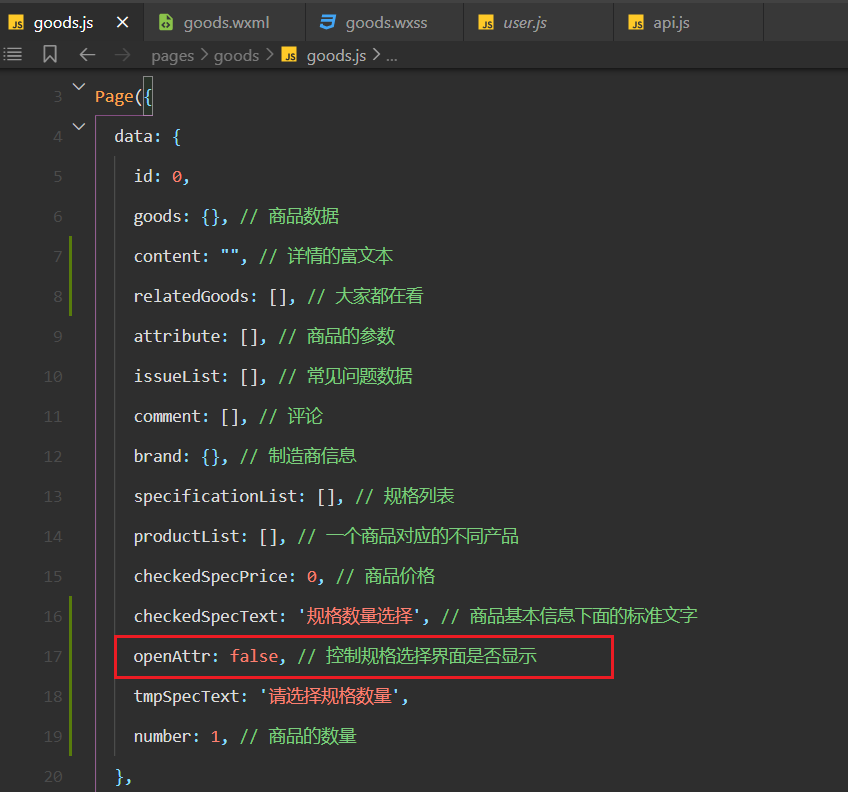
点击时,需要让弹窗弹出,如下:
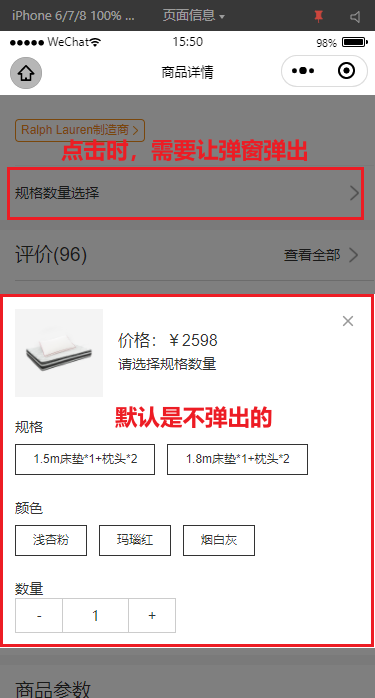
默认不弹出,如下:
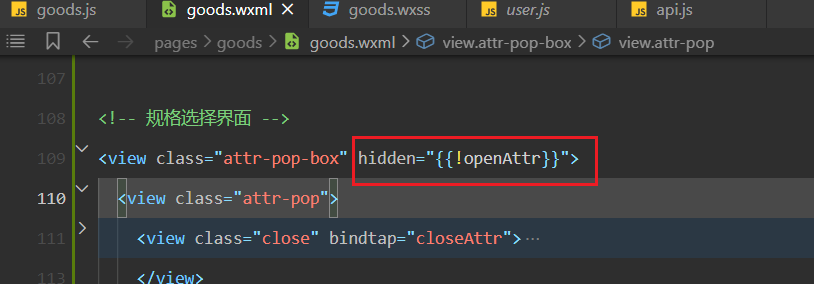
实现点击事件,如下:
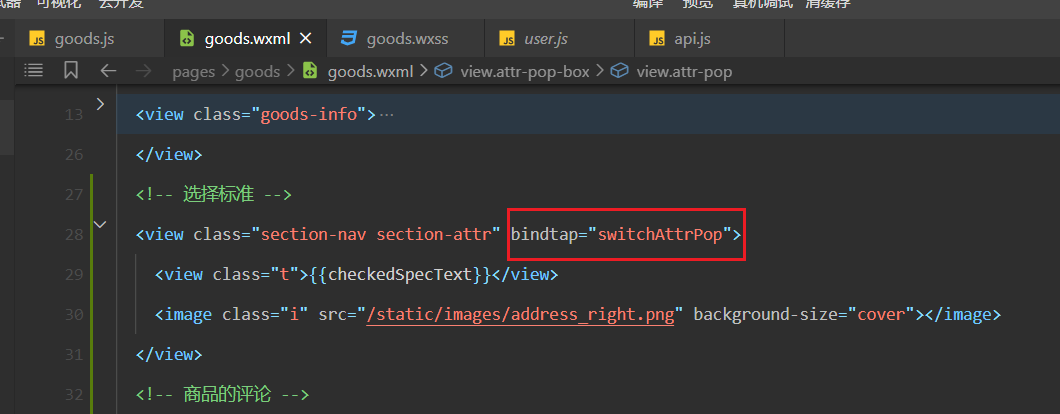
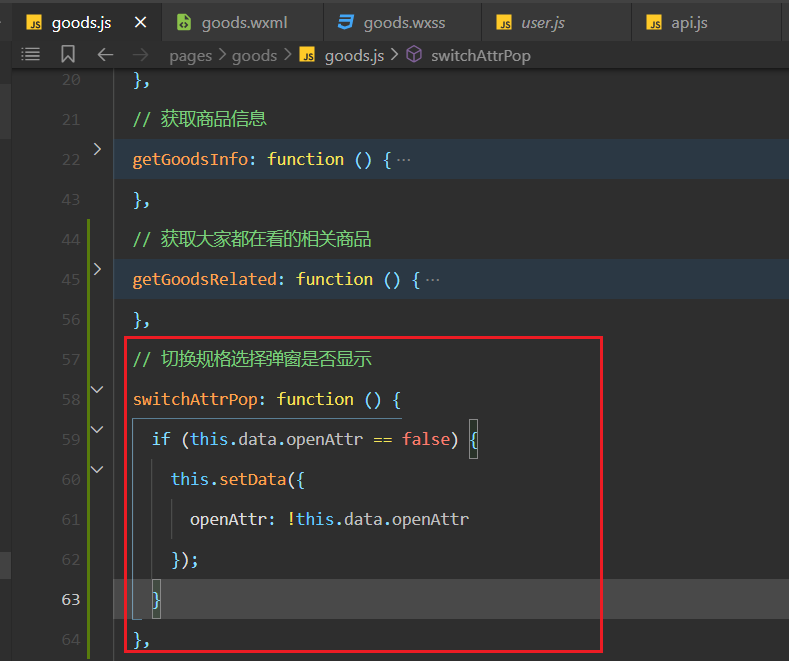
测试OK,如下:
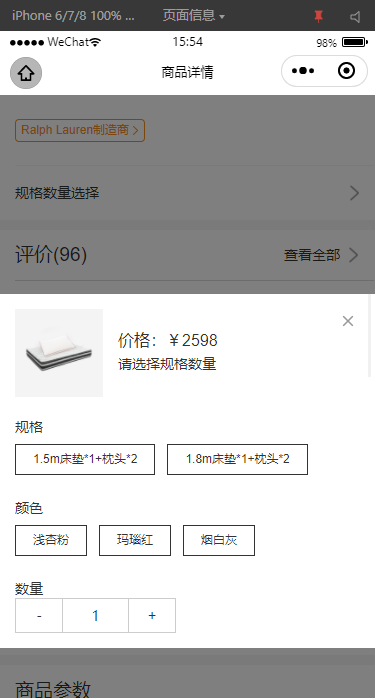
当点击小叉时,需要关闭弹窗,如下:
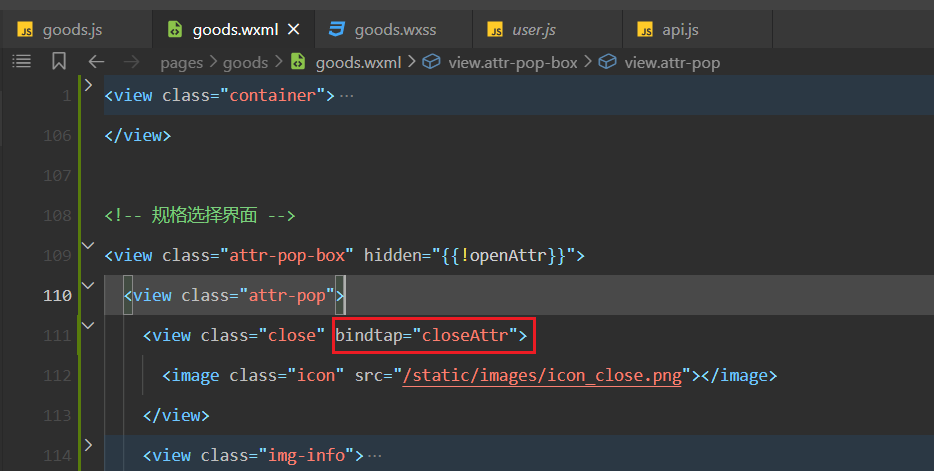
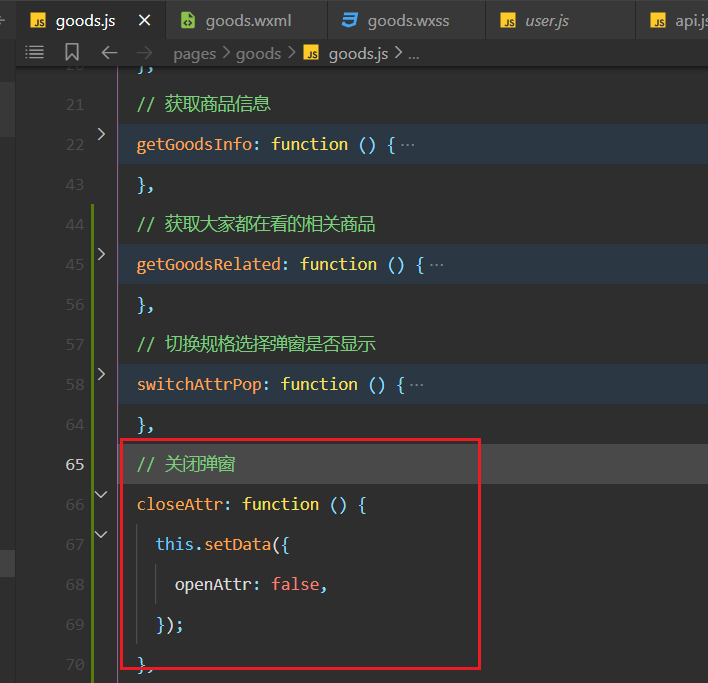
测试OK,如下:
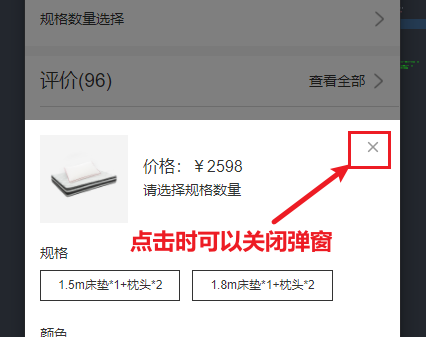
# 10,底部按钮渲染
需求:
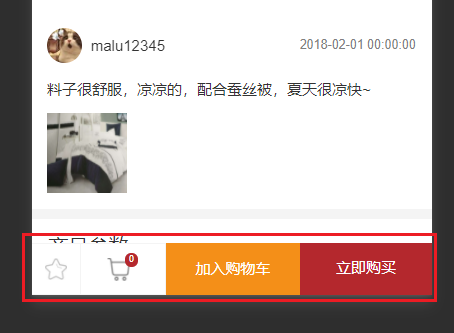
定义相关的状态,如下:
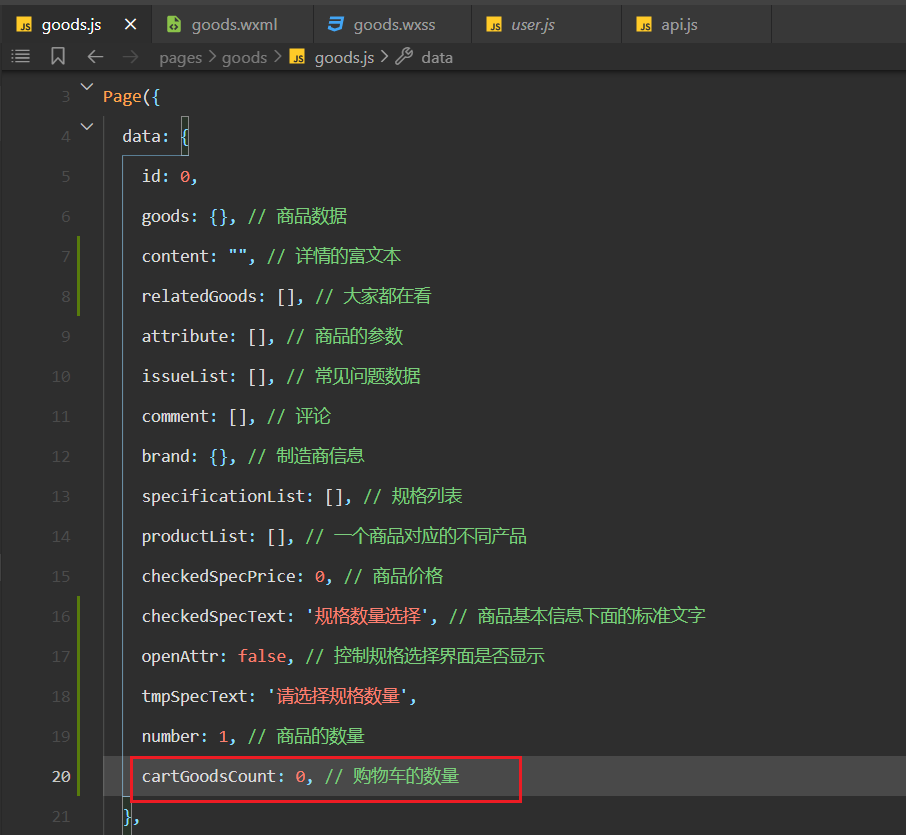
书写对应的结构如下:
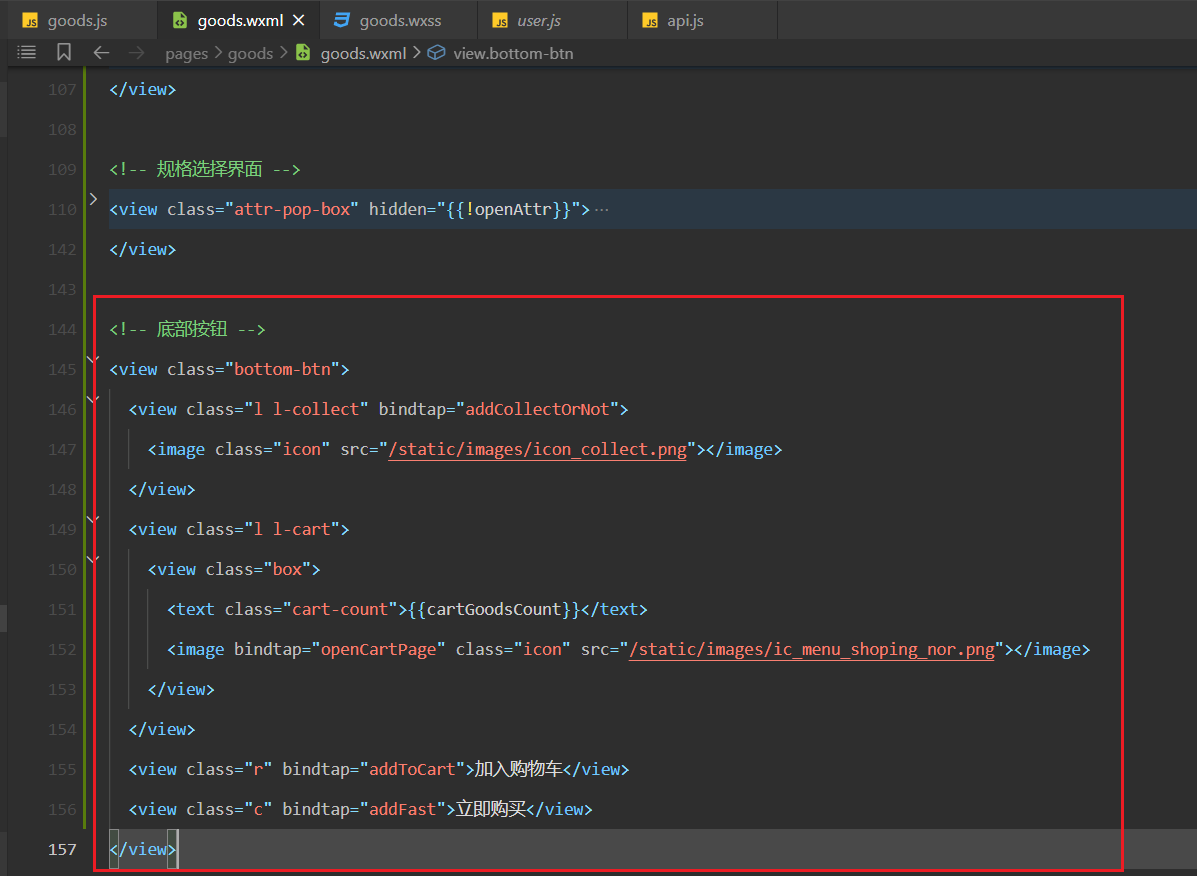
参考代码如下:
<!-- 底部按钮 -->
<view class="bottom-btn">
    <view class="l l-collect" bindtap="addCollectOrNot">
        <image class="icon" src="/static/images/icon_collect.png"></image>
    </view>
    <view class="l l-cart">
        <view class="box">
            <text class="cart-count">{{cartGoodsCount}}</text>
            <image bindtap="openCartPage" class="icon" src="/static/images/ic_menu_shoping_nor.png"></image>
        </view>
    </view>
    <view class="r" bindtap="addToCart">加入购物车</view>
    <view class="c" bindtap="addFast">立即购买</view>
</view>
2
3
4
5
6
7
8
9
10
11
12
13
14
效果如下:
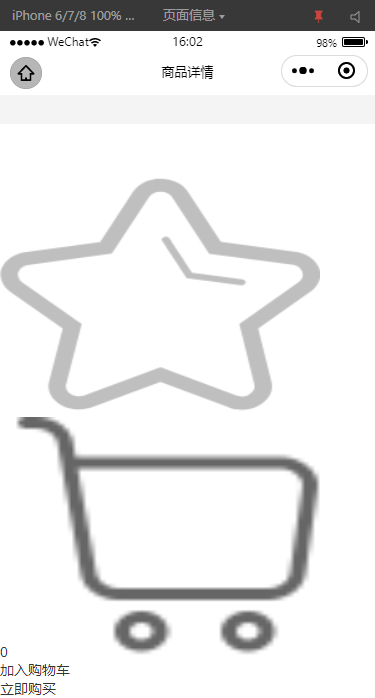
书写对应的样式,如下:
/* ---------------------- 底部按钮 */
.bottom-btn {
    position: fixed;
    left: 0;
    bottom: 0;
    z-index: 10;
    width: 750rpx;
    height: 100rpx;
    display: flex;
    background: #fff;
}

.bottom-btn .l {
    float: left;
    height: 100rpx;
    width: 162rpx;
    border: 1px solid #f4f4f4;
    display: flex;
    align-items: center;
    justify-content: center;
}

.bottom-btn .l.l-collect {
    border-right: none;
    border-left: none;
    text-align: center;
    width: 90rpx;
}

.bottom-btn .l.l-kefu {
    position: relative;
    height: 54rpx;
    width: 63rpx;
}

.bottom-btn .l.l-cart .box {
    position: relative;
    height: 60rpx;
    width: 60rpx;
}

.bottom-btn .l.l-cart .cart-count {
    height: 28rpx;
    width: 28rpx;
    z-index: 10;
    position: absolute;
    top: 0;
    right: 0;
    background: #b4282d;
    text-align: center;
    font-size: 18rpx;
    color: #fff;
    line-height: 28rpx;
    border-radius: 50%;
}

.bottom-btn .l.l-cart .icon {
    position: absolute;
    top: 10rpx;
    left: 0;
}

.bottom-btn .l.l-kefu .kefu-count {
    height: 28rpx;
    width: 28rpx;
    z-index: 10;
    position: absolute;
    top: 0;
    right: 0;
    text-align: center;
    font-size: 18rpx;
    color: #fff;
    line-height: 28rpx;
    border-radius: 50%;
}

.bottom-btn .l.l-kefu .icon {
    position: absolute;
    top: 10rpx;
    left: 0;
}

.bottom-btn .l .icon {
    display: block;
    height: 44rpx;
    width: 44rpx;
}

.bottom-btn .c {
    float: left;
    background: #b4282d;
    height: 100rpx;
    line-height: 96rpx;
    flex: 1;
    text-align: center;
    color: #fff;
}

.bottom-btn .r {
    border: 1px solid #f48f18;
    background: #f48f18;
    float: left;
    height: 100rpx;
    line-height: 96rpx;
    flex: 1;
    text-align: center;
    color: #fff;
}
2
3
4
5
6
7
8
9
10
11
12
13
14
15
16
17
18
19
20
21
22
23
24
25
26
27
28
29
30
31
32
33
34
35
36
37
38
39
40
41
42
43
44
45
46
47
48
49
50
51
52
53
54
55
56
57
58
59
60
61
62
63
64
65
66
67
68
69
70
71
72
73
74
75
76
77
78
79
80
81
82
83
84
85
86
87
88
89
90
91
92
93
94
95
96
97
98
99
100
101
102
103
104
105
106
107
108
效果如下:
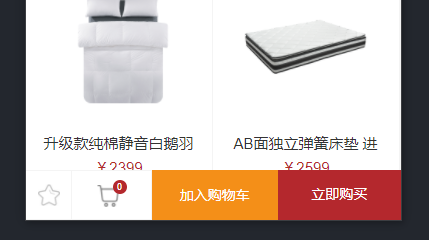
# 11,统计出点击的不同规格
我们可以点击不同的规格,如下:
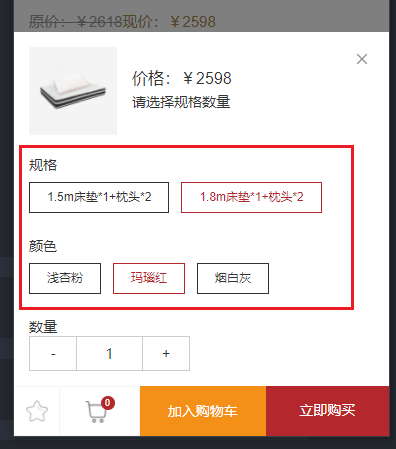
点击绑定的事件如下:
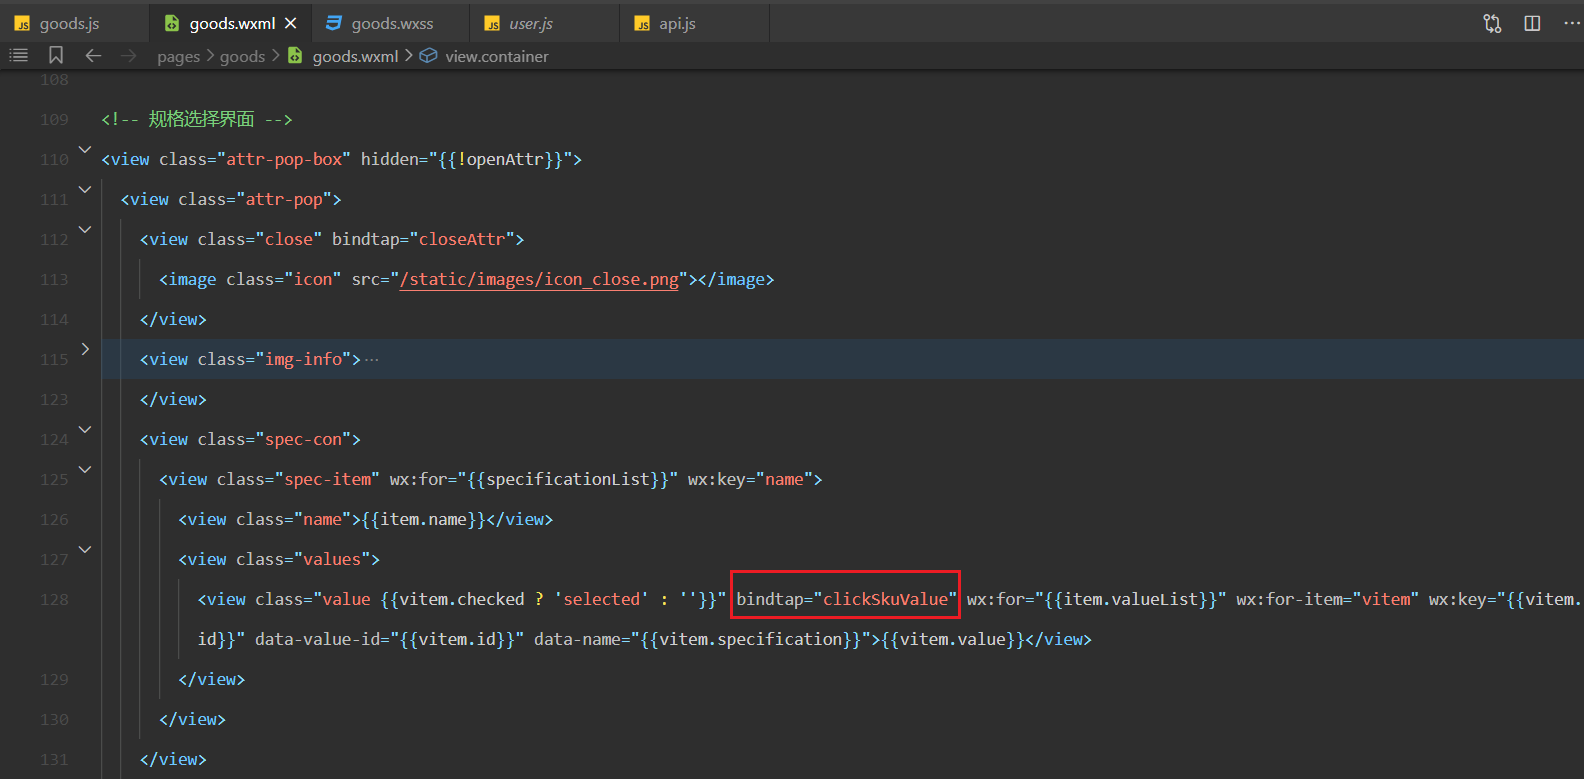
实现对应的方法,如下:
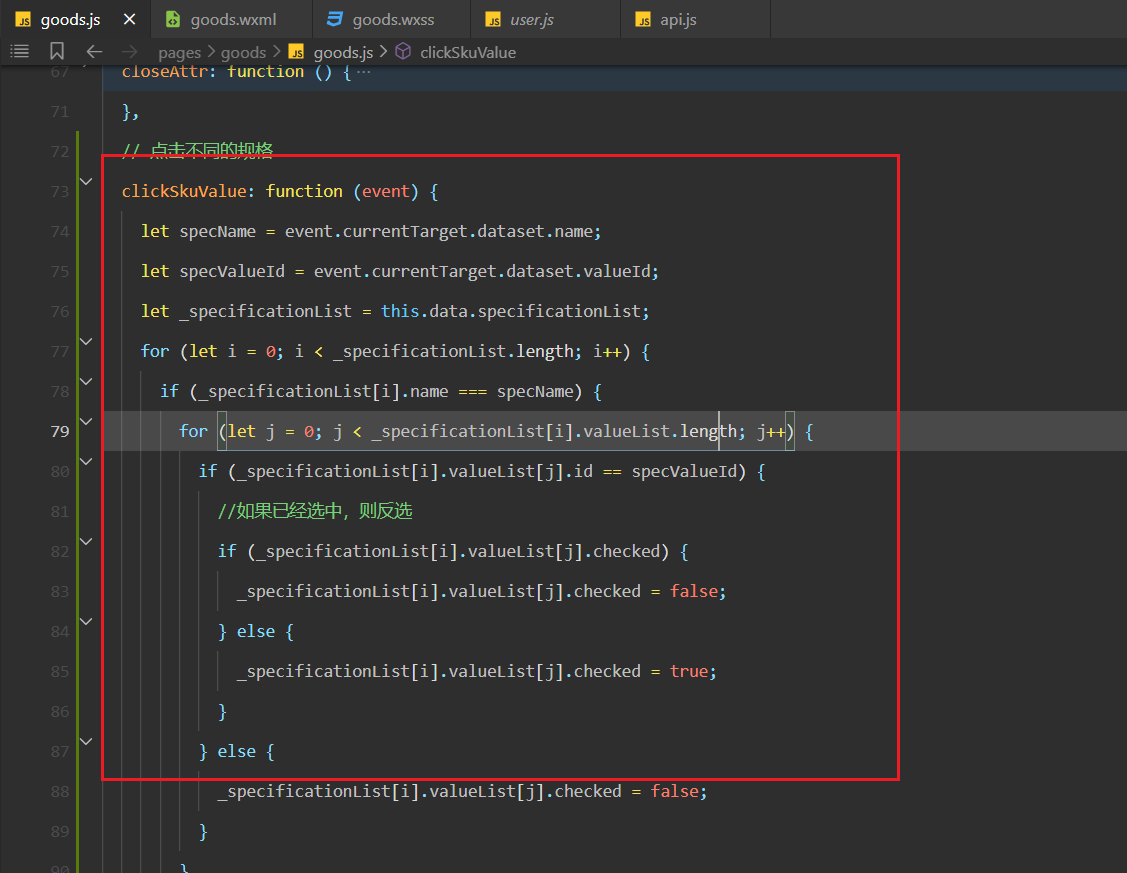
参考代码如下:
// 点击不同的规格
clickSkuValue: function(event) {
    let specName = event.currentTarget.dataset.name;
    let specValueId = event.currentTarget.dataset.valueId;
    let _specificationList = this.data.specificationList;
    for (let i = 0; i < _specificationList.length; i++) {
        if (_specificationList[i].name === specName) {
            for (let j = 0; j < _specificationList[i].valueList.length; j++) {
                if (_specificationList[i].valueList[j].id == specValueId) {
                    //如果已经选中,则反选
                    if (_specificationList[i].valueList[j].checked) {
                        _specificationList[i].valueList[j].checked = false;
                    } else {
                        _specificationList[i].valueList[j].checked = true;
                    }
                } else {
                    _specificationList[i].valueList[j].checked = false;
                }
            }
        }
    }
    this.setData({
        specificationList: _specificationList,
    });
},
2
3
4
5
6
7
8
9
10
11
12
13
14
15
16
17
18
19
20
21
22
23
24
25
测试,看一下能不能收集到你选择的规格,收集对应的数据,如下:
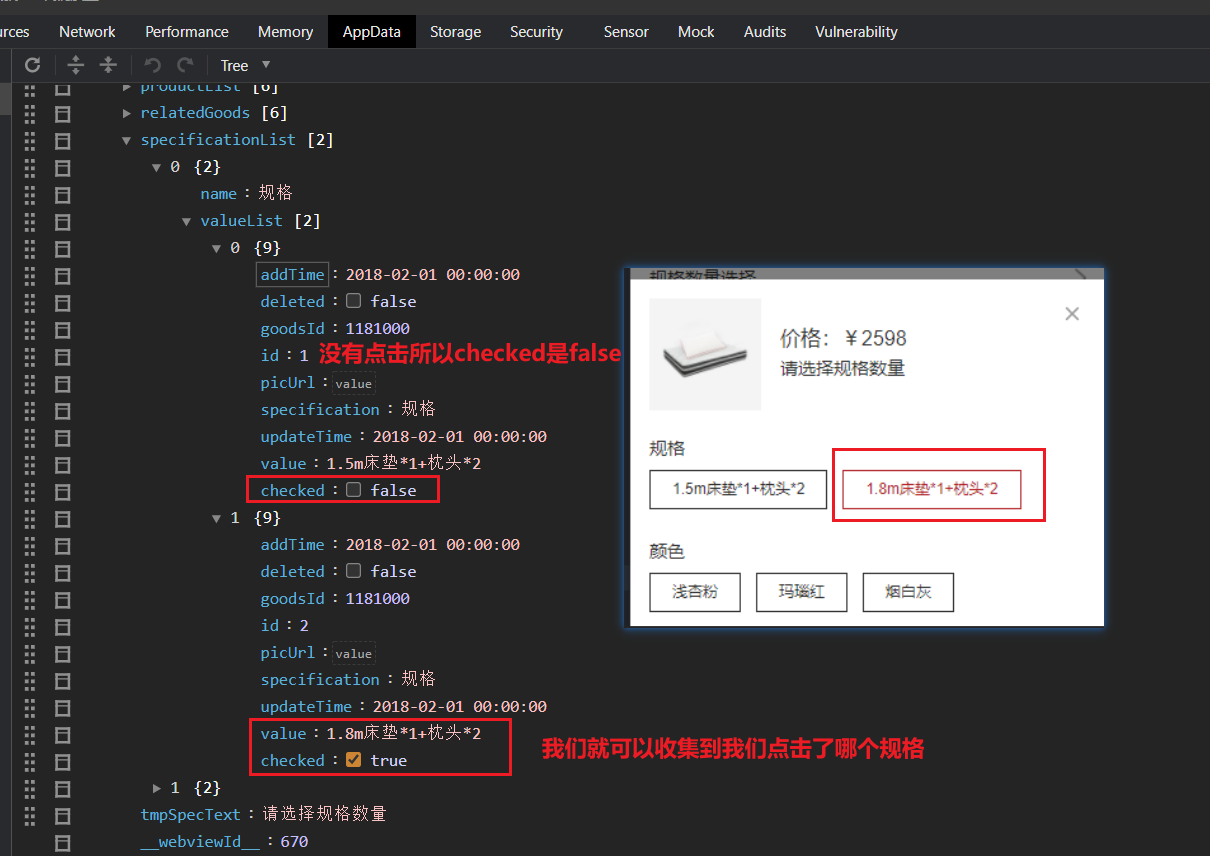
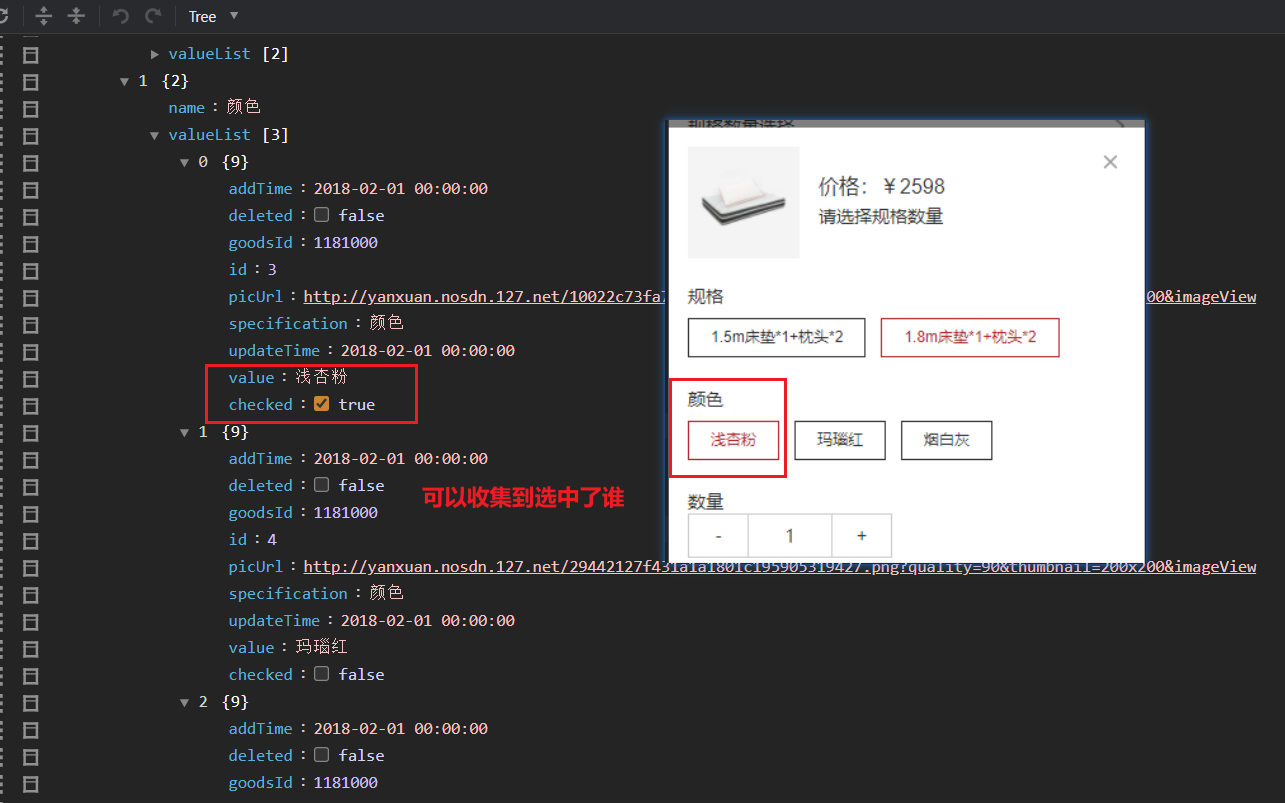
当规格变了,我们需要计算信息,调用方法,如下:
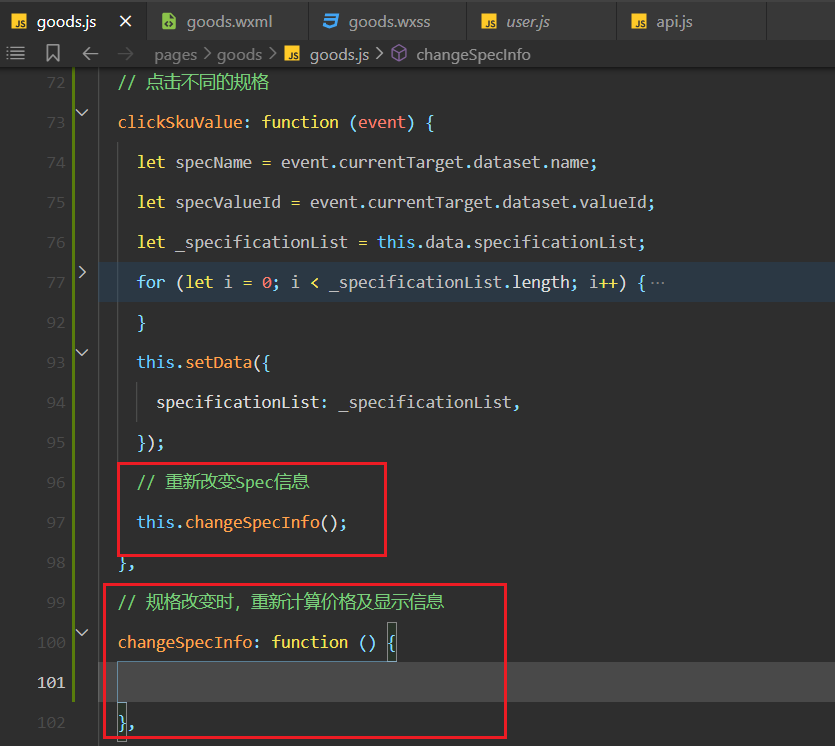
重新计算,那我们需要获取到选中的规格信息,定义一个方法,用来获取,如下:
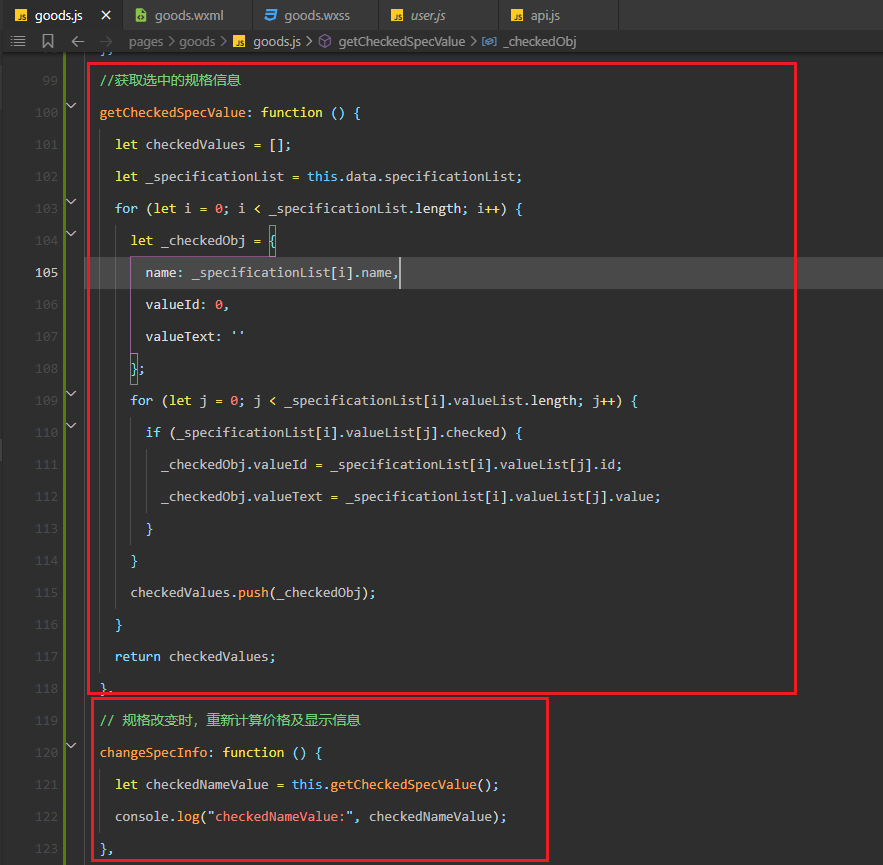
测试如下:
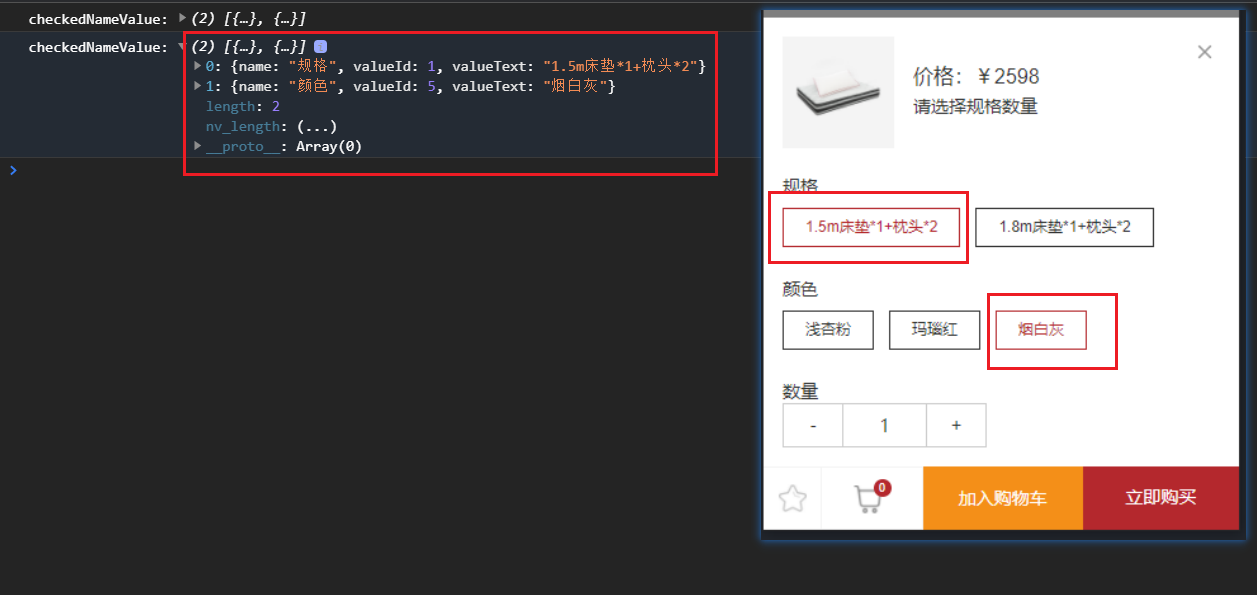
然后设置选择信息,如下:
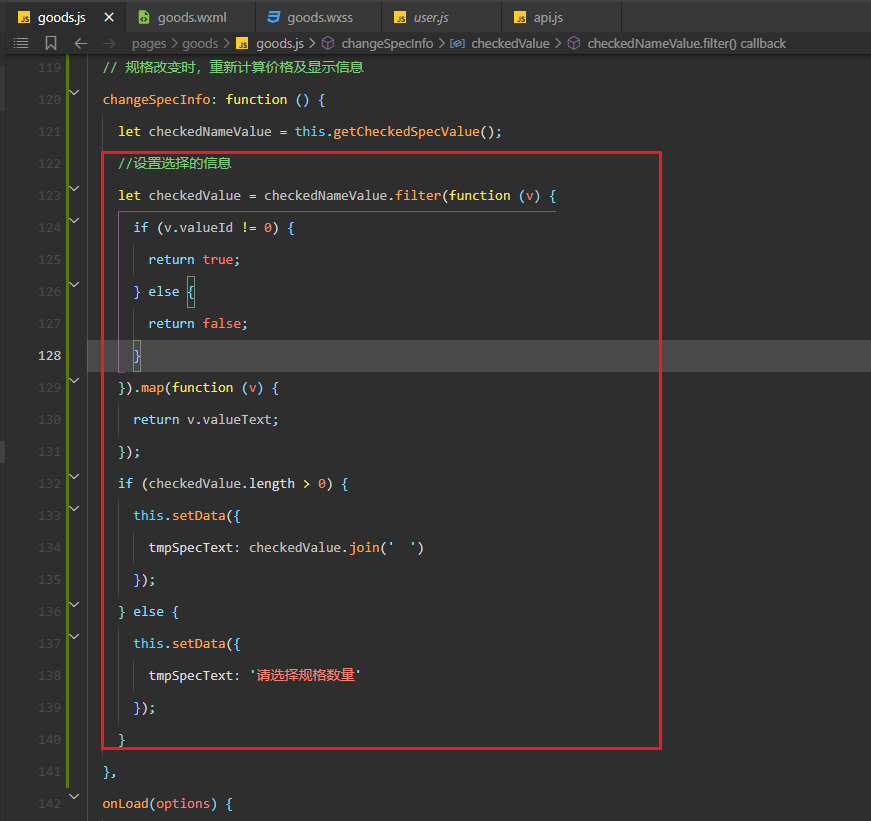
效果如下:
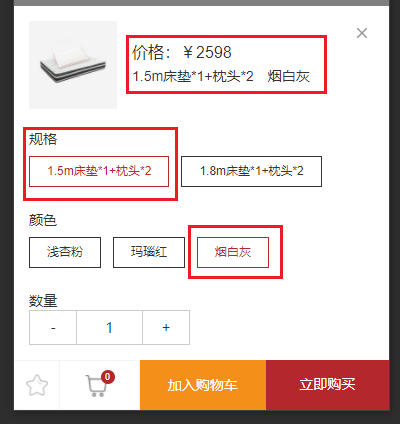
定义一个方法,判断规格是否选择完整,如下:
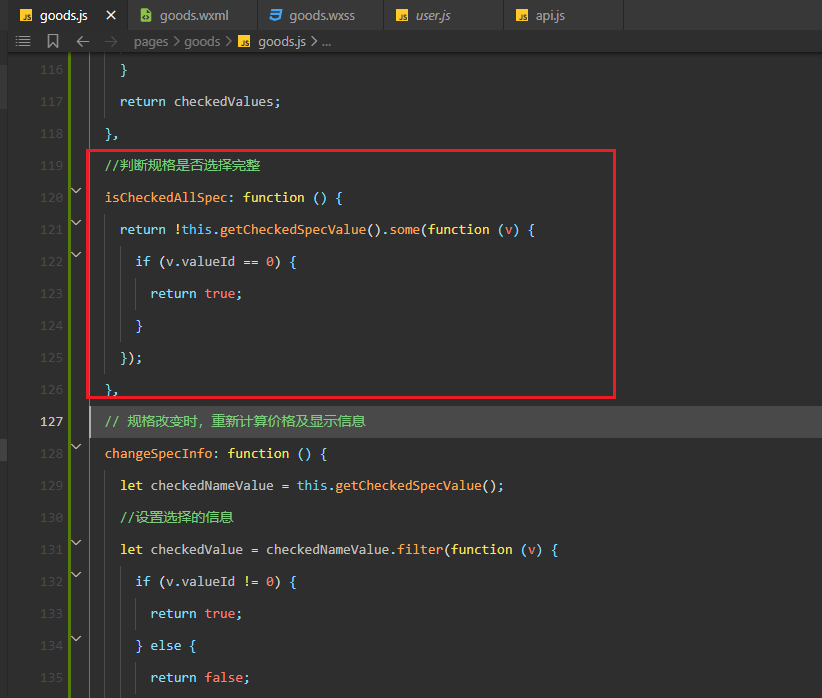
使用之,如下:
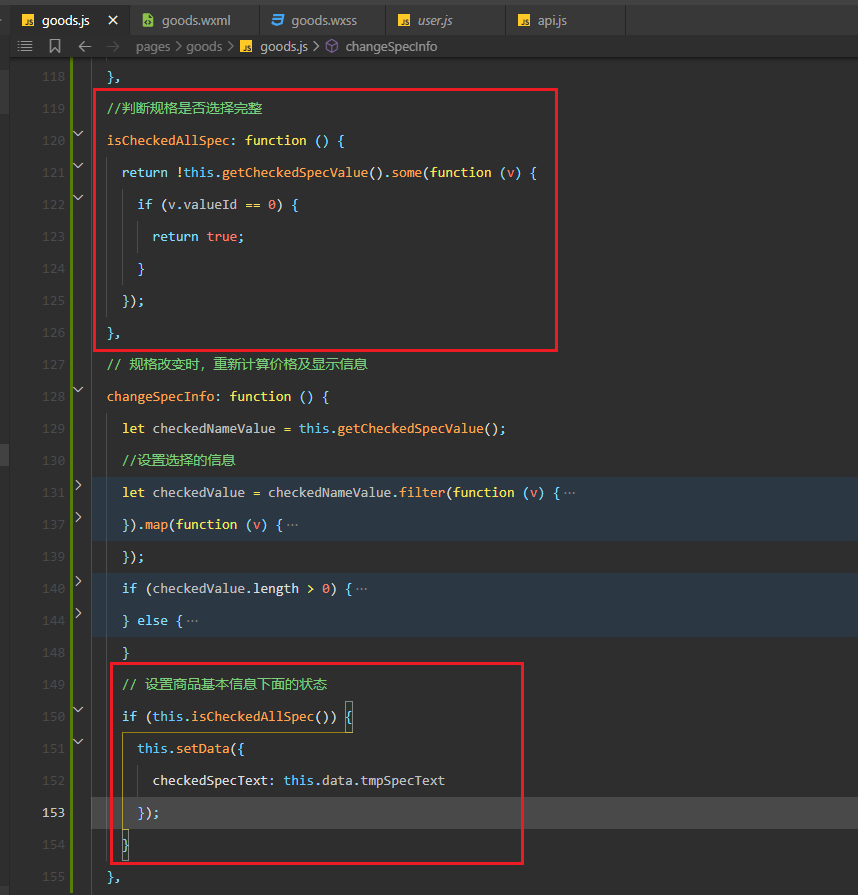
测试如下:
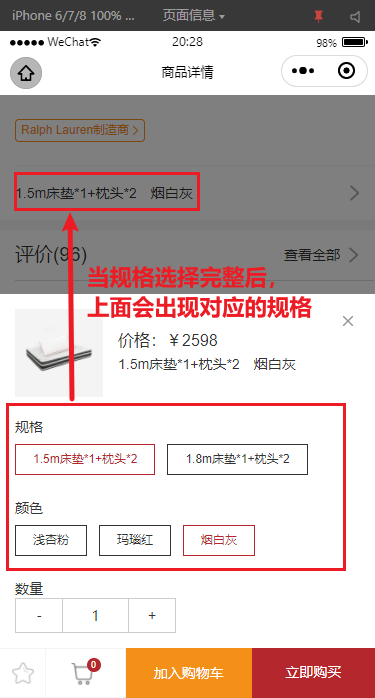
# 12,处理计数器
点击加1和减1,绑定对应的方法,如下:
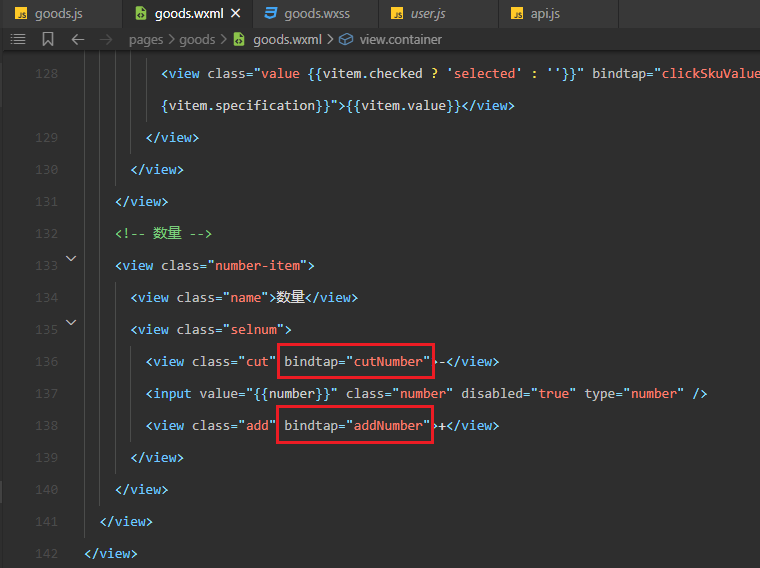
实现对应的方法,如下:
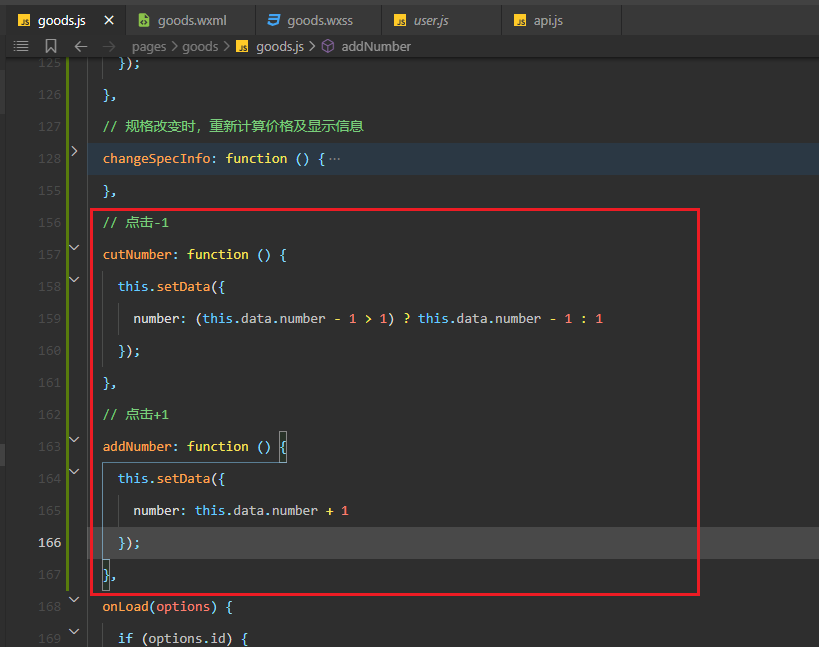
测试效果如下:
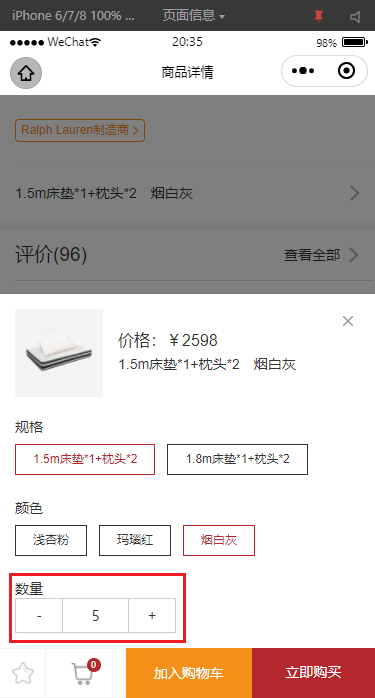
# 13,点击加入购物车
# 六,购物车页面开发
需求:
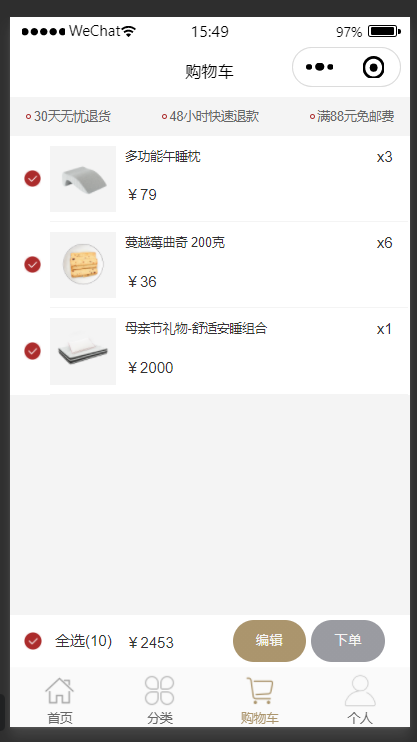
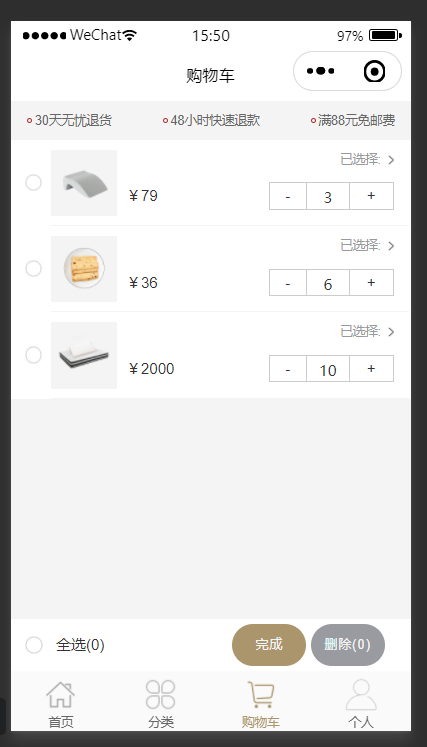
# 七,附录
# 1,代码的仓库地址
代码的仓库地址:https://gitee.com/tubie/ml-shop.git
完整的代码地址(参考):https://gitee.com/tubie/mymall-wx.git
# 2,项目用到的设计图
# 1)首页面

# 2)商品详情页面

# 3)分类页面
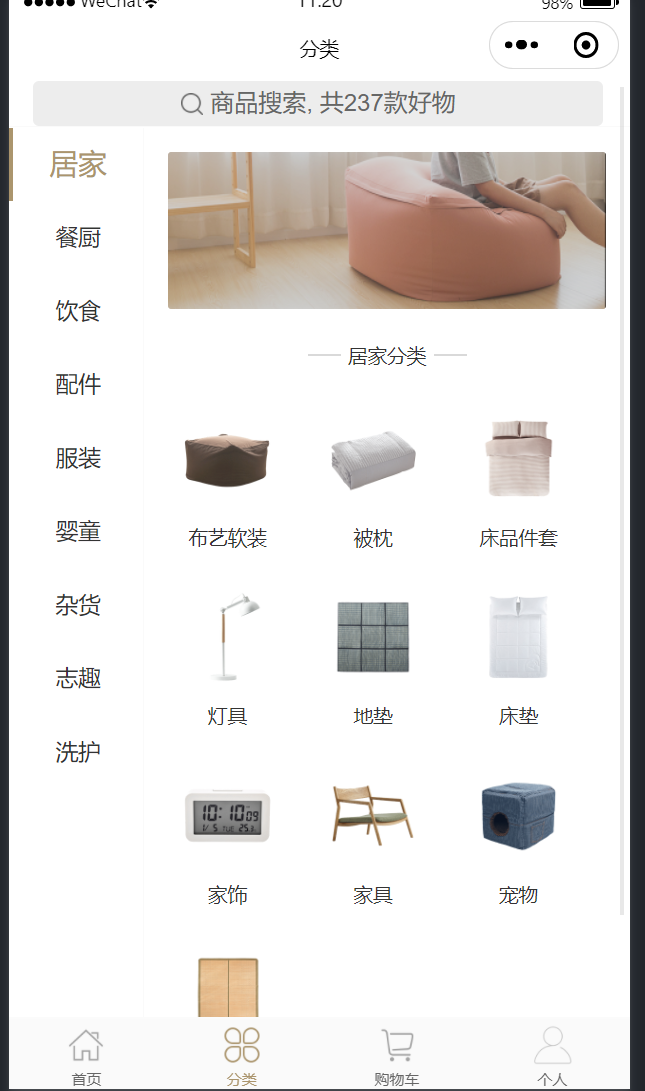
# 4)选择登录页面
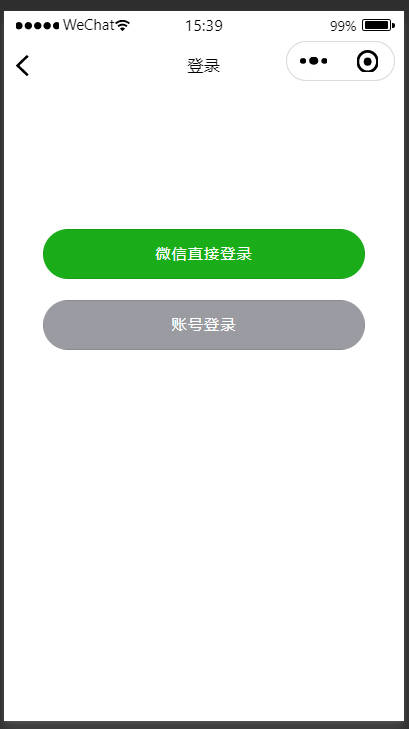
# 5)账号页面
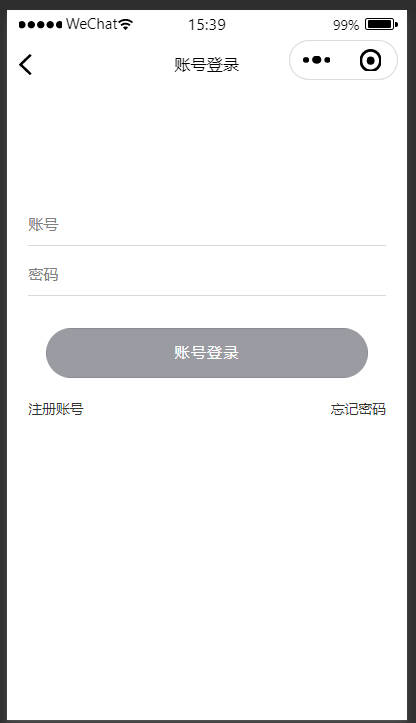
# 6)注册页面
